인프런의 따라하며 배우는 자바스크립트 A-Z 강의를 수강하며 정리한 내용입니다.
Intersection observer
브라우저 뷰포트(Viewport)와 설정한 요소(Element)의 교차점을 관찰하며, 사용자 화면에 지금 보이는 요소인지 아닌지를 구별하는 기능을 제공한다.
비동기적으로 실행되기 때문에, scroll 같은 이벤트 기반의 요소 관찰에서 발생하는 렌더링 성능이나 이벤트 연속 호출 같은 문제없이 사용할 수 있다.
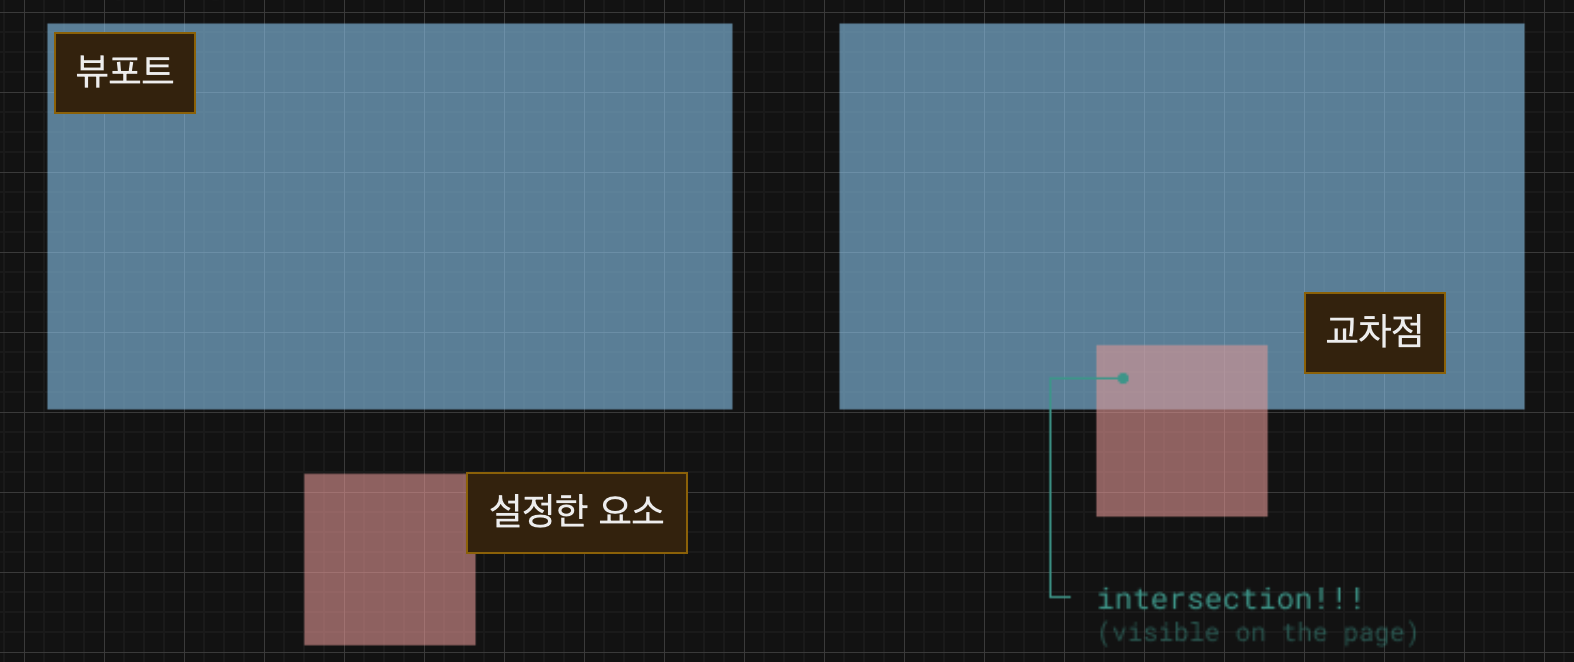
intersection ratio : 0.5 인것은 요소와 뷰포트가 겹친 정도가 50%라는 뜻
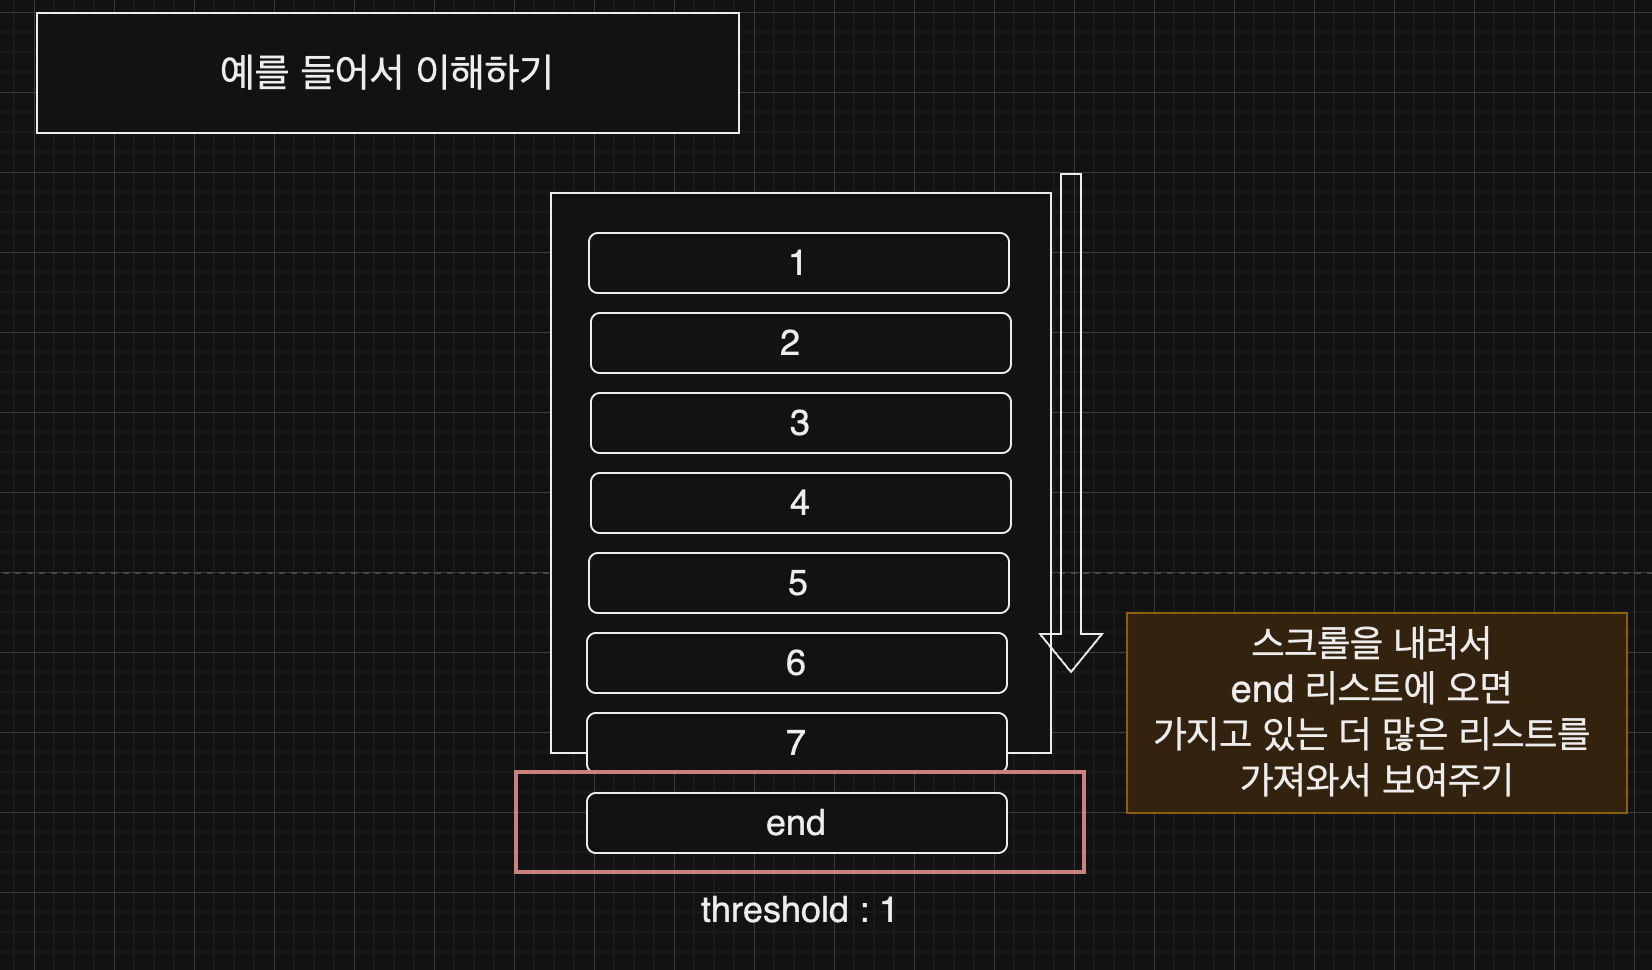
intersection observer를 통해 무한 스크롤이나 레이지 로딩을 구현할 수 있음.
무한 스크롤
main.js
const count = 20; //한번 새로운 item이 추가될 때마다 추가되는 item의 개수
let itemIndex = 0;

let observer = new IntersectionObserver(
  (entries) => {
    entries.forEach((entry) => {
      const list = document.querySelector(".list");
      //타켓과  교차하는 영역이 있을 때
      if (entry.isIntersecting) {
        for (let i = itemIndex; i < itemIndex + count; i++) {
          //item을 count 숫자만큼 추가
          const item = document.createElement("p");
          item.classList.add("item");
          item.textContent = i;
          list.appendChild(item);
        }
        itemIndex += count;
      }
    });
  },
  { root: null, threshold: 0.5 }
);
//root가 null이면 뷰포트를 기준으로 교차하는 영역을 계산한다.
//threshold는 교차하는 영역의 비율을 나타낸다. 0.5는 50%를 의미한다.
//0.5이상이면 콜백실행

//list의 끝부분을 알려주는 p 타켓 요소를 관찰
observer.observe(document.querySelector(".end"));
index.html
<!DOCTYPE html>
<html lang="en">
  <head>
    <meta charset="UTF-8" />
    <meta name="viewport" content="width=device-width, initial-scale=1.0" />
    <title>Document</title>
    <style>
      .item {
        text-align: center;
        padding: 20px;
      }
      .item:nth-child(even) {
        background-color: tomato;
      }
    </style>
  </head>
  <body>
    <div class="list"></div>
    <p class="end"></p>
    <script src="main.js
    "></script>
  </body>
</html>
Lazy Loading
보이는 부분만 우선 로드하는 것!
예를 들어 전체 사진 갤러리를 다운로드했지만 사용자가 첫번째 이미지만 본 후 떠났을 때 웹페이지에서는 메모리 및 대역폭 낭비가 발생함. 그래서 실제로 접근했을 때만 보여주는게 Lazy Loading이다.
이를 사용하면 페이지가 placeholder 콘텐츠로 작성되며, 사용자가 필요할 때만 실제 콘텐츠로 대체된다.
<!DOCTYPE html>
<html lang="en">

<head>
    <meta charset="UTF-8">
    <title>Lazy Loading</title>
    <style>
        img {
            width: 400px;
            height: 300px;
            display: block;
            margin: 10px auto;
        }
    </style>
</head>

<body>

    <img src='https://via.placeholder.com/400x300'
        data-src='https://ik.imagekit.io/demo/img/image4.jpeg?tr=w-400,h-300'>
    </img>

    <img src='https://via.placeholder.com/400x300'
        data-src='https://ik.imagekit.io/demo/img/image5.jpeg?tr=w-400,h-300'>
    </img>

    <img src='https://via.placeholder.com/400x300'
        data-src="https://ik.imagekit.io/demo/img/image6.jpeg?tr=w-400,h-300">
    </img>

    <img src='https://via.placeholder.com/400x300'
        data-src='https://ik.imagekit.io/demo/img/image7.jpeg?tr=w-400,h-300'>
    </img>

    <script>
        // Intersection Observer 인스턴스
        const observer = new IntersectionObserver(function (entries, observer) {
            entries.forEach(entry => {
                // 루트 요소와 타겟 요소가 교차하면 dataset에 있는 url을 src 에 넣어주기.
                if (entry.isIntersecting) {
                    entry.target.src = entry.target.dataset.src

                    // Lazy Loading 후에는 unobserve 해주기.
                    observer.unobserve(entry.target)
                }
            })
        }, { threshold: 1 })
        // 타겟 요소의 100%가 루트 요소와 겹치면 콜백을 실행.

        // 모든 img들을 관찰하기
        const imgs = document.querySelectorAll('img')
        imgs.forEach((img) => {
            observer.observe(img)
        })
    </script>

</body>

</html>
참고자료
https://www.inflearn.com/course/%EB%94%B0%EB%9D%BC%ED%95%98%EB%A9%B0-%EB%B0%B0%EC%9A%B0%EB%8A%94-%EC%9E%90%EB%B0%94%EC%8A%A4%ED%81%AC%EB%A6%BD%ED%8A%B8/dashboard
https://scarlett-dev.gitbook.io/all/it/lazy-loading
