Spring Security
: 스프링 서버에 필요한 인증 및 인가를 위한 기능을 제공해주는 프레임워크
<인증(Authentication) / 인가(Authorization) >
- 인증과 인가는 얼핏 보면 같은 개념으로 혼동하기 쉬움
- 인증: 사용자 신원을 확인하는 행위
- 인가: 사용자 권한을 확인하는 행위
- 보안구역에 출입한다고 생각해보자, 출입하기 위해 출입증을 제출하여 신원을 확인하는 것은 인증에 해당하며, 신원에 따라 출입 장소에 접근할 수 있는 권한을 확인하는 것이 인가이다.
- 웹에 접근하는 상황에서는, 인증은 로그인을 하는 것이고, 인가는 역할에 따른 사용 권한을 관리하는 것

<Credential 기반 인증 방식>
- Spring Security에서는 인증과 인가를 위해 Principal을 아이디, Credential을 비밀번호로 사용하는 Credential 기반의 인증 방식을 사용한다.
- Principal(접근 주체) : 보호받는 Resource에 접근하는 대상
- Credential(비밀번호) : Resource에 접근하는 대상의 비밀번호
⇒ Security는 '인증'과 '권한'에 대한 부분을 Filter 흐름에 따라 처리한다.
스프링 시큐리티의 기능
- 홈페이지에 인증 권한을 빠르게 부여해 인증 및 권한 보호 기능을 손쉽게 추가할 수 있다.
- 필요한 데이터에 안전하고 빠르게 접근하도록 지원하며, 동시에 고객 정보 및 거래 데이터를 승인되지 않는 접근으로부터 보호하여, 고객 데이터를 효율적으로 관리하는 데 도움을 준다.
스프링 시큐리티를 왜 사용하는가?
- Spring의 생태계에서 보안에 필요한 기능을 제공해준다.
- Spring에서 추구하는 IoC/DI 패턴과 같은 확장 패턴을 염두해서 인증/인가 부분을 직접 개발하기는 쉽지 않은데, Spring Security에서는 이와 같은 기능을 제공해주기 때문에 개발 작업 효율을 높일 수 있다.
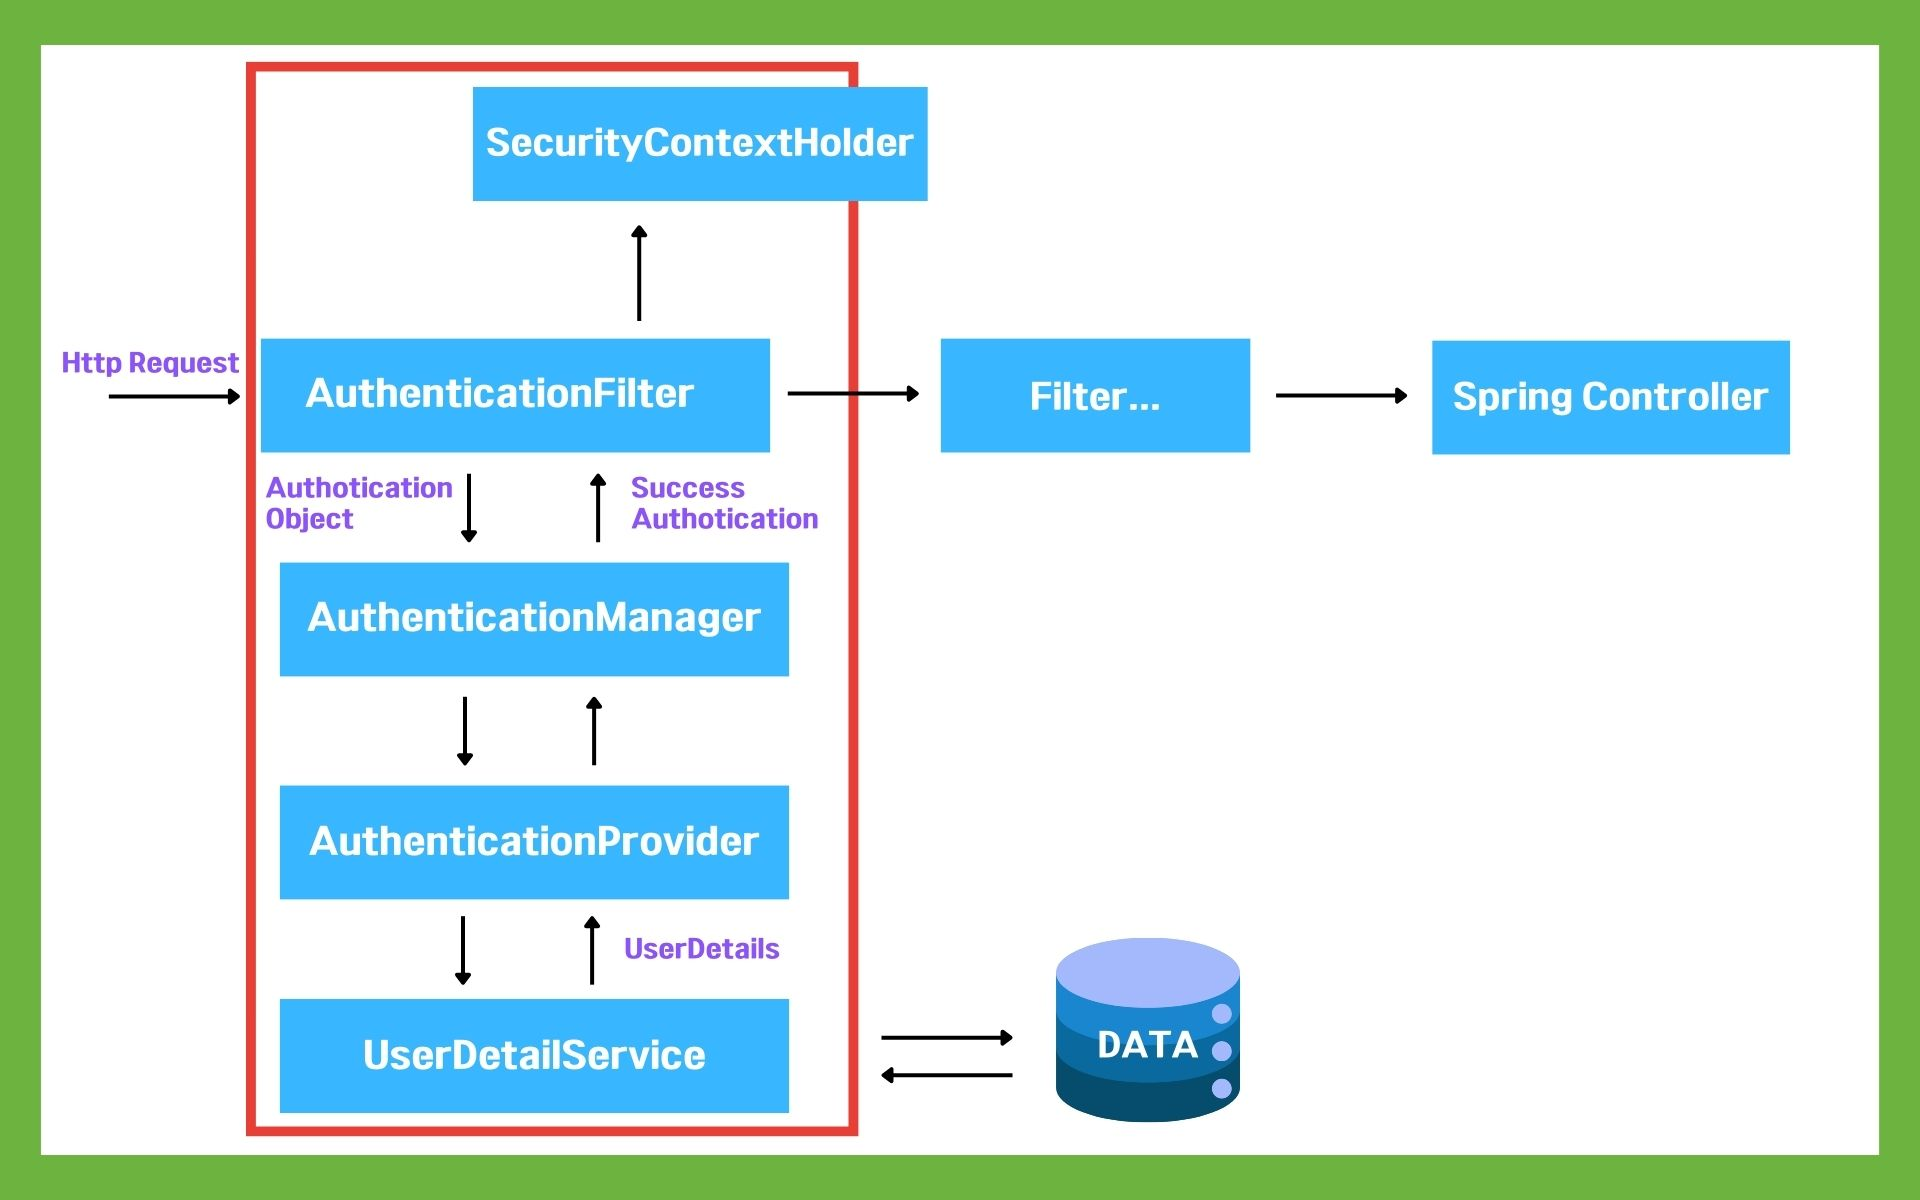
위의 그림은 Spring Security가 Spring 프레임워크에서 작동되는 구조이다.
개발 구조가 잘 설계되어 있기 때문에 기존의 코드를 변경하지 않고도 그림처럼 중간에 삽입하여 사용할 수 있다.
1. 사용자의 요청이 서버로 들어옵니다.
2. Authotication Filter가 요청을 가로채고 Authotication Manger로 요청을 위임합니다.
3. Authotication Manager는 등록된 Authotication Provider를 조회하며 인증을 요구합니다.
4. Authotication Provider가 실제 데이터를 조회하여 UserDetails 결과를 돌려줍니다.
5. 결과는 SecurityContextHolder에 저장이 되어 저장된 유저정보를 Spring Controller에서 사용할 수 있게 됩니다.
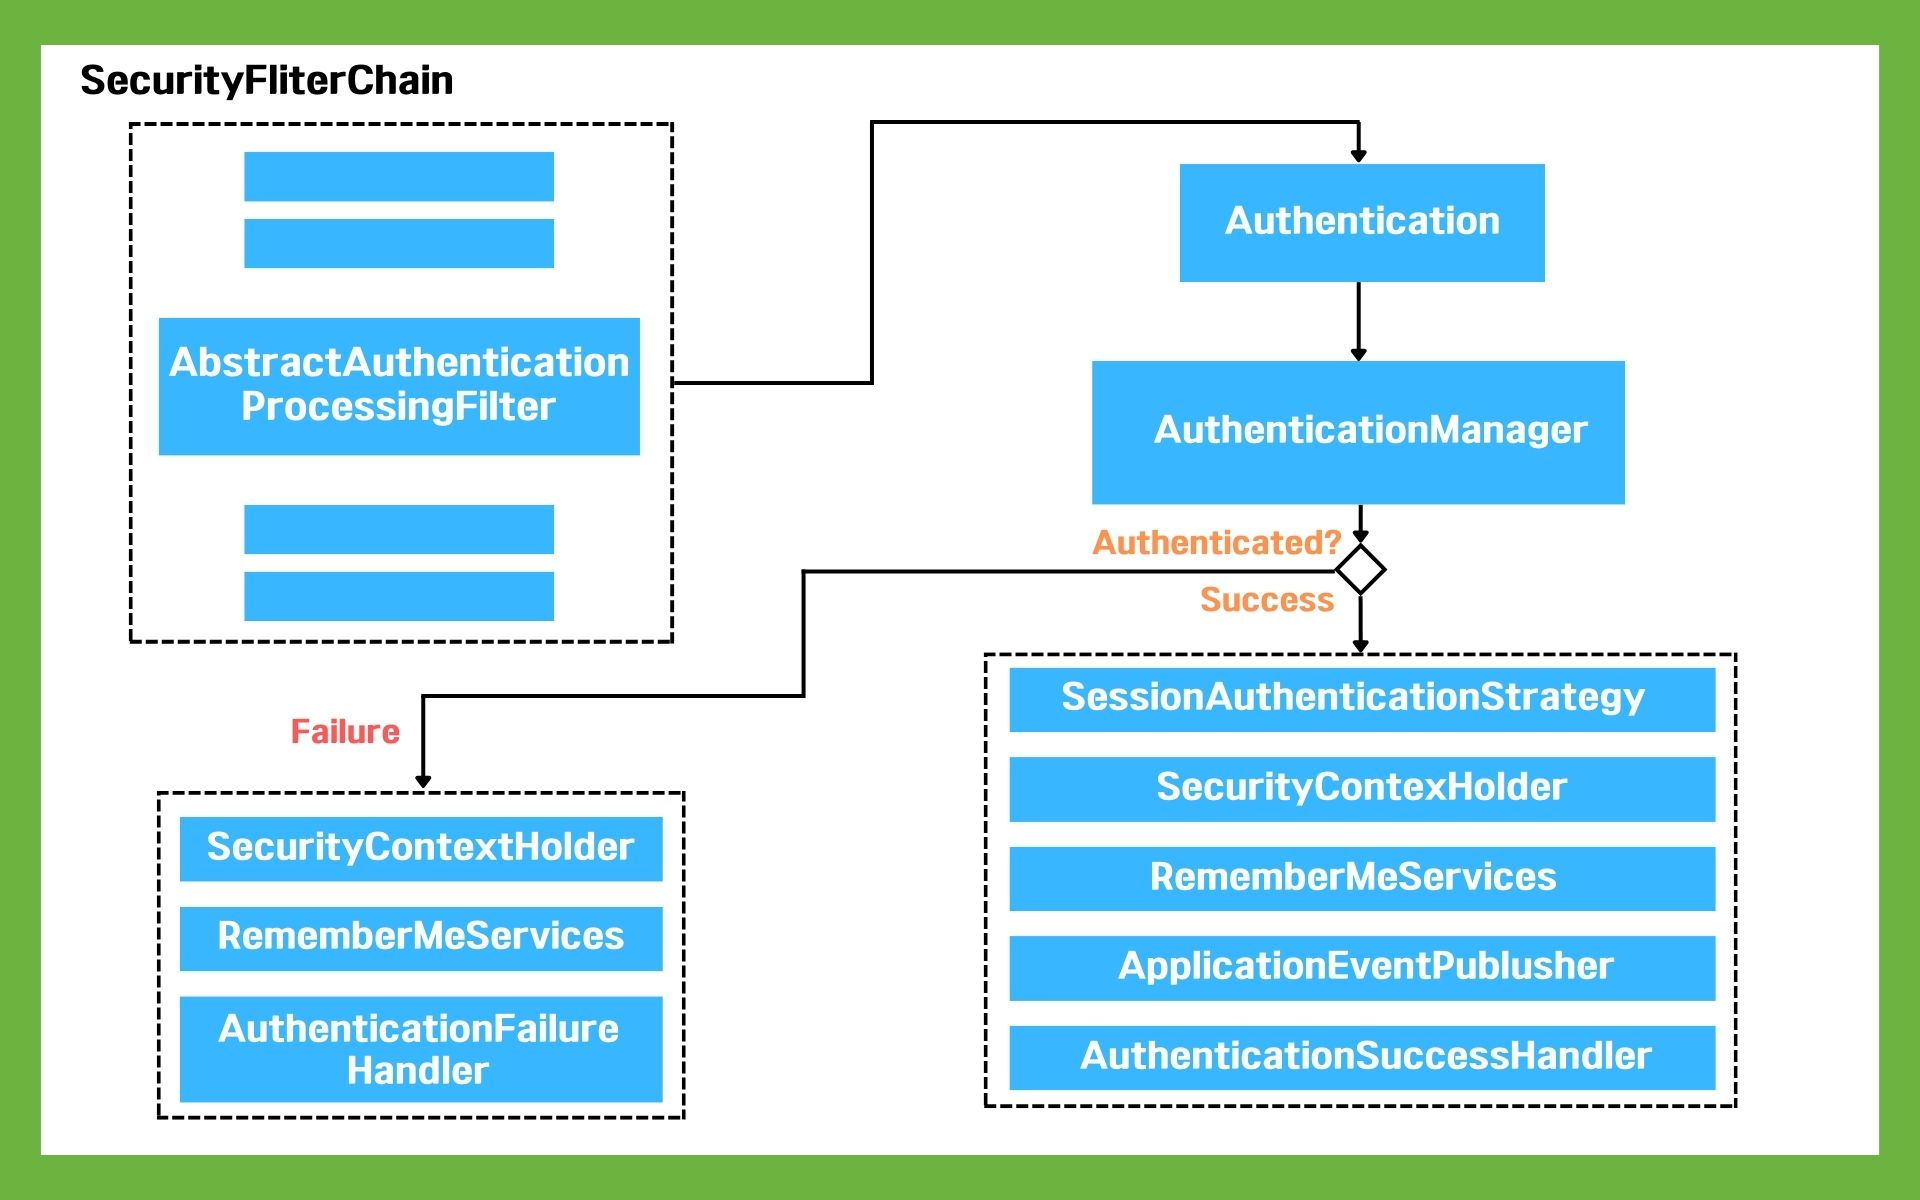
위의 그림은 Spring Security의 내부 구조이다.
1. 사용자가 자격 증명 정보를 제출하면, AbstractAuthenticationProcessingFilter가 Authentication 객체를 생성합니다.
2. Authentication 객체가 AuthenticationManager에게 전달됩니다.
3. 인증에 실패하면, 로그인 된 유저정보가 저장된 SecurityContextHolder의 값이 지워지고 RememberMeService.joinFail()이 실행됩니다. 그리고 AuthenticationFailureHandler가 실행됩니다.
4. 인증에 성공하면, SessionAuthenticationStrategy가 새로운 로그인이 되었음을 알리고, Authentication 이 SecurityContextHolder에 저장됩니다. 이후에 SecurityContextPersistenceFilter가 SecurityContext를 HttpSession에 저장하면서 로그인 세션 정보가 저장됩니다.
그 뒤로 RememberMeServices.loginSuccess()가 실행됩니다. ApplicationEventPublisher가 InteractiveAuthenticationSuccessEvent를 발생시키고 AuthenticationSuccessHandler 가 실행됩니다.
Spring Security을 적용하기 전에 이런 흐름을 가지고 작동한다는 것을 알아두면 도움이 됩니다. 사실 아키텍처나 처리 과정들은 구글링을 통하여 가볍게 구현 방법을 알 수 있기 때문에 이러한 과정들을 몰라도 실무에서 구현하는 데는 문제가 전혀 없습니다.
// 스프링 시큐리티
implementation 'org.springframework.boot:spring-boot-starter-security'
우선, 스프링 시큐리티를 사용하기 위해 해당 dependency를 프로젝트에 맞게 추가한다.
프로그램을 실행하면 어떤 설정도 하지 않았지만 로그인 페이지가 나타난다.
콘솔창의 로그를 확인해보면 이상한 패스워드 같은 것이 보일 것이다.
이 패스워드를 로그인 창에 기입하면 된다. 아이디는 user
Spring 라이브러리를 프로젝트에 import하면 Spring이 가지고 있던 화면이 보이고 인증을 요청하게 된다. 이런 부분들은 설정을 통해 허용이 가능하다.
사용자로부터 호출되는 URL의 인증, 인가는 다음과 같은 설정을 통해 케이스별로 적용이 가능하다.
Security 설정 파일 생성
- configure() 메서드 주요 기능
| 설정 | 설명 |
|---|---|
| http.authorizeRequests() | URL 경로에 대한 인가 규칙을 설정합니다. |
| .antMatchers().permitAll() | 특정 URL 경로를 인증 없이 허용합니다. |
| .anyRequest().authenticated() | 모든 요청에 대해 인증을 요구합니다. |
| .hasRole() | 특정 역할을 가진 사용자만 접근을 허용합니다. |
| .formLogin() | 폼 기반 로그인을 활성화합니다. |
| .loginPage() | 로그인 페이지의 경로를 지정합니다. |
| .defaultSuccessUrl() | 로그인 성공 후 이동할 기본 URL을 설정합니다. |
| .logout() | 로그아웃을 처리하는 설정을 추가합니다. |
| .logoutUrl() | 로그아웃 URL을 지정합니다. |
| .logoutSuccessUrl() | 로그아웃 성공 후 이동할 URL을 설정합니다. |
| .csrf() | CSRF(Cross-Site Request Forgery) 공격 방어 설정을 활성화합니다. |
| .sessionManagement() | 세션 관리를 설정합니다. |
| .sessionCreationPolicy() | 세션 생성 정책을 설정합니다. |
- 패스워드 인코딩 → BCrypt로 암호화 메서드를 Bean에 등록하여 사용한다.
사용자 Service 클래스 생성
- UserDetailsService를 Bean에 등록
package org.study.board.service;

import org.springframework.beans.factory.annotation.Autowired;
import org.springframework.security.core.userdetails.UserDetails;
import org.springframework.security.core.userdetails.UserDetailsService;
import org.springframework.security.core.userdetails.UsernameNotFoundException;
import org.springframework.stereotype.Service;
import org.study.board.dto.User;
import org.study.board.repository.UserMapper;

import java.util.ArrayList;

@Service
public class CustomUserDetailsService implements UserDetailsService {

    @Autowired
    private UserMapper mapper;

    @Override
    public UserDetails loadUserByUsername(String userId) throws UsernameNotFoundException {
        User user = mapper.findByLoginId(userId);
        if (user == null) {
            throw new UsernameNotFoundException("User not found");
        }
        return new org.springframework.security.core.userdetails.User(user.getUserId(), user.getPassword(), new ArrayList<>());
    }
}- loadUserByUsername() 메서드
- 인증 과정 중에 자동으로 호출되는 메서드
- 사용자가 로그인할 때, 입력한 사용자명을 기반으로 Spring Security는 loadUserByUsername() 메서드를 호출하여 사용자 정보를 조회한다.
- 이 메서드는 사용자명을 입력받아 해당 사용자에 대한 정보를 반환하는 역할을 수행한다.
사용자 권한 설정
CSRF 토큰
: 서버에 들어온 요청이 실제 서버에서 허용한 요청이 맞는지 확인하기 위한 토큰
- XSS Atack
- PC에서 악성 Script가 실행되어 지는 것
- CSRF Attack
- Browser에서 이미 접속한 Web Application 에게, "위조된 HTTP Request"와 같은 "Browser 사용자가 원하지 않는 action"을 보내어, Web server로 위조된 request 수행
- 예방법 : 인증 정보를 request 양식에 포함시켜, Web Server에서 HTTP request를 받아들일 때, source를 확인하여 “다른 Session(인증 받지 아니한 location)”에서 온 Request이면 reject 수행
스프링 시큐리티는 사용자가 요청한 페이지에 CSRF 토큰을 자동으로 심는다.
CSRF 방어 가능은 Spring Security 3.2.0이후부터 지원된다.
따라서 3.2.0 이전 버전에서는 CSRF 토큰을 설정해야한다.
- CSRF 설정을 추가하면 리소스를 변경하는 HTTP Method(POST, PUT, DELETE) 를 사용하는 경우, 유효한 csrf token과 함께 요청하지 않으면 Forbidden(403) 상태코드를 리턴한다.
http.csrf().disable();- CSRF 설정을 추가하지 않으면, 해당 코드를 HttpSecurity설정(Security Config)에 넣어주면 된다.
    @Override
    protected void configure(HttpSecurity http) throws Exception {
        http
                .authorizeRequests()
                .antMatchers("/login", "/join").permitAll()
                .antMatchers("/user/**").hasRole("USER")
                .anyRequest().authenticated()
                .and()
                .formLogin()
                .loginPage("/login")
                .loginProcessingUrl("/login")
                .usernameParameter("loginId")  // 로그인 ID 필드 이름 설정
                .passwordParameter("password") // 비밀번호 필드 이름 설정
                .defaultSuccessUrl("/main", true)
                .permitAll()
                .and()
                .logout()
                .logoutUrl("/logout")
                .logoutSuccessUrl("/main")
                .permitAll()
                .and()
                .csrf().disable() // **"csrf 비활성화"**
                .rememberMe();
    }
Spring Security 권한
Spring Security는 권한 부여를 위해 사용자의 권한과 요청 자원의 권한을 비교한다.
사용자의 권한은 사용자가 로그인하면서 인증 과정에서 얻어지며,
요청 자원의 권한은 개발자가 설정해야 한다.
- 사용자의 권한 설정
사용자의 권한은 ‘UserDetails’ 인터페이스의 구현 클래스를 이용해 설정할 수 있다.
일반적으로 ‘User’클래스를 사용해 권한을 설정한다.
- ‘roles’ 메서드를 이용하여 사용자에게 권한을 부여할 수 있다.
- 권한은 여러 개 부여할 수 있으며, 각 권한은 ‘ROLE_’가 붙은 형태로 저장된다.
- 자원에 대한 권한 설정
자원에 대한 권한은 ‘HttpSecurity’ 객체를 사용해 설정할 수 있다.
'authorizeRequests()' 메소드를 이용해 다양한 권한 설정을 적용할 수 있다.
- 아래 예시에서는 ‘/user/**’ 경로에 대한 접근은 ‘ADMIN’ 권한을 가진 사용자만 허용한다.
http
                .authorizeRequests()
                .antMatchers("/login", "/join").permitAll()
                .antMatchers("/user/**").hasRole("ADMIN") // 권한 부여
.anyRequest().authenticated();- 메소드 보안
메소드 수준에서 권한을 설정할 수도 있다.
'@PreAuthorize' 어노테이션을 사용해 메서드 실행 전에 권한을 확인할 수 있다.
- 아래 예시에서 deleteBoard() 메소드는 ‘ADMIN’ 권한을 가진 사용자만 실행할 수 있다.
@PreAuthorize("hasRole('ADMIN')")
@DeleteMapping("/delete/{bno}")
public ResponseEntity<String> deleteBoard(@PathVariable Integer bno) {
        boolean deleted = boardService.deleteBoard(bno);
        if (deleted) {
            return ResponseEntity.ok("게시물이 성공적으로 삭제되었습니다.");
        } else {
            return ResponseEntity.status(HttpStatus.INTERNAL_SERVER_ERROR)
                    .body("게시물 삭제 중에 오류가 발생했습니다.");
        }
}- 접근 거부 처리
사용자가 권한이 없는 자원에 접근하려고 할 때, 접근 거부 처리를 구현할 수 있다.
- Spring Security는 기본적으로 사용자가 권한이 없는 자원에 접근하려 할 때, ‘AccessDeniedException’을 발생시키며 403 Forbidden 응답을 반환한다.
하지만 이러한 기본 동작을 사용자 지정으로 변경할 수 있다. (접근거부 페이지/핸들러 설정)
Spring Security 권한 처리
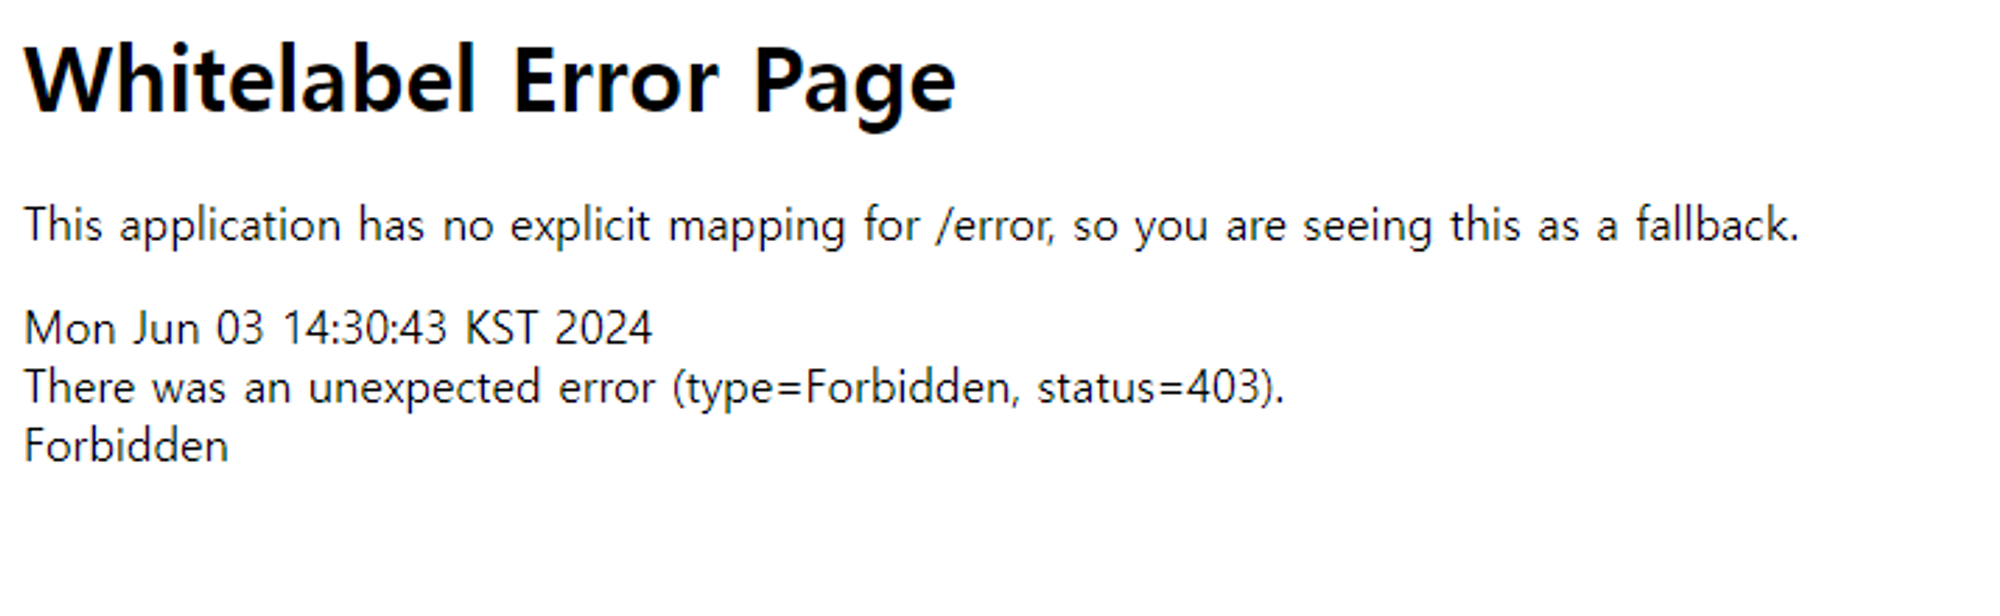
그런데 권한을 부여한 뒤 실행해도 에러 페이지가 뜨기도 한다.
Spring Security를 적용하고 아무런 설정도 변경하지 않으면 모든 요청에 대해서 401 Unauthorized 혹은 403 Forbidden 응답을 받게 된다.
Spring Security에서 JSON 응답을 커스텀하려면 별도로 설정이 필요하기 때문이다.
ExceptionTranslationFilter
- API 기반으로 동작하는 경우 클라이언트 측 문제(400)나 서버 측 문제(500)로 인해 요청이 실패한 경우 그 이유나 요청 시각 등 API 응답에 필요한 항목을 바디에 포함해야 한다.
- Spring Security에 의해서 차단된 경우 필터 단에서 걸러지기 때문에 이는 시큐리티 설정 클래스에서 직접 핸들러를 등록해야 한다.
- 이 때 사용할 수 있는 인터페이스가 AuthenticationEntryPoint와 AccessDeniedHandler다.
- 스프링 시큐리티 필터 체인에서는 인증 예외가 발생했다면
AuthenticationEntryPoint를, 인가 예외가 발생했다면 익명(anonymous) 사용자일 경우AuthenticationEntryPoint를, 그렇지 않다면AccessDeniedHandler를 실행한다.
authenticationEntryPoint
: 인증되지 않은 사용자가 보호된 리소스에 접근할 때 처리할 수 있다.
- Authorization 헤더에 JWT를 포함하지 않았을 경우 인증 실패로 인해 401 응답이 발생한다.
- 만약 시큐리티 설정에서 핸들러를 등록해주지 않았다면 403 상태 코드 외에는 아무런 응답이 반환되지 않을 것이다. 이는 스프링 시큐리티에서 아무런
AuthenticationEntryPoint가 등록되지 않았을 경우 Http403ForbiddenEntryPoint를 사용하기 때문이다.
@Component
public class CustomAuthenticationEntryPoint implements AuthenticationEntryPoint {

    @Override
    public void commence(HttpServletRequest request, HttpServletResponse response, AuthenticationException authException) throws IOException, ServletException {
        response.setStatus(HttpServletResponse.SC_UNAUTHORIZED);
        RequestDispatcher dispatcher = request.getRequestDispatcher("/error/401");
        dispatcher.forward(request, response);
    }
}
response.sendError(HttpServletResponse.SC_FORBIDDEN, "Access Denied");- 만약 401로 바꾸고 싶다면 위처럼 별도의 핸들러를 구현하여 등록해야 할 것이다.
accessDeniedHandler
: 권한이 없는 사용자에게 커스텀 에러 페이지를 보여주거나 JSON 응답을 반환할 수 있다.
- 인가 예외가 발생했을 경우도
HttpSecurity의accessDeniedHandler를 이용하여AccessDeniedHandler인터페이스의 구현체를 전달하면 된다.
@Component
public class CustomAccessDeniedHandler implements AccessDeniedHandler {

    @Override
    public void handle(HttpServletRequest request, HttpServletResponse response, AccessDeniedException accessDeniedException) throws IOException, ServletException {
        response.setStatus(HttpServletResponse.SC_FORBIDDEN);
        RequestDispatcher dispatcher = request.getRequestDispatcher("/error/403");
        dispatcher.forward(request, response);
    }
}
@Override
protected void configure(HttpSecurity http) throws Exception {
    http
        .exceptionHandling()
        .accessDeniedHandler(accessDeniedHandler)
        .authenticationEntryPoint(unauthorizedEntryPoint);
...- 인가 예외를 발생시키는 로직을 실행시켜보면 다음처럼 응답이 커스텀되어 잘 나온다.
참고자료
https://www.elancer.co.kr/blog/view?seq=235
https://cordcat.tistory.com/97
https://github.com/gregor77/start-spring-security
https://cocococo.tistory.com/entry/Spring-Boot-Spring-Security-권한-설정-및-사용-방법
https://velog.io/@cielo_g/Spring-스프링-시큐리티의-모든-것feat.-spring-security-최신-3.xx-버전
https://velog.io/@park2348190/Spring-Security의-Unauthorized-Forbidden-처리