* 만든 목적
▶ redux saga과 toolkit 그리고 next.js로 만든 프로젝트를 만들면서 일부 내용들은 typescript로 변환하여 만들어보고자 함
* 알고 있던 내용
▶ 타입스크립트는 변수, 매개변수 이용 시 타입을 정하는 것이다
▶ 타입스크립트는 설계를 먼저 한 후 코드를 작성한다
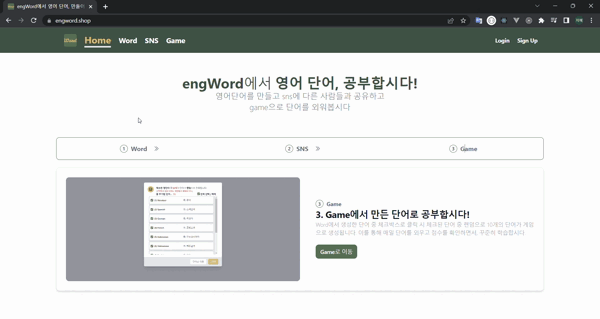
* 결과
▶ default로 id가 1일 때 고정됨(새로고침해도 가장 처음 내용이 나옴)
▶ stepper라고 말한 이유는 css는 tailwindcss를 사용하는데, 참고하는 곳에서 stepper라고 언급하기 때문
* 순서
▶ 내용말고 형식은 모두 비슷하기 때문에 들어갈 데이터의 타입을 정의함
▶ 사진은 변하거나 수정하지 않기 때문에 프로젝트 내부 저장공간(public)을 사용함
▶ 상단의 ① > ② > ③을 누르면 내용이 변화하도록 하는 것이 목표
1. 타입 정의 및 타입 내용 지정
[type.ts]
export interface IProjects {
    id: number,
    title:string,
    name: string,
    description: string,
    image_path: string,
    path: string,
}
[data.ts]
import { IProjects } from "./type";

export const projects:IProjects[] = [
    {
        id: 1,
        title: 'Word',
        name: "1. Word에서 영단어 생성, 단어를 공부합시다!",
        description: `Lorem Ipsum is simply dummy text of the printing and typesetting industry. Lorem Ipsum has been the industry's standard dummy text ever since the 1500s,`,
        image_path: "/word.png",
        path: "/word"
    },
    {
        id: 2,
        title: 'SNS',
        name: "2. SNS에서 다른 사람들과 교류합시다!",
        description: `when an unknown printer took a galley of type and scrambled it to make a type specimen book. It has survived not only five centuries, but also the leap into electronic typesetting, remaining essentially unchanged.`,
        image_path: "/sns.png",
        path: "/post"
    },
    {
        id: 3,
        title: 'Game',
        name: "3. Game에서 만든 단어로 공부합시다!",
        description: ` It was popularised in the 1960s with the release of Letraset sheets containing Lorem Ipsum passages, and more recently with desktop publishing software like Aldus PageMaker including versions of Lorem Ipsum.`,
        image_path: "/game.png",
        path: "/game"
    }
]
2. 페이지 단에서 반복되는 항목은 컴포넌트로 넘겨준다
▶ 또한 useState를 사용해 data의 값을 받아서 전달한다
▶ projects는 data의 내용을 show는 ① > ② > ③을 눌렀을 때 다르게 표시되게 함
▶ ProjectTitle, ProjectCard 컴포넌트는 project, show, setShow를 전달 받는다
→ 이것들을 사용하기 위해서는 컴포넌트 단에서 어떤 props가 필요한지 정의해야한다
[pages/index.tsx]
import Head from "next/head";
import React, { useState } from "react";
import { projects as projectsData } from "../data";
import Navbar from "../components/Navbar";

//컴포넌트
import ProjectCard from "../components/ProjectCard";
import ProjectTitle from "../components/ProjectTitle";

const Home = () => {
    const [projects, setProjects] = useState(projectsData)
    const [show, setShow] = useState<number | null>(1); //default로 1 고정

  return (
    <>
      <Navbar>
        <section>
          <div>
            <div>
              <h2>
                <span>engWord</span>
                에서
                <span>영어 단어, 공부합시다!</span>
              </h2>
              <p>
                영어단어를 만들고 sns에 다른 사람들과 공유하고
              </p>
              <p>
                game으로 단어를 외워봅시다
              </p>
            </div>
            {/* steps */}
            <ol>
                {projects.map((project) => (
                    <ProjectTitle project={project} show={show} setShow={setShow} key={project.id} />
                ))}
            </ol>
            <div>
              {projects.map((project) => (
                <ProjectCard project={project} show={show} setShow={setShow} key={project.id}/>
              ))}
            </div>
          </div>
        </section>
      </Navbar>
    </>
  );
};

export default Home;
[components/ProjectCard.tsx]
import React, { FunctionComponent, useState } from 'react'
import { IProjects } from '../type';
import Link from "next/link"

const ProjectCard:FunctionComponent<{
  //타입을 지정해준다
  project: IProjects;
  show:null|number;
  setShow:(id:null | number) => void;}> = ({
    project: {id, title, name, description, image_path, path},
    show, setShow}) => {

  const [buttonTitle, setButtonTitle] = useState(title)
  const [buttonPath, setButtonPath] = useState(path);
  const [activeItem, setActiveItem] = useState<string>("")

  const ButtonItem:FunctionComponent<{
    buttonTitle: string,
    buttonPath: string}> =
    ({buttonTitle, buttonPath}) => {
      return (
        <Link href={buttonPath} >
          <p onClick={() => setActiveItem(buttonTitle)}
       		>{buttonTitle}로 이동</p>
        </Link>
      )
    }

  return (
        <>
        //id값이 같을 때 화면에 나오는 정보를 다르게 보여준다
          {show === id && (
            <article>
            <div>
              <img src={image_path} alt="" />
              <div>
                <p>
                  <span>
                    {id}
                  </span>
                  {title}
                </p>
                <h5>
                {name}
                </h5>

                <p>
                  {description}
                </p>
                  <ButtonItem buttonTitle={buttonTitle} buttonPath={buttonPath} />
                </div>
              </div>
          </article>
          )}
        </>
    )
}

export default ProjectCard;
[components/ProjectTitle.tsx]
import { ChevronDoubleRightIcon } from '@heroicons/react/24/outline';
import React, { FunctionComponent } from 'react'
import { IProjects } from '../type';

const ProjectTitle:FunctionComponent<{
    project: IProjects;
    show:null|number;
    setShow:(id:null | number) => void;}> = ({
        project: {id, title},
        show, setShow
    }) => {
  console.log("show", show)
  return (
    <li onClick={() => setShow(id)}> //클릭할 때마다 id값이 다르게 들어간다
      <span>
        {id}
      </span>
      {title}
      {id === 1  && (
        <ChevronDoubleRightIcon />
      )}
      {id === 2  && (
        <ChevronDoubleRightIcon />
      )}
    </li>
  )
}

export default ProjectTitle
개발 블로그, 티스토리(https://ba-gotocode131.tistory.com/)로 갈아탐