* 작성하는 이유
▶ 타입스크립트를 적용한 프로젝트를 진행하면서 카테고리에서 filter로 적용하는 법을 알게 되어 복습함
* 만들고자 하는 것
타입지정을 통해 props로 전달되는 데이터들의 타입을 지정하는 과정 기록
"animals" | "dogs" | "cats" | "birds" 항목들이 있고,
각 항목을 눌렀을 때 보여지는 이미지가 다를 것
* 결과

* 폴더 구조
└ components (컴포넌트)
	└ TestCard.tsx
    └ TestNavbar.tsx
└ pages (화면 표시)
	└ test.tsx
└ public (이미지)
	└ img
    	└ cat1 ~ 3.jpg
        └ dog1 ~ 3.jpg
        └ brid1 ~ 2.jpg
└ type.ts (타입지정)
└ data.ts (데이터)
1. 타입 지정 후 이미지와 데이터 보여주기
1-1. 타입을 지정한다.
[type.ts]
export interface IAnimals{
    id: number,
    name: string,
    description: string,
    image_path: string,
    category: string[],
}

export type Lists = "all" | "dogs" | "cats" | "birds"
1-2. 타입을 기반으로 넣고자 하는 데이터값을 작성한다.
[data.ts]
import { IAnimals } from "./type"

export const animals:IAnimals[] = [
     {
        id: 0,
        name: "고양이1",
        description:
          "고양이 사진 1입니다.",
        image_path: "/img/cat1.jpg",
        category: ["cats", "all"],
    },
    {
        id: 1,
        name: "강아지1",
        description:
          "강아지 사진 1입니다.",
        image_path: "/img/dog1.jpg",
        category: ["dogs", "all"],
    },
    {
        id: 2,
        name: "조류 1",
        description:
          "조류 사진 1입니다.",
        image_path: "/img/bird1.jpg",
        category: ["birds", "all"],
    },
    {
        id: 3,
        name: "고양이2",
        description:
          "고양이 사진 2입니다.",
        image_path: "/img/cat2.jpg",
        category: ["cats", "all"],
    },
    {
        id: 4,
        name: "강아지2",
        description:
          "강아지 사진 2입니다.",
        image_path: "/img/dog2.jpg",
        category: ["dogs", "all"],
    },
    {
        id: 5,
        name: "조류 2",
        description:
          "조류 사진 2입니다.",
        image_path: "/img/bird2.jpg",
        category: ["birds", "all"],
    },
    {
        id: 6,
        name: "고양이3",
        description:
          "고양이 사진 3입니다.",
        image_path: "/img/cat3.jpg",
        category: ["cats", "all"],
    },
    {
        id: 7,
        name: "강아지3",
        description:
          "강아지 사진 3입니다.",
        image_path: "/img/dog3.jpg",
        category: ["dogs", "all"],
    },
]
1-3. [pages/test.tsx]에 데이터(data.tsx)를 넣는다
▶ TestCatd에 넣을 props는 animal로 지정
import { CategoryLists } from "@/type";
import { animals as animalsData } from "@/data";
import { useState } from "react";

const Test = () => {
    const [animals, setAnimals] = useState(animalsData);

    return (
        <>
         <h1 className="mt-5 ml-5">Project</h1>
        <div className="px-5 py-2 overflow-y-scroll" style={{ height: "85vh" }}>
           <div className="relative grid grid-cols-12 gap-4 my-10">
            {animals.map((animal) => (
            <div className="col-span-12 p-2 border-4 rounded-lg sm:col-span-6 lg:col-span-4 border-gray-blue">
                <TestCard animal={animal} key={animal.name} />
            </div>
             ))}
            </div>
        </div>
        </>
    )
}

export default Test;
1-4. [components/TestCard.tsx]에 pages에서 받을 props(animal)의 타입을 입력한다
▶ tailwindcss 사용해서 className에 값이 들어갔음
▶ FunctionComponent : 컴포넌트임을 지정
▶ animal의 타입지정에 IAnimals 사용
▶ animal 안에 들어있는 값들(id ~ category 불러옴)
import { IAnimals } from "@/type"
import { FunctionComponent, useState } from "react"
const TestCard:FunctionComponent<{animal: IAnimals}> = ({animal: {
id,
name,
description,
image_path,
category
}}) => {
const [showDetail, setShowDetail] = useState(false);
return (
<>
<p>{id + 1}</p>
<img
src={image_path}
alt={name}
className="w-full h-40 rounded-lg cursor-pointer"
onClick={() => setShowDetail(true)}
/>
<p className="my-2 text-center">{name}</p>
{showDetail && (
<div className="absolute top-0 left-0 z-10 grid w-full h-full p-2 text-black rounded-lg bg-light-beige md:p-10 dark:bg-black-100 dark:text-gray-100 md:grid-cols-2 gap-x-12 ">
<div>
<div className="border-4 rounded-lg border-gray-blue">
<img src={image_path} alt={name} className="w-full h-full rounded-lg cursor-pointer"/>
</div>
<div className="flex justify-center my-4 space-x-3">
</div>
</div>
<div>
<h2 className="mb-3 text-xl font-medium md:text-2xl ">{name}</h2>
<h3 className="my-3 text-base font-medium">{description}</h3>
<div className="flex flex-wrap mt-5 space-x-2 text-sm tracking-wider">
</div>
</div>
<button
className="absolute p-1 w-10 h-10 rounded-full bg-gray-blue top-3 right-3 focus:outline-none dark:bg-black-200"
onClick={() => setShowDetail(false)}
>
X
</button>
</div>
)}
</>
)
}
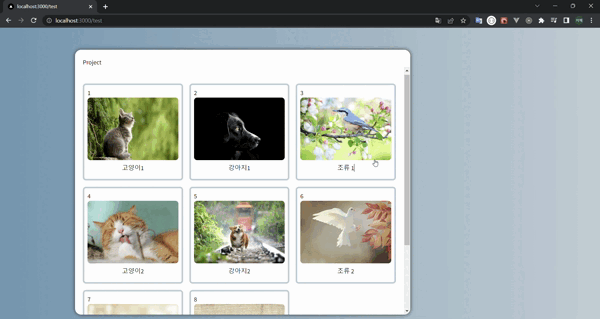
export default TestCard* 1-1 ~ 1-4번까지 했을 때 결과
2. 이미지들을 카테고리에 맞게 보여주자
2-1. [pages/test.tsx]
type.ts에서 지정한 것
export type Lists = "all" | "dogs" | "cats" | "birds"
TestNavbar,animals,active,filterLists추가됨
import { Lists } from "@/type";
import { animals as animalsData } from "@/data";
import { useState } from "react";
import TestCard from "@/components/TestCard";
import ProjectNavbar from "@/components/ProjectsNavbar";
import TestNavbar from "@/components/TestNavbar";

const Test = () => {
    const [animals, setAnimals] = useState(animalsData);
    const [active, setActive] = useState('all')

    const filterLists =  (lists:Lists | 'all') => {
    	//lists가 all인 경우
        if(lists === "all") {
            setAnimals(animalsData);
            setActive(lists);
            return;
        }
        //lists가 all외 다른 것일 경우
        const newArray = animalsData.filter(project => project.category.includes(lists));
        setAnimals(newArray);
        setActive(lists)
    }

    return (
        <>
         <h1 className="mt-5 ml-5">Project</h1>
        <div className="px-5 py-2 overflow-y-scroll" style={{ height: "85vh" }}>
        //추가됨
        <TestNavbar filterLists={filterLists}
            active={active}/>
        <div className="relative grid grid-cols-12 gap-4 my-10">
            {animals.map((animal) => (
            <div className="col-span-12 p-2 border-4 rounded-lg sm:col-span-6 lg:col-span-4 border-gray-blue">
                <TestCard animal={animal} key={animal.name} />
            </div>
             ))}
            </div>
        </div>
        </>
    )
}

export default Test;
2-2. [components/TestNavbar.tsx]
import { Lists } from "@/type"
import { FunctionComponent } from "react"
export const NavItem:FunctionComponent<{
value: Lists | 'all';
filterLists:Function;
active:string}> =
({value, filterLists, active}) => {
let className = "capitalize cursor-pointer hover:text-green-500";
if(active === value) className += " text-green-500";
//console.log("value",value)
//lists의 모든 값("all" | "dogs" | "cats" | "birds") 나옴
return (
<li className={className}
onClick={() => filterLists(value)}>
{value}
</li>
)
}
const TestNavbar:FunctionComponent<{filterLists:Function, active:string}>
= (props) => {
console.log("props", props)
//all을 누를 때 : {active: 'all', filterLists: ƒ}
//dogs을 누를 때 : {active: 'dogs', filterLists: ƒ}
//cats을 누를 때 : {active: 'cats', filterLists: ƒ}
//birds 누를 때 : {active: 'birds', filterLists: ƒ}
return (
<div className="flex px-3 py-2 space-x-3 overflow-x-auto list-none">
<NavItem value="all" {...props} />
<NavItem value="dogs" {...props} />
<NavItem value="cats" {...props} />
<NavItem value="birds" {...props} />
</div>
)
}
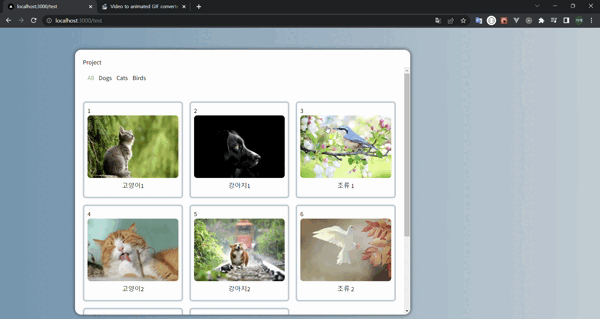
export default TestNavbar* 2-1 ~ 2-2번까지 했을 때 결과

개발 블로그, 티스토리(https://ba-gotocode131.tistory.com/)로 갈아탐