이 글의 내용은 프로젝트를 github에서 내려받을 수 있고,
runserver를 통해 어느정도 페이지 뷰가 나온다음
django에서 자체적으로 지원하는 서버가 아닌
nginx로 실행되는 서버를 구축하기 위한 절차이다.
이 글은 hellonero님의 글을 공부한 후 정리한 내용입니다.블로그 글 가기
uWSGI서버 연결하기
먼저 가상환경을 활성화 시켜준다.
$ source venv/bin/activateuwsgi패키지를 설치한다.
$ pip3 install uwsgi uwsgi 서버를 이용해서 Django 프로젝트를 연결한다. 다음 형식으로 명령어는 이루어져있다.
$ uwsgi --http :[포트번호] --home [가상환경] --chdir [장고프로젝트경로] -w [wsgi 모듈이 있는 폴더].wsgi - 포트번호: 8000이나 8080
- 가상환경 경로: uwsgi를 설치한 venv경로, 경로는 절대경로로 지정해 주는 것이 좋다고 한다.
- 장고 프로젝트 폴더 경로: /srv/django-project/ 역시 절대 경로로 지정한다.
- wsgi 모듈이 있는 폴더: 프로젝트 폴더에 mysite 안에 wsgi.py가 있을 겁니다. 그 경로이기 때문에 mysite를 입력.
실제 명령어의 예시
$ uwsgi --http :8000 --home /home/ubuntu/myvenv/ --chdir /srv/for_connect_repo/ -w restfulapiserver.wsgi
그러면 다음과 같은 내용과 함께 서버가 켜집니다.
*** Starting uWSGI 2.0.19.1 (64bit) on [Tue Jan 19 03:24:04 2021] ***
compiled with version: 7.5.0 on 18 January 2021 08:09:34
os: Linux-5.4.0-1029-aws #30~18.04.1-Ubuntu SMP Tue Oct 20 11:09:25 UTC 2020
nodename: ip-172-31-44-4
machine: x86_64
clock source: unix
detected number of CPU cores: 1
current working directory: /srv/for_connect_repo
detected binary path: /home/ubuntu/myvenv/bin/uwsgi
!!! no internal routing support, rebuild with pcre support !!!
chdir() to /srv/for_connect_repo/
*** WARNING: you are running uWSGI without its master process manager ***
your processes number limit is 3802
your memory page size is 4096 bytes
detected max file descriptor number: 1024
lock engine: pthread robust mutexes
thunder lock: disabled (you can enable it with --thunder-lock)
uWSGI http bound on :8000 fd 4
spawned uWSGI http 1 (pid: 3186)
uwsgi socket 0 bound to TCP address 127.0.0.1:34655 (port auto-assigned) fd 3
Python version: 3.6.9 (default, Oct  8 2020, 12:12:24)  [GCC 8.4.0]
PEP 405 virtualenv detected: /home/ubuntu/myvenv/
Set PythonHome to /home/ubuntu/myvenv/
*** Python threads support is disabled. You can enable it with --enable-threads ***
Python main interpreter initialized at 0x55d312e104e0
your server socket listen backlog is limited to 100 connections
your mercy for graceful operations on workers is 60 seconds
mapped 72920 bytes (71 KB) for 1 cores
*** Operational MODE: single process ***
WSGI app 0 (mountpoint='') ready in 1 seconds on interpreter 0x55d312e104e0 pid: 3185 (default app)
*** uWSGI is running in multiple interpreter mode ***
spawned uWSGI worker 1 (and the only) (pid: 3185, cores: 1)
이제 본인 로컬 브라우저로 확인해보면 잘 연결되었음을 확인할 수 있다.
만약 여기서 에러가 나왔다면 다음과 같은 상황을 확인해보자
1. ec2의 보안그룹에서 인바운드 8000포트을 열었는지?
2. Django에서 allowed_host를 ec2추가 혹은 '*'를 해놓앗는지?
3. 기본적인 Django 프로젝트의 urls.py, views.py, templates/index.html 등을 잘 생성해 두었는지?
2. 복잡한 uwsgi 명령어를 저장해서 사용하자.
먼저 배포를 위한 계정을 만듭니다.(왜.. 는 모르겠습니다.)
$ sudo adduser deploy이제 deploy 계정이 배포를 담당하게 될 것이라는 것 정도만 인지하면됩니다.
그 다음 파일로 uwsgi 옵션을 저장해 사용해봅니다.
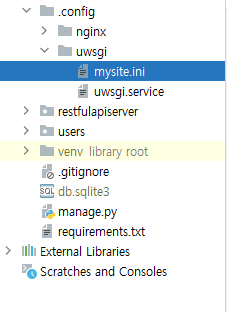
로컬 컴퓨터로 돌아와서 manage.py가 있는 폴더에 .config/uwsgi/mysite.ini를 생성합니다.
그리고 다음과 같은 코드를 작성합니다.
[uwsgi]
chdir = /srv/django-project/
module = mysite.wsgi:application
home = /home/ubuntu/venv/

uid = deploy
gid = deploy

http = :8000

enable-htreads = true
master = true
vacuum = true
pidfile = /tmp/mysite.pid
logto = /var/log/uwsgi/mysite/@(exec://date +%%Y-%%m-%%d).log
log-reopen = true- chdir: 장고 프로젝트 폴더의 경로입니다.
- module: wsgi가 존재하는 경로, :application을 붙입니다.
- home: 가상환경 경로입니다.
- uid: uwsgi를 사용할 계정
- gid: uwsgi를 사용할 그룹
- http: 포트번호
- logto: uwsgi 서버의 로그를 저장할 폴더
저장 후
git add .
git commit -m "add uwsgi명령어 파일 = mysite.ini"
git push
외부 서버로 가서 다시 파일을 받는다.
$ git pull그리고 logto 경로에 폴더가 없기 때문에 생성한다.
$ sudo mkdir -p /var/log/uwsgi/mysite그리고 이 로그는 uwsgi 실행자인 deploy 소유여야 로그를 작성할 수 있습니다.
만든 로그 폴더 전체를 deploy의 소유로 변경합니다.
$ sudo chown -R deploy:deploy /var/log/uwsgi/mysite/mysite.ini에 있는 옵션을 통해 서버를 다시 켜보니다.
관리자 권한으로 실행해야 하기 때문에 ubuntu의 홈 홀더에 있는 가상환경 내의 uwsgi를 직접 실행.
설치한 uwsgi는 가상환경 폴더 안의 bin폴던 안에 있습니다.
$ sudo /home/ubuntu/venv/bin/uwsgi -i /srv/django-project/.config/uwsgi/mysite.ini그러면 이런 문구가 보이면서 서버가 켜집니다.
[uWSGI] getting INI configuration from /srv/for_connect_repo/.config/uwsgi/mysite.ini