화면 만들기
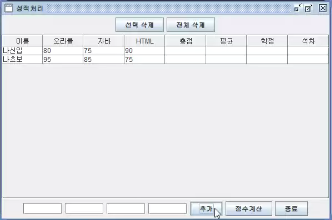
<성적 화면 구현 소스>
package com.step4;

import java.awt.BorderLayout;
import java.awt.Color;
import java.awt.Font;
import java.awt.event.ActionEvent;
import java.awt.event.ActionListener;
import javax.swing.JButton;
import javax.swing.JFrame;
import javax.swing.JPanel;
import javax.swing.JScrollPane;
import javax.swing.JTable;
import javax.swing.JTextField;
import javax.swing.table.DefaultTableModel;

public class SungJukView implements ActionListener {

	String col[] = { "이름", "오라클", "자바", "HTML", "총점", "평균", "학점", "석차" }; // 컬럼명
																			// 생성
	int p_num = 0; // 입력 받을 사람수 저장할 변수

	DefaultTableModel dtm;
	JTable table; // = new JTable(value, col); 테이블
	JScrollPane jsp; // = new JScrollPane(table); 스크롤

	JFrame jf_sungjuk = new JFrame();
	// JFrame에 붙일 속지 두 개 선언하고 생성하기
	JPanel jp_center = new JPanel();
	// 배치-jp_center 속지 중앙에 배치하자
	JPanel jp_north = new JPanel();
	JPanel jp_south = new JPanel();


	JButton jbt_clear = new JButton("전체 삭제");
	JButton jbt_selectDelRow = new JButton("선택 삭제");
	JButton jbt_add = new JButton("추가");


	//텍스트 입력창 선언
	JTextField jt_name = new JTextField(6);
	JTextField jt_oracle = new JTextField(6);
	JTextField jt_java = new JTextField(6);
	JTextField jt_html = new JTextField(6);


	JButton jbt_process = new JButton("점수계산");
	JButton jbt_exit = new JButton("종료");


	public void initDisplay() {


		System.out.println("initDisplay 호출성공");

		jp_center.setLayout(new BorderLayout(0, 20));

		// 버튼 동작 등록

		jbt_clear.addActionListener(this); // 표지우기
		jbt_selectDelRow.addActionListener(this); //선택된 행만 지우기
		jbt_process.addActionListener(this); // 처리
		jbt_add.addActionListener(this); // 처리
		jbt_exit.addActionListener(this); // 종료


		jp_north.add(jbt_selectDelRow);
		jp_north.add(jbt_clear);

		//텍스트 창 붙이기
		jp_south.add(jt_name);
		jp_south.add(jt_oracle);
		jp_south.add(jt_java);
		jp_south.add(jt_html);

		//텍스트 입력창 초기화 부분
		jt_name.setText("");                    //이름 텍스트입력창 초기값
		jt_oracle.setText("");           //오라클 텍스트입력창 초기값
		jt_java.setText("");
		jt_html.setText("");

		//동작 버튼 붙이기
		jp_south.add(jbt_add);
		jp_south.add(jbt_process);
		jp_south.add(jbt_exit);

		dtm = new DefaultTableModel(col,0);            //디폴트 테이블 생성 col 배열에 있는 값들로 컬럼이름 하고, p_num만큼 밑에 행열 생성함
		table= new JTable(dtm);	                                    //테이블 생성(디폴트 테이블에 정해둔 값으로 생성됨)
		jsp=new JScrollPane(table);									//스크롤바 붙임
	    jp_center.add("Center",jsp);
	    jp_center.validate();

		jf_sungjuk.setBackground(new Color(214, 211, 206));

		// 속지 두 장을 JFrame에 붙이기
		jf_sungjuk.add("Center", jp_center);
		jf_sungjuk.add("South", jp_south);
		jf_sungjuk.add("North", jp_north);
		jf_sungjuk.setSize(600, 400);

		jf_sungjuk.setTitle("성적처리");// 메소드 구현할 때에는 타입이 오고 호출할 때에는 타입을 쓰지 않는다.
		// 호출 하는 거니까 타입이 필요가 없습니다.
		jf_sungjuk.setVisible(true);
	}

	@Override
	public void actionPerformed(ActionEvent ae) {

		//이벤트가 발생한 컴포넌트의 주소번지 가져오기 - 어떤 버튼을 눌렀나?
		Object obj = ae.getSource();


	if(obj==jbt_process)
	{
		p_num=dtm.getRowCount();     //계산할때 인원수는 현재 테이블의 행 숫자이므로
	}
	else if(obj==jbt_add)
	{
		String input[] = new String[col.length];    //사용자값 저장할 배열 선언, col배열길이만큼
		input[0]=jt_name.getText();       //이름 input[0]에 저장
		input[1]=jt_oracle.getText();      //오라클점수
		input[2]=jt_java.getText();        //자바점수
		input[3]=jt_html.getText();      //html점수

		dtm.addRow(input);

		 //입력값 저장 하고 나서 텍스트입력 칸 다시 초기화 해두기
		jt_name.setText("");
		jt_oracle.setText("");
		jt_java.setText("");
		jt_html.setText("");

	}
	else if(obj==jbt_selectDelRow)
	{	//테이블 선택했을때 .getSelectedRow() 메소드 값은 그 행의 값이 나오고
		//아무것도 선택 안되어잇을때는 -1을 전달함.
		if(table.getSelectedRow()==-1) //-1일때(아무것도 선택되지 않았을때
		{										 //if문 탈출할때 return;을 사용함
			return;                            //따라서 삭제 버튼 눌렀을때 아무일도 일어나지 않는다.

		}
		else                                    //행이 선택되어있을때
		{
			dtm.removeRow(table.getSelectedRow());   //선택된 행값을 가져와서 삭제메소드실행
		}

	}
	else if(obj==jbt_clear)               //전체 삭제
	{

		for(int i = dtm.getRowCount(); i>0; i--)          //행갯수만큼 삭제메소드 반복실행
		{
			dtm.removeRow(0);
		}

	}

	else if(obj==jbt_exit)
	{
			System.exit(0); //자바 가상머신과 연결이 끊김
    }
}

	public static void main(String[] args) {
		JFrame.setDefaultLookAndFeelDecorated(true);
		SungJukView sj = new SungJukView();
		sj.initDisplay();
	}
}
Null이 찍히게 하는 방법
<예제1-1>
package com.week3;
class Param {
	int ival;
}
public class TestParam {
	TestParam(){

	}
	// 파라미터(생성자, 메소드) 자리에 참조형 타입 활용 연습
	void effectParam(Param p) { //p=null
		System.out.println(p);

	}
	public static void main(String[] args) {
		TestParam tp = new TestParam();
		tp.effectParam(null);
	}

}
<예제1-2>
package com.week3;
class Param {
	int ival;
}
public class TestParam {
	TestParam(){

	}
	// 파라미터(생성자, 메소드) 자리에 참조형 타입 활용 연습
	void effectParam(Param p) { //p=null
		System.out.println(p);

	}
	public static void main(String[] args) {
		TestParam tp = new TestParam();
		Param p = null;
		tp.effectParam(p);
		p = new Param();
		// tp.effectParam(null); 널을 찍히게 하려면 이 방법도 있다 1.
	}

}
<예제1-3. 이 방법 추천> - 생성자 통해서 메소드 호출
package com.week3;
class Param {
	int ival;
}
public class TestParam {
	TestParam(){ // 이 null은 생성자에서 결정되었다
		System.out.println("TestParam 생성자호출");
		Param p = null;
		effectParam(p);
	}
	// 파라미터(생성자, 메소드) 자리에 참조형 타입 활용 연습
	void effectParam(Param p) {
		System.out.println("effectParam:"+p); // null

	}
	public static void main(String[] args) {
		TestParam tp = new TestParam();
	}
}<예제2>
package com.week3;
class Param {
int ival;
}
public class TestParam {
TestParam(){ // 이 null은 생성자에서 결정되었다
System.out.println("TestParam 생성자호출");
Param p = null;
effectParam(p);
}
// 파라미터(생성자, 메소드) 자리에 참조형 타입 활용 연습
void effectParam(Param p) {
// p = new Param(); // 이게 있을 때와 없을 때의 차이
System.out.println("effectParam:"+p);
p.ival = 100;
System.out.println("sub ival:"+p.ival);
}
public static void main(String[] args) {
TestParam tp = new TestParam();
Param p = null;
p = new Param();
p.ival = 500;
tp.effectParam(p);
System.out.println("main ival:"+p.ival);
}
}
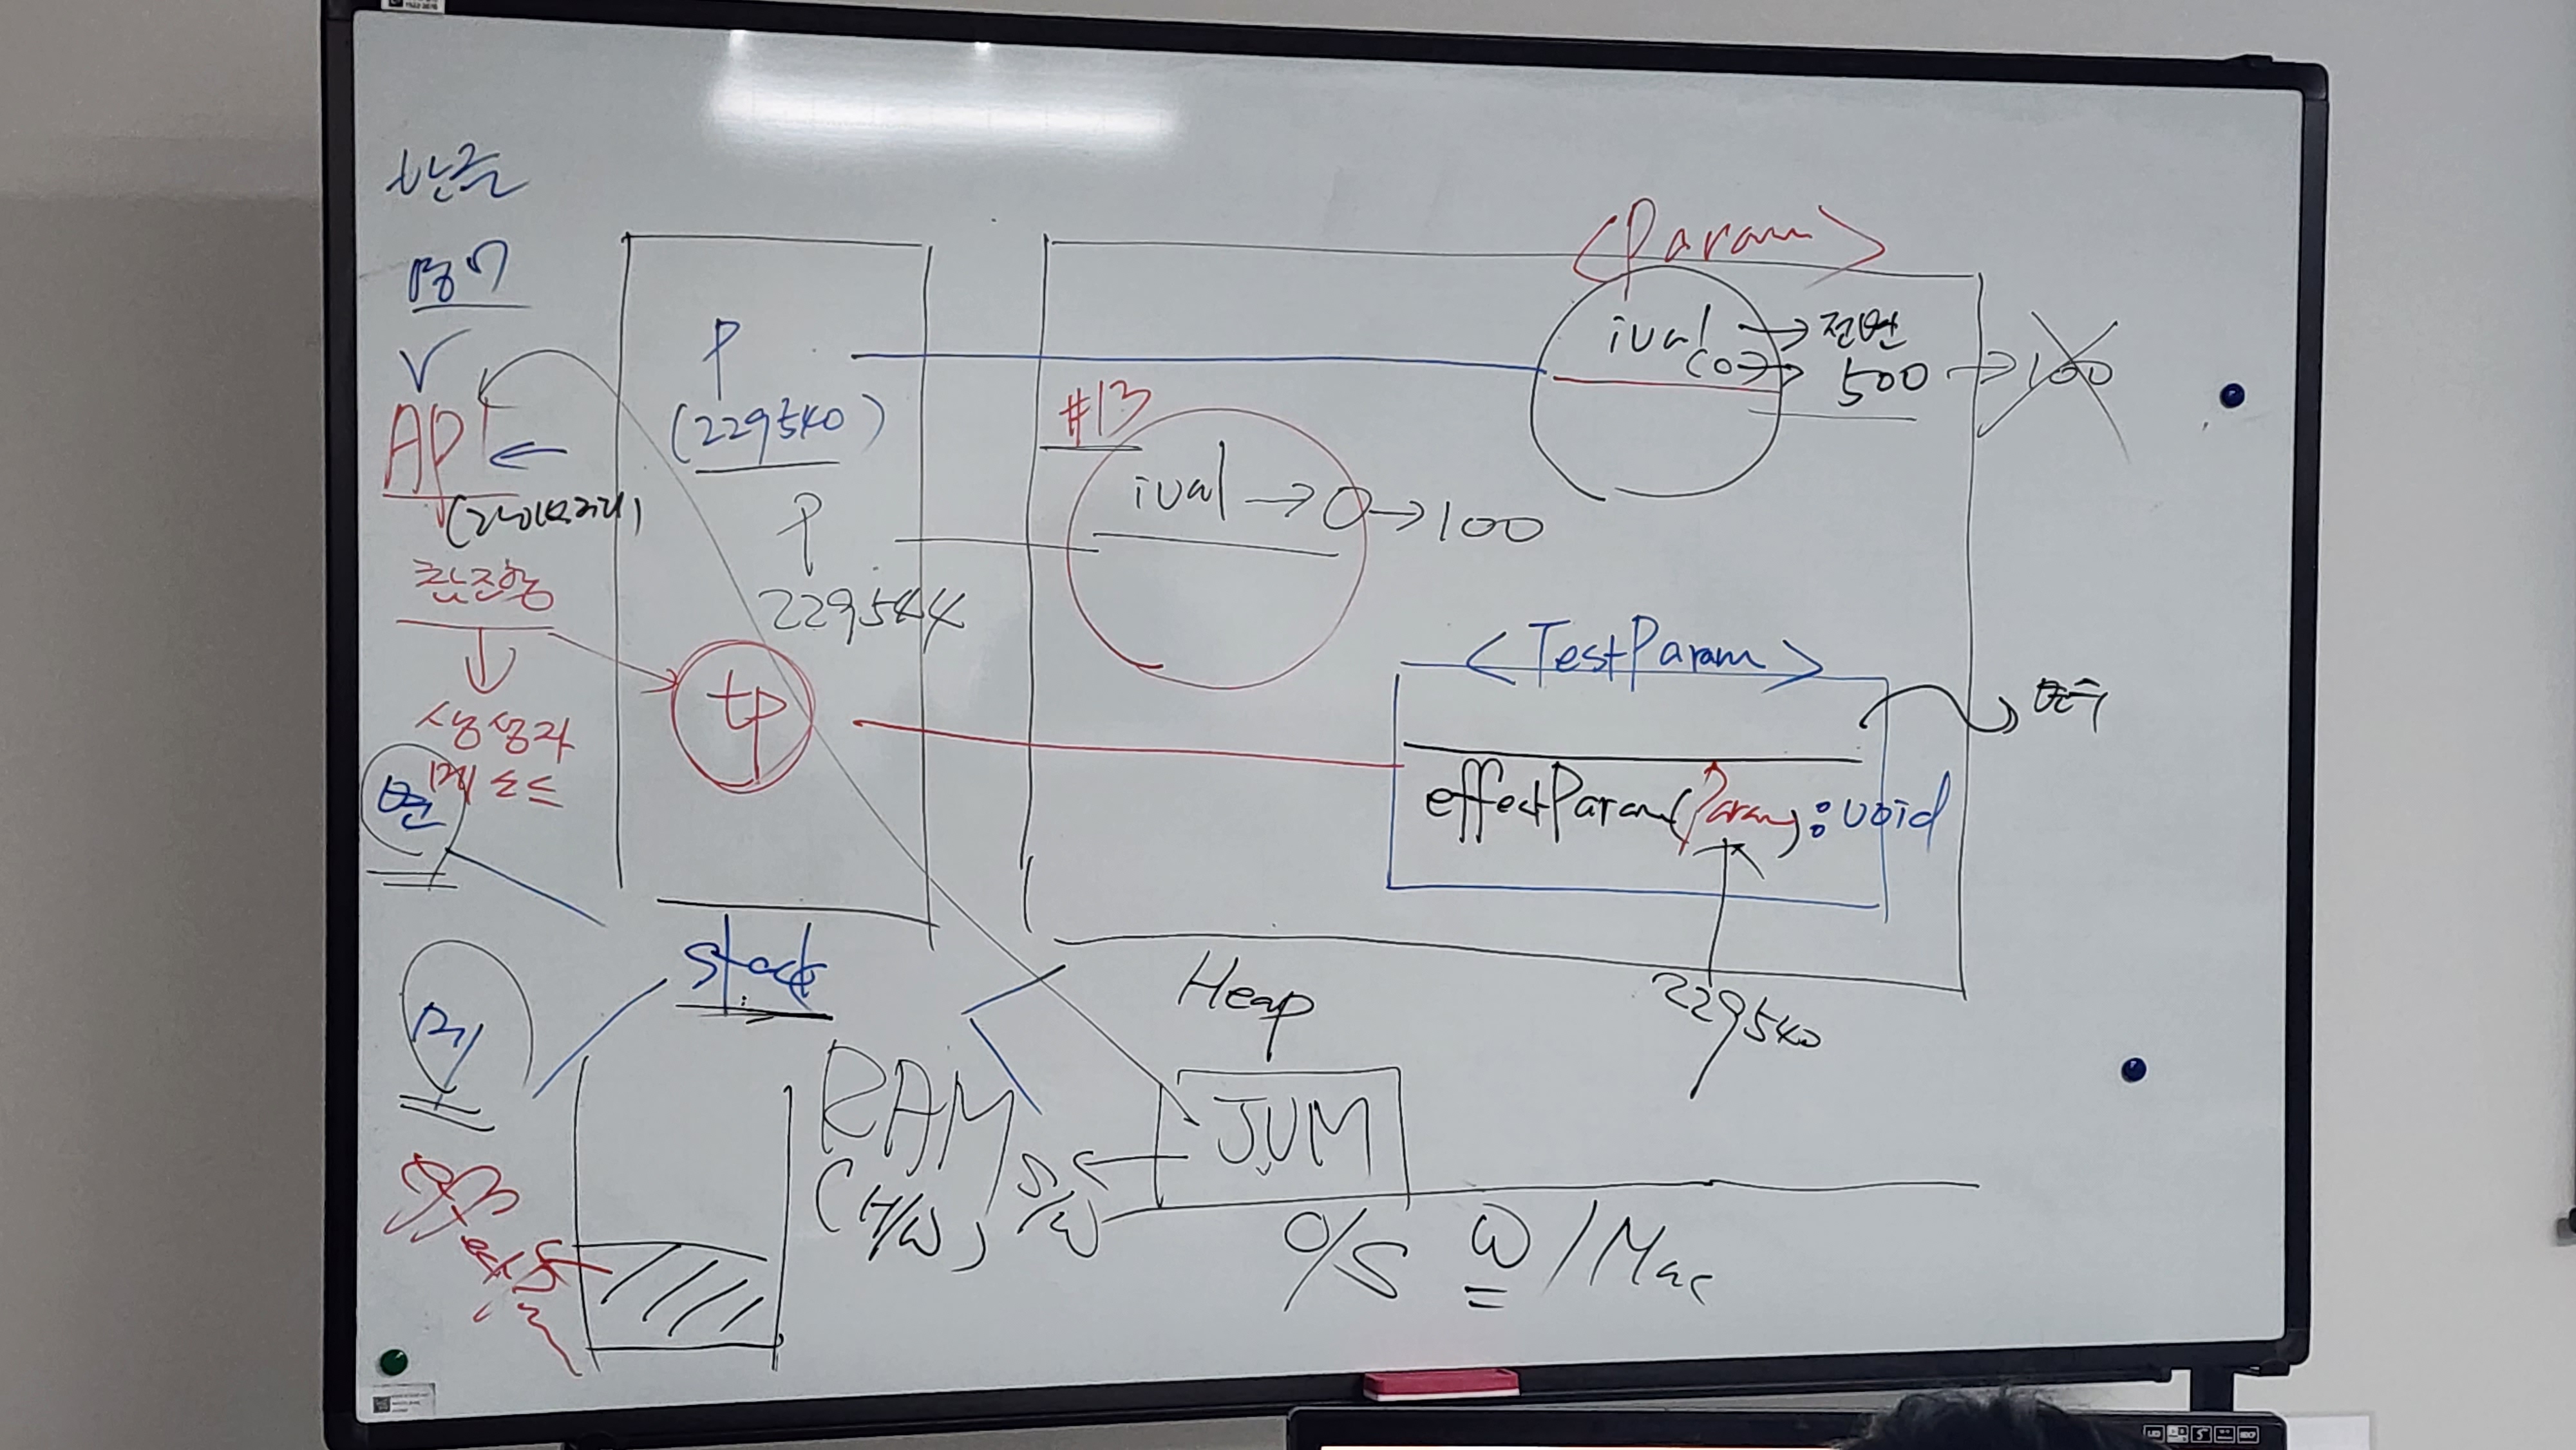
<예제3>
package com.week3;

import javax.swing.JFrame;

public class JFrame1 {
	// 선언부
	int width;
	int height;
	JFrame jf = null;
	// 생성자
	JFrame1(){ // 디폴트 생성자라 함(파라미터 자리가 비어있는 것)
		System.out.println("디폴트 생성자 호출");
		jf = new JFrame();
		String title = "토마토님의 대화창";
		jf.setTitle("입력|수정|상세보기");
		jf.setTitle(title); // 토마토님의 대화창
		System.out.println(jf);
	}
	JFrame1(int width, int height){ // 생성자의 파라미터의 값들은 언제 결정될까? 언제 초기화된다? -> 호출할 때 : 인스턴스화(선언만 말고 생성도 포함) 한다
		System.out.println("파라미터가 있는 생성자 호출");
		System.out.println("지역변수 width: "+width+", 전역변수: "+this.width+",지역변수 height: "+height+",전역변수: "+this.height);
		this.width = width;
		this.height = height;
		System.out.println("지역변수 width: "+width+", 전역변수: "+this.width+",지역변수 height: "+height+",전역변수: "+this.height);
		System.out.println(jf);
		jf = new JFrame("제목을 출력해줌");
	}
	// 사용자 정의 메소드
	public void initDisplay() {
		this.width = 900;
		this.height = 700;
		jf.setSize(width,height);// 전역변수로 선언했으니까 다른 메소드에서도 접근이 가능한 거야
		jf.setVisible(true);
	}
	// 메인메소드
	public static void main(String[]args) {
		JFrame1 jf1 = new JFrame1(); // 파라미터 자리가 있냐 없냐에 따라 둘 중의 다른 클래스 호출
		jf1.initDisplay();
	}
}
계산기 만들기
<계산기 만들기>
package com.week3;

import java.awt.event.ActionEvent;
import java.awt.event.ActionListener;

import javax.swing.JButton;
import javax.swing.JFrame;
import javax.swing.JPanel;
import javax.swing.JTextField;

public class CalcView implements ActionListener{
	JFrame jf = new JFrame();
	JTextField jtf_display = new JTextField("0");
	JPanel jp = new JPanel();
	JButton jbtnOne = new JButton("1");
	JButton jbtnTwo = new JButton("2");
	JButton jbtnPlus = new JButton("+");
	JButton jbtnEqual = new JButton("=");
	JButton jbtnBack = new JButton("<=");
	public void initDisplay() {
		//이벤트 처리를 담당하는 핸들러 클래스의 인스턴스변수를 준다.
		jbtnOne.addActionListener(this);
		jbtnTwo.addActionListener(this);
		jbtnPlus.addActionListener(this);
		jbtnEqual.addActionListener(this);
		jbtnBack.addActionListener(this);
		jp.add(jbtnOne);
		jp.add(jbtnTwo);
		jp.add(jbtnPlus);
		jp.add(jbtnEqual);
		jp.add(jbtnBack);
		jf.add("North",jtf_display);
		jf.add("Center",jp);
		jf.setSize(400, 400);
		jf.setVisible(true);
	}
	public static void main(String[] args) {
		CalcView cv = new CalcView();
		cv.initDisplay();
	}
	@Override
	public void actionPerformed(ActionEvent e) {
		String command = e.getActionCommand();
		if("1".equals(command)) {//너 숫자 1 버튼 누른거야?
			jtf_display.setText(jtf_display.getText()+"1");
		}
		else if("2".equals(command)) {//너 숫자 2 버튼 누른거야?
			jtf_display.setText(jtf_display.getText()+"2");
		}
		else if("+".equals(command)) {//너 + 버튼 누른거야?
			System.out.println("더하기 버튼");
		}
		else if("=".equals(command)) {//너 = 버튼 누른거야?
			System.out.println("계산 결과는 얼마");
		}
		else if("<=".equals(command)) {//너 = 버튼 누른거야?
			System.out.println("한글자씩 지우기 구현");
		}
	}

}
API 관련 사이트 추천
- postman 설치
- 네이버 API
- 카카오 API
- Firebase
계산기 만들기
<계산기 클래스 1. CalcView2>
package com.week3;

import java.awt.event.ActionEvent;
import java.awt.event.ActionListener;

import javax.swing.JButton;
import javax.swing.JFrame;
import javax.swing.JPanel;
import javax.swing.JTextField;

// CalcView2 클래스 안에 두 클래스(CalcLogic/CalcEvent)가 주입되었다
public class CalcView2 {
	// 선언부
	// this - 현재 메모리에 로딩되어 있는 클래스 자신을 의미함
	CalcLogic cLogic = new CalcLogic(this); // this가 원본이다(출력해보면 주소 같은 것 확인할 수 있음) // 생성자의 파라미터자리를 통해서 넘긴다
	CalcEvent cEvent = new CalcEvent(this); //
	JFrame jf = new JFrame();
	JTextField jtf_display = new JTextField("0");
	JPanel jp = new JPanel();
	// 위치를 선택하는 기준이 있나요? -> 버튼의 주소번지를 actionPerformed 메소드 안에서 사용해야 하므로 전역변수로 한다
	JButton jbtnOne = new JButton("1");
	JButton jbtnTwo = new JButton("2");
	JButton jbtnPlus = new JButton("+");
	JButton jbtnEqual = new JButton("=");
	JButton jbtnBack = new JButton("<=");
	// 생성자
	CalcView2(){
	}
	// 화면처리부
	public void initDisplay() {
		jbtnOne.addActionListener(cEvent);
		jbtnTwo.addActionListener(cEvent);
		jbtnPlus.addActionListener(cEvent);
		jbtnEqual.addActionListener(cEvent);
		jbtnBack.addActionListener(cEvent);
		jp.add(jbtnOne);
		jp.add(jbtnTwo);
		jp.add(jbtnPlus);
		jp.add(jbtnEqual);
		jp.add(jbtnBack);
		jf.add("North",jtf_display);
		jf.add("Center",jp);
		jf.setSize(400,400);
		jf.setVisible(true); // true면 활성화, false면 비활성화 (공통점: 둘 다 메모리에 살아있다)
	}
	// 메인메소드
	public static void main(String[] args) {
		CalcView2 cv = new CalcView2();
		cv.initDisplay();
	}
}
<계산기 클래스 2. CalcLogic>
package com.week3;

public class CalcLogic {
	CalcView2 calcView2 = null; // 유지, 동기화 이런 키워드와 관계가 있음. 전역변수 사용하는 것 연습 많이 하기
	public CalcLogic(CalcView2 calcView2) {
		System.out.println(calcView2); // 객체 주입(원본이다-현재 메모리에 로딩 중인)
		this.calcView2 = calcView2;
	}

}
<계산기 클래스 3. CalcEvent>
package com.week3;

import java.awt.event.ActionEvent;
import java.awt.event.ActionListener;

public class CalcEvent implements ActionListener {
	CalcView2 calcView2 = null;
	public CalcEvent(CalcView2 calcView2) {
		System.out.println(calcView2); // 객체 주입(원본이다-현재 메모리에 로딩 중인)
		this.calcView2 = calcView2; // this 생략해도 되지만 직관적으로 짜는 게 좋은 거니까
	}

	@Override
	public void actionPerformed(ActionEvent e) {
		String command = e.getActionCommand();
		if("1".equals(command)) {//너 숫자 1 버튼 누른거야?
			calcView2.jtf_display.setText(calcView2.jtf_display.getText()+"1");
		}
		else if("2".equals(command)) {//너 숫자 2 버튼 누른거야?
			calcView2.jtf_display.setText(calcView2.jtf_display.getText()+"2");
		}
		else if("+".equals(command)) {//너 + 버튼 누른거야?
			System.out.println("더하기 버튼");
		}
		else if("=".equals(command)) {//너 = 버튼 누른거야?
			System.out.println("계산 결과는 얼마");
		}
		else if("<=".equals(command)) {//너 = 버튼 누른거야?
			System.out.println("한글자씩 지우기 구현");
		}

	}

}
<예제4-this 중점적으로>
package com.week3;
class A {
	JFrame2 jf = null;
	public A(JFrame2 jFrame2) {
		System.out.println("A(this)호출");
		this.jf = jFrame2;
		System.out.println(this.jf); // 원본이니까 this는 붙여야지
		System.out.println("jFrame2: "+jFrame2.i+",this.jf.i"+this.jf.i); // 1을 쥐고 있을까?
	}
}
class B {

}
public class JFrame2 {
	int i = 1;
	// 인스턴스화 한 이 위치는 전변 위치
	// A a = new A(this); // 생성자로 옮겼으니까 주소를 막았다
	JFrame2(){
		A a = new A(this);
	}
	// main스레드이다 - entry point
	public static void main(String[] args) {
		System.out.println("main호출");
		JFrame2 jf = new JFrame2();
		System.out.println(jf.i); // this를 쓰는 것과 jf 쓰는 것은 같다
		System.out.println(jf);
	}

}
Sting 1차 배열
<예제5-1>
package com.week3;

public class EmpVO {
	private int empno; // 사원번호
	private String ename; // 사원명
	private double salary; // 0.0
	EmpVO(){

	}
	EmpVO(int empno, String ename, double salary){
		this.empno = empno;
		this.ename = ename;
		this.salary = salary;
	}
}
<예제 5-2. getters/setters>
// 이것을 한 이유? 1차 배열 쓰기 위해

package com.week3;

public class EmpVO {
	private int empno; // 사원번호
	private String ename; // 사원명
	private double salary; // 0.0
	EmpVO(){

	}
	EmpVO(int empno, String ename, double salary){
		this.empno = empno;
		this.ename = ename;
		this.salary = salary;
	}
	public int getEmpno() {
		return empno;
	}
	public void setEmpno(int empno) {
		this.empno = empno;
	}
	public String getEname() {
		return ename;
	}
	public void setEname(String ename) {
		this.ename = ename;
	}
	public double getSalary() {
		return salary;
	}
	public void setSalary(double salary) {
		this.salary = salary;
	}
}
<예제 5-3. 객체배열>
package com.week3;

public class EmpVOTest {

	public static void main(String[] args) {
		EmpVO eVOs[] = new EmpVO[3];
		EmpVO eVO = new EmpVO(7466,"SMITH",3000);
		System.out.println(eVO);
		System.out.println(eVO.getEmpno()); // 7466
		eVOs[0] = eVO;
		eVO = new EmpVO(7599,"KING",4000);
		eVOs[1] = eVO;
		System.out.println(eVO.getEmpno()); // 7599
		eVO = new EmpVO(7398,"JAMES",5000);
		eVOs[2] = eVO;
		System.out.println(eVO);
		for(int i=0;i<eVOs.length;i++) {
			System.out.println(eVOs[i]);
		}
	}

}
<Time Server>
package com.week3;

import java.io.IOException;
import java.net.ServerSocket;
import java.net.Socket;
import java.util.Calendar;

public class TimeServer extends Thread {

	@Override
	public void run() {
		// TODO Auto-generated method stub
		super.run();
	}
	// 서버측에서 CalendarAPI를 이용해 현재 시간 정보를 반환하는 메소드 설계한다
	// 반환타입과 리턴타입을 결정해 본다 - 파라미터는 필요없다. -> r.nextInt(10) 이럴 때는 필요함
	// 리턴타입은 String으로 한다. 왜? JLabel 찍으려고
	public String getTime() {
		Calendar cal = Calendar.getInstance();
		int hour = cal.get(Calendar.HOUR_OF_DAY);
		int min = cal.get(Calendar.MINUTE);
		int sec = cal.get(Calendar.SECOND);
		return hour + ":" + min + ":" + sec;
	}
	public static void main(String[] args) {
		int port = 3000;
		ServerSocket server = null;
		Socket client = null;
		try {
			server = new ServerSocket(port);
		} catch (IOException e) {
			System.out.println("해당포트는 이미 사용중입니다.");
			try {
				server.close();
			} catch (Exception e2) {
				System.out.println("2222");
			}
		} // end of try
		// 여기까지 진행되었다면, 포드도 점유했고 서버소켓도 정상적으로 만들어짐
		System.out.println("TimeServer started successfully...");
		while(true) {
			try {
				client = server.accept();
				System.out.println("New client connected...");
			} catch(Exception e){
				System.out.println("1111");
			}
		}
	}
}
<Time Client>
package com.week3;

import java.net.Socket;

import javax.swing.JLabel;

public class TimeClient extends Thread {

	JLabel jlbTime = null;
	public TimeClient() {

	}
	public TimeClient(JLabel jlbTime) {
		this.jlbTime = jlbTime;
		TimeServer ts = new TimeServer();
		jlbTime.setText(ts.getTime());
	}
	// 콜백메소드 - actionPerformed - 개발자가 직접 호출하지 못한다
	@Override
	public void run() {
		System.out.println("run호출");
		Socket socket = null;
		try {
			socket = new Socket("172.16.2.117",3000);
		} catch (Exception e) {

		}
	}

	public static void main(String[] args) {
		TimeClient tc = new TimeClient();
		tc.start();
	}
}
<Time View>
package com.week3;

import java.awt.Font;

import javax.swing.JFrame;
import javax.swing.JLabel;

public class TimeView {
	// 선언부
	JFrame jf = new JFrame();
	Font font = new Font("돋움체",Font.BOLD,30);
	JLabel jlbTime = new JLabel("현재시간정보",JLabel.CENTER);
	TimeClient tc = new TimeClient(jlbTime);
	// 생성자
	TimeView(){
	}
	public void initDisplay() {
		jlbTime.setFont(font);
		jf.add("North",jlbTime);
		jf.setSize(700,400);
		jf.setVisible(true);
	}
	// 메인메소드
	public static void main(String[] args) {
		TimeView tv = new TimeView();
		tv.initDisplay();
	}
}<Util>
package com.week3;
public class Util {
Util util = null;
public Util getInstance() {
if(util == null){
util = new Util();
}
return util;
}
public static void main(String[] args) {
Util util = new Util(); // 지역변수 util
System.out.println(util);
System.out.println(util.getInstance());
}
}
<예외처리>
package com.week3;

public class Exception1 {

	public static void main(String[] args) {
		try {
			System.out.println(10/0);
		} catch(Exception e) {
			System.out.println("어떤 값을 0으로 나눈 값은 계산할 수 없습니다");
		}
		System.out.println("필수처리해야하는 코드가 있다.");
	}
}
두 번째 타임서버/타임클라이언트
package com.week3;

import java.io.IOException;
import java.io.ObjectOutputStream;
import java.net.ServerSocket;
import java.net.Socket;
import java.util.Calendar;

public class TimeServer extends Thread {
	// 아래 소켓은 서버소켓에 접속해온 클라이언트의 소켓 정보를 쥐고 있다
	Socket client = null;
	public TimeServer(Socket client) {
		this.client = client;
	}
	@Override
	public void run() {
		try {
			ObjectOutputStream oos = new ObjectOutputStream(client.getOutputStream());
		while(true) {
			// 서버소켓에 접속한 클라이언트 소켓을 가지고 OutputStream을 생성하면 writeObject메소드를 통해서
			// 오브젝트 단위로 메세지를 쓴다.
			oos.writeObject(getTime());
			try {
				sleep(1000);
		} catch(Exception e) {

		} finally {
			try {
				client.close();
			} catch(Exception e2) {
			}
			}
		}
		} catch(Exception e) {

		}
	}
	// 서버측에서 CalendarAPI를 이용해 현재 시간 정보를 반환하는 메소드 설계한다
	// 반환타입과 리턴타입을 결정해 본다 - 파라미터는 필요없다. -> r.nextInt(10) 이럴 때는 필요함
	// 리턴타입은 String으로 한다. 왜? JLabel 찍으려고
	public String getTime() {
		Calendar cal = Calendar.getInstance();
		int hour = cal.get(Calendar.HOUR_OF_DAY);
		int min = cal.get(Calendar.MINUTE);
		int sec = cal.get(Calendar.SECOND);
		return hour + ":" + min + ":" + sec;
	}
	public static void main(String[] args) {
		int port = 3000;
		ServerSocket server = null;
		Socket client = null;
		try {
			server = new ServerSocket(port);
		} catch (IOException e) {
			System.out.println("해당포트는 이미 사용중입니다.");
			try {
				server.close();
			} catch (Exception e2) {

			}
		} // end of try
		// 여기까지 진행되었다면, 포드도 점유했고 서버소켓도 정상적으로 만들어짐
		System.out.println("TimeServer started successfully...");
		while(true) {
			try {
				client = server.accept();
				if(client!=null) {
					System.out.println(client);
				}
				System.out.println("New client connected...");
				TimeServer ts = new TimeServer(client);
			} catch(Exception e){

			}
		}
	}
}
package com.week3;

import java.io.ObjectInputStream;
import java.io.ObjectOutputStream;
import java.net.Socket;

import javax.swing.JLabel;

public class TimeClient extends Thread {

	JLabel jlbTime = null;
	public TimeClient() {

	}
	public TimeClient(JLabel jlbTime) { // 여기 메소드도 학습목표
		this.jlbTime = jlbTime;
	}
	// 콜백메소드 - actionPerformed - 개발자가 직접 호출하지 못한다
	@Override
	public void run() {
		System.out.println("run호출");
		Socket socket = null;
		ObjectOutputStream oos = null;
		ObjectInputStream ois = null;
		String timeStr = null;
		try {
			socket = new Socket("localhost",5000); //172.16.2.41
			oos = new ObjectOutputStream(socket.getOutputStream());
			ois = new ObjectInputStream(socket.getInputStream());
			while(true) {
				timeStr = ois.readObject().toString();
				System.out.println(timeStr);
				// 아래 코드는 TimeView에서 생성한 JLabel콤포넌트에 직접 출력하는 문장
				jlbTime.setText(timeStr); // 이 부분이 학습목표. 이렇게 쓸 수 있어야 한다.
				try {
					Thread.sleep(1000);
				} catch(InterruptedException e) {
					System.out.println(e.toString());
				}
			} //////////// end of while ///////////////
		} catch (Exception e) {
			System.out.println(e.toString());
		} finally {
			try {
				ois.close();
				oos.close();
				socket.close();
			} catch(Exception e2) {

			}
		}
	} ///////// end of run ///////////////

	public static void main(String[] args) {
		TimeClient tc = new TimeClient();
		tc.start();
	}
}