브라우저 없이 JS 코드 실행하기
node -v : 노드 버전 확인
npm -v
: 외부에서 제공되는 여러 라이브러리들을 누릴 수 있다
- npm (Node Package Manager): JavaScript 프로그래밍 언어를 위한 패키지 관리자 및 온라인 저장소. 주로 Node.js 환경에서 사용되며, JavaScript 라이브러리와 프레임워크, 모듈, 패키지 등을 관리하고 공유하는데 사용
파셀(Parcel) 번들러 설치 -> 설치방법 보기
https://ko.parceljs.org/getting_started.html
- 파셀: 주로 웹 개발에서 사용되는 도구 중 하나로, 여러 개의 리소스 파일(예: JavaScript, CSS, 이미지)을 하나의 번들(bundle)로 결합하는 도구
해커뉴스 api -> 포스트맨에서 사용
https://github.com/tastejs/hacker-news-pwas/blob/master/docs/api.md
- Postman은 API 개발 및 테스트를 위한 툴. API 요청을 생성하고 관리하며, API 응답을 테스트하고 문서화하는 데 사용
- ECMAScript 2015 (ES6): 읽어보기
https://developer.mozilla.org/en-US/docs/Web/JavaScript/Reference/Template_literals
- ECMAScript: JavaScript의 표준화된 버전을 정의하는 일련의 규격과 규칙을 나타내는 표준 스크립트 언어. JavaScript의 핵심 구문, 데이터 유형, 함수, 객체 및 다른 기능을 정의
js 셋팅방법(로컬 셋팅을 별도로 처리하는 방법)
: .vscode 폴더 생성 - settings.json 파일 생성 - 설정 코드 작성
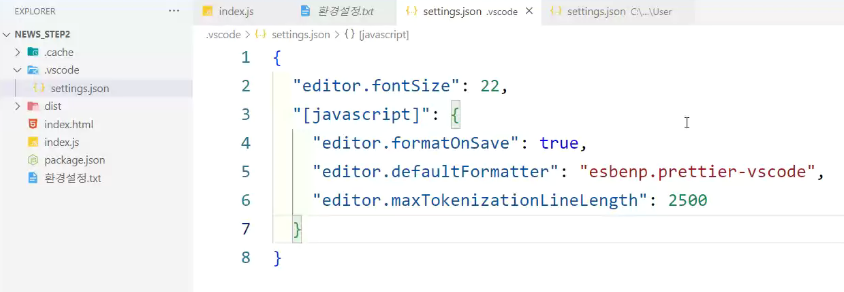
{
  "editor.fontsize": 20,
  "[javascript]":{
    "editor.formatOnSave": true,
    "editor.defaultFormatter": "esbenp.prettier-vscode",
    "editor.maxTokenizationLineLength": 2500
  }
}
index.html
<!DOCTYPE html>
<html lang="ko">
<head>
  <meta charset="UTF-8">

  <!-- 모바일 뷰포트 설정 지정 -->
  <meta name="viewport" content="width=device-width, initial-scale=1.0">

  <title>실습 - 뉴스API</title>

  <!-- 외부 JavaScript 파일을 로드 -->
  <script src="./index.js" defer></script>
</head>
<body>
  <!-- id를 쓸 때는 #-->
  <!-- innerHTML-->
  <div id="root"></div>
</body>
</html><script src="./index.js" defer></script>
- defer: 페이지 파싱이 끝난 후 스크립트를 실행
- ./index.js: 상대경로.
(재사용성을 위해 절대경로보다 상대경로 쓴다)- 애플리케이션을 만들어보는 과정에서 프로그래밍이라는 것이 무엇인지 알아보자
- 애플리케이션이 뭘까?
: 입력된 데이터를 가지고 처리과정을 거치고 출력의 형태로 변환하는 과정 → 이것이 본질 - 입력데이터, 오라클서버가 필요(자바는 일단 배제)
step1-index.js
console.log('hello parcel'); // 번들러(누가? 파셀이)

// XMLHttpRequest 객체를 생성하여 서버와 통신을 담당할 변수 'ajax'를 선언
const ajax = new XMLHttpRequest();

// API 엔드포인트(?) URL을 NEWS_URL 상수에 저장
const NEWS_URL = 'https://api.hnpwa.com/v0/news/1.json';

// HTTP GET 요청 설정 + 서버로 요청을 보냄
ajax.open('GET', NEWS_URL, true);
ajax.send();

// 서버로부터 받은 JSON 응답을 객체로 파싱하여 'newsList' 변수에 저장
const newsList = JSON.parse(ajax.response);

// 서버측에서 보낸 응답을 출력해 보기
// Array로 변환하여 출력해줌
console.log(newsList);

// ul: 순서나 계층을 나타내지 않는 목록
const ul = document.createElement('ul'); // DOM API를 가지고 태그를 만드니까 직관적이지 않다. DOM Tree 그려지지 않아서

// 'newsList' 배열의 각 요소에 대한 반복문 시작
for(let i=0;i<newsList.length;i++){
  const li = document.createElement('li');
  li.innerHTML = newsList[i].title;
  ul.appendChild(li);
} // end of for

document.getElementById('root').appendChild(ul);
const ajax = new XMLHttpRequest();-
const(constant): 상수. 한 번 값을 할당하면 이후 변경할 수 없으므로, 변수에 대한 불변성을 강제하는 역할
-
XMLHttpRequest: 비동기적으로 서버와 통신할 수 있는 기능을 제공하는 JavaScript 객체(브라우저가 비동기처리를 위해 제공하는 내장객체). 이 객체를 사용하면 웹 페이지에서 서버로 데이터를 보낼 수 있고, 서버로부터 데이터를 받아와 웹 페이지를 업데이트 할 수 있음
-
비동기 통신: XMLHttpRequest는 비동기적으로 데이터를 서버로 보내거나 서버로부터 데이터를 받아올 수 있음(웹 페이지가 브라우저를 차단하지 않고 계속 실행될 수 있게 함)
ajax.open('GET', NEWS_URL, true);- XMLHttpRequest 객체의 open 메서드를 사용하여 HTTP GET 요청을 설정
- 첫 번째 인수: HTTP 요청 메서드로 'GET'를 사용
- 두 번째 인수: 요청을 보낼 URL(NEWS_URL)을 전달
- 세 번째 인수: true는 비동기 방식으로 요청을 보내라는 것을 나타냄. JavaScript가 요청을 보낸 후 응답을 기다리지 않고 다른 작업을 수행할 수 있도록 함
ajax.send();- XMLHttpRequest 객체의 send 메서드를 호출하여 서버로 실제 HTTP GET 요청을 보냄
- 이때 서버로의 요청이 발생하며, 서버는 데이터를 처리하고 응답을 반환. 이 코드로 비로소 서버 측에 요청이 보내짐
const newsList = JSON.parse(ajax.response); - newsList 상수 선언: 서버로부터 가져온 데이터를 저장할 용도
- JSON.parse(): 서버로부터 받은 JSON 형식의 문자열을 JavaScript 객체로 변환
- ajax.response: XMLHttpRequest 객체의 response 속성은 서버로부터 받은 응답 데이터를 문자열로 포함. 이 속성을 통해 서버가 전송한 데이터에 접근할 수 있음
처리과정
1. ajax.response에 저장된 JSON 형식의 응답 데이터를 가져온다
-
JSON.parse() 함수를 사용하여 이 데이터를 해석하고, JavaScript 객체로 변환
-
이 객체를 newsList 변수에 할당. 이제 newsList에는 서버에서 가져온 데이터가 JavaScript 객체로 저장되어 있음. 이 객체를 이후에 사용하여 데이터를 화면에 표시하거나 다른 작업을 수행할 수 있음
for(let i=0;i<newsList.length;i++){
  // 빈 목록 항목 생성
  const li = document.createElement('li');
  li.innerHTML = newsList[i].title;
  // 생성한 li 요소를 <ul> 요소에 추가
  ul.appendChild(li);
}- newsList 배열: 서버에서 가져온 뉴스 항목의 목록을 포함
- .innerHTML: HTML 요소의 내부 HTML 콘텐츠를 설정하거나 가져오는 속성. 이를 통해 HTML 요소의 내용을 조작할 수 있음
- newsList[i].title: newsList에서 i번째 요소의 title 속성 값을 가져옴. title 속성은 서버에서 가져온 뉴스 항목의 제목을 포함
li.innerHTML = newsList[i].title;- 처리과정
- newsList 배열에서 i번째 요소의 title 속성 값을 가져옴(뉴스 항목의 제목)
- 해당 제목을 가져와서, 이전에 생성한 li 요소의 내부 HTML로 설정
-> 각 리스트 항목(<'li'>)의 내부 HTML 콘텐츠는 해당 뉴스 항목의 제목으로 설정
ul.appendChild(li);- 'li'(리스트 아이템) 요소를 HTML 문서의 'ul'(순서 없는 목록) 요소 내에 추가
- appendChild(li): 이 부분은 DOM에서 요소를 추가하는 메서드로, ul 요소의 자식으로서 새로운 요소인 li를 추가
- appendChild: JavaScript를 사용하여 HTML 요소를 다른 HTML 요소에 부모-자식 관계로 추가하는 메서드
document.getElementById('root').appendChild(ul);- HTML 문서에서 id 속성이 "root"로 설정된 요소를 찾고, 이 요소에 새로운 HTML 요소를 추가
- 처리과정
- document.getElementById('root')를 통해 id가 "root"인 HTML 요소를 찾음
- 찾아진 요소(여기서는 "root")에 새로 생성한 'ul' 요소를 추가
Step2-index.js
- 뉴스 코멘트 생성
- root 아이디를 따로 container에 담아줌
- EventListener 함수 생성 -> 해시값이 변경되면 id값 변경/title을 content에 담아줌
- ul과 content를 container에 담아줌(두 개 화면?)
const ajax = new XMLHttpRequest();

const TITLE_URL = "https://api.hnpwa.com/v0/news/1.json";

const container = document.getElementById("root");

// 뉴스 comment를 담을 태그 생성
const content = document.createElement("div");
const CONTENT_URL = "https://api.hnpwa.com/v0/item/@id.json";

ajax.open("GET", TITLE_URL, true);
ajax.send();
// response 속성값도 XMLHttpRequest객체가 제공
const newsList = JSON.parse(ajax.response);

const ul = document.createElement("ul");

window.addEventListener("hashchange", () => {
  console.log("해시변경되었나?");

  const id = location.hash.substring(1);
  console.log(id);

  // 뒤에 아이디 자리에 #이 들어오면 안된다
  ajax.open("GET", CONTENT_URL.replace("@id", id), false);
  ajax.send();
  const ncontent = JSON.parse(ajax.response);

  const title = document.createElement("h1");
  title.innerHTML = ncontent.title;

    // 파라미터 자리에 변수가 왔다 - 싱글 쿼테이션은 없다
  // 파라미터에 변수를 사용하면 대응하는 객체는 따로 존재함
  // 기존에 태그 하위태그로 추가하는 함수이다
  content.appendChild(title);
  // 서버로부터 받은 데이터 객체를 로그에 출력
  console.log(ncontent);
});

// 뉴스 목록에서 상위 5개 항목을 가져와 화면에 출력
for (let i = 0; i < 5; i++) {
  const li = document.createElement("li");
  const a = document.createElement("a");
  a.href = `#${newsList[i].id}`;

  // innerHTML을 통해서 a태그 내부에 텍스트노드를 결정
  a.innerHTML = `${newsList[i].title}(🚨${newsList[i].comments_count})`;
  li.appendChild(a); //<li><a>
  ul.appendChild(li); // <ul><li>
} //end of for

// 두 개 화면으로 나눠보기
// <div id='root'>에 <ul>을 붙여달라는 것
container.appendChild(ul);
// appendChild는 기존에 있는 노드에 추가하기
container.appendChild(content);
// 객체를 생성했으니
const ajax = new XMLHttpRequest();
.
.
.
// 함수를 호출할 수 있다
ajax.open("GET", TITLE_URL, true);
- 전송방식 - 클라이언트가 서버 요청할 때(get방식)
- 동기: false / 비동기: true
동기적으로 처리할 거라면 굳이 XMLHttpRequest를 사용할 필요가 없다(ajax를 쓸 필요가 없다)
// 뉴스 목록을 가져오는 것
const TITLE_URL = "https://api.hnpwa.com/v0/news/1.json";

// 뉴스에 대한 댓글 정보를 가져오는 것
const CONTENT_URL = "https://api.hnpwa.com/v0/item/@id.json";- URL 주소는 2가지가 있다 → url이 별개(아이디를 통해 달라졌다)
const container = document.getElementById("root");- HTML 문서 내에서 id 속성 값이 "root"인 요소를 찾아서 선택
const content = document.createElement("div");- 새로운 HTML 요소를 생성. 여기서는 새로운 요소를 생성하도록 지정
- 이 코드는 HTML 문서에 아직 추가되지 않았으며, 생성된 요소를 이후에 필요한 위치에 추가할 수 있음
window.addEventListener("hashchange", () => {});- 해시값이 변경될 때 인터셉트해서 감지가 되면 Array 객체 안에 들어있는 @id 값을 38074701(id)로 변경
- window 생략해도 됨(this 객체를 가리키니까)
- 변수를 쓰게 되면 event가 올 수 있음. 사용하지 않았기 때문에 회색글씨
console.log(location.hash); - //#38019991-> ??? 여기 설명 못 알아 듣겠음. 포스트맨에 send 할 때 앞에 #38019991 앞에 샾 붙이면 처리가 안 된다는 말인 것 같음
const id = location.hash.substring(1);- 이 코드는 location.hash에서 해시 부분을 가져오고, .substring(1)을 사용하여 첫 번째 문자인 # 기호를 제거한 후 id 변수에 저장
- location.hash: 현재 URL의 해시 부분
- 해시: 웹 개발에서 URL(Uniform Resource Locator)에 포함된 일부 문자열. 일반적으로 URL 내의 # 기호 뒤에 오는 문자열
(ex. https://www.example.com/page#section 에서 section이 해시)
ajax.open("GET", CONTENT_URL.replace("@id", id), false);- CONTENT_URL 상수 내의 "@id" 부분을 실제 id 값으로 치환하여 요청 URL을 생성
title.innerHTML = ncontent.title;- ncontent.title에 있는 내용을 'h1' 요소의 내부 HTML로 설정 -> 'h1' 요소에 서버로부터 가져온 제목이 표시
content.appendChild(title);
  //<h1>제목</h1> <div>내용</div>
  // <div><h1> 제목{텍스트노드: 태그이름은 없고 값은 있다.}</h1> <div>내용</div>
-> 어떤 게 맞는지?- 'h1' 요소를 content 요소의 자식으로 추가
-> 서버에서 가져온 제목이 웹 페이지에 표시
a.href = `#${newsList[i].id}`;
// <a href=' '> 이렇게 값을 지정해줄 수 있다
// 여기 들어갈 정보가 현재 없기 때문에</a>-
a 링크의 href 속성을 설정하여 링크가 클릭될 때 브라우저의 해시(앵커)를 변경
-
newsList[i].id: 현재 반복 인덱스 i에 해당하는 뉴스 항목의 id 값을 가져와서 해당 id 값을 해시로 설정
-
a 링크의 href 속성: 해당 링크가 가리키는 URL 또는 웹 페이지의 위치를 정의
step4-index.js
- 서버 요청/응답을 getData 함수로 처리
- EventListener 안의 서버 요청/응답 과정 삭제
const ajax = new XMLHttpRequest();

const TITLE_URL = "https://api.hnpwa.com/v0/news/1.json";
const container = document.getElementById("root");
const content = document.createElement("div");
const CONTENT_URL = "https://api.hnpwa.com/v0/item/@id.json";

// @param: url - TITLE_URL or CONTENT_URL
// @return : Array(JSON->application/json - 파이썬으로 하든 c#을 하든)
getData = (url) => {
  ajax.open("GET", url, true);
  ajax.send();
  return JSON.parse(ajax.response);
};

const newsList = getData(TITLE_URL);
console.log(newsList);
const ul = document.createElement("ul");

window.addEventListener("hashchange", () => {
  console.log("해시변경되었나???");

  const id = location.hash.substring(1);
  console.log(id);

  // url에 있으면 되니까 필요가 없음
  // ajax.open("GET", CONTENT_URL.replace("@id", id), false); // 뒤에 아이디 자리에 #이 들어오면 안된다
  // ajax.send();

  const ncontent = getData(CONTENT_URL.replace("@id", id));

  const title = document.createElement("h1");
  title.innerHTML = ncontent.title;
  content.appendChild(title);
  console.log(ncontent);
});

for (let i = 0; i < 5; i++) {
  const li = document.createElement("li");
  const a = document.createElement("a");
  a.href = `#${newsList[i].id}`;
  //console.log(newsList[i].title);
  a.innerHTML = `${newsList[i].title}(🚨${newsList[i].comments_count})`;
  li.appendChild(a);
  ul.appendChild(li);
}

container.appendChild(ul);
container.appendChild(content);
getData = (url) => {}; - getData 함수는 url 매개변수를 받음. 이 url은 데이터를 가져올 API 엔드포인트의 URL을 나타냅
- getData 함수가 호출되는 시점: 함수에 전달된 url이 입력될 때
getData함수를 Arrow funcion으로 처리
- ES6(ECMAScript 2015)에서 도입된 JavaScript의 함수 선언 방식 중 하나
- 기존의 함수 선언 방식과 비교하면 간결하고 명확한 구문을 제공
ex)
// 기존 함수 선언
function add(a, b) {
  return a + b;
}
// Arrow function
const add = (a, b) => a + b;
step3-index.js
- for문 수정: 상위 5개 뉴스 다른 방식으로 구현
const ajax = new XMLHttpRequest();

const TITLE_URL = "https://api.hnpwa.com/v0/news/1.json";
const container = document.getElementById("root");
const content = document.createElement("div");
const CONTENT_URL = "https://api.hnpwa.com/v0/item/@id.json";

getData = (url) => {
  ajax.open("GET", url, true);
  ajax.send();
  return JSON.parse(ajax.response);
};

const newsList = getData(TITLE_URL);
console.log(newsList);
const ul = document.createElement("ul");

window.addEventListener("hashchange", () => {
  const id = location.hash.substring(1);
  const ncontent = getData(CONTENT_URL.replace("@id", id));

  const title = document.createElement("h1");
  title.innerHTML = ncontent.title;
  content.appendChild(title);
});

for (let i = 0; i < 5; i++) {

  const div = document.createElement("div");

  div.innerHTML = `
    <li>
      <a href = "#${newsList[i].id}">
        ${newsList[i].title}(👌${newsList[i].comments_count})
      </a>
    </li>
  `;

  ul.appendChild(div.firstElementChild);
}

container.appendChild(ul);
container.appendChild(content);ul.appendChild(div.firstElementChild);- div 요소의 첫 번째 자식 요소인 'li' 요소를 ul에 추가
- 이렇게 생성된 리스트 항목은 hashchange 이벤트 핸들러에서 클릭할 수 있는 링크로 사용
step2-test.html
<!DOCTYPE html>
<html lang="ko">
<head>
  <meta charset="UTF-8">
  <meta name="viewport" content="width=device-width, initial-scale=1.0">
  <title>Document</title>
</head>
<body>
  <ul>
    <li><a href="http://www.naver.com">네이버</a></li>
    <li><a href="http://www.google.com">구글</a></li>
  </ul>
  <script>
    // 호출하지 않아도 자동실행됨. 왜냐하면 함수를 선언하지 않았잖아
    location.href = "http://www.naver.com";
  </script>
</body>
</html>
step4
ajax.open("GET", TITLE_URL, true);
ajax.send();
// 함수의 이름을 정해줍시다
function getData(url){ // 왜 타입이 없을까? // js는, html은 컴파일(문법체크-타입체크)을 안하잖아
// 그럼 자바스크립트는 타입을 언제 결정하나요? -> 런타임시에 결정됨 - >true를 주면 boolean, 1을 주면 정수, 0.5를 주면 실수
// 실행은 누가 해준다? 브라우저
// 자바스트립트에서는 함수도 객체다 - 고차함수, 일급객체,
ajax.open("GET", CONTENT_URL.replace("@id", id), true);
ajax.send(); // 서버 측에 요청을 보내고 응답을 기다리는 중...
return JSON.parse 함수 이용해서 return JSON.parse(ajax.response);
}
-> 이걸 arrow function으로 바꾸자.
arrow function에서는 function 생략하자.
getData라는 함수명을 바로 쓰자. 파라미터 쓸 때 = () 붙이자.
함수명 = (파라미터 자리) => { // 파라미터는 생략 가능하다
실행문(변수선언, 재정의, 제어문)
}
함수 이름을 변수처럼 사용이 가능하다
getData = (url)
타입이 있지만 런타임시 결정. 또 컴파일이 없으니까(문법체크 안 하니까) 독이 될 수도 있다
// 데이터를 해커뉴스 서버에서 응답으로 받아와야 해
CONTENT_URL.replace("@id", id) 이게 중요하니 선언을 먼저
- 다음은 위치를 결정(기준이 있다)하기 - 초보가 아니다
(<->구조지향적이다 - 자바는 메소드 순서가 뒤죽박죽이어도 잘 호출이 된다)
: 절차지향적이다 -> 순서도대로 최대한 처리해 볼 수 있는 언어
선언이 사용보다 먼저다
파라미터를 결정한다 - 사용자가 입력한 값을 담는다
응답을 담는다 - 리턴타입
실행되는 순서대로 코드를 나열하기
ajax.open("GET", CONTENT_URL.replace("@id", id), false);
ajax.send();
개선코드 1단계 - 반복되는 코드를 줄여봐요...
어떻게 줄일 수 있죠? - 함수를 선언하자
선언방법:
function 함수명(){}
이 함수를 서버에 요청을 할 때 쓰는 것
ex. 해커뉴스 서버에 뉴스정보를 요청할 때 사용함
요청을 한다는 건? 응답을 기다리는 것. 처리 결과를 받아와서 응답(Array (뉴스)30개)
리턴값을 받을 수 있는 코드가 추가되어야 한다.
function 함수명(){ return }
해커뉴스가 응답으로 JSON 포맷으로 데이터셋을 준다
- 받았는지 콘솔을 통해 찍어서 확인해봤었음
JSON포맷을 주면 Array로 변경해 주자. 이때 관여하는 게 JSON.parse() // 요청에 대한 응답을 받아오는 코드
응답을 나타내는 속성이 response -> JSON.parse(response)
이때 앞에 소유주 나타내야하는데 그 소유주가 누구? ajax
-> JSON.parse(ajax.response)
const ajax = new XMLHttpRequest(); // ajax.open(), ajax.send()
자바에서 인스턴스변수 앞에서 적었던 것 처럼 ajax라는 변수 이름을 붙여준다
브라우저는 마임타입으로 알아본다
JSON(mime type: application/json, image/png, image/jpg, text/js, text/css...)
step4-index.html
<!DOCTYPE html>
<html lang="ko">
<head>
  <meta charset="UTF-8">
  <meta name="viewport" content="width=device-width, initial-scale=1.0">
  <title>실습 - 뉴스API</title>
  <script src="./index.js" defer></script>
</head>
<body>
  <div id="root"></div>
</body>
</html>
step4-index.js
const ajax = new XMLHttpRequest();
const TITLE_URL = "https://api.hnpwa.com/v0/news/1.json";
const container = document.getElementById("root");
const content = document.createElement("div");
const CONTENT_URL = "https://api.hnpwa.com/v0/item/@id.json";

// @param: url - TITLE_URL or CONTENT_URL
// @return : Array(JSON->application/json - 파이썬으로 하든 c#을 하든)
getData = (url) => {
  ajax.open("GET", url, false);
  ajax.send();
  return JSON.parse(ajax.response); // JSON -> Array
};

const newsList = getData(TITLE_URL);
console.log(newsList);
const ul = document.createElement("ul");

window.addEventListener("hashchange", (event) => {
  const id = location.hash.substring(1);

  // 얘네 필요없다. url에 있으면 되니까
  // ajax.open("GET", CONTENT_URL.replace("@id", id), false); // 뒤에 아이디 자리에 #이 들어오면 안된다
  // ajax.send();

  const ncontent = getData(CONTENT_URL.replace("@id", id));

  const title = document.createElement("h1");
  title.innerHTML = ncontent.title;
  content.appendChild(title);
  console.log(ncontent);
});

for (let i = 0; i < 5; i++) {
  const li = document.createElement("li");
  const a = document.createElement("a");
  a.href = `#${newsList[i].id}`;

  a.innerHTML = `${newsList[i].title}(🚨${newsList[i].comments_count})`;
  li.appendChild(a);
  ul.appendChild(li);
}

container.appendChild(ul);
container.appendChild(content);
배치
s1.html
<!DOCTYPE html>
<html lang="ko">
<head>
  <meta charset="UTF-8">
  <meta name="viewport" content="width=device-width, initial-scale=1.0">
  <title>Document</title>
  <link rel="stylesheet" href="s1.css">
</head>
<body>
    <!-- .wrap > .box1 + .box2 -->
    <!-- div 블록요소이다. 위 아래로 출력 -->
    <div class="wrap">
      <div class="box1"></div>
      <div class="box2"></div>
    </div>
</body>
</html>
s1.css
.wrap{
    width: 300px;
    height: 600px;
    border: 10px solid black;
    margin: 10px auto;
}
.wrap .box1 {
    width: 300px;
    height: 300px;
    background-color: skyblue;
}
.box2 {
    width: 300px;
    height: 300px;
    background-color: pink;
}
Q. 배치할 때 현재 레이아웃에 영향을 주지 않으면서 box1만 위로 50px 올라가기를 원한다면?
<정답>
.wrap .box1 {
    width: 300px;
    height: 300px;
    background-color: skyblue;
    position: relative; // 추가
    top: -50px; // 추가
}- 하나만 이동하려면 relative값을 지정
(원래 있던 자리에서 위로, 오른쪽, 왼쪽, 아래로 이동
top, left, right, bottom)
<오답>
margin-top: -50px; // 추가box1과 box2가 함께 이동한다
- 결론
-relative: 현재 레이아웃에 영향을 주지 않으면서
자기(box1만) 자신만 움직이게 한다
-absolute: 현재 레이아웃에 영향을 준다
r1.html
<!DOCTYPE html>
<html lang="ko">
<head>
  <meta charset="UTF-8">
  <meta name="viewport" content="width=device-width, initial-scale=1.0">
  <title>Position- Relative</title>
  <link rel="stylesheet" href="r1.css">
</head>
<body>
  <article class="container">
    <div></div>
    <div class="box">Box</div>
    <div></div>
    <div></div>
    <div></div>
    <div></div>
    <div></div>
    <div></div>
    <div></div>
    <div></div>
  </article>
</body>
</html>
r1.css
* {
  border: 1px solid red;
}

.container {
  background-color: black;
  position: relative;
}

div {
  width: 100px;
  height: 100px;
  background-color: skyblue;
  margin-bottom: 10px;
}

.box {
  background-color: orangered;
  position: absolute;
  left: 20px; /* x축으로 이동 */
  top: 20px; /* y축으로 이동 */
}position: relative;- 요소 자기 자신의 원래 위치(static일 때의 위치)를 기준으로 배치
- 원래 위치를 기준으로 위쪽(top), 아래쪽(bottom), 왼쪽(left), 오른쪽(right)에서 얼마만큼 떨어질 지 결정
- 위치를 이동하면서 다른 요소에 영향을 주지 않음
.box {
  background-color: orangered;
  position: absolute;
  left: 20px; /* x축으로 이동 */
  top: 20px; /* y축으로 이동 */
}- 부모인 container에서 가로세로 20px 띄어진 위치에 출력(내가 담긴 상자 안에서 움직인 것)
- 모니터 왼쪽 상단: (0,0)
position: absolute;- 가장 가까운 위치에 있는 조상 요소를 기준으로 배치
- relative는 영역 안에서 움직이고, absolute는 자유롭게 움직임
컨텐츠가 좌우로 배치되는 경우도 많다. div는 무조건 위아래로 배치가 되므로
강제로 float를 사용하여 좌우배치가 되도록 할 수 있다.
float설정시 부모요소가 자식 요소 높이값 인식시키는 방법
1. 부모요소에 강제 높이값 지정
:반응형으로 할때는 깨진다
2. 부모 요소에 overflow: auto;
:특정 브라우저에서 가로 세로 스크롤이 생길 수 있다
3. 부모 요소에 overflow: hidden
4. 부모 요소에 float설정
:left를 주면 왼쪽으로 붙고 right를 주면 오른쪽으로 붙음
5. float된 요소의 아래쪽에 배치되는 요소에 clear:both;적용
:bottom 요소가 필요없으면 의미 없다
6. 가상 선택자 ::after 를 이용해서 clear: both;
:이것이 권장 사항이다
clear: both는 취소하다 라는 개념으로 float: left/right와 짝꿍 개념이다
float 속성을 적용하면 그 이후에 오는 다른 요소들까지 똑같은 속성이 전달되어
둘러싼 형태가 되거나 부유된 영역 아래(under)로 들어가게 됨
float속성이 더 이상 사용하지 않고 그 전으로 되돌리고 싶다면 사용하는 것이
clear:both 임
clear: both; 오른쪽/왼쪽을 취소, 가장 많이 사용
clear: left; 왼쪽을 취소
clear: right; 오른쪽을 취소
clear: none; 기초값을 clear값을 설정하지 않은 것과 같다
float: left를 해제하기 위해서 clear:left 라고 지정하면 되지만
float속성값을 일일이 기억하기 번거롭기 때문에 보통 clear:both라고 지정함
a1.html
<!DOCTYPE html>
<html lang="ko">
<head>
<meta charset="UTF-8">
<meta name="viewport" content="width=device-width, initial-scale=1.0">
<title>Document</title>
<link rel="stylesheet" href="a1.css">
</head>
<body>
<!--.wrap>.left+.right+.bottom-->
<div class="wrap">
  <div class="left"></div>
  <div class="right"></div>
  <div class="bottom"></div>
</div>
</body>
</html>
a1.css
.wrap {
  width: 800px;
  border: 10px solid black;
  margin: 100px auto;
}
.left {
  width: 400px;
  height: 400px;
  background-color: lightblue;
  float: left;
}
.right {
  width: 400px;
  height: 400px;
  background-color: lightpink;
  float: left;
}
.wrap .bottom {
  width: 800px;
  height: 100px;
  background-color: green;
  clear: both;
}

.wrap::after {
  content: "";
  display: block;
  clear: both;
}float: left;요소를 왼쪽으로 띄우는 속성
clear: both;- 아래쪽에 다른 부유 요소가 오지 못하도록 만드는 데 사용
- .wrap에 float을 주면 항상 하위태그가 밀리므로 하위태그에 clear:both를 주어서 밀림을 방어
.wrap::after { }-
.wrap 클래스의 가상 선택자: 특정 요소의 일부 또는 가상의 부분을 선택하는 데 사용
/* 가상선택자는 인라인요소이다
부모 요소에 무조건 가상선택자를 사용해서
부모요소가 자손요소를 감싸게 해줌
content: "";- 가상 요소의 내용을 비어 있는 문자열("")로 설정하였기 때문에 화면에 실제로 표시되는 내용은 없음(가상 요소를 생성하고 그것에 스타일을 적용하기 위한 일반적인 절차)
