📒 servlet/JSP/JDBC
📕 Java Servlet
1. Servlet
1) 개념
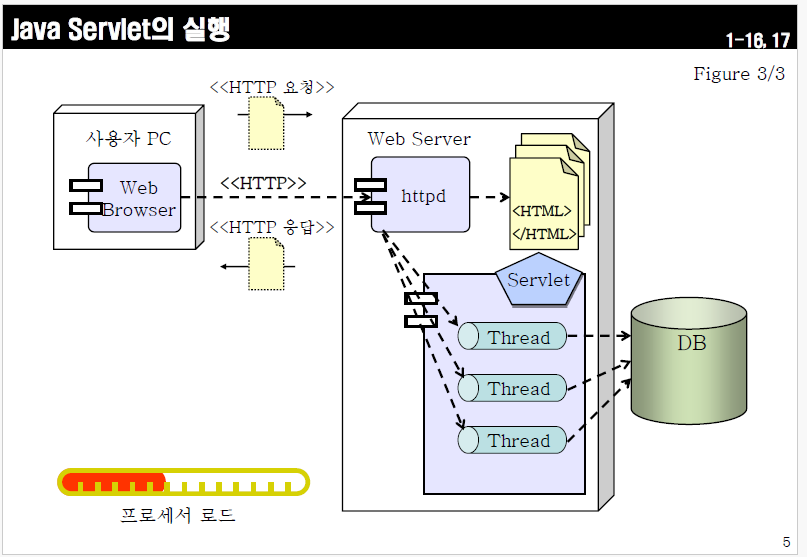
- Web Container가 Web Server의 기능을 일부 지원하여, Web Server 없이 Web Browser와 통신
- Web Server : 동적으로 html 처리
- Web Container : Servlet을 빠르게 실행할 수 있도록 지원
- Servlet은 멀티 쓰레드로 요청을 받아 처리
- Thread Fooling : 여러 쓰레드를 만들어 놓고 쓰레드 풀에서 꺼내 처리
2) 특징
- 장점
- 각 요청마다 다른 스레드로 실행되기 때문에 서블릿 요청의 처리 속도가 기존 CGI 처리 속도보다 빠름
- 확장성이 있음
- 견고하고, 객체 지향적
- Java 언어로서만 구현
- Platform independent
- Loggin 기능에 access 할 수 있음
- 웹 컨테이너가 Servlet에 오류 처리나 보안 같은 추가 서비스 제공
- 단점
- 비즈니스 로직과 프레젠테이션 로직을 구분하기 힘들기 때문에 웹 응답을 생성하는데 사용하기 어려움
➡️ JSP (Java Server Page)로 해결 - 동시성 문제를 고려해야함 (쓰레드 원인)
- 비즈니스 로직과 프레젠테이션 로직을 구분하기 힘들기 때문에 웹 응답을 생성하는데 사용하기 어려움
2. JSP (Java Server Page)
1) Template Page
- Template Page
- HTML 내에 코드를 포함하는 방법
- HTML내에 코드를 포함하는 기술
- PHP : Apache -> Apache 에서만 동작
- ASP (Acitve Sever Page) : Microsoft -> IIS에서만 동작
- JSP (Java Server Page) : Sun Microsystems (웹 서버 독립적)
2) JSP 개념
- Java 코드를 포함하는 HTML
- JSP page는 Web Container에 의해 서블릿 인스턴스로 변환되며, 변환된 서블릿은 해당 JSP page에 대한 요청을 처리
- ASP나 PHP page는 HTTP 요청이 들어올 때마다 iterpret 되는 반면, JSP는 Java bytecode로 컴파일
- Presentation logic에 포커스 맞춤 (Servlet과 JSP의 차이점)
3) JSP 특징
- 장점
- OS의 쉘이나 프로세스가 아닌 스레드가 사용되기 때문에 웹 응용프로그램의 성능과 확장성 있음
- Java 기반으로 해서 Platform independent
- 객체지향 언어와 모든 API 사용 가능
- 단점
- Presentation logic과 Business logic을 같이 포함하는 경우가 있음
- 동시성 문제를 고려해야 함
- Debugging이 어려움
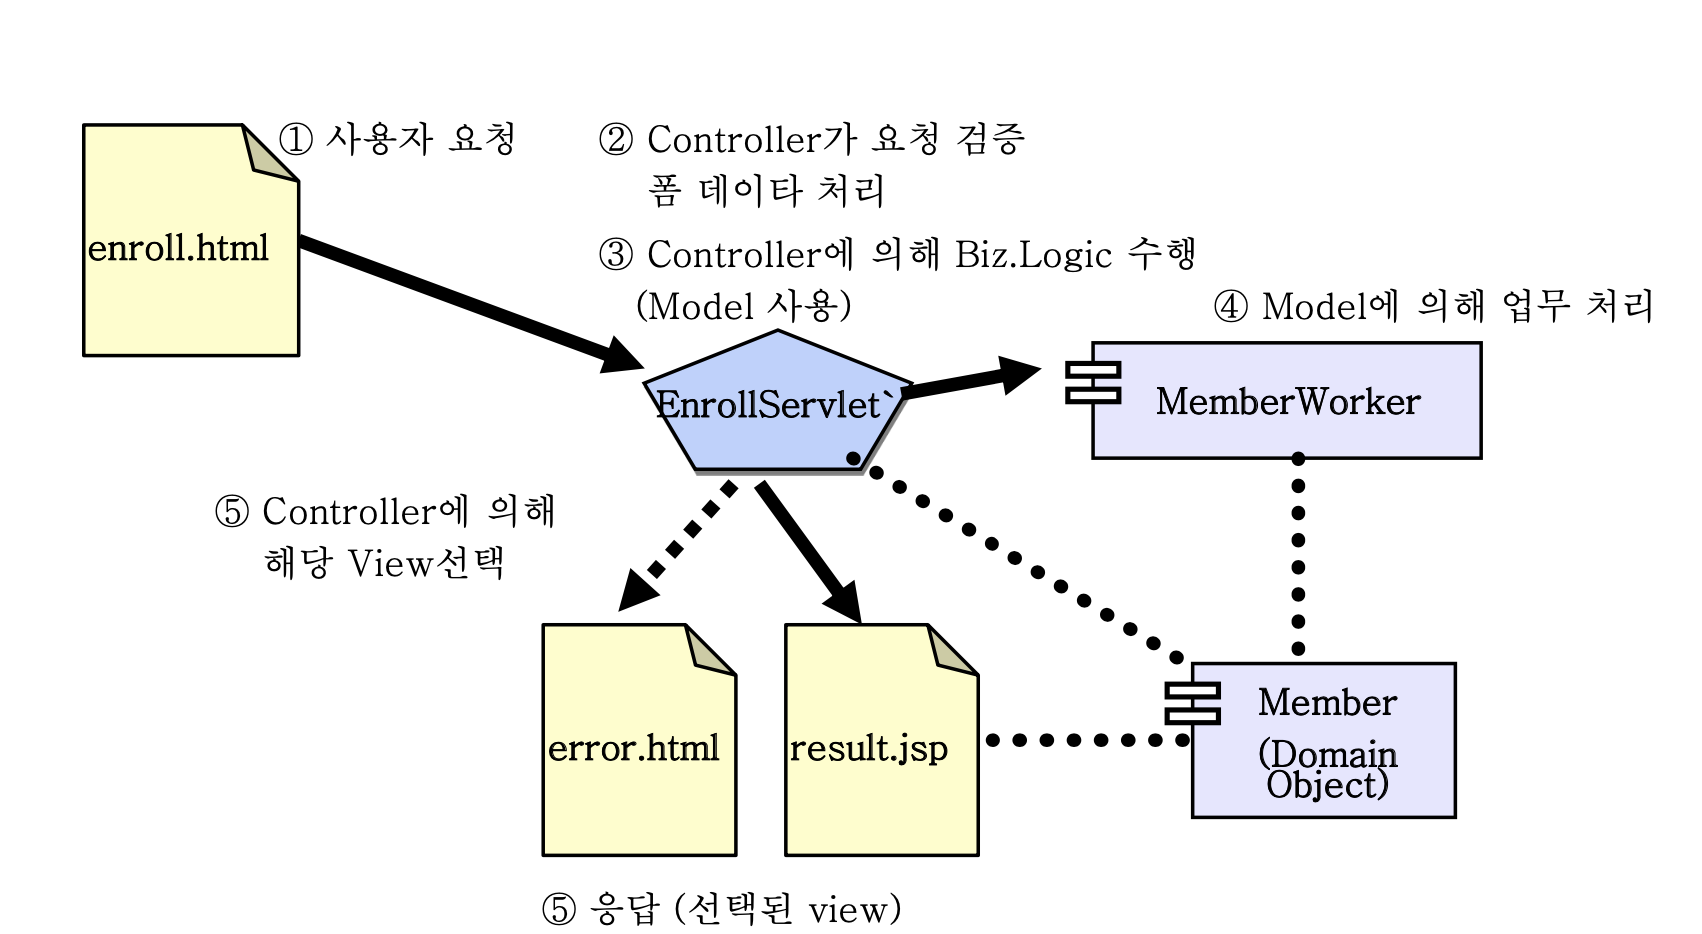
3. MVC
1) Model-View-Controller Design
- 소프트웨어 시스템을 3가지 타입의 구조 컴포넌트로 분할하는 소프트웨어 패턴
- Model : 비즈니스 로직 및 도메인 객체
- View : 사용자 인터페이스 (UI)
- Controller : Model을 변경하여 UI에 대한 사용자 입력을 해석
2) Model 2 Architecture
- Servlet과 JSP page 사용
- Servlet : Controller 역할, 폼 데이터를 검증하고 폼 데이터를 사용하여 모델을 갱신하고 응답으로 다음에 보여줄 View를 선택
- JSP page : VIEW 역할, Model로부터 응답을 생성하는데 필요한 데이터를 꺼내서 HTML 응답을 만들어내고, 사용자 상호 작용이 가능한 HTML폼을 제공
- Java 클래스 : Model의 역할, 웹 응용프로그램의 비즈니스 로직을 구현
- 특징
- 빠른 속도, 쉬운 개발
- 플랫폼간 호환성, 확장성
- 효율적인 유지 보수 가능
- Spring Framework
4. HTTP
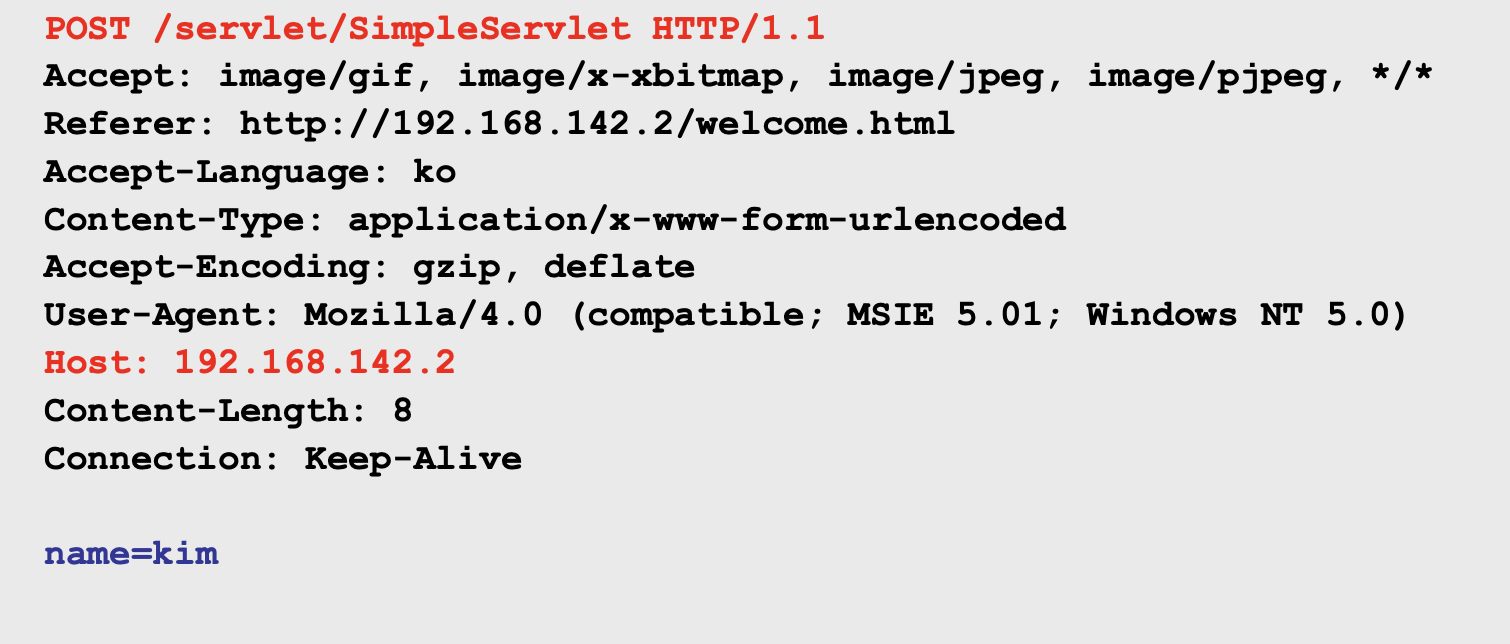
1) HTTP Request 구성 요소
- GET/POST 메서드
- URI
- Protocol/Version
- GET 메서드
- 요청에 대한 모든 정보를 요청 URI에 담아서 보내는 메서드
- 웹 브라우저의 주소창이나 hyper link를 클릭하는 것은 모두 GET 메서드 요청
- 특별히 메소드를 지정하지 않는 경우 default로 GET 메서드 요청
- 요청 헤더
- 문서 본체
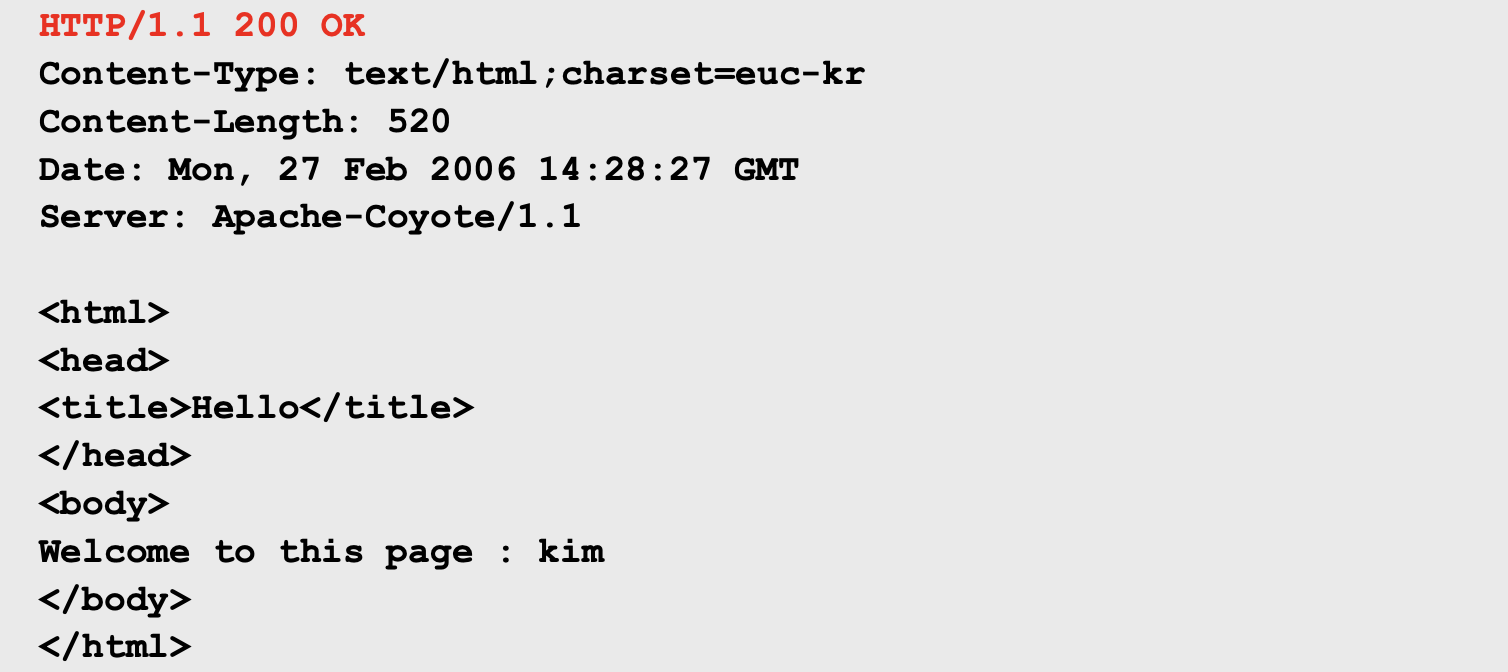
2) HTTP Response 구성 요소
- Protocol/Version
- 상태코드
- 서버가 처리한 결과를 알려주는 3자리 정수 코드
- 첫 번째 자리 숫자는 응답 종류에 대한 분류 기호/나머지 숫자는 일련 번호
- 1xx : Informational (향후의 사용을 위해 예약, 아직 사용되지 않음)
- 2xx : Success (성공적으로 수신되고 해독되고 처리된 경우)
- 3xx : Redirection (완전한 처리를 위해 추가적인 동작이 필요로 한 경우)
- 4xx : Client Error (요구 메시지에 글자상의 문제가 있는 경우거나 메시지를 처리할 수 없을 때)
- 5xx : Server Error (서버가 요구 메시지를 처리하는 가운데 문제 발생)
- 설명
- 상태코드
- 응답 헤더
- 문서 본체
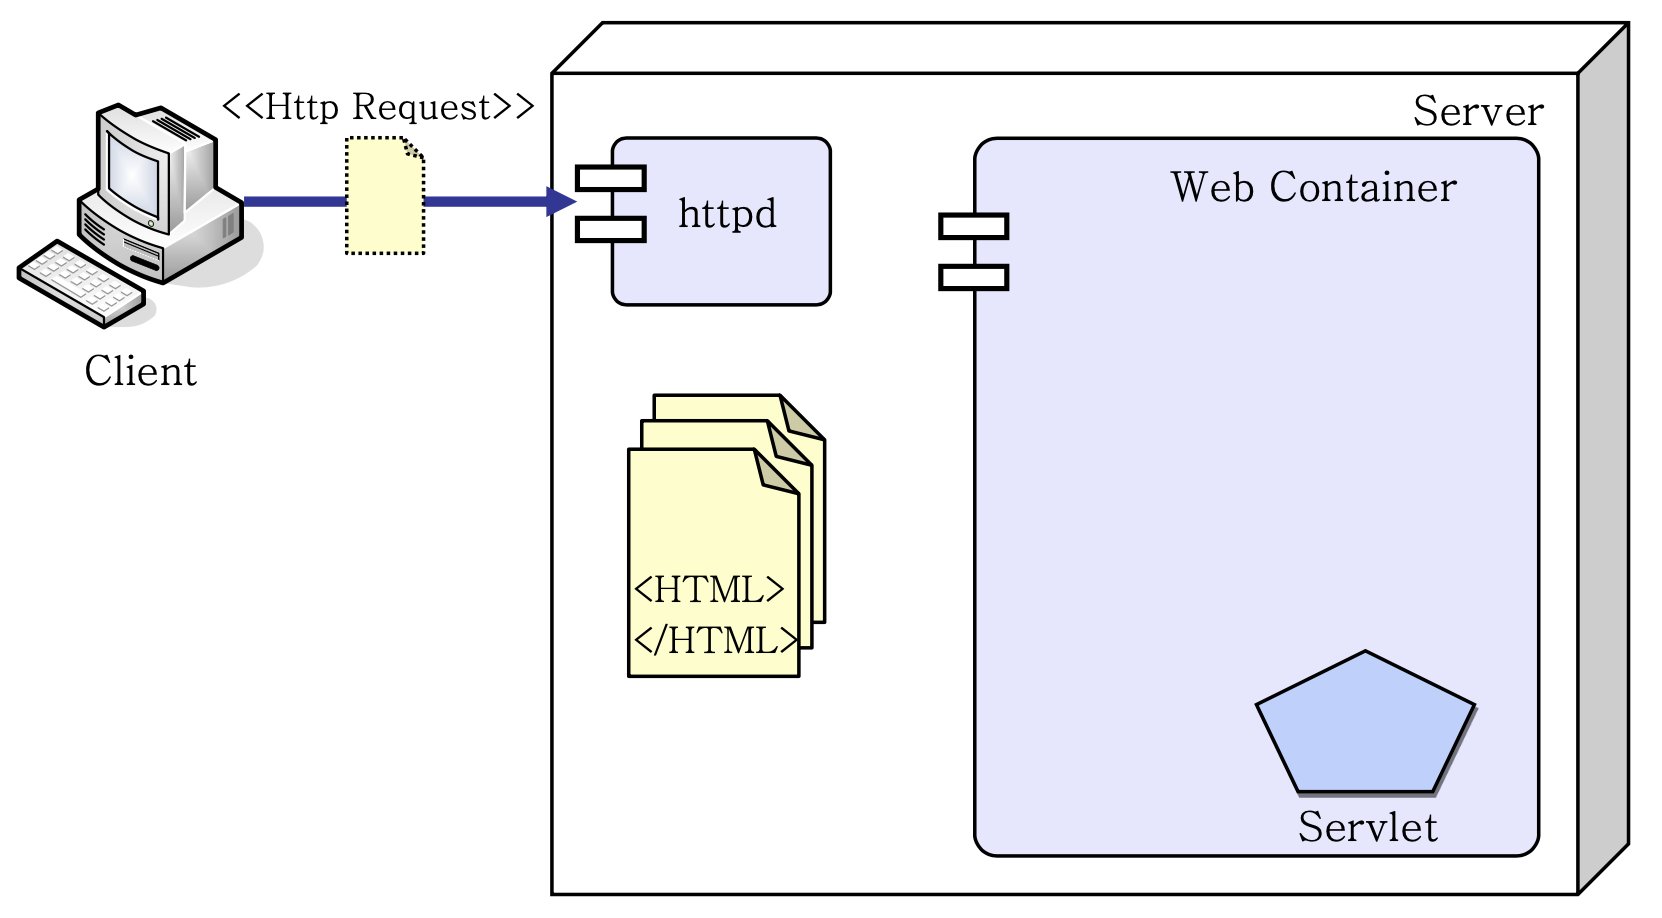
3) HTTP C/S Architecture
- 1️⃣ : Web Browser가 서버에 요청
- 2️⃣ : HTTP 요청을 보냄
- 3️⃣ : Web Server가 요청 받은 welcome.html 문서 검색
- 4️⃣ : HTTP 응답을 보냄
- 5️⃣ : Web Browser는 응답을 해석하여 사용자에게 해당 문서를 보여줌

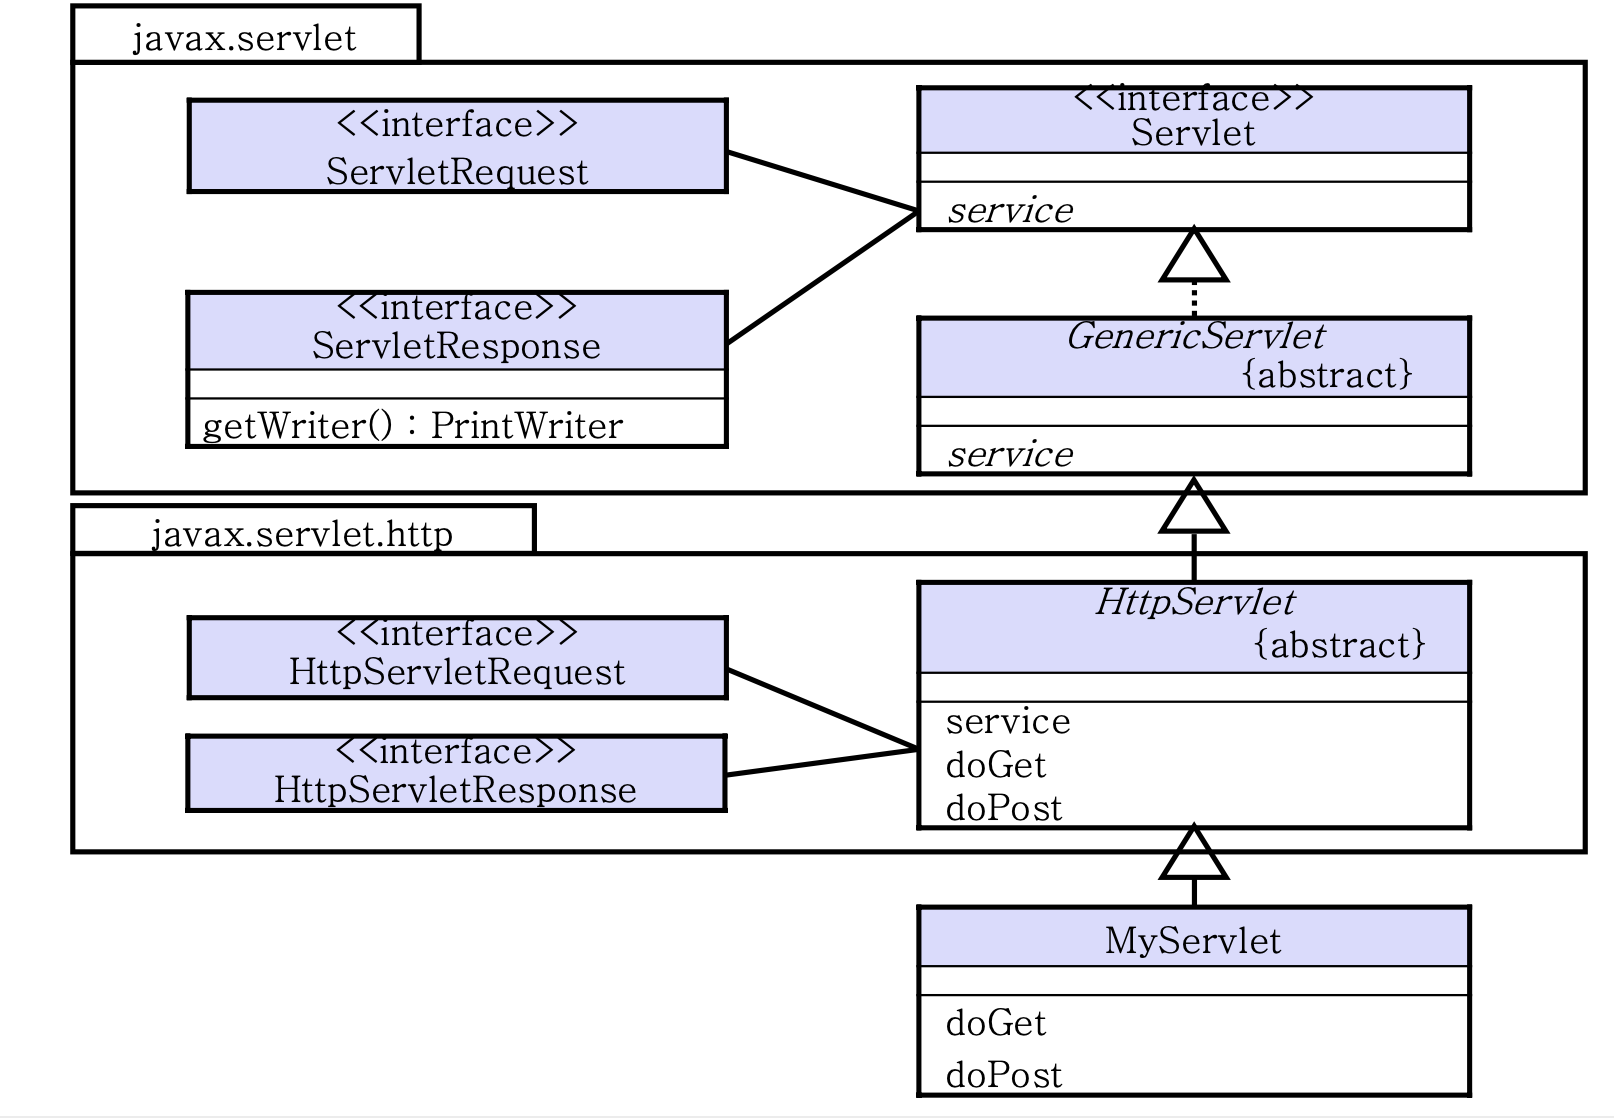
5. Servlet
1) Generic Servlet
-
웹(WWW)은 HTTP 프로토콜에서 작동함
- 사용자 정의 프로토콜 생성이 가능함
- Java Servlet 명세는 사용자 정의 프로토콜을 사용하는 servlet을 생성할 수 있는 API를 제공함
-
Servlet API
-
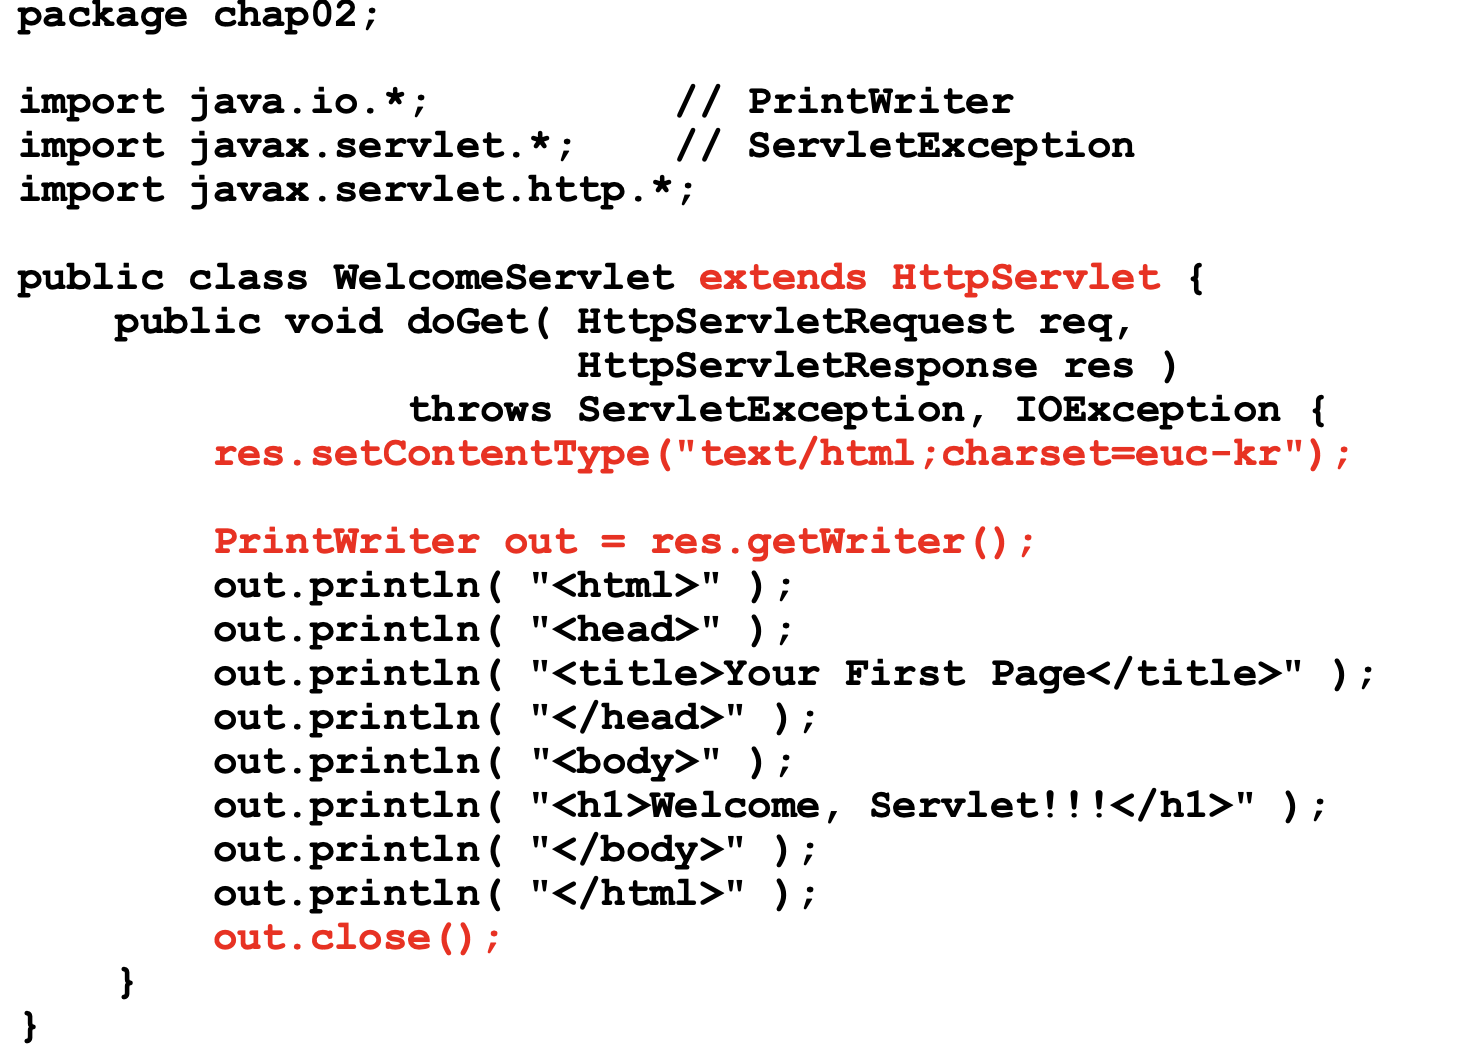
Servlet 작성
- 1️⃣ : 필요한 package import
import javax.servlet.*; import javax/servlet.http.*;- 2️⃣ : HttpServlet을 상속받는 클래스 작성
public class myServlet extends HttpServlet { }- 3️⃣ : doGet() 또는 doPost() Overriding
public class MyServlet extends HttpServlet { public void doGet ( HttpServletRequest req, HttpServletResponse res) { } }- 4️⃣ : 응답 스트림을 작성하고자 할 때는, HttpServletResponse의 getWriter();를 호출하여 스트림을 얻음
printWriter out = res.getWriter(); -
동적인 응답 HTML 생성
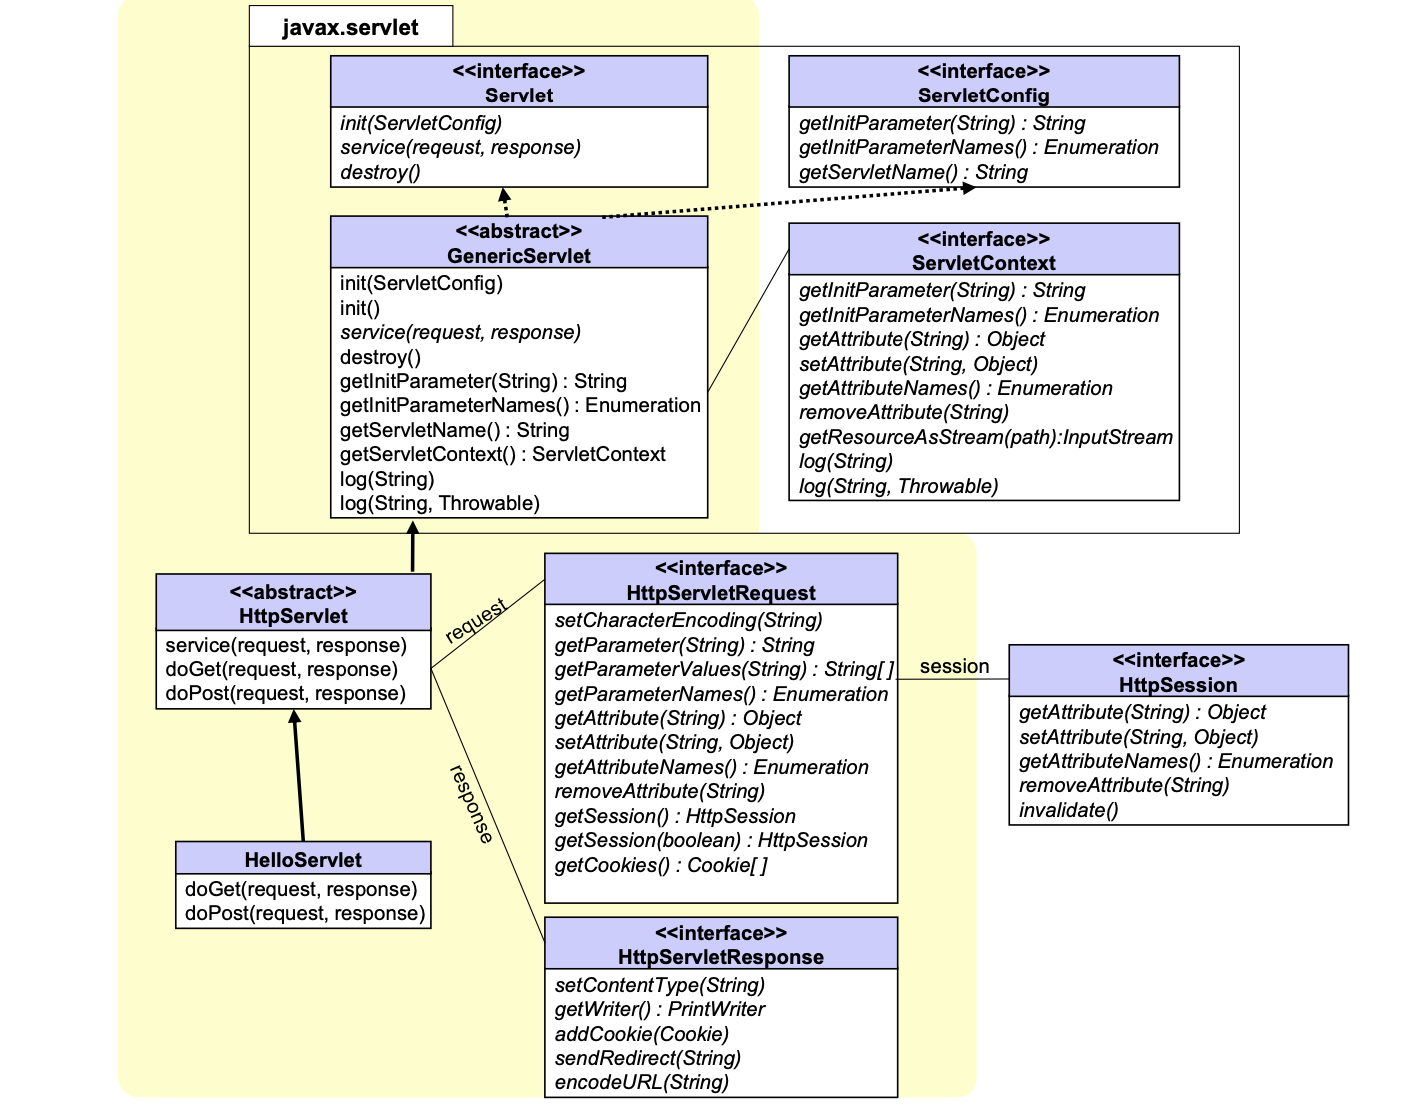
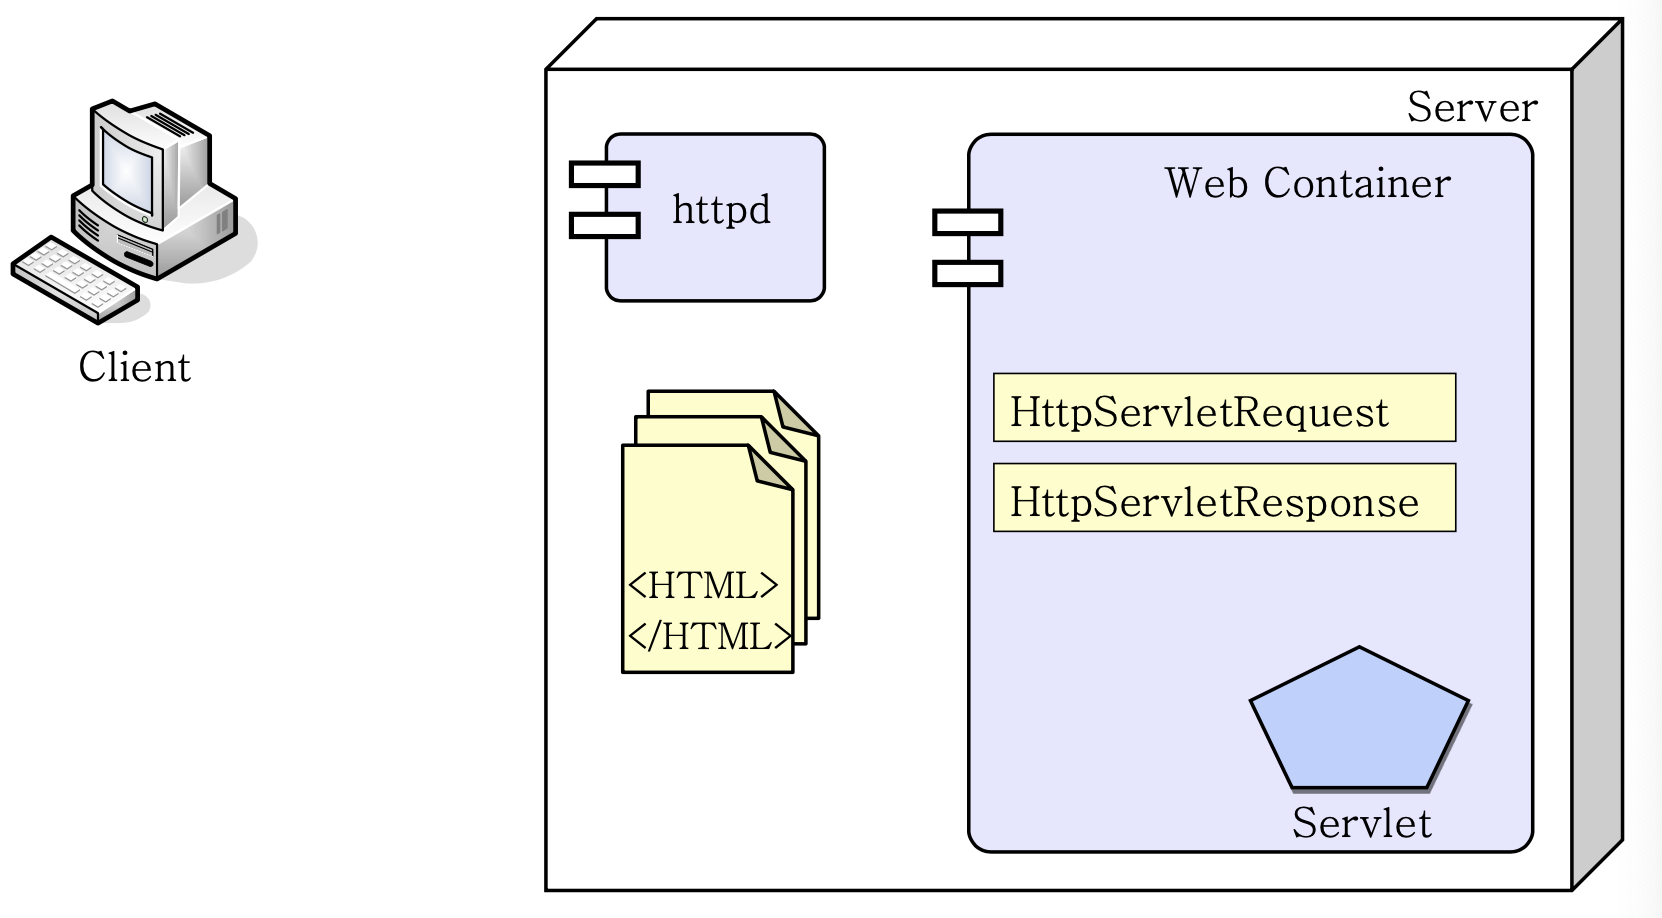
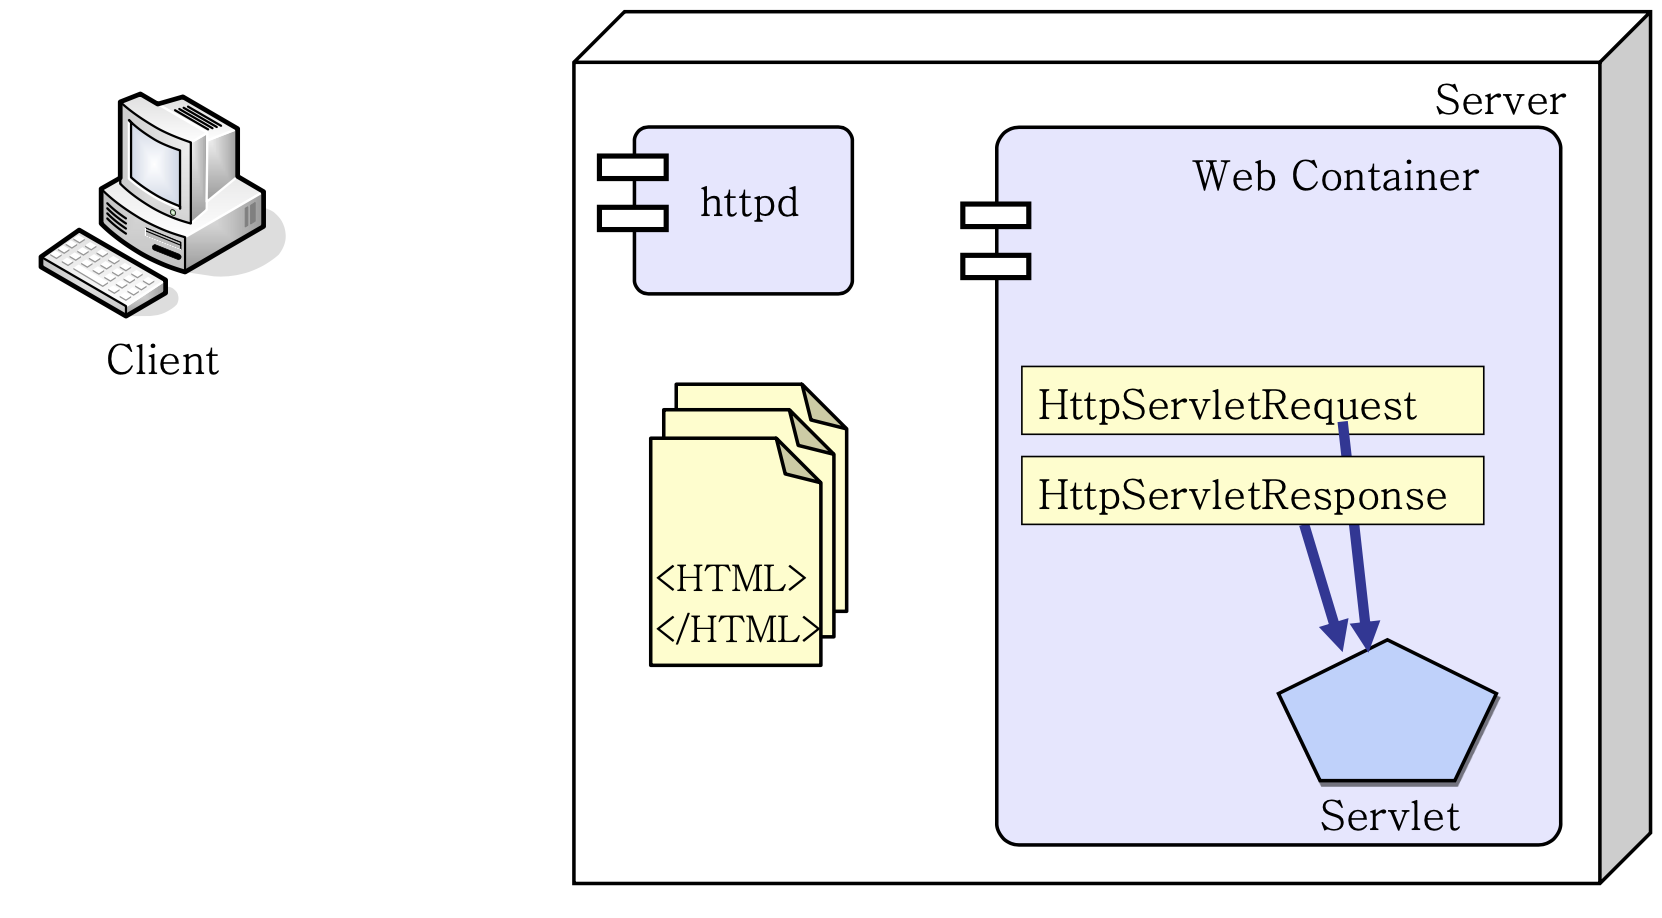
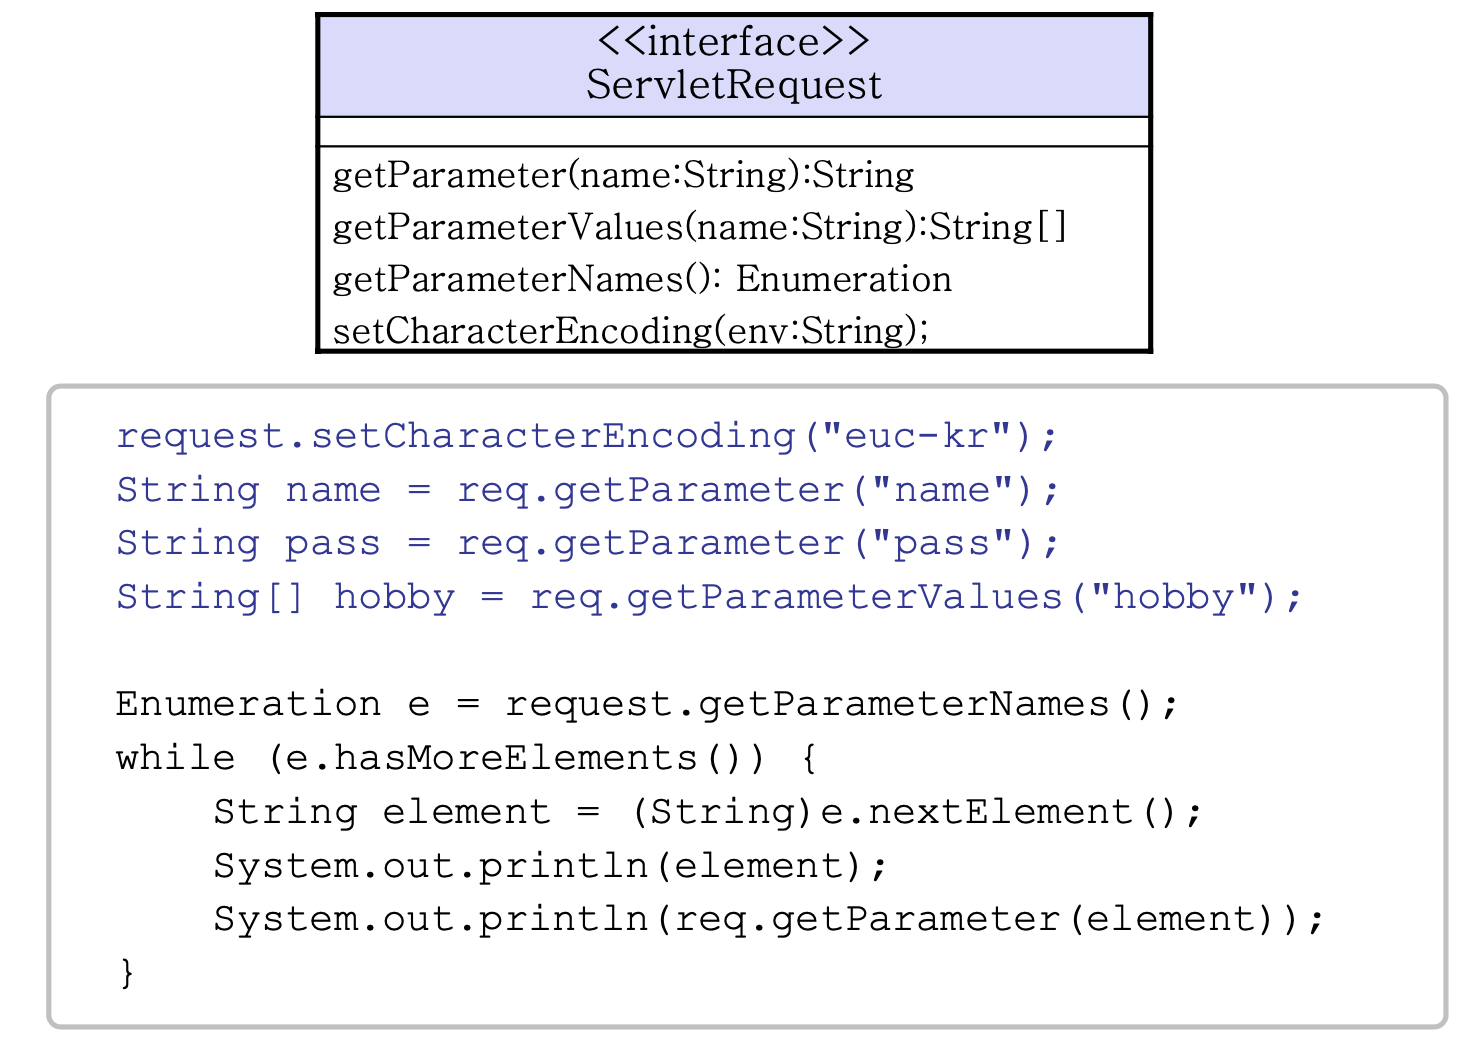
2) HttpServletRequest API
- HTTP 요청 정보는 HttpServletRequest에 의해 캡슐화됨
- getHeaderNames() : 요청 스트림에 있는 각 헤더의 이름으로 이루어진 문자열을 return
- getHeader() : 특정 헤더 값 검색
- getIntHeader(), getDateHeader() : 일부 헤더 값은 정수/날짜를 표현하는 문자열을 자동으로 변환하여 return
- Browser로부터 온 요청 정보는 HttpServletRequest 객체로 생성되고, 객체를 통하여 요청 정보를 알 수 있음
3) HttpServletResponse API
- HTTP 요청 정보는 HttpServletResponse에 의해 캡슐화됨
- serContentType() : MIME 타입 설정
- 🗒️ 예시 : response.setContentType("text/html; charset=euc-kr");
- getWriter() : HTML 응답 생성 스트림(PrintWriter) 객체를 얻음
- serContentType() : MIME 타입 설정
- Browser로 부터 온 요청에 대한 응답을 생성할 때 HttpServletResponse 객체를 사용함
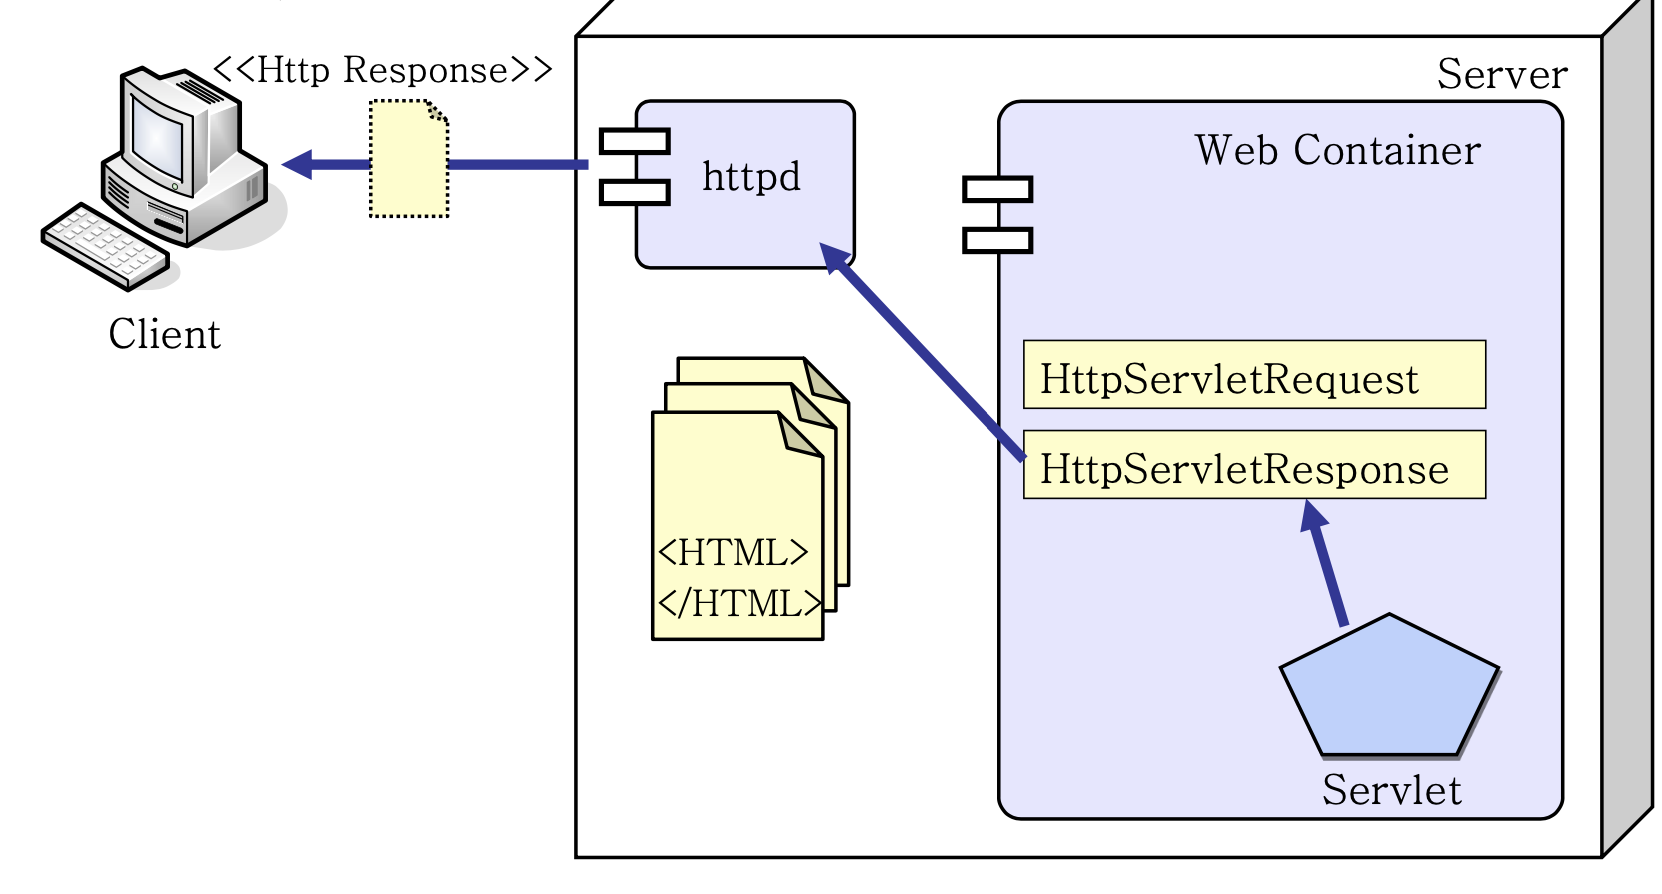
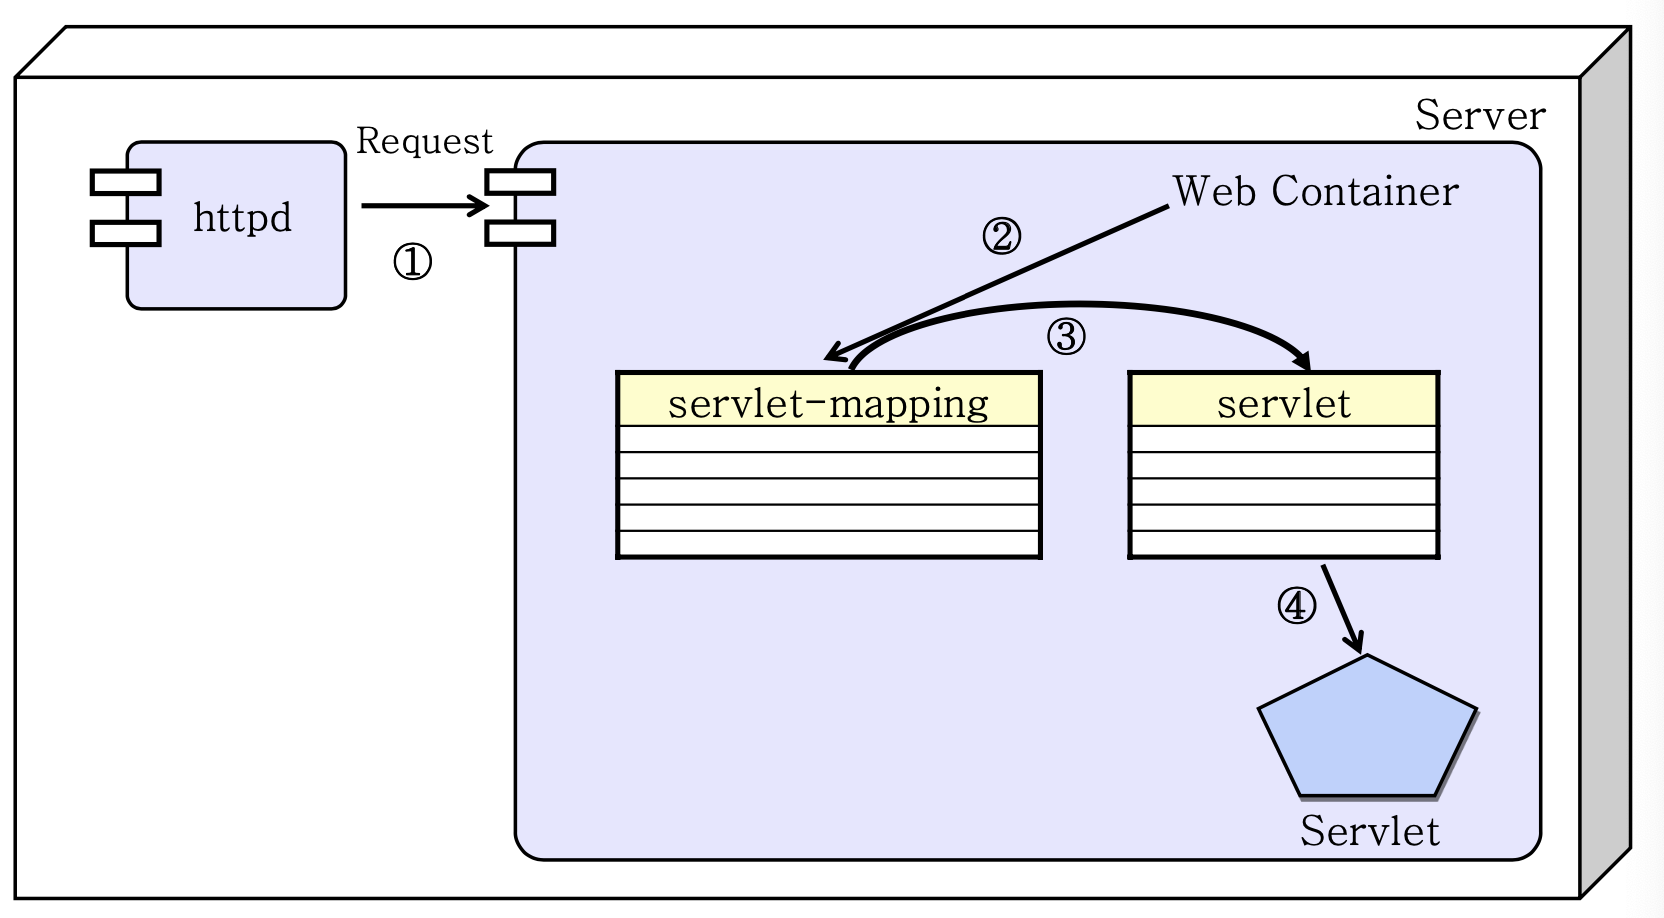
6. Web Container Architecture
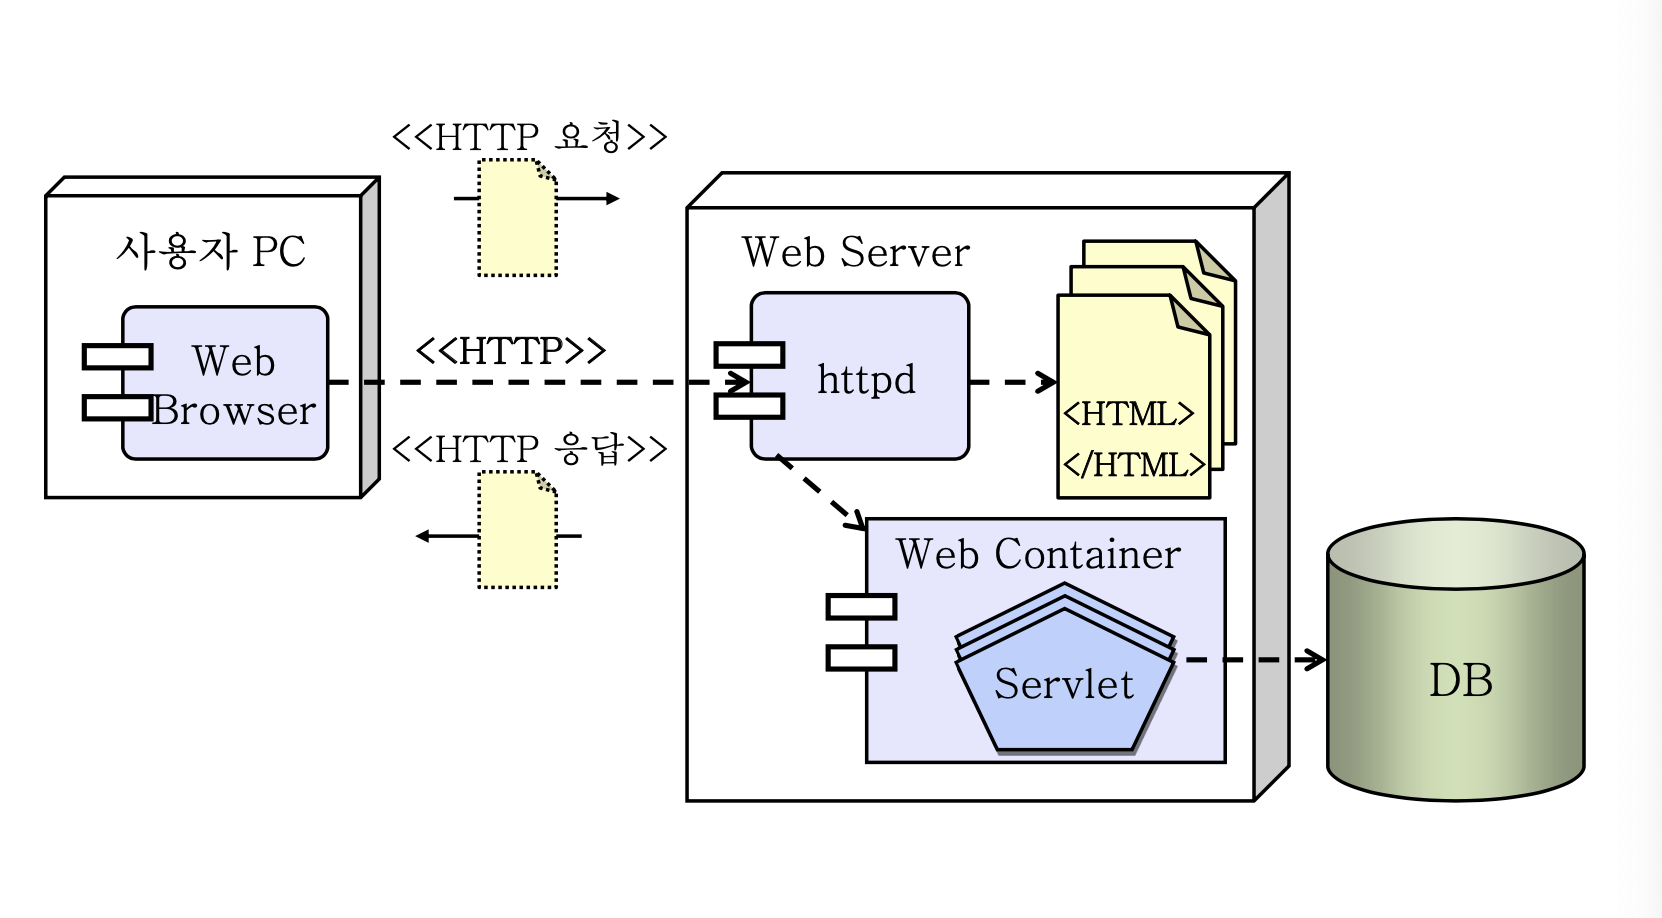
1) Client가 HTTP서비스 (Web Server)에 HTTP Request 전달
2) HTTP 서비스가 Web Container에 Request 전달
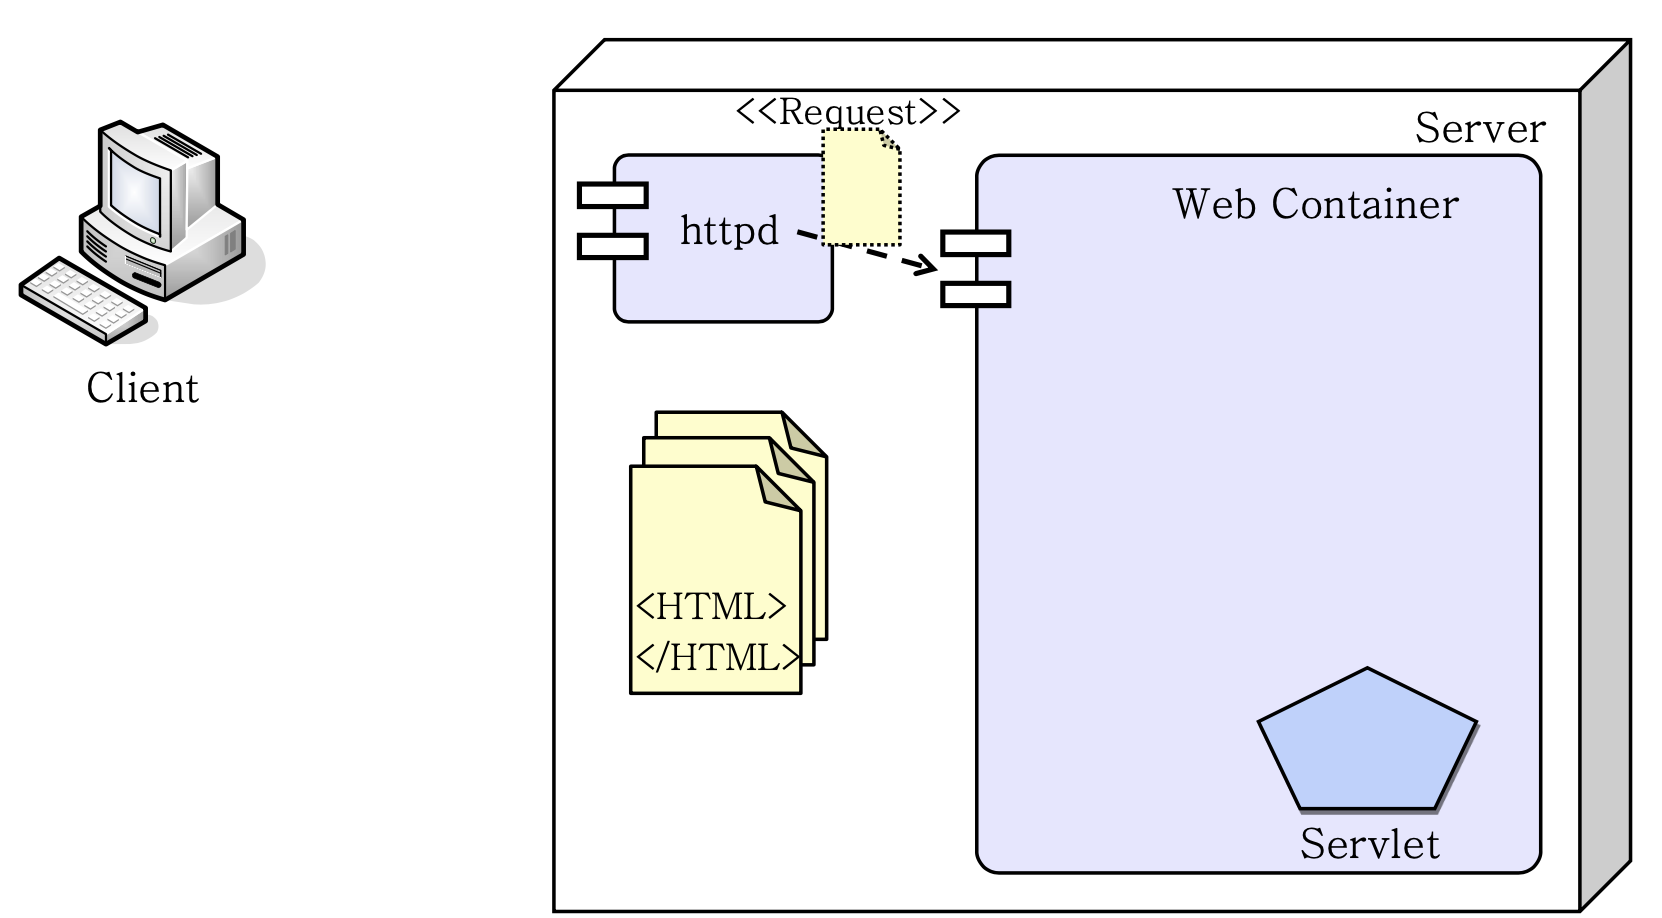
3) Web Container가 HttpServletRequest와 HttpServletResponse 객체 생성
4) Web Container가 요청된 servlet의 service 메소드 실행 (이 때, request와 response 객체가 인자로 전달되고 service 메소드는 쓰레드로 실행됨)
5) Servlet에서 생성한 응답 텍스트가 HTTP 응답 스트림에 실려, HTTP 서비스로 전달되고, 다시 Client로 전달
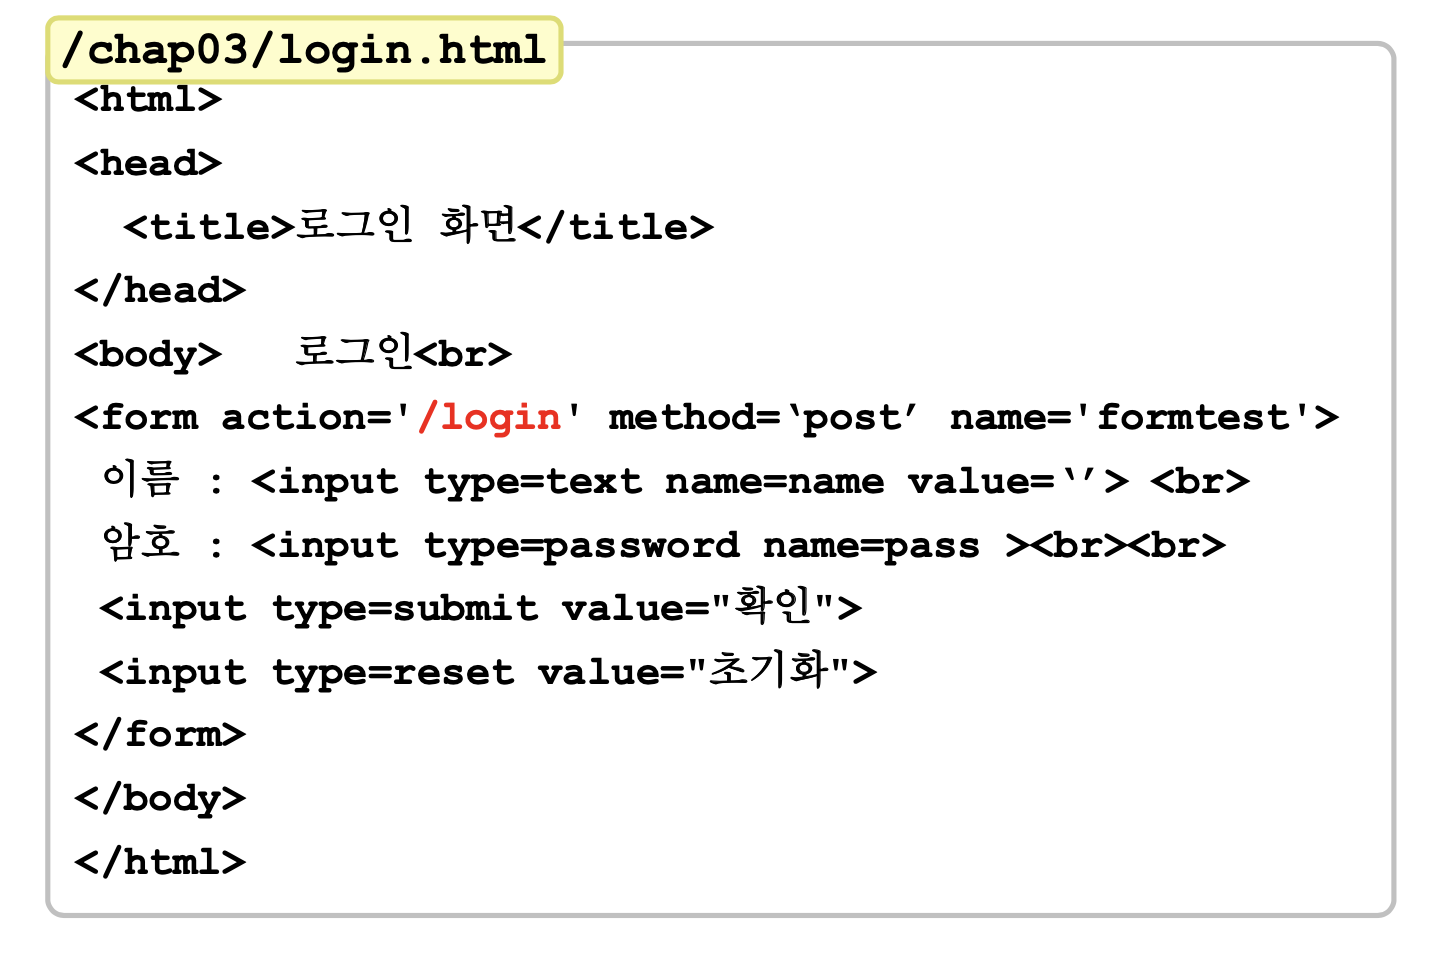
📕 HTML 폼을 사용한 Servlet
1. HTML Form Component
1) 종류
- Textfield
- 한 줄로 된 텍스트 입력
- <input type="text" ... >
- Submit button
- 클릭시 폼 제출
- <input type="submit" ... >
- Reset
- 폼에 있는 필드를 지움
- <input type="reset" ... >
- Checkbox
- 하나 이상의 옵션 선택
- <input type="checkbox" ... >
- Radio button
- 하나의 옵션 선택
- <input type="radio" ... >
- Password
- 한 줄로 된 텍스트 입력 (단, 내용 확인 불가)
- <input type="password" ... >
- Hidden field
- 화면에 보이지 않지만 데이터 가지고 잇음
- <input type="hidden" ... >
- Select
- <select> <option> </select>
- 목록 상자에서 하나 이상의 옵션 선택
- Textarea
- 여러 라인 텍스트 입력
- <textarea> </textarea>
- Form
<form name="myFormName"
		method="post"
      action="example.jsp">

      // input tag에 사용 가능한 입력 요소들

</form>
2) Form Data 전송
-
1️⃣ : Form tag 이용
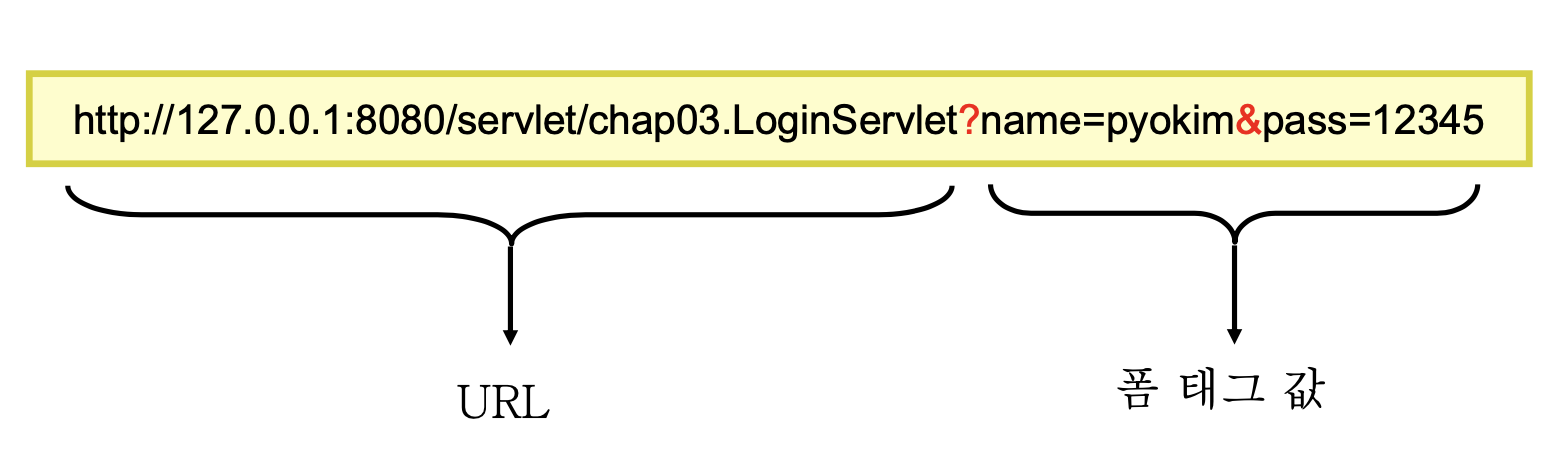
- submit 될 때 form tag 사이에 있는 input tag 내용이 name=value 쌍으로 URL에 조립되면서 서버로 전달됨
- form의 action 속성에 지정된 값이 url이 됨
- url과 폼 태그 값은 ?로 구분됨
- 폼 태그가 2개 이상 전송될 때, 각각은 &로 구분됨
- GET, POST 요청 가능 (Form tag의 METHOD 속성에 지정)
- METHOD 속성을 생략하면, default로 GET 요청이 됨
-
2️⃣ : 주소 필드에 직접 입력
- http://192.168.0.100:8080/servlet/chap03.FormTestServlet?name=kim&pass=abc
- GET만 가능
-
3️⃣ : <a href> 태그 이용
- <a href =‘http://192.168.0.100:8080/servlet/chap03.FormTestServlet?name=kim&pass=abc’> 이동
-
GET만 가능
3) GET과 POST
- GET
- 폼 데이터가 URL에 포함되어 전송
- 폼 데이터 양이 적은 경우 (256 바이트 제한)
- 요청에 대한 북마크(즐겨찾기)를 하고자 한 경우
- 검색 이외의 작업에 사용X
- URL과 데이터 구분은 ?로 됨
- 이름=값 쌍이 여러 개인 경우, 각각은 &로 구분
- POST
- 폼 데이터 요청 body에 포함되어 전송
- 폼 데이터 양이 큰 경우 (데이터 크기 제한 없음)
- 패스워드 등 폼 데이터의 내용이 URL에 보여지지 않아야 하는 경우
- 이름=값 쌍이 여러 개인 경우, 각각은 &로 구분
4) HttpServletRequest
📕 Deployment Desciptor
1. Servlet Naming 문제점
- Simple Servlet 배치 전략의 문제점
- URL에 package 이름까지 포함된 Servlet Class 이름을 사용하여 access
- package와 class 이름이 너무 길어서 page 설계자의 작업이 많아짐
- 디렉터리 구조와 클래스 이름을 그대로 노출시켜 보안에 취약함
- 문제 해결
- Servlet에 대한 URL 매핑 지원
- DD(Deployment Desciptor)에서 설정함
2. Deployment Descriptor (배치 설명자)
- 특정 Web Application에 대한 구성/배치 정보를 지정하는 XML 파일 (web.xml)
- 반드시 WEB_ROOT_DIR\WEB-INF\에 위치
- Servlet Mapping
- 항상 servlet tag와 servlet-mapping tag가 쌍으로 존재
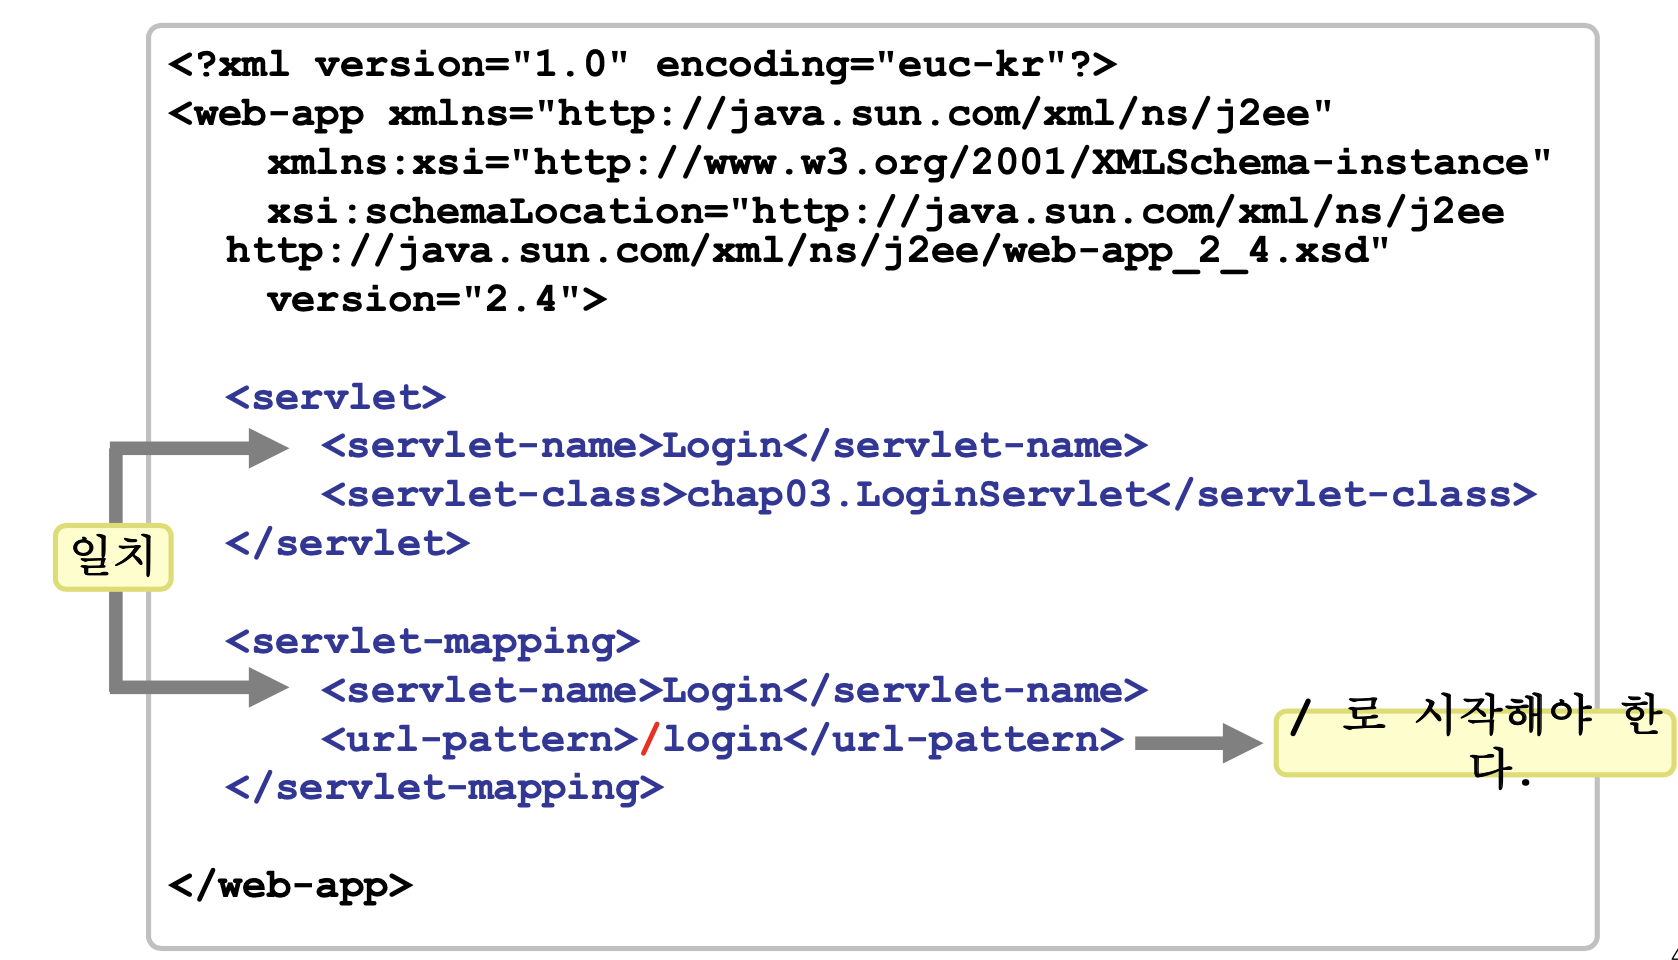
- Servlet Mapping을 하면, 이를 url 부분을 url-pattern tag에 선언한 것으로 대체함
- Servelt Mapping을 여러 개 선언할 경우, servlet tag와 servlet-mapping tag의 선언 위치에 주의
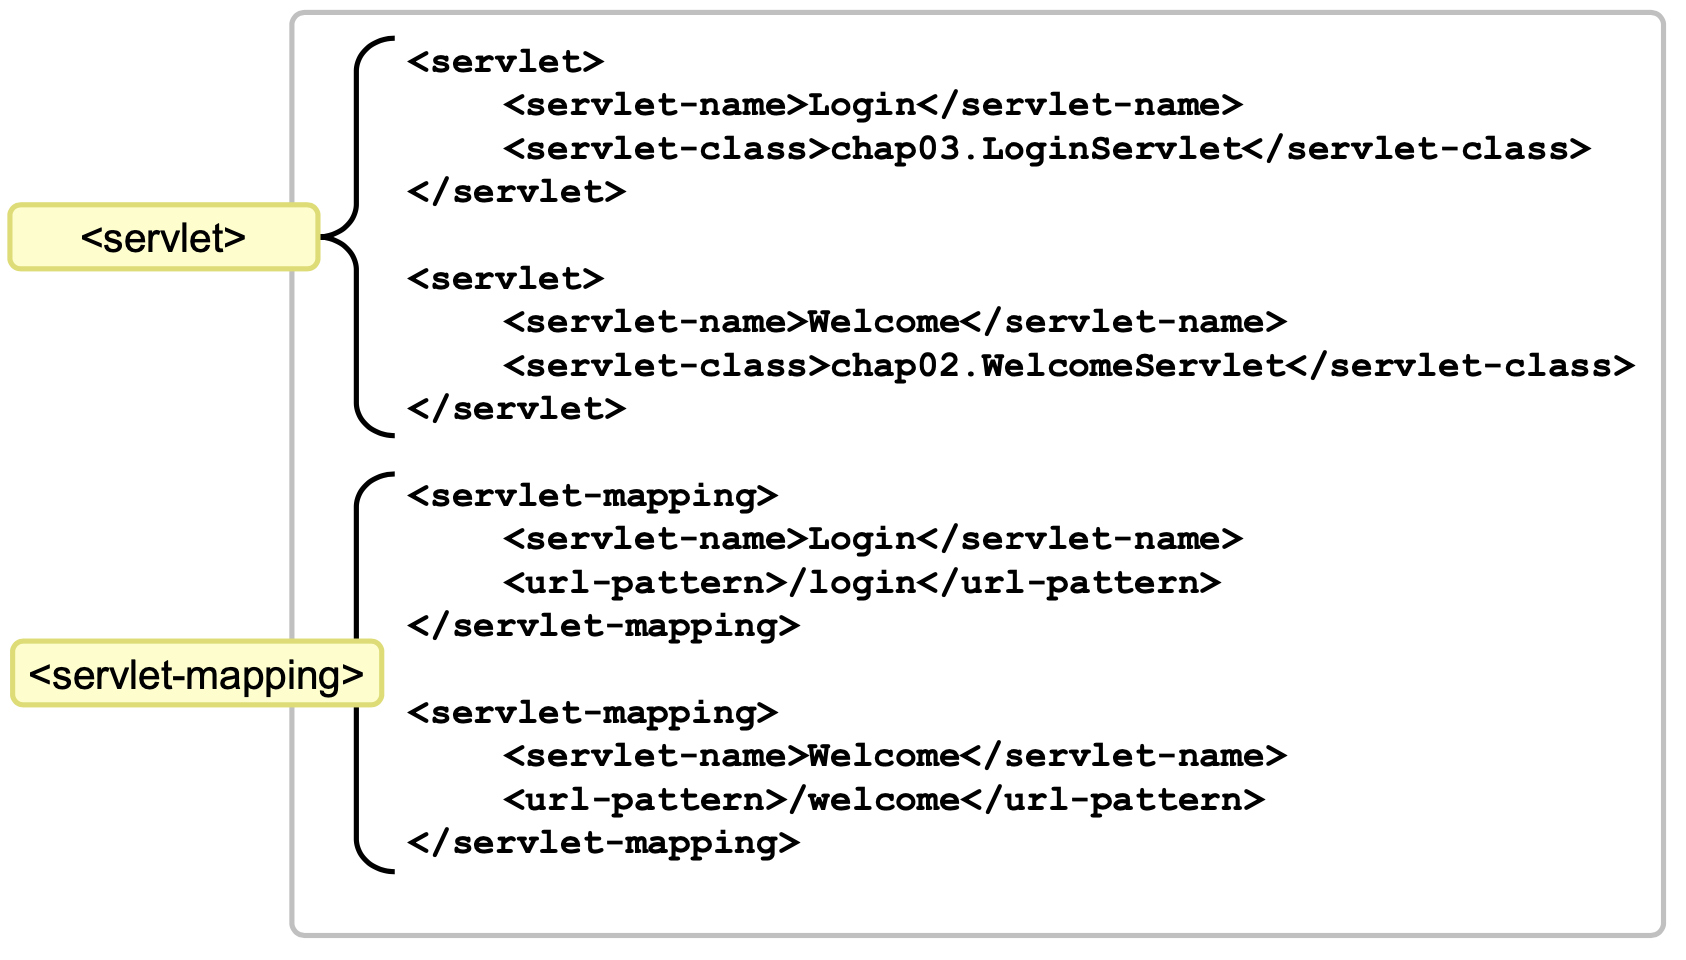
- 항상 servlet tag와 servlet-mapping tag가 쌍으로 존재
3. Deployment Environment
- WEB_ROOT (HTML, JSP)
- welcome.html
- chap03
- login.html
- WEB_INF (Deployment Descriptor)
- web.xml
- classes (Servlet 및 그 외 관련 클래스)
- LoginServlet.class
- lib (JAR)
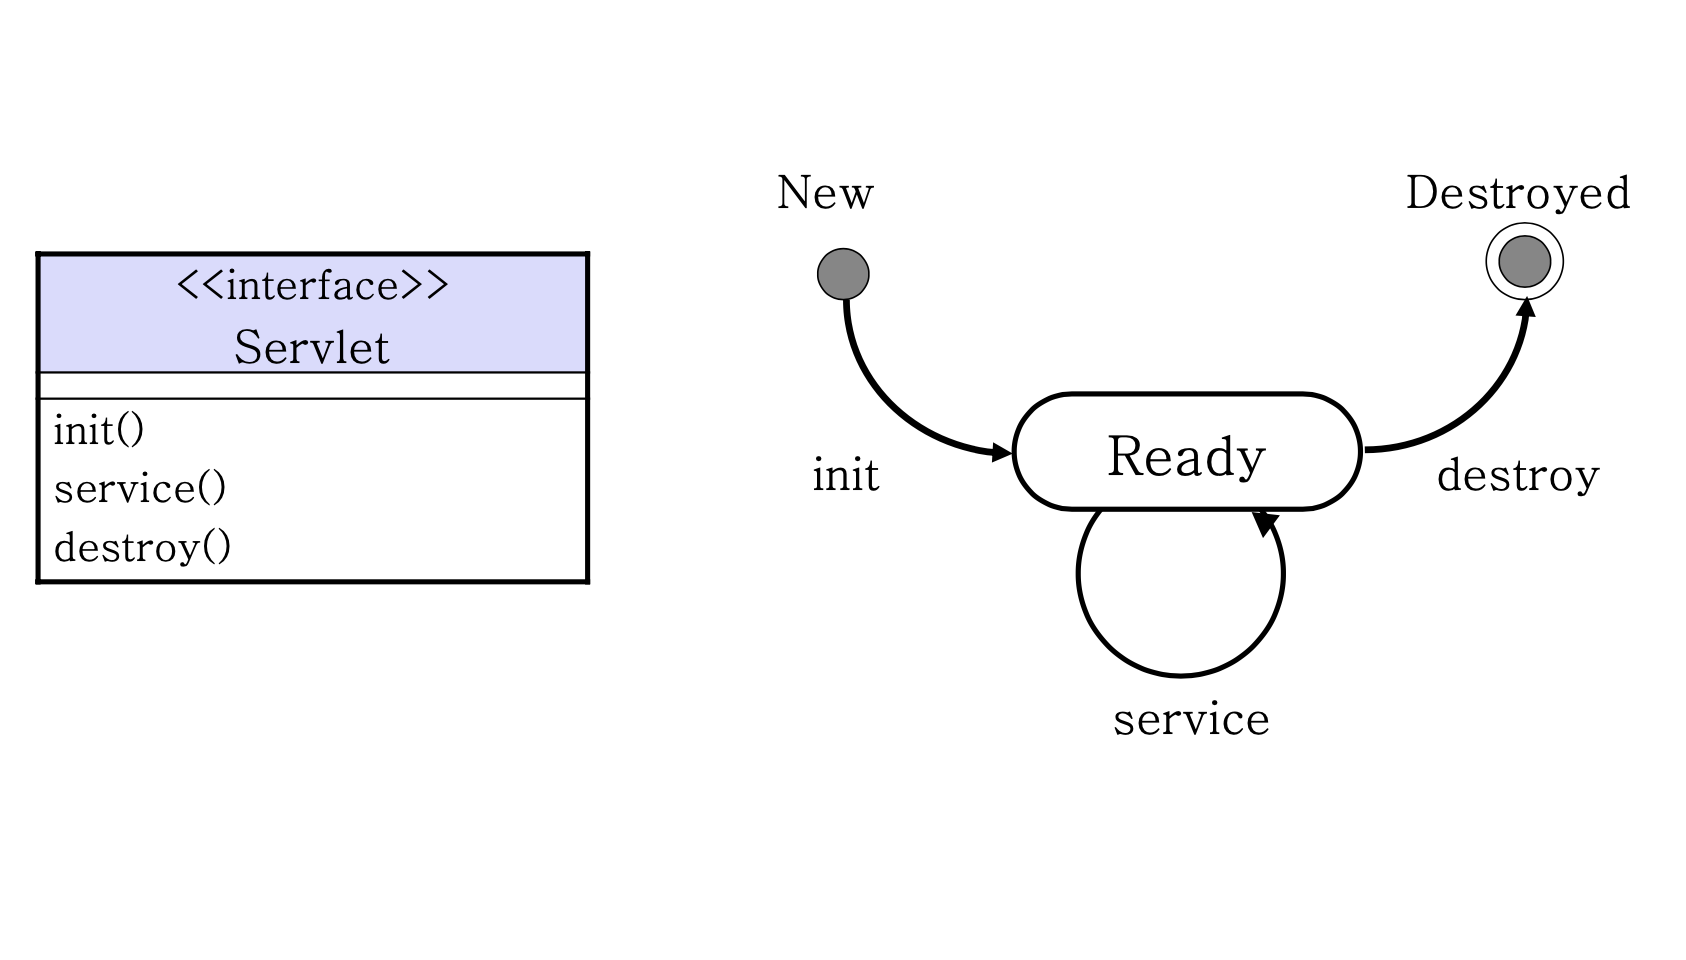
📕 Servlet Life Cycle
1. 메서드
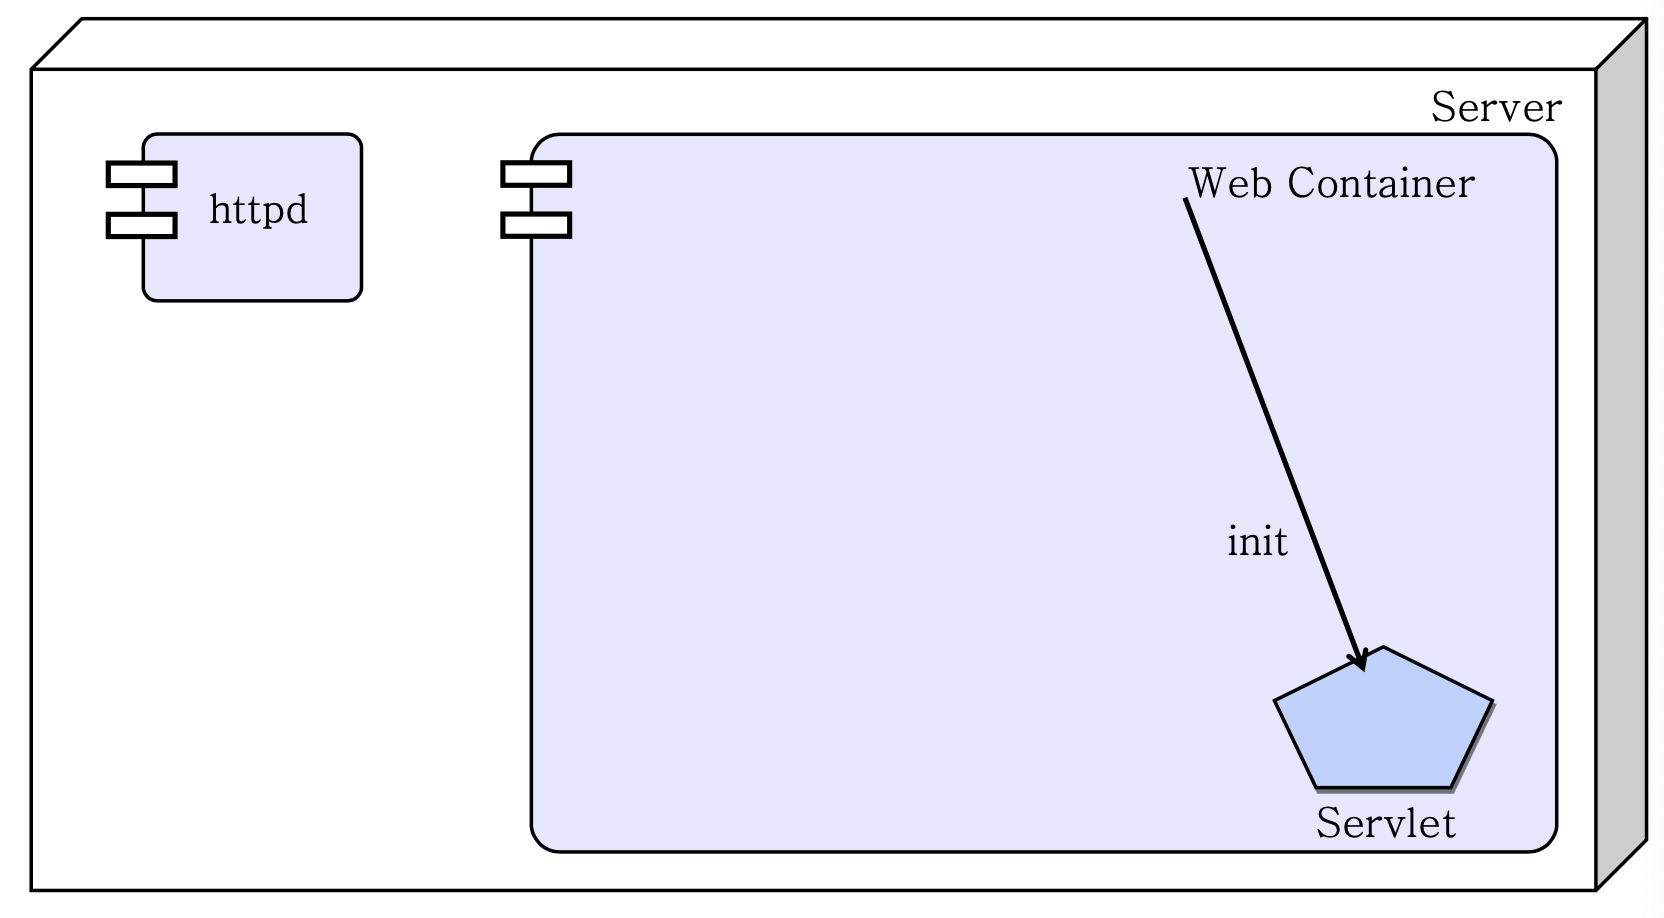
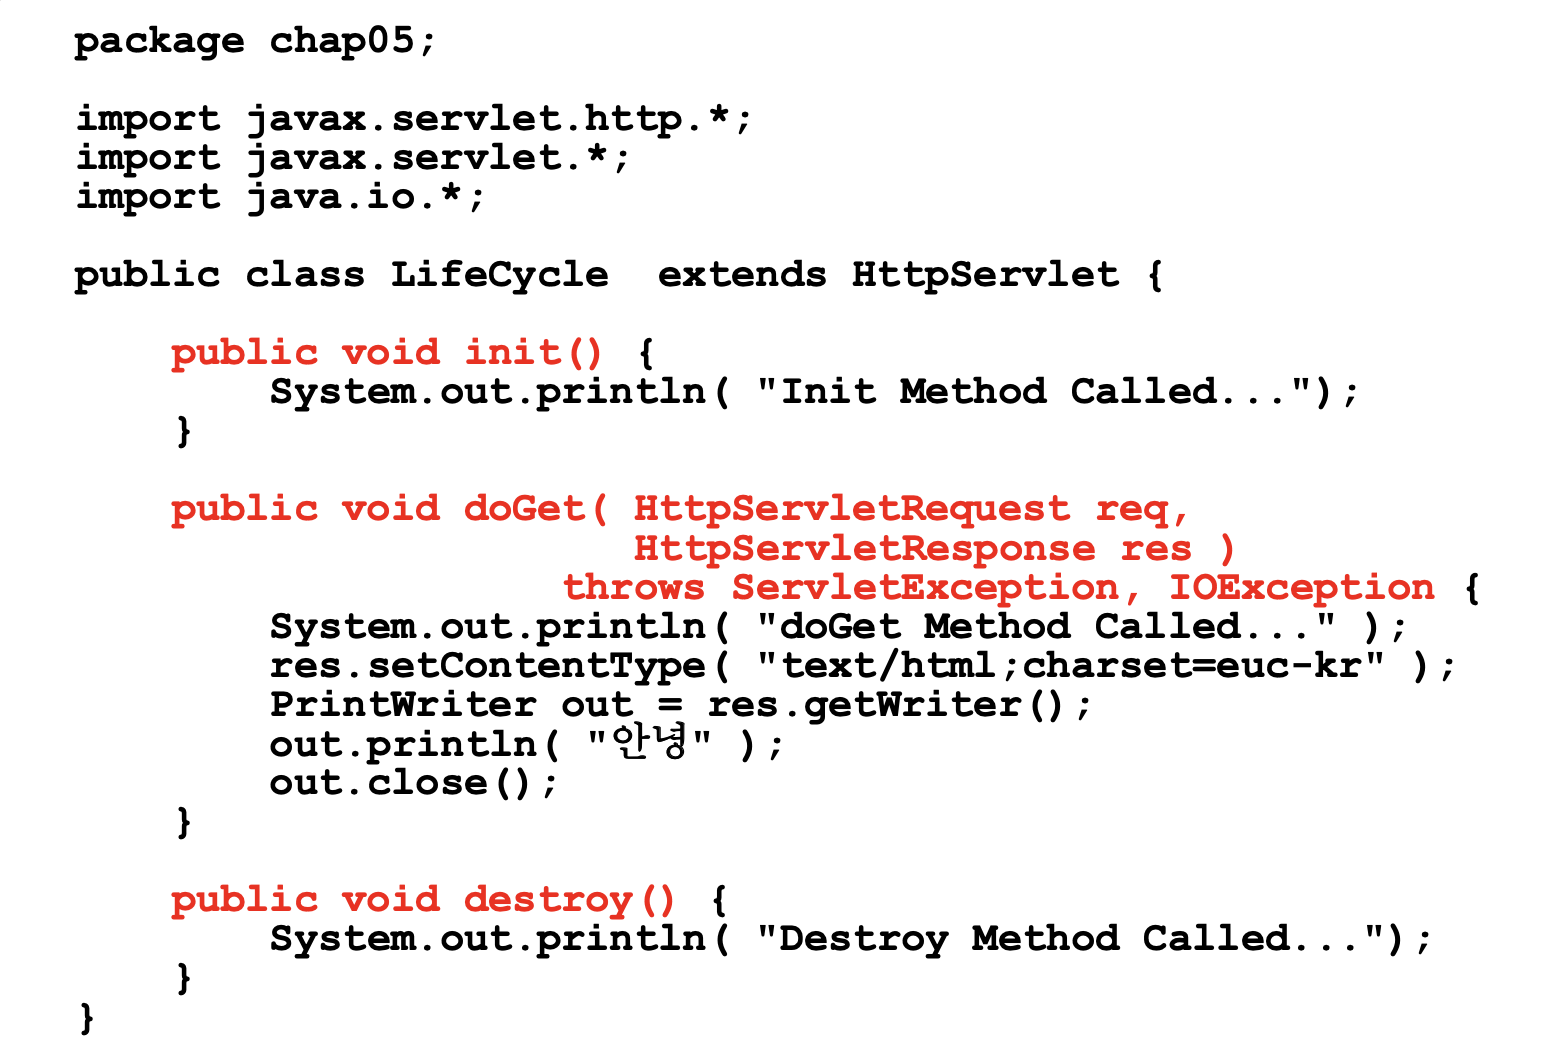
1) init()
- Servlet 인스턴스가 처음 생설될 때 호출됨
- 이 메서드를 Overriding하여 Servlet에 필요한 초기화 작업을 수행할 수 있음
- 여러 인스턴스에서 공유하는 자원은 웹 어플리케이션 수준에서 구성해야 함
- init 메서드에서 초기화되는 자원은 하나의 인스턴스에만 공유됨
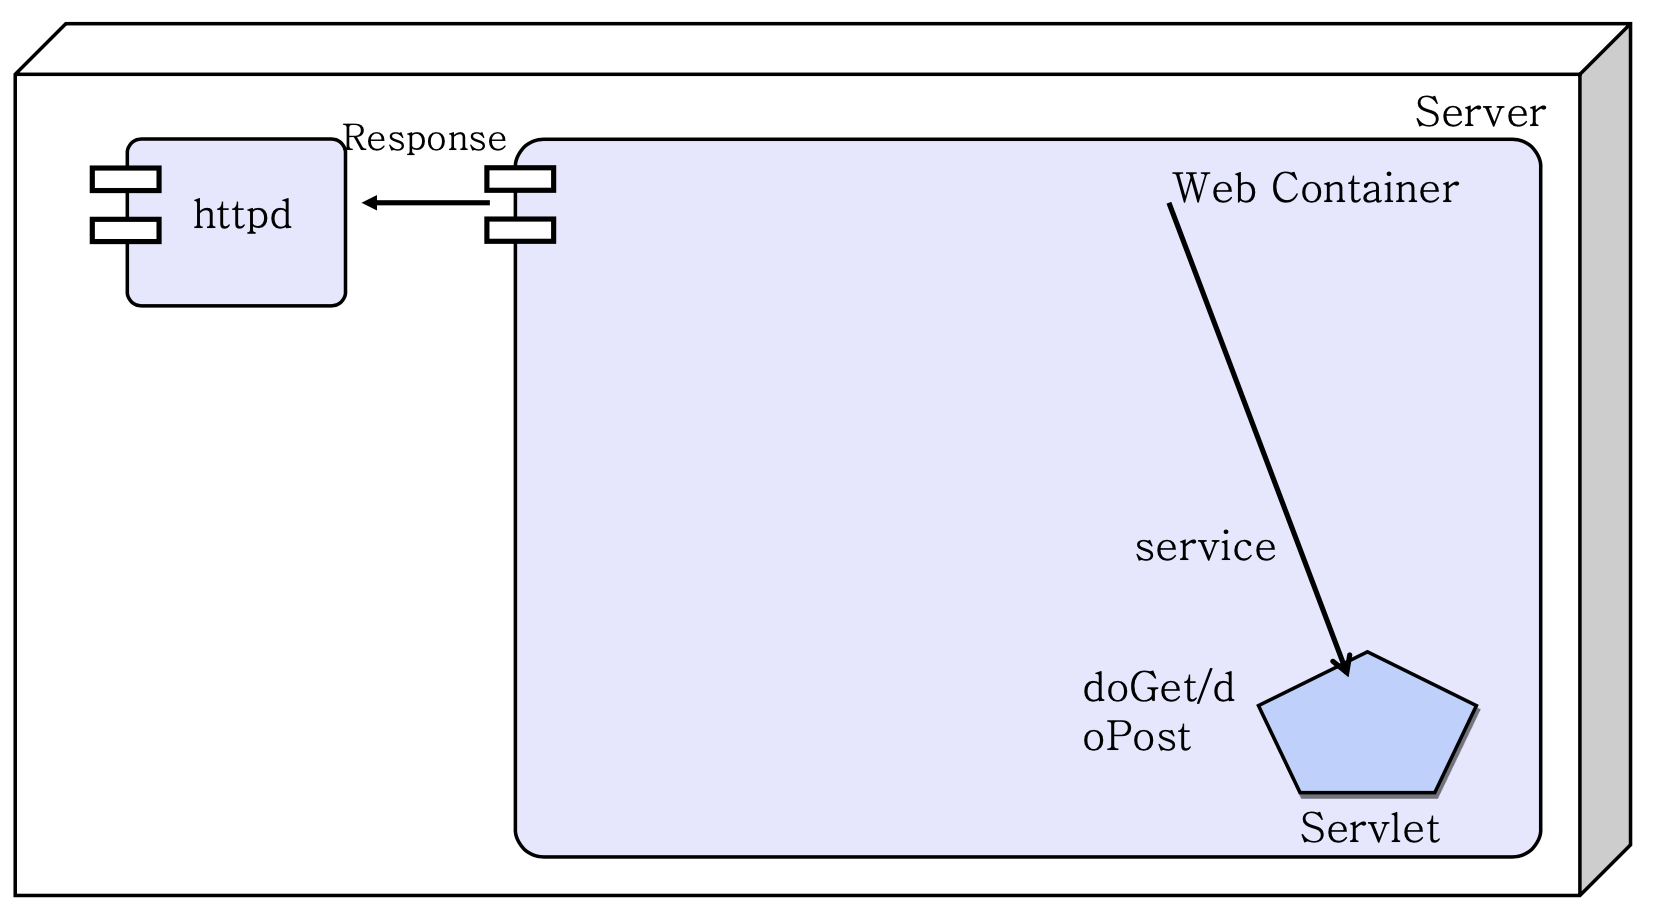
2) service()
- 사용자 요청을 처리하는 메서드
- 대부분 직접 구현하지 않고, service 메서드에 호출되는 doGet, doPost 메서드를 Overriding 함
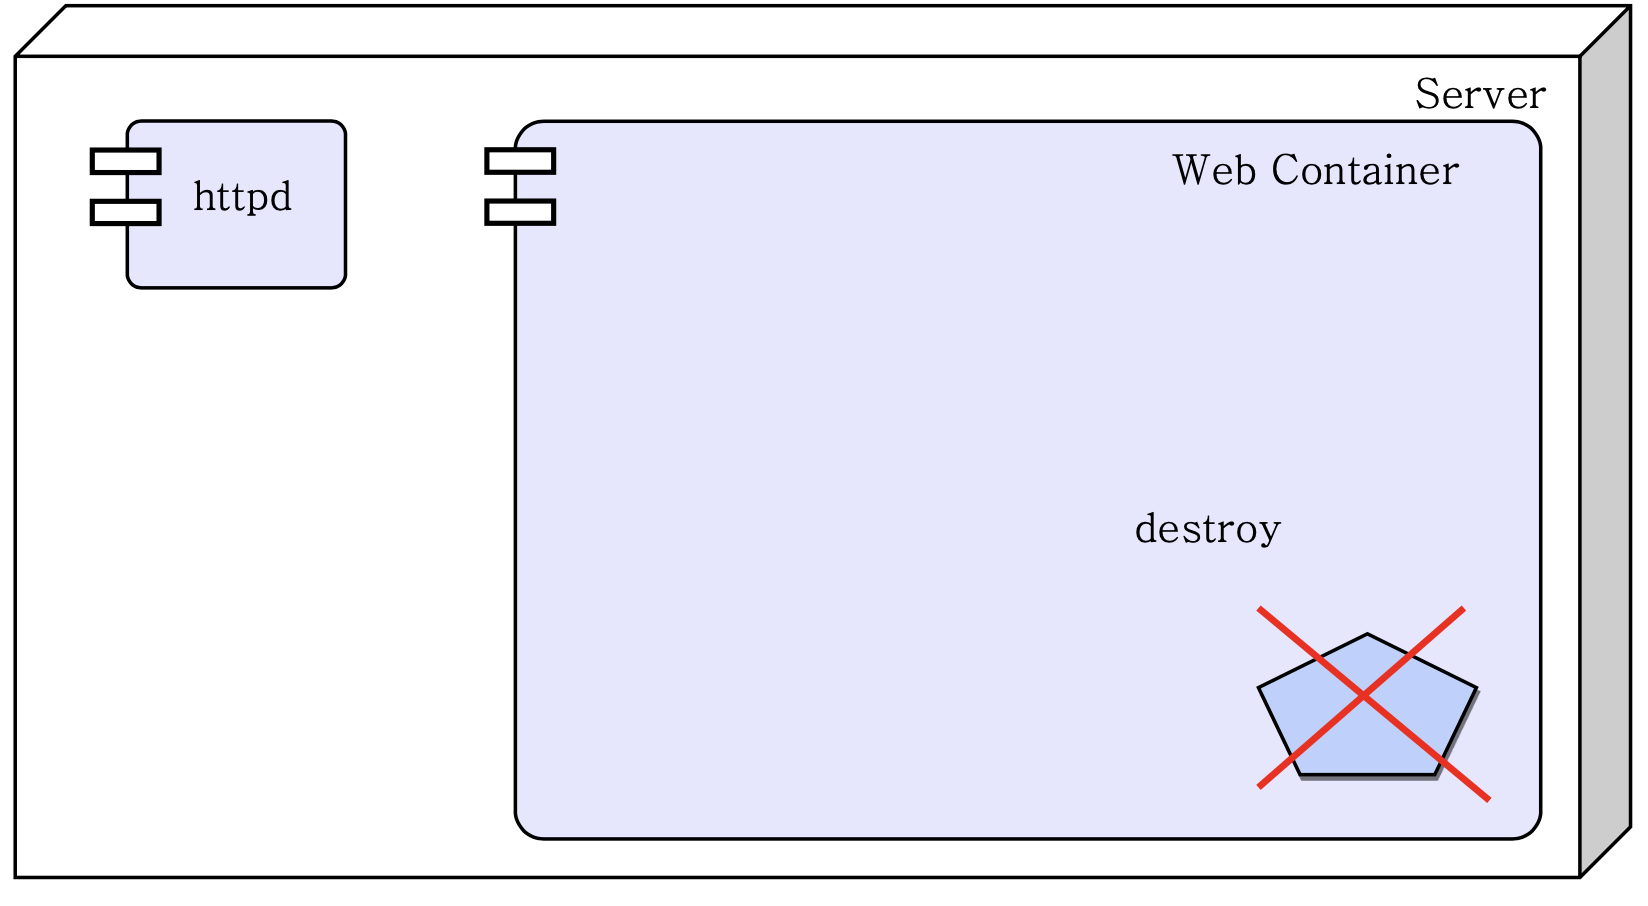
3) destroy()
- Servlet 인스턴스가 제거될 때, 호출됨
2. 과정
1) Request에 대해 Web Container가 해당 되는 Servlet을 생성함
2) Servlet 인스턴스가 생성되면, Web Container가 init 메소드를 호출함
3) 요청을 처리하기 위해 Web Container는 Servlet의 service 메서드를 호출하고, service 메서드는 doGet 또는 doPost 호출
4) Servlet 인스턴스가 제거될 때, Web Container에 의해 destroy 메서드가 호출됨
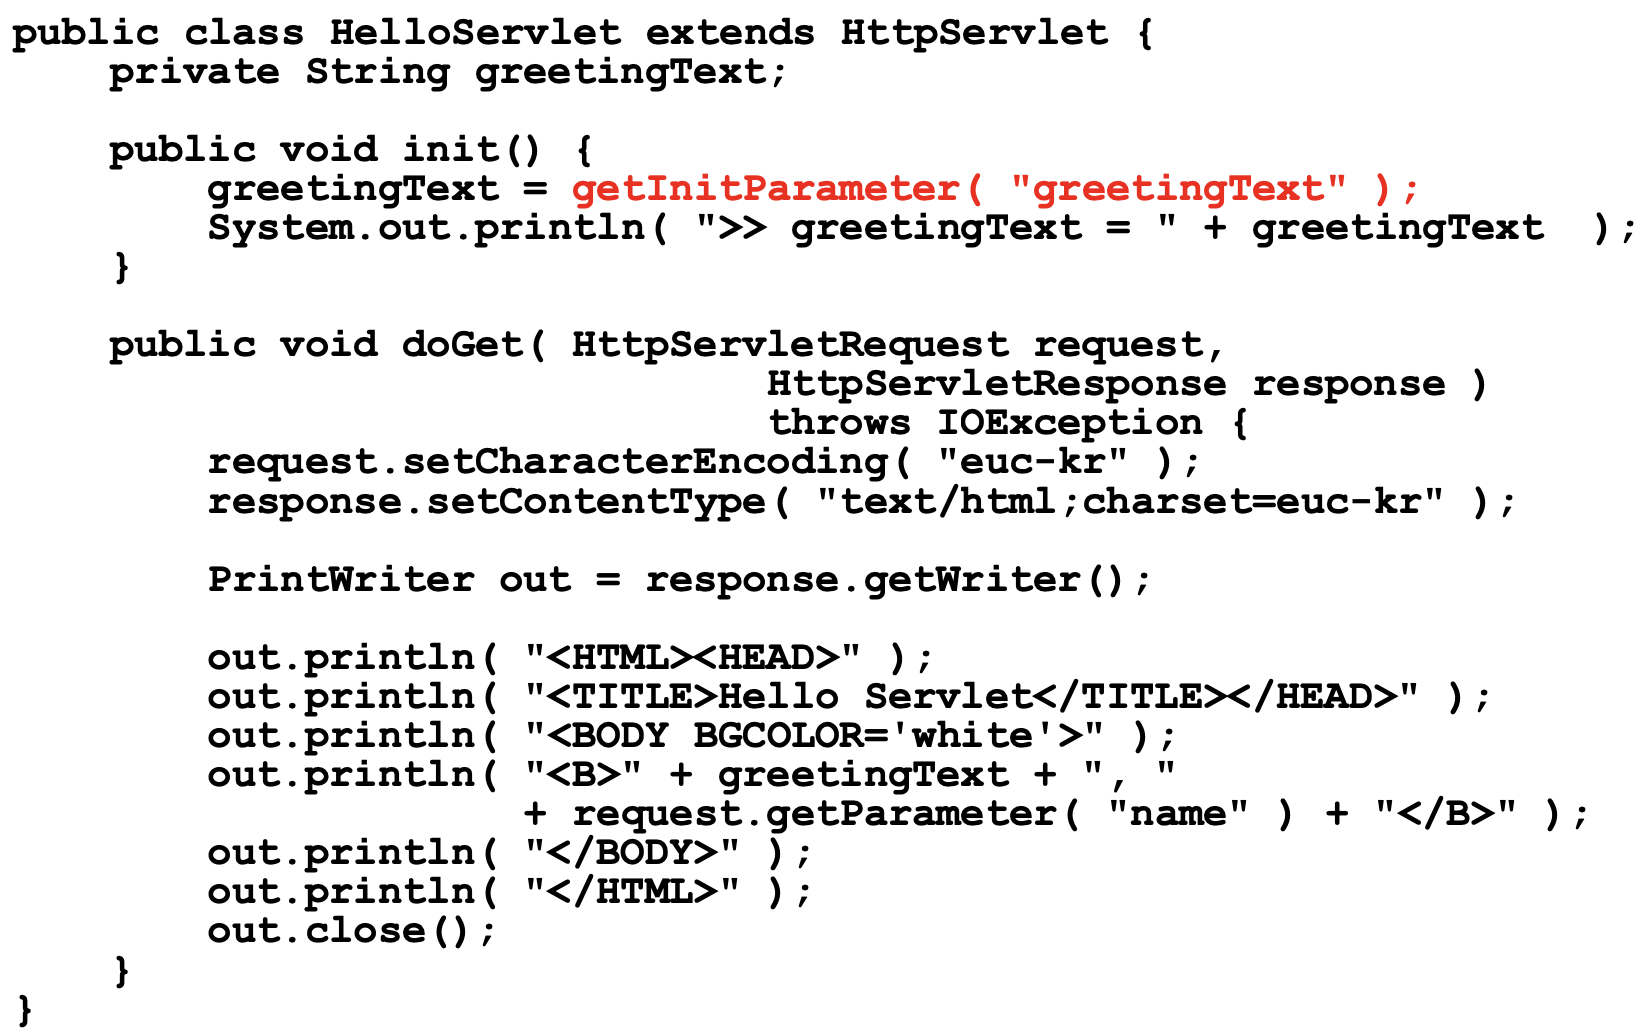
3. Servlet Config API
1) ServletConfig API
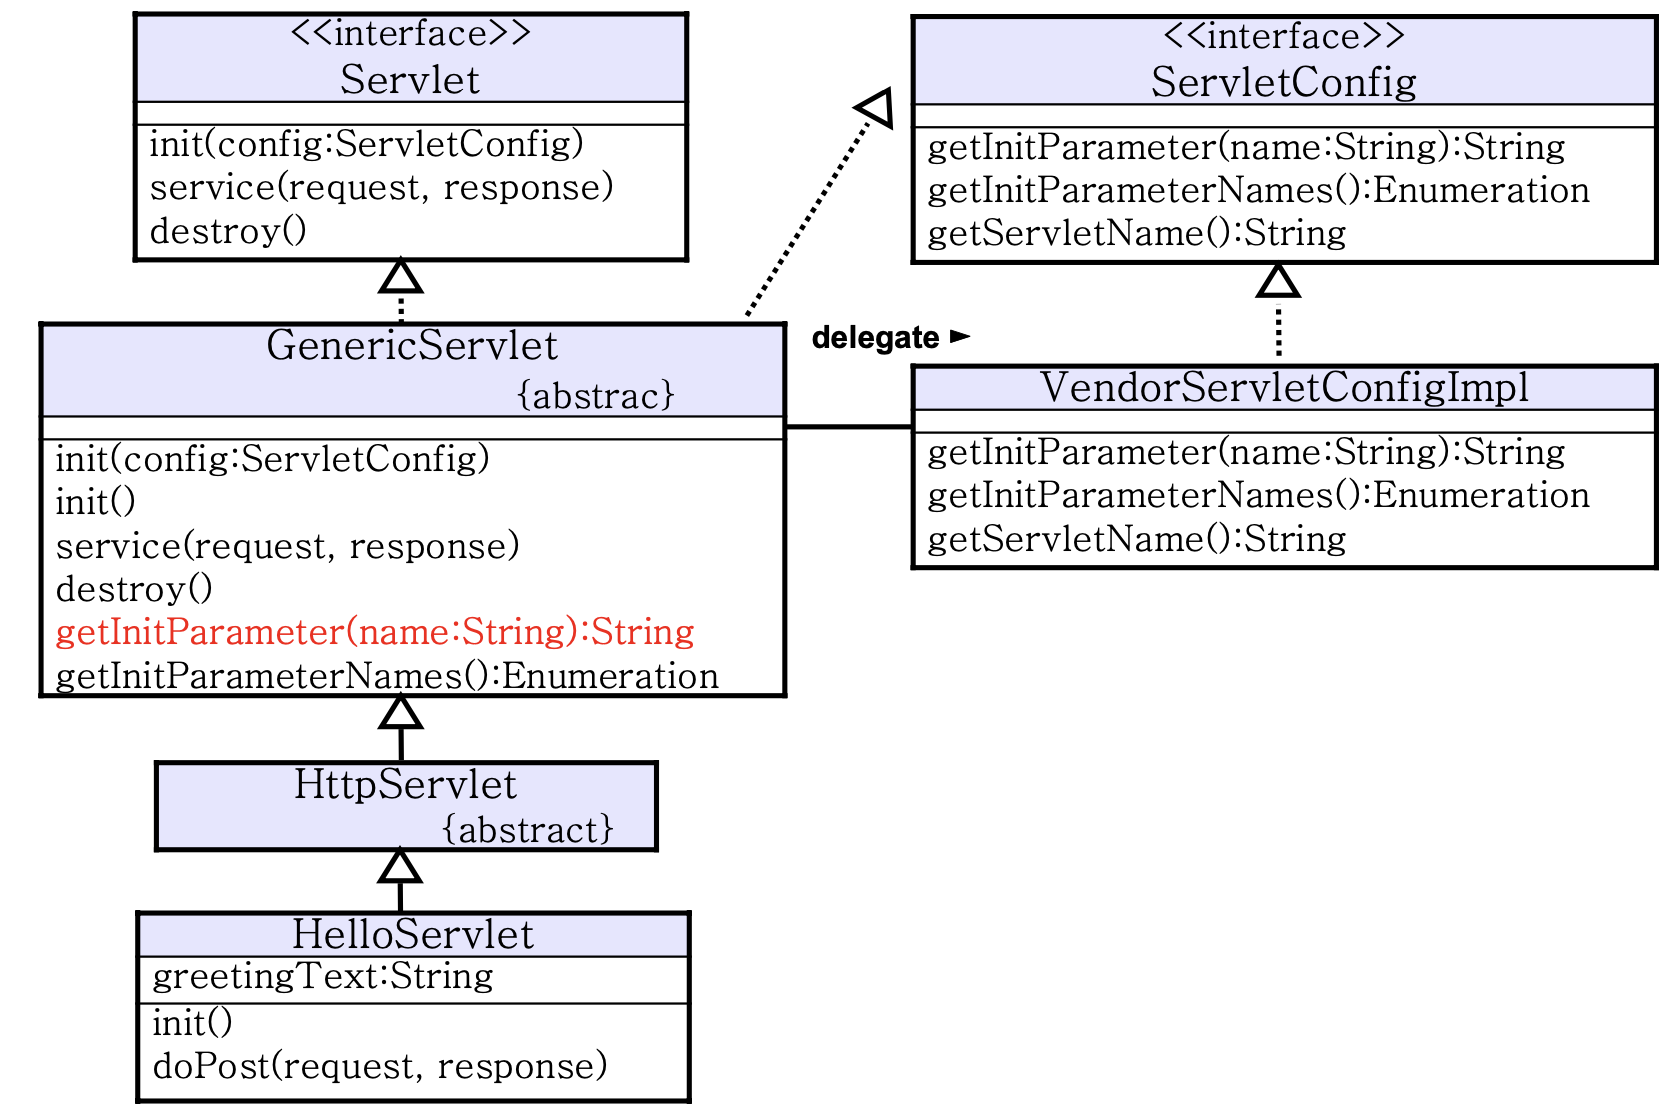
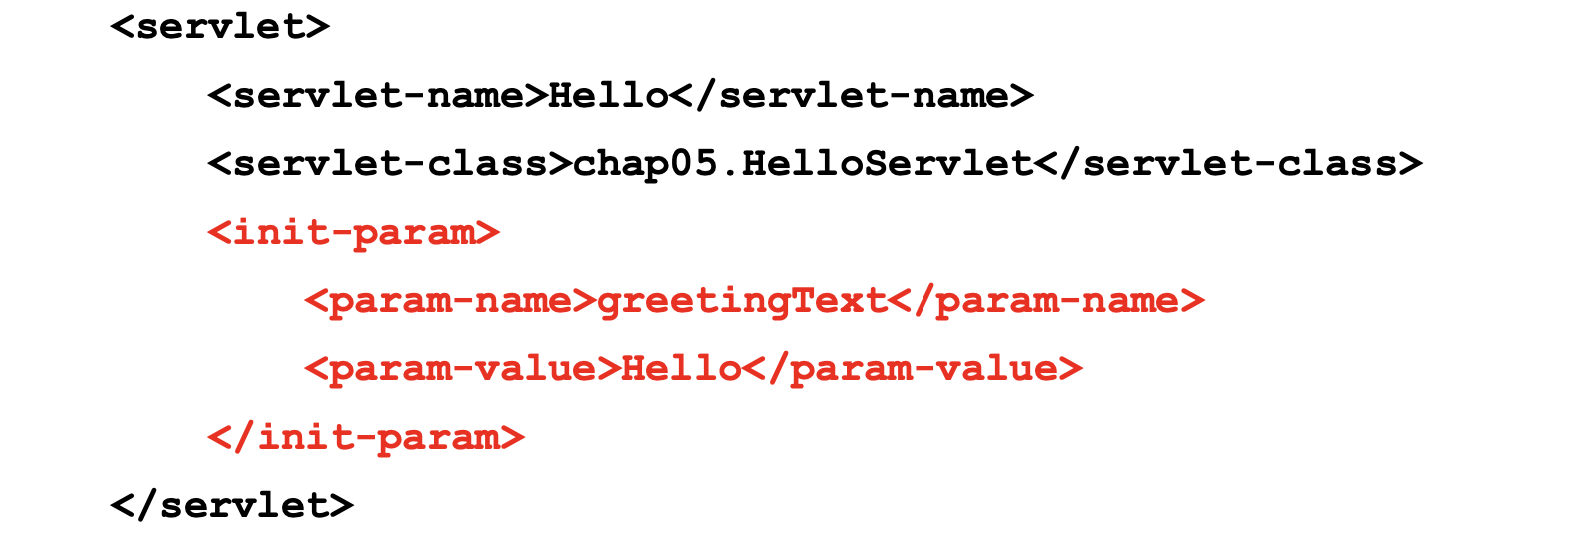
2) DD 설정
- Servlet이 초기화 될 때, 공통적으로 수행되는 작업은 메모리에 모든 외부 자원을 로드하는 것
- 자원의 디렉터리와 파일 경로 정보는 Servlet 초기화 파라미터로 저장됨
📕 Servlet Context
1. Servlet Context
1) Web Application
- HTML 페이지, 미디어 파일, 데이터, 자원 파일, Servlet/JSP, 기타 보조 클래스 및 객체와 같이 필요한 정적/동적 자원을 모두 포함하는 Collection
- Deployment Descriptor는 Web Application에서 사용하는 구조와 서비스를 지정하는데 사용
2) Servlet Context Object
- Web Application의 Runtime 표현
- Web Application == Context
2. Servlet Context API 기능
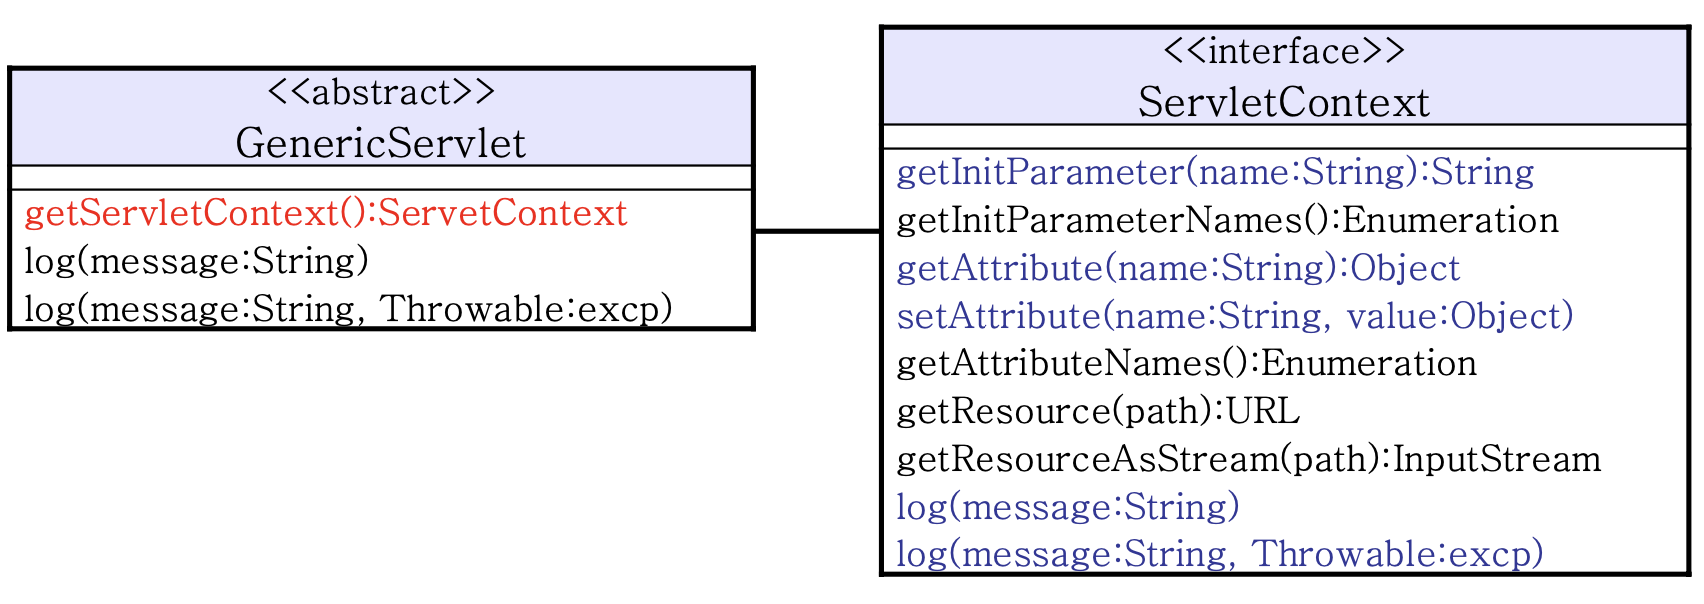
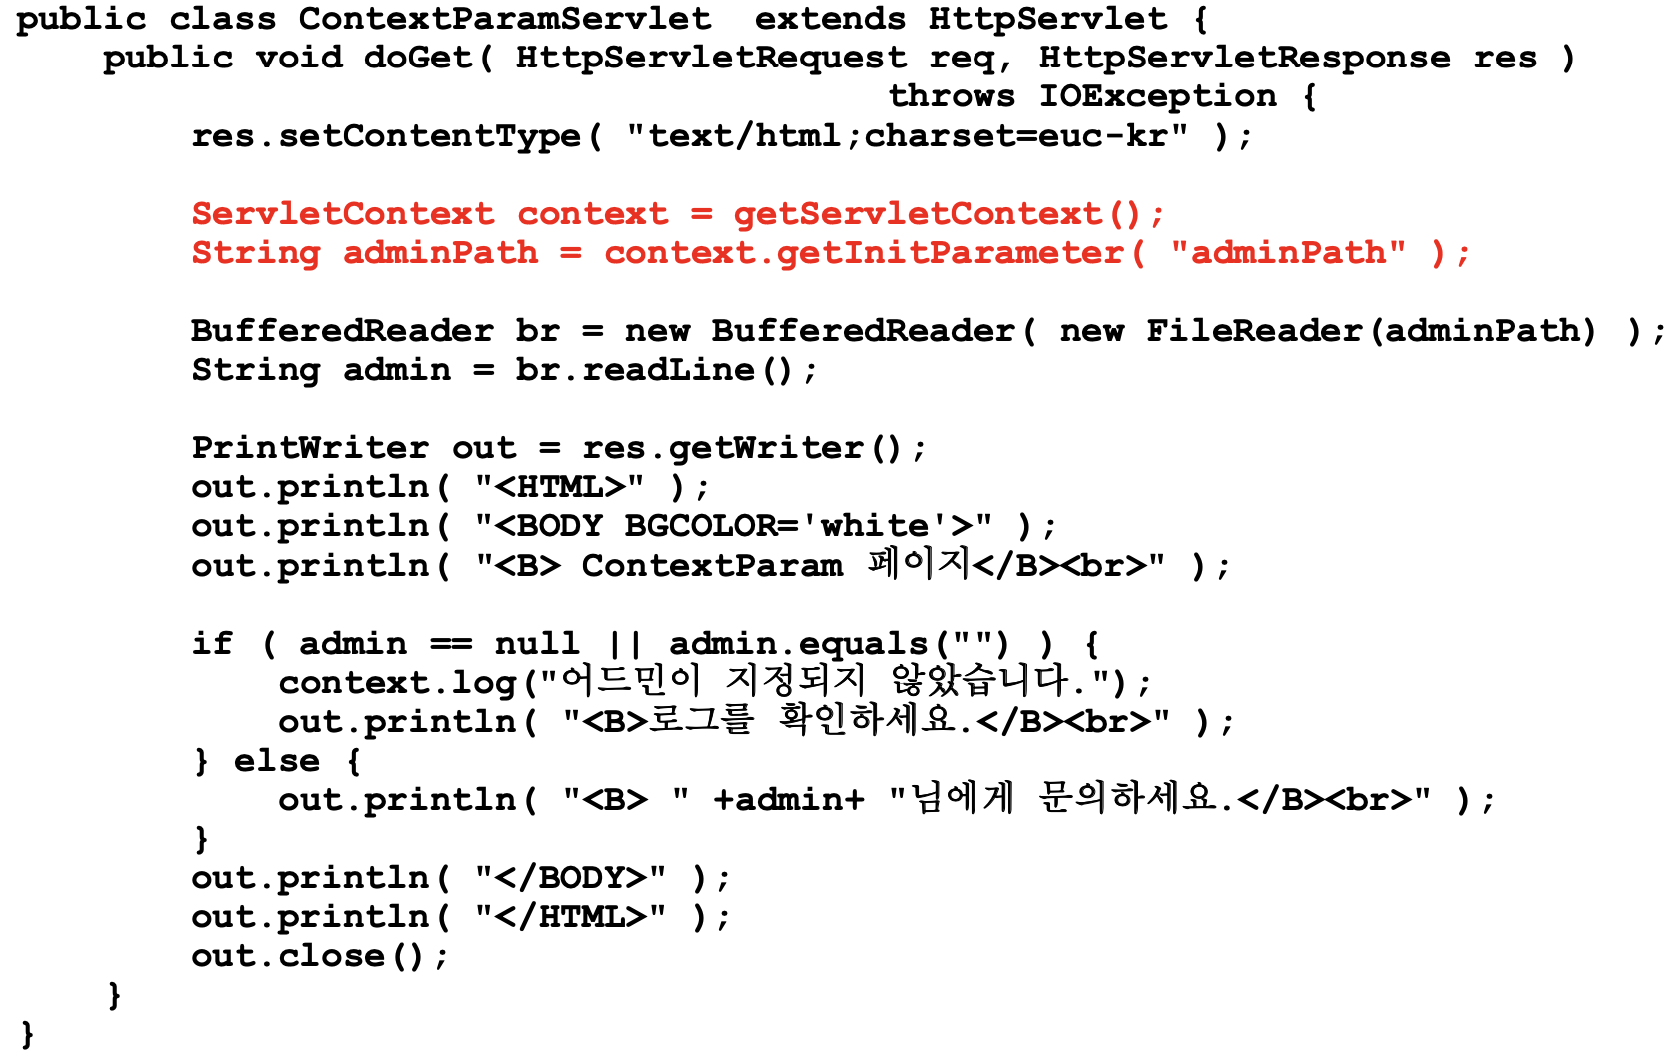
1) Application 범위 초기화 파라미터에 대한 읽기 전용 Access
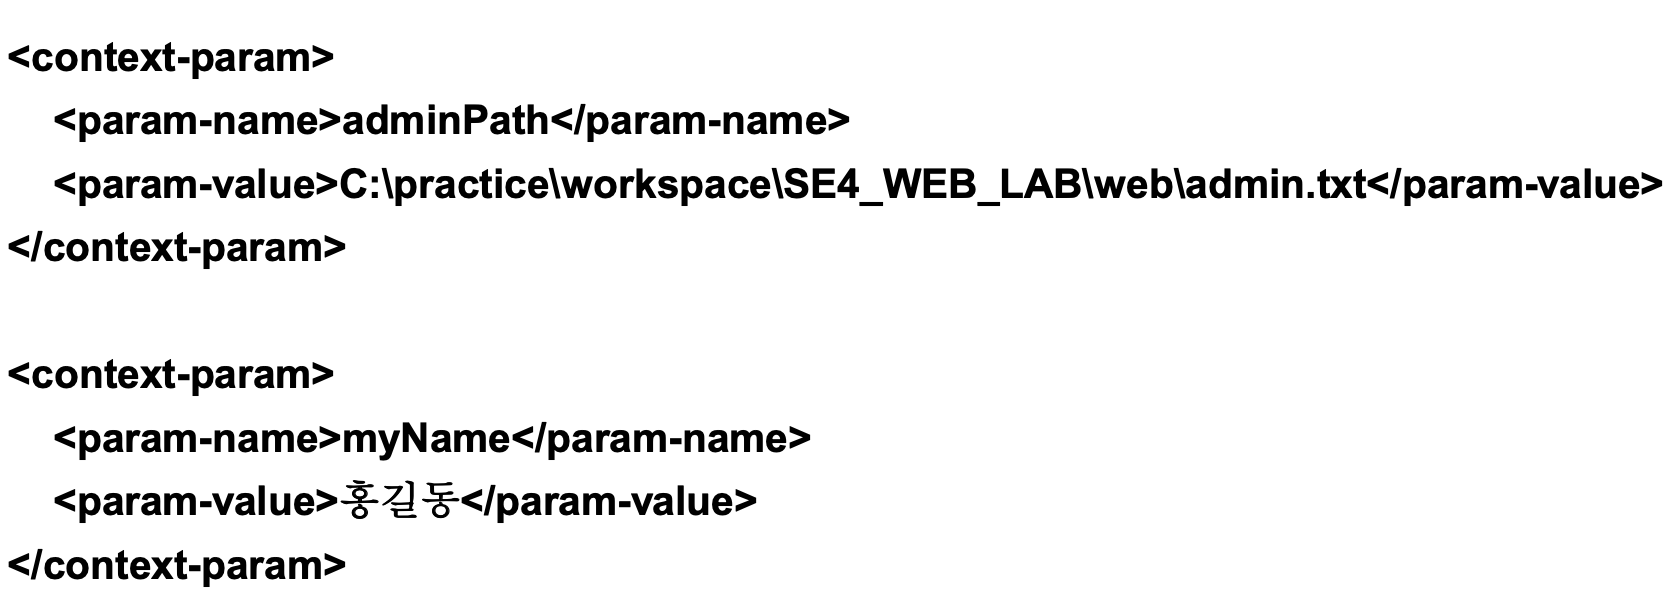
- Context내에서 사용될 초기화 매개 변수 선언 (web.xml)
2) Application수준 파일 자원에 대한 읽기 전용 Access

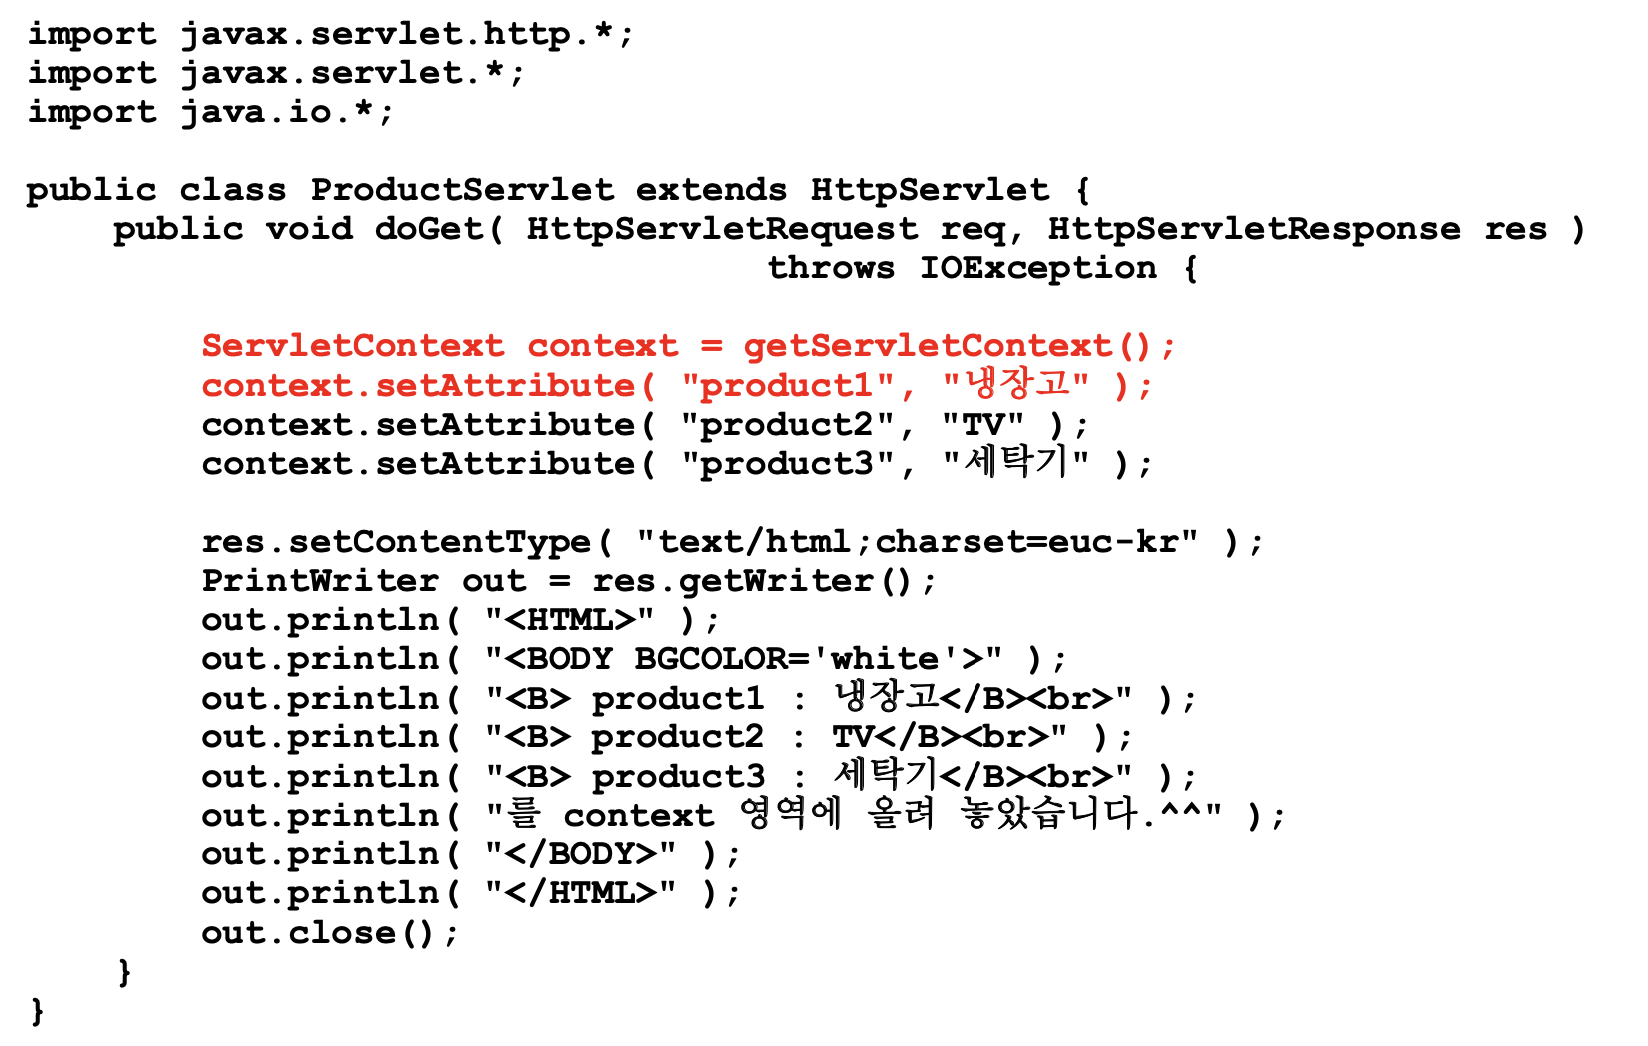
3) Application 범위 속성에 대한 읽기/쓰기 Access
- 읽기 : context.getAttribute()
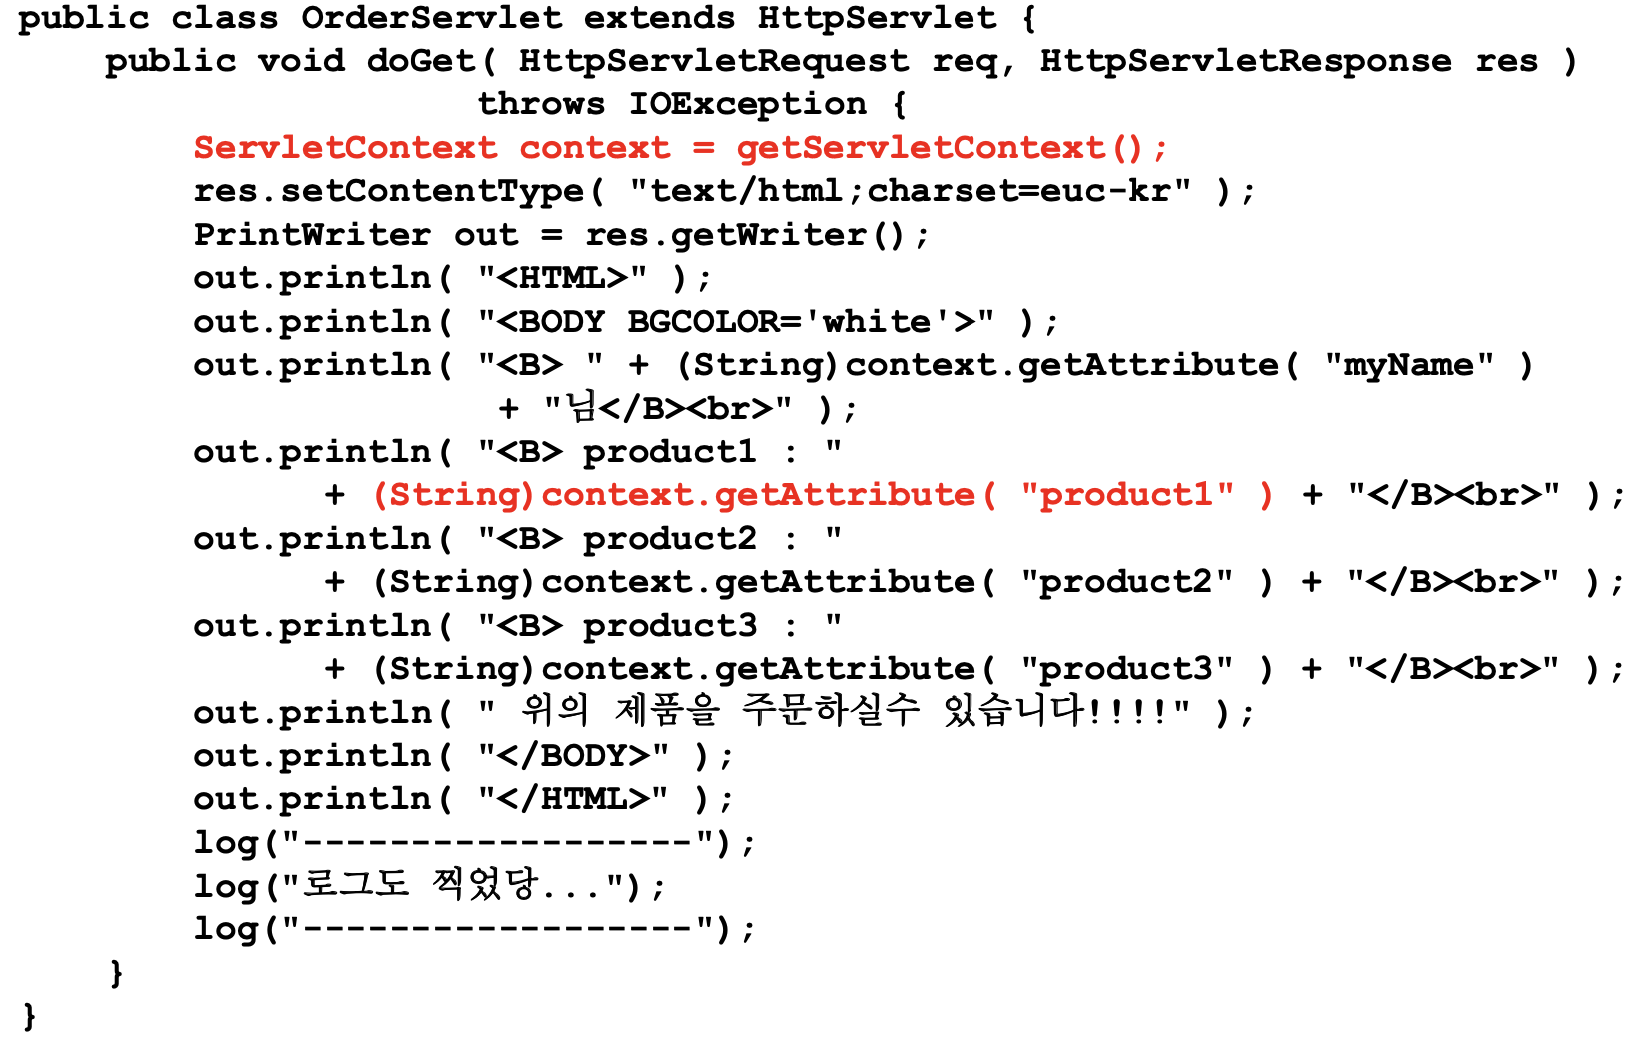
- 쓰기 : context.setAttribute()
4) 로깅 기능
- Log는 날짜별로 별도의 텍스트 파일로 기록됨
- c:\practice\workspace\SE4_WEB_LAB\web\admin.txt 내용을
지우고 다시 servlet 요청 - C:\TOMCAT_HOME \logs\localhost_log.날짜.txt 에서 확인
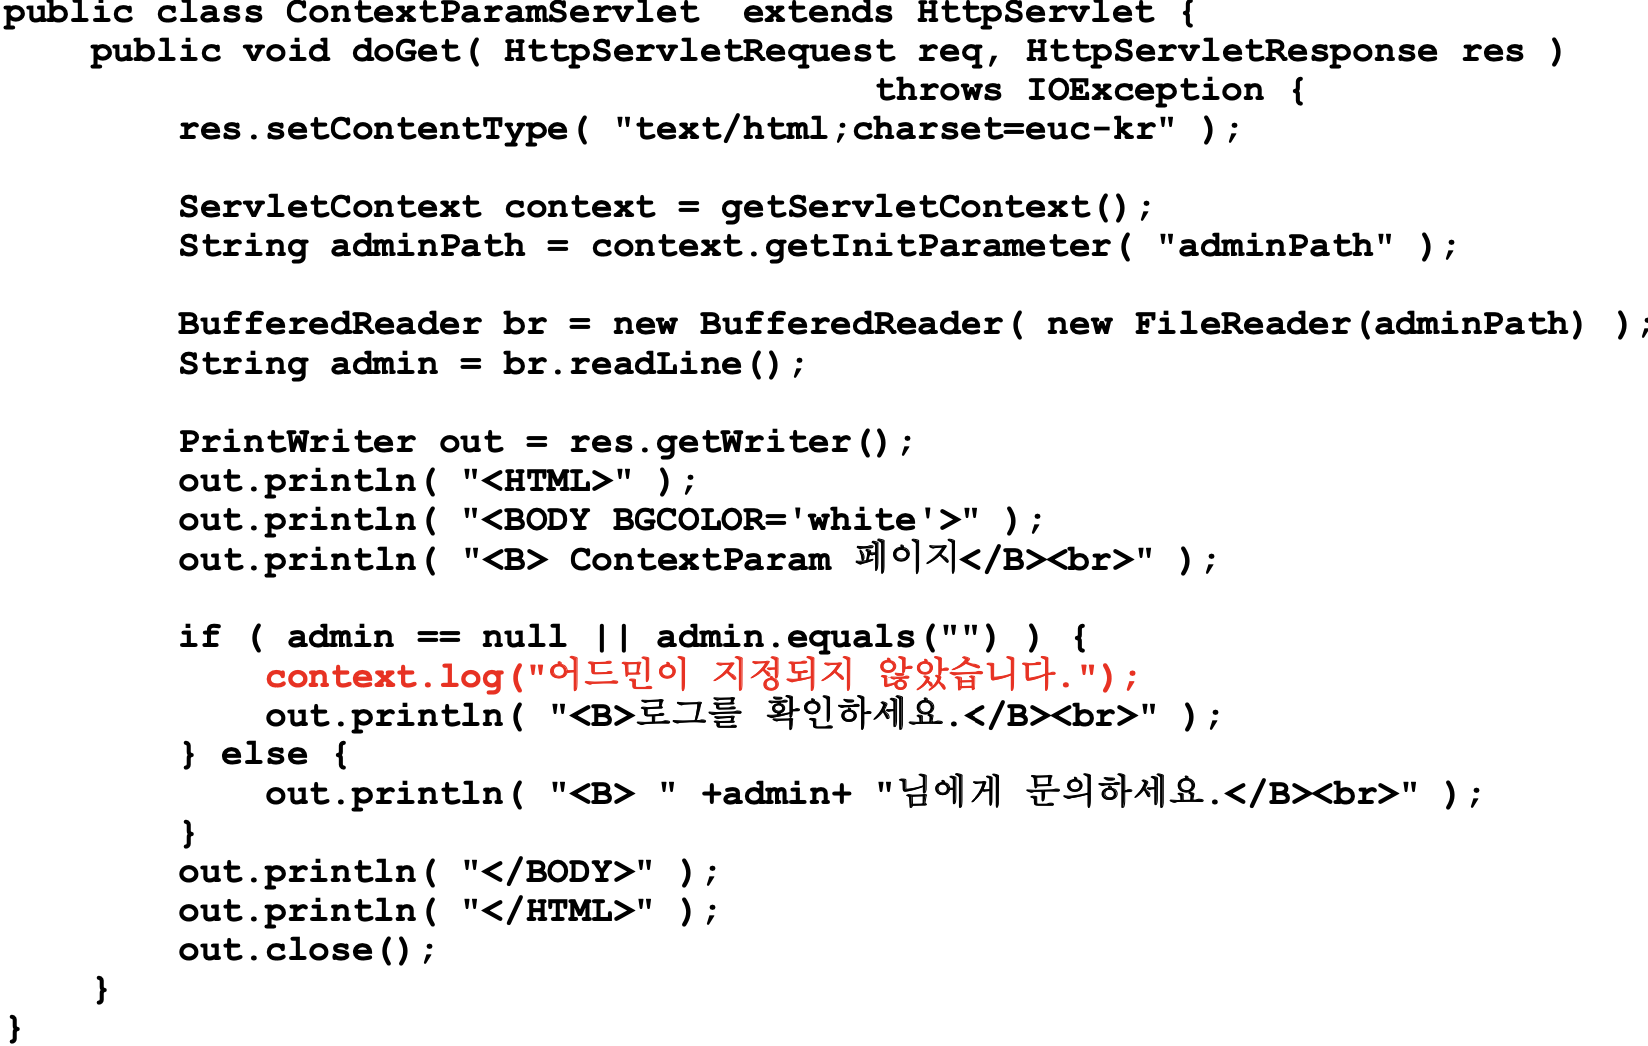
- c:\practice\workspace\SE4_WEB_LAB\web\admin.txt 내용을
3. Servlet Context Listener
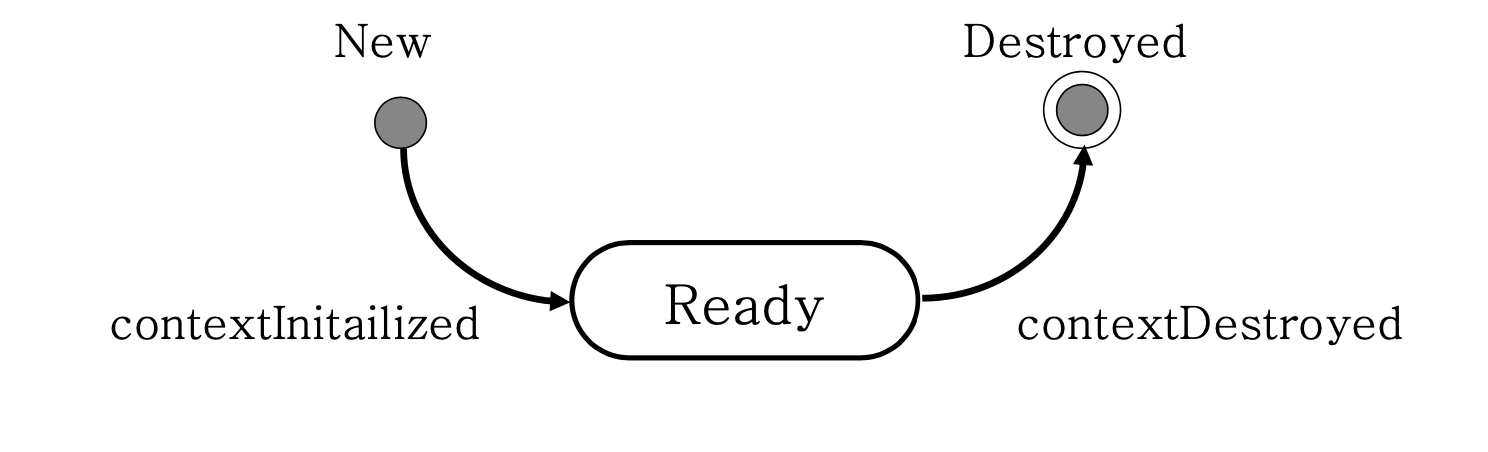
1) Web Application Life Cycle
- Web Application은 Web Container가 시작될 때 초기화되며, Web Container가 종료될 때 제거됨
- Web Application이 시작될 때와 종료될 때 event가 발생하며, event에 트리거되는 것이 ServletContextListener
2) Listener 클래스
-
DD (web.xml)에 listener 클래스 지정
- listener 클래스 여러개 지정 가능
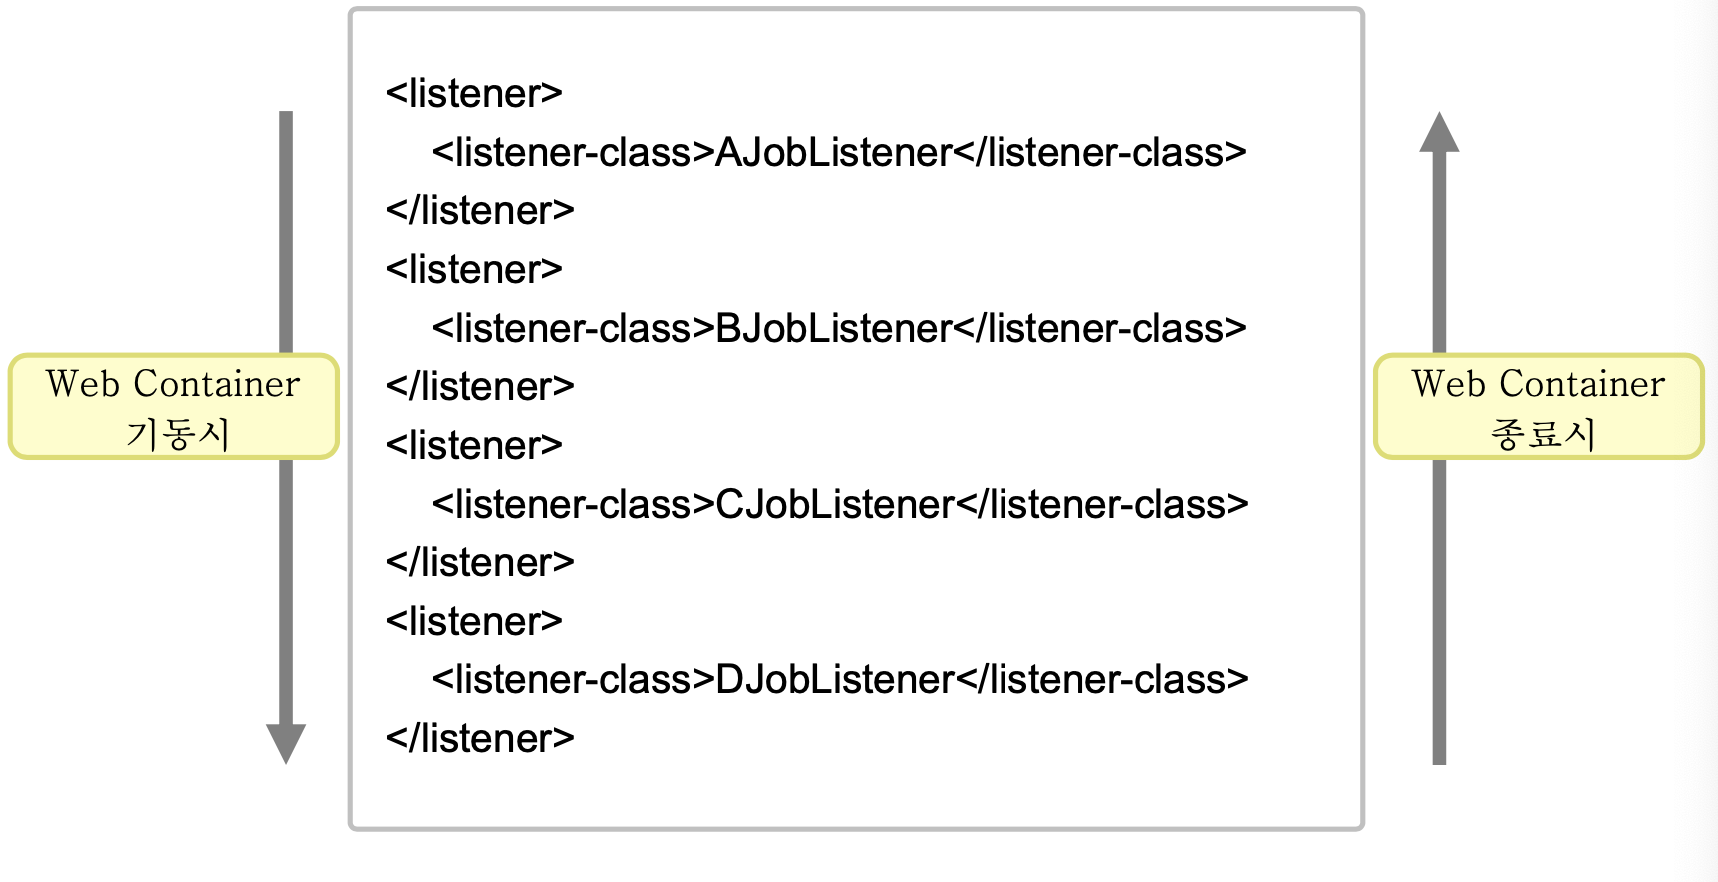
- listener 클래스 여러개 지정 가능
-
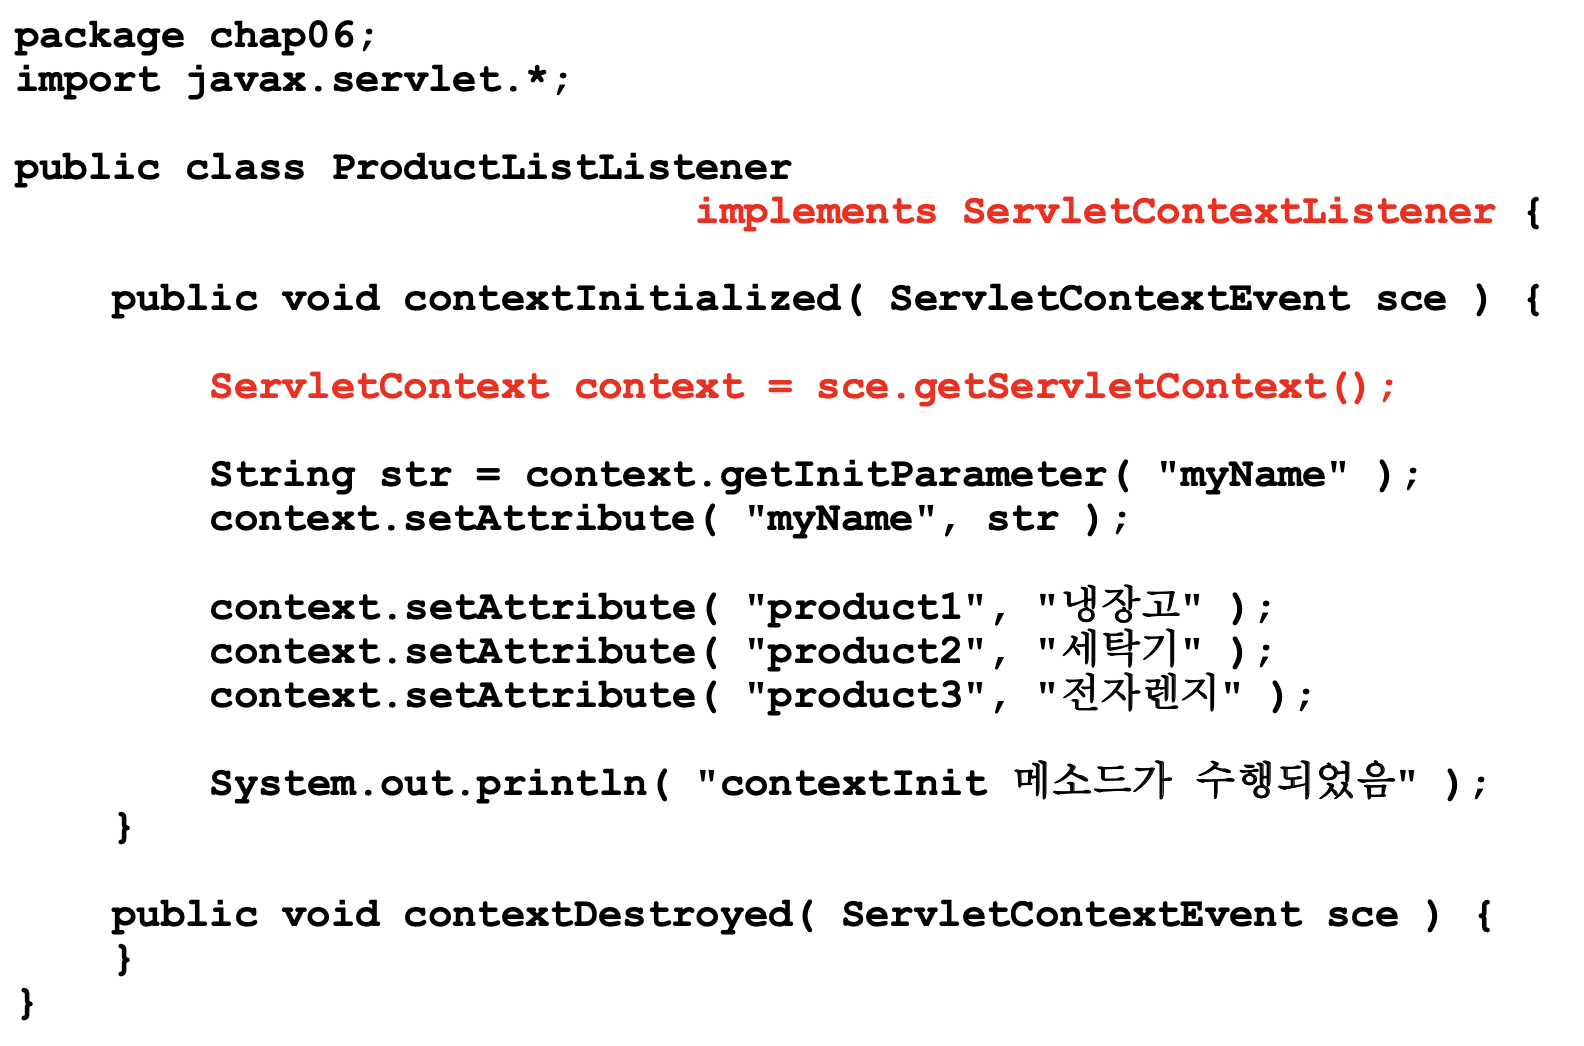
ServletContextListener 인터페이스를 implements하는 클래스를 작성
- contextInitialized()
- Web Application 시작시 호출
- JDBC Connection Pool이나 Biz.객체(카탈로그) 등과 같이 1번 생성하면 Web Application 전체에 걸쳐 사용하는 공유 자원을 초기화하는데 쓰임
- contextDestroyed()
- Web Application 종료시 호출
- Connection 제거, 변경된 공유 자원 Write 등 작업
- contextInitialized()
3) ServletContextListener API
Servlet과 달리 ServletContextListener에서 ServletContext를 이용하기 위해서는 contextInitialized()/constextDestroyed()의 parameter인 ServletContextEvent를 통해 얻어옴

📕 JSP
1. JSP (JavaServer Page)
1) 개념
- HTML 페이지에 Java 코드를 추가할 수 있게 해주는 기술
- Presentation과 Business logic 분리가 목적
- 페이지 요청시, Web Container에 의해 서블릿이 변환 되어 서블릿 수행됨
2) 특징
- JSP 파일을 변경하지 않는다면, .jsp파일에 대한 컴파일은 다시 일어나지 않음
- JSP 파일을 변경할 때마다 Web Container는 complile, load, initialization의 과정을 수행함
- JSP 파일 변경시에는 Tomcat을 shutdown/start 과정을 할 필요가 없음
- JSP의 배포 환경은 html과 같음
- 구 버전의 JSP 파일을 overwrite할 경우 제대로 반영이 되지 않는 경우가 발생할 수 있음
- 장점
- Web Designer가 Java를 몰라도, 페이지 디자인이 가능함
- Java 프로그래머가 Web Design을 건드리지 않고 코드 작성 가능
3) JSP 내부 변환 과정
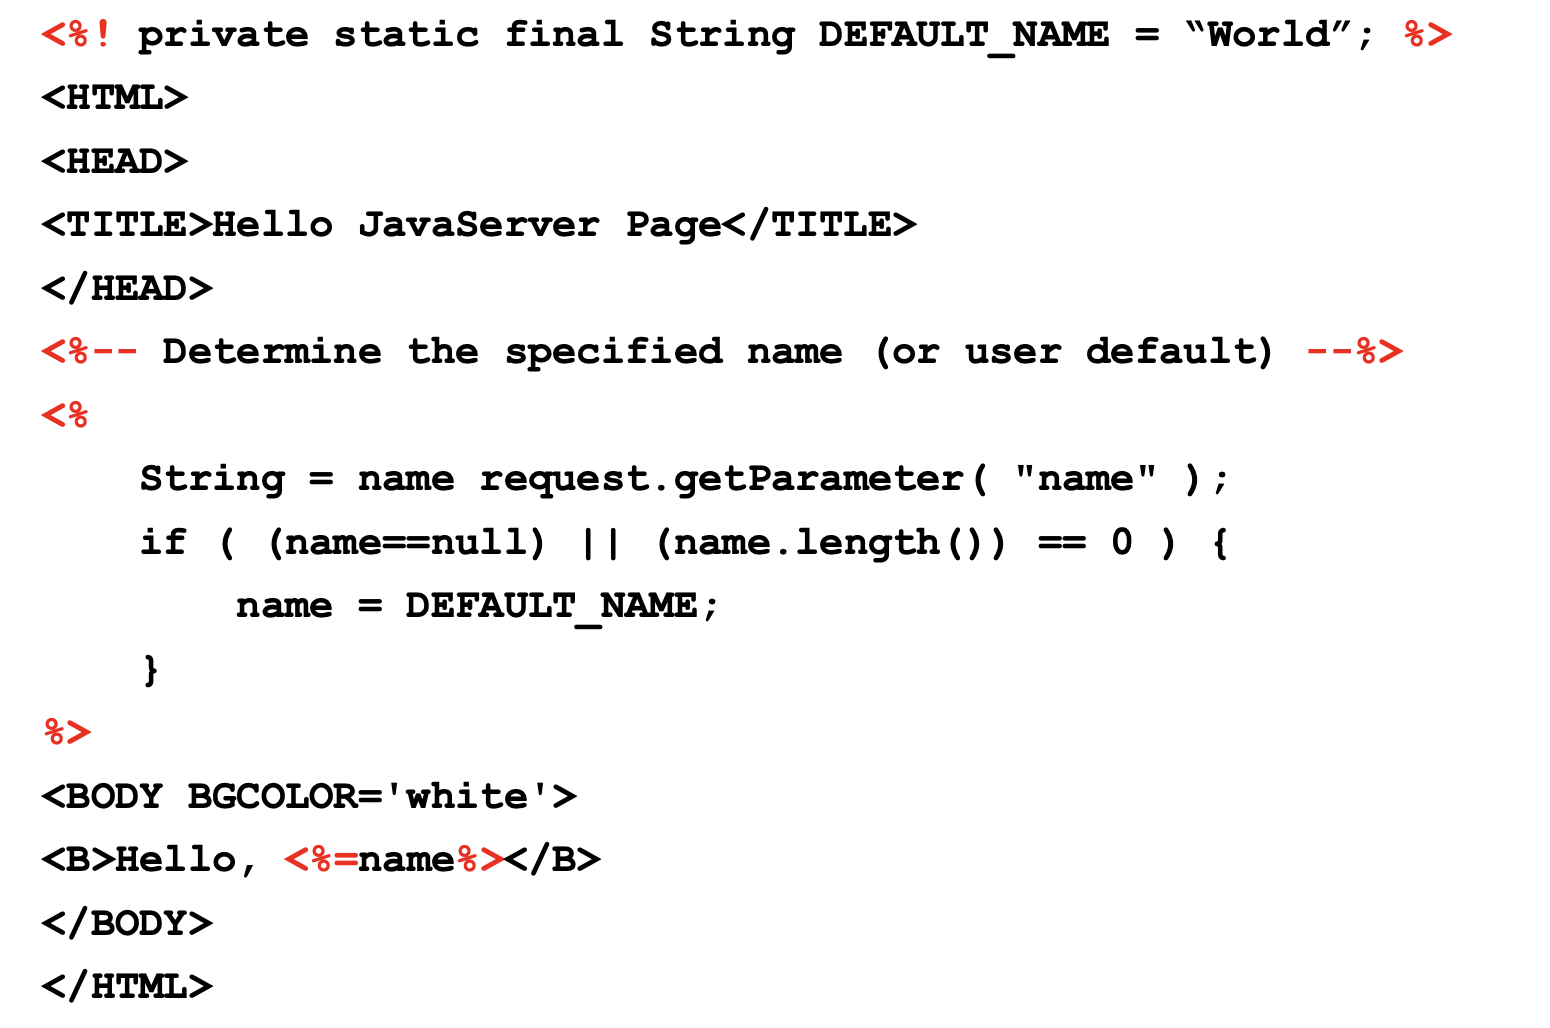
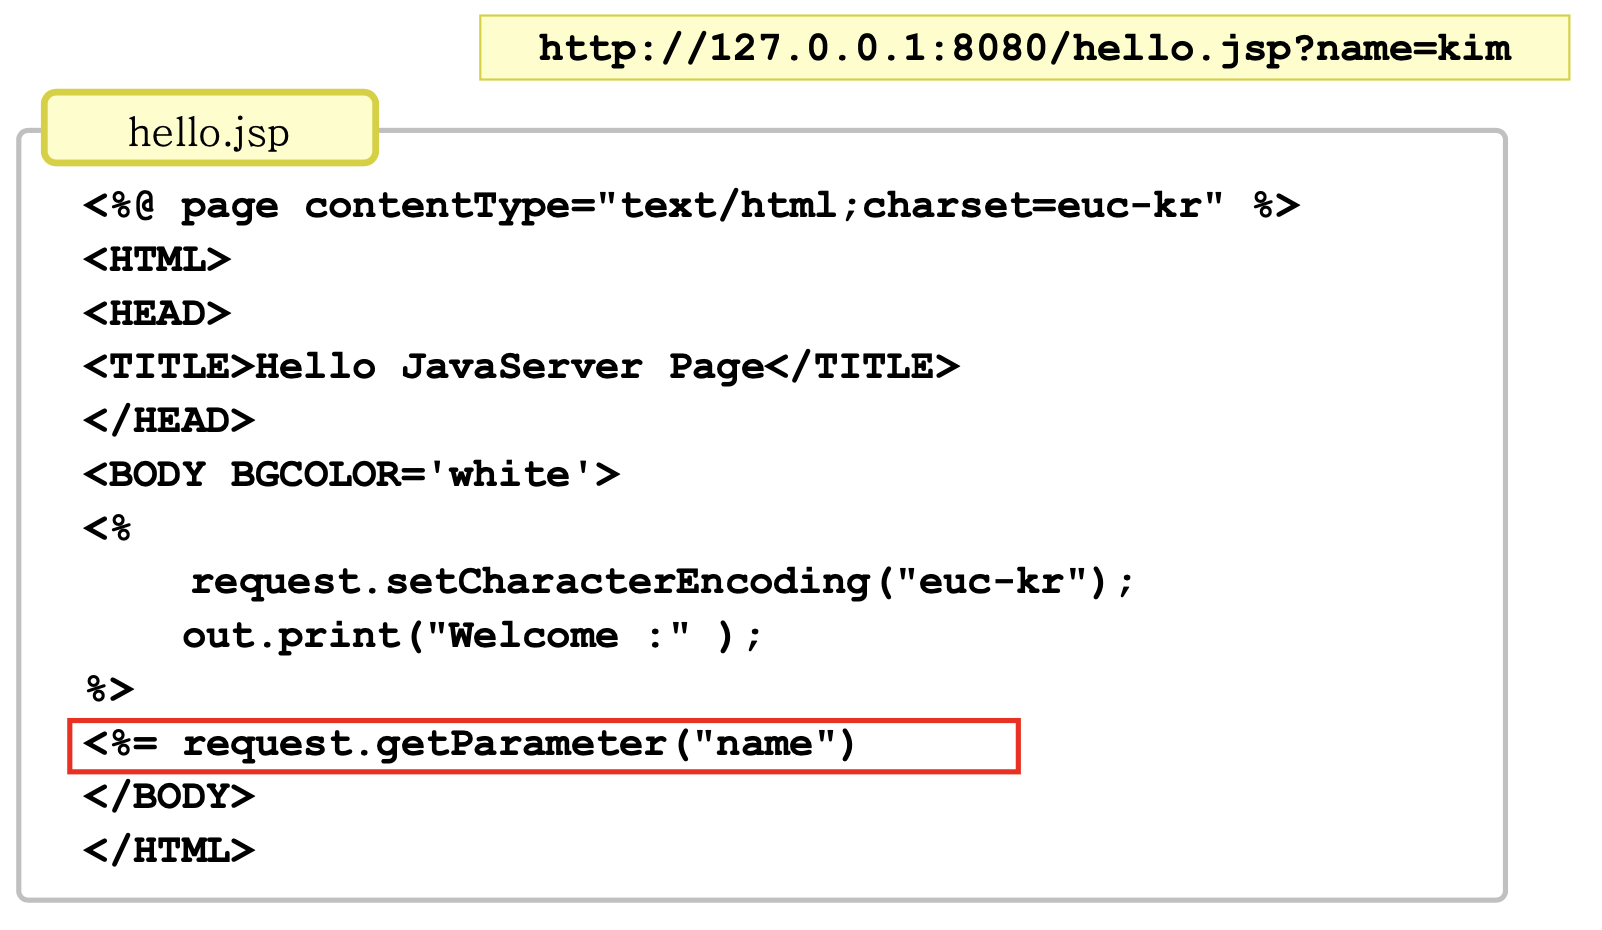
- 1️⃣ : jsp 코드 작성
<%@ page contentType="text/html;charset=euc-kr" %>
<HTML>
<HEAD>
<TITLE>Hello JavaServer Page</TITLE>
</HEAD>
<BODY BGCOLOR='white'>
<%
	request.setCharacterEncoding( "euc-kr" );
    out.print( "Hello, " );
%>
<%= request.getParameter( "name" ) %>
</BODY>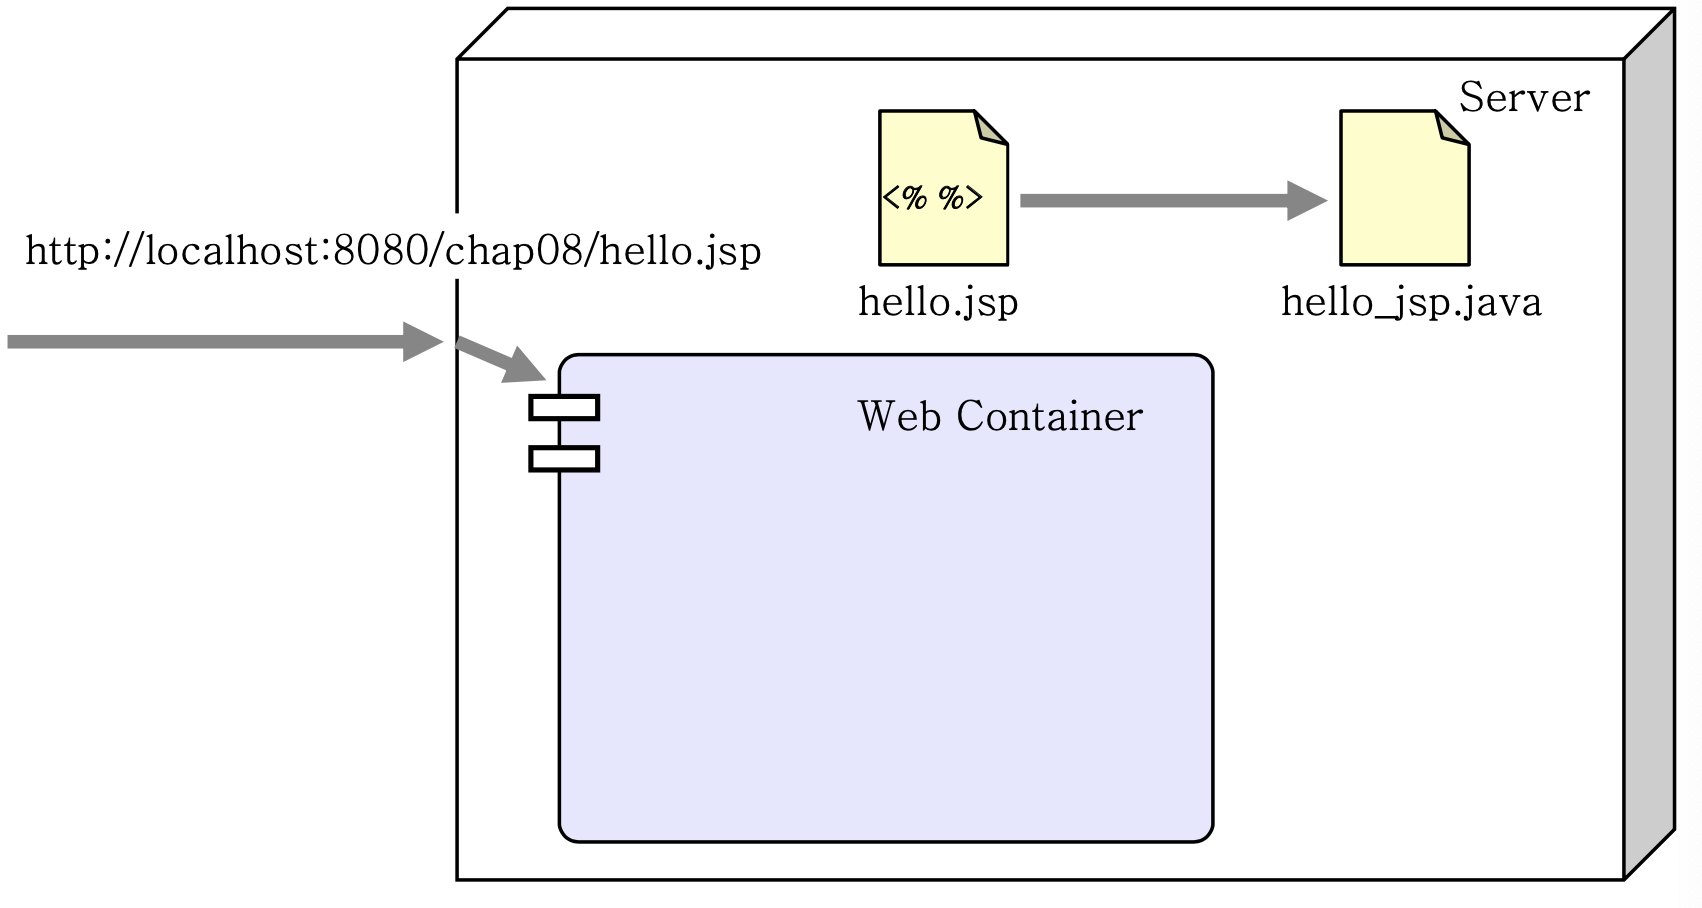
</HTML>- 2️⃣ : 웹 브라우저에서 url 호출
http://127.0.0.1:8080/chap08/hello.jsp?name=kim- 3️⃣ : 생성된 java 파일 확인
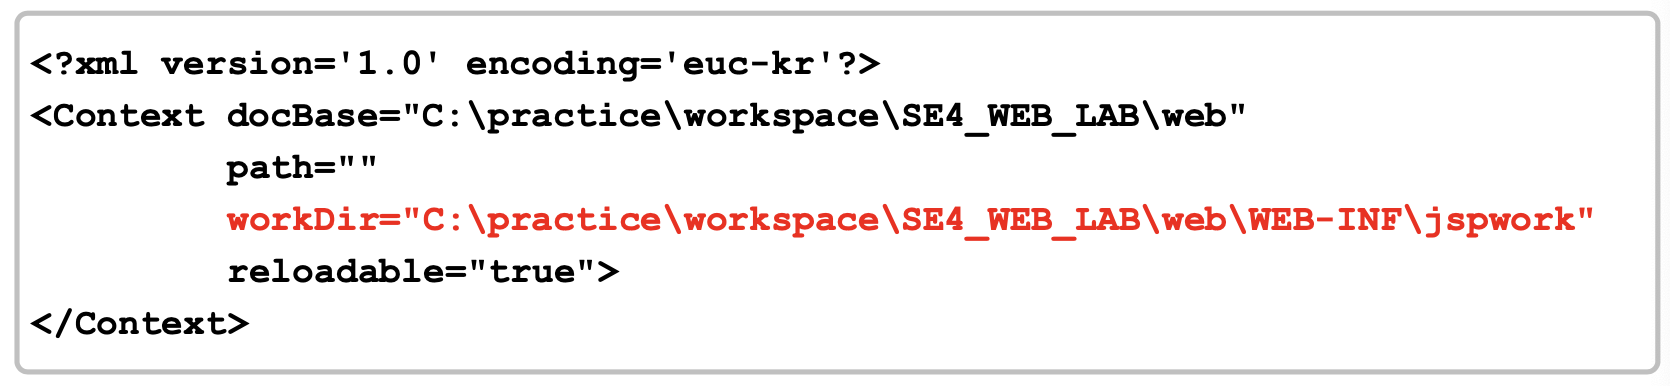
- 4️⃣ : 변환된 java 파일 생성 위치 지정 (Root.xml)
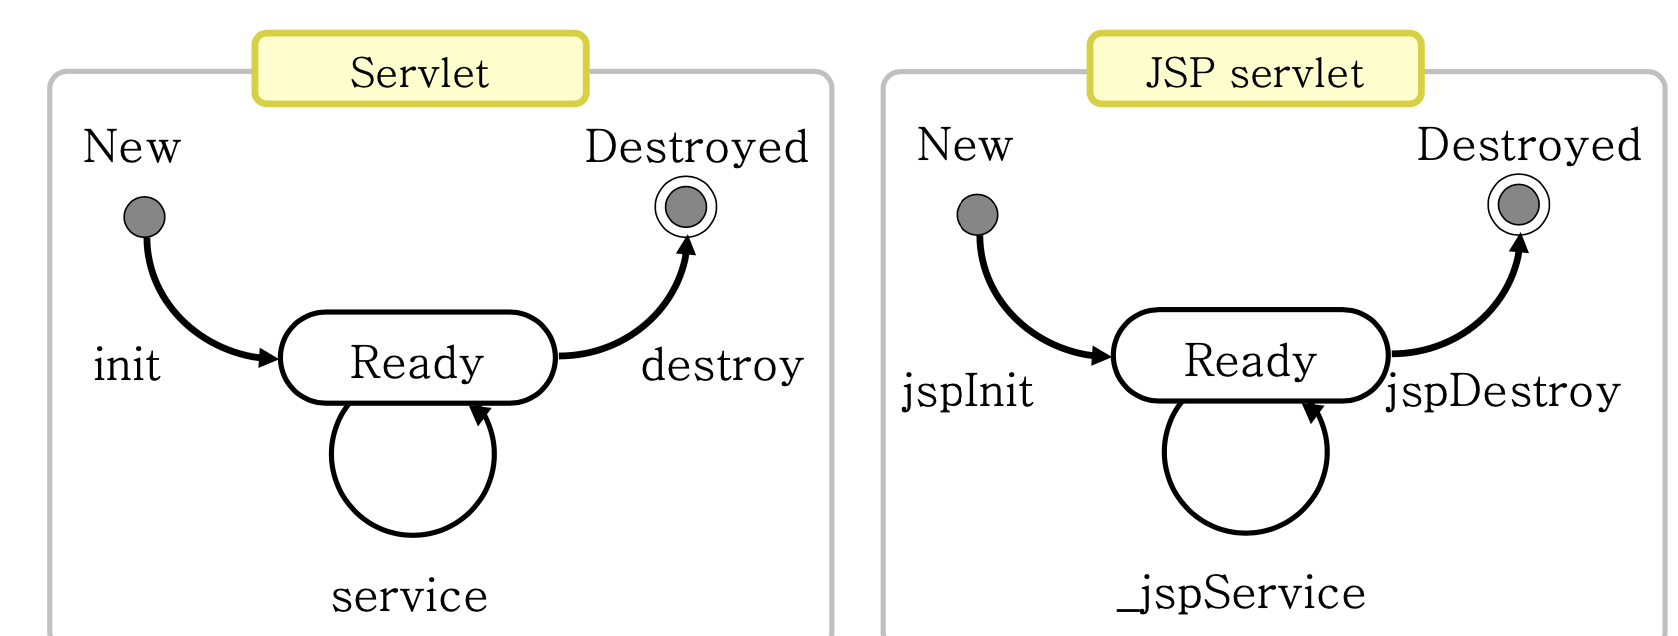
2. JSP 실행 방식
1) JSP에 대해 첫 번째 요청이 오면, Web Container는 .jsp를 Servlet(.java)으로 변환
2) Web Container는 .java를 .class로 컴파일하고, Web Container의 JVM에 의해 컴파일된 클래스 파일은 load됨
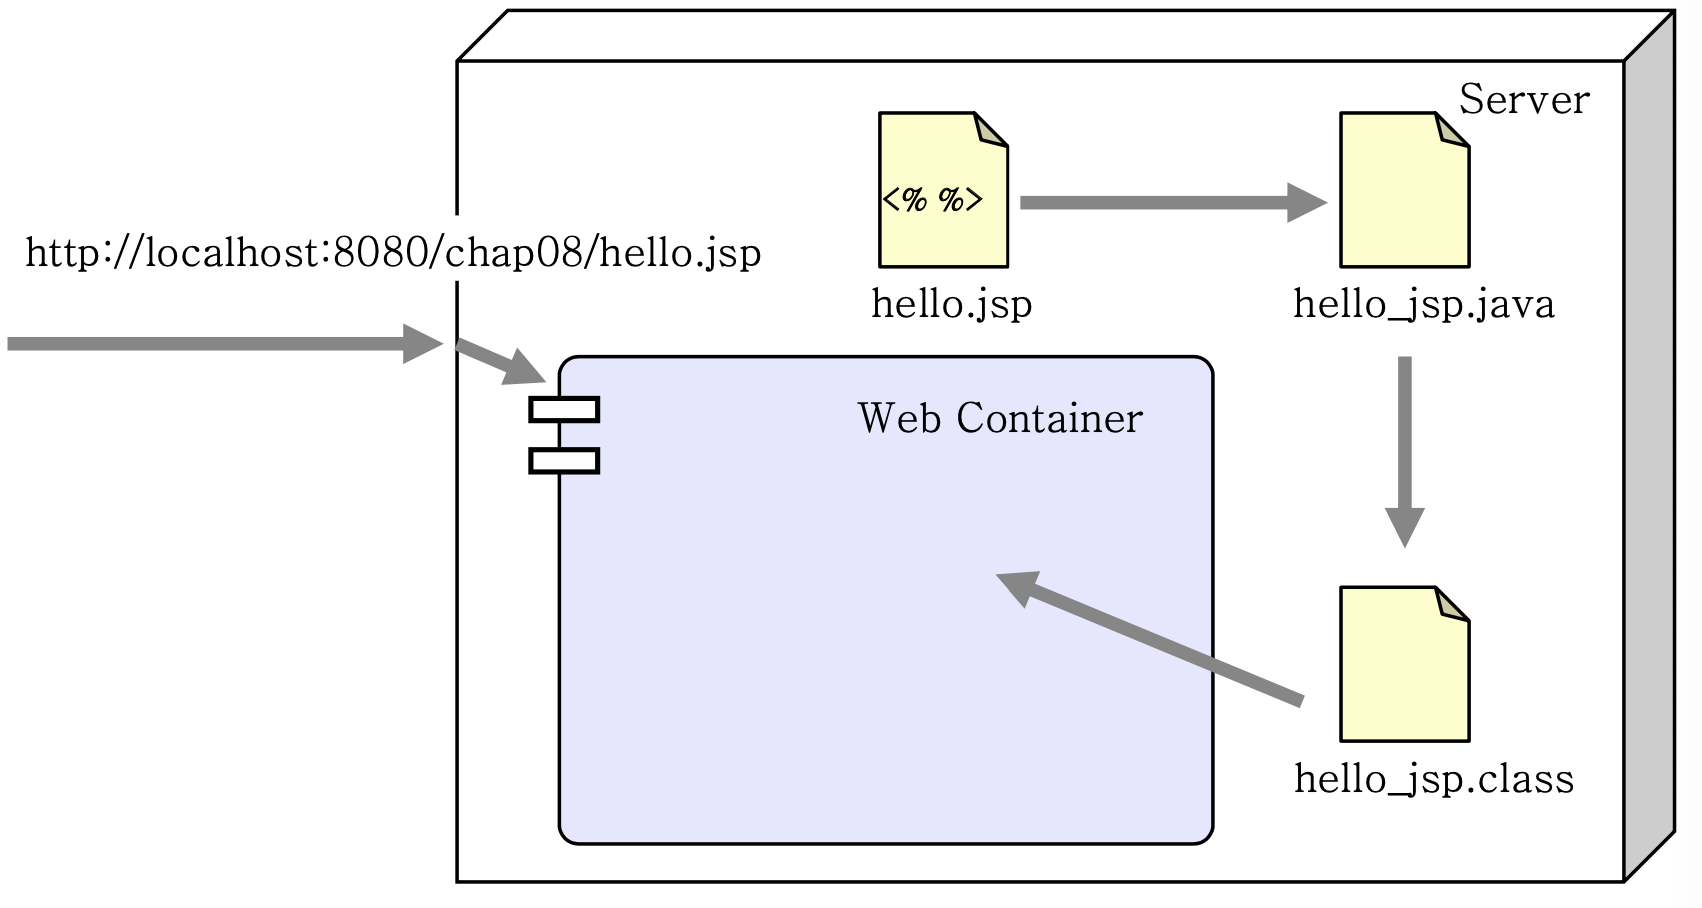
3) Web Container는 Servlet 인스턴스를 생성하고, jspInit 메소드를 호출함
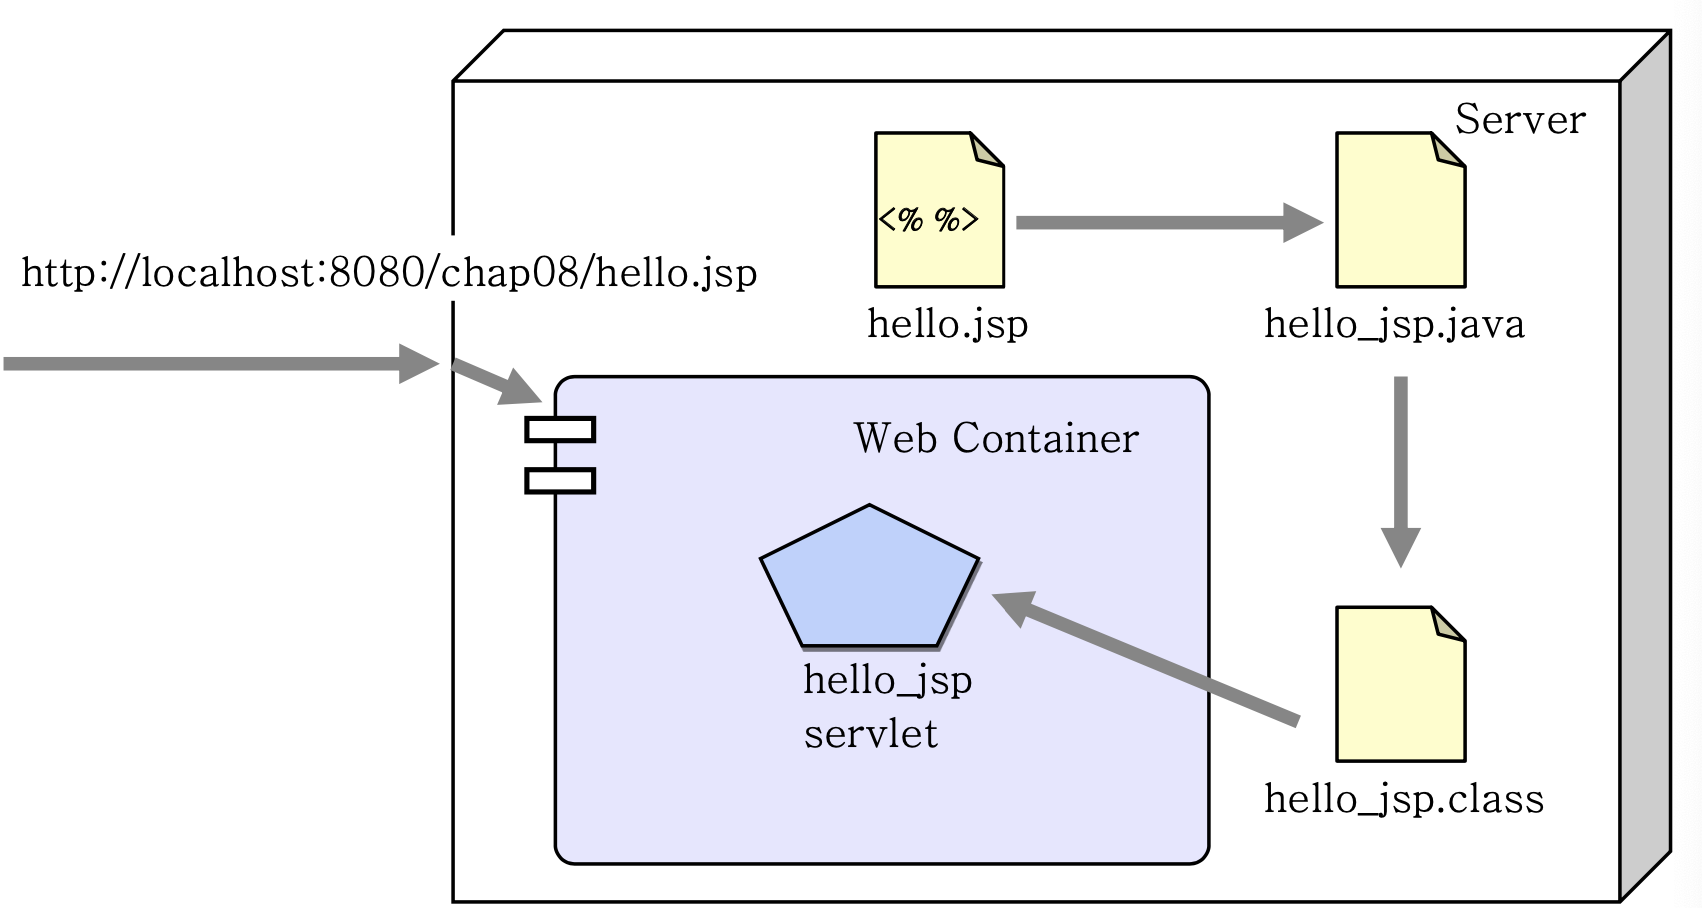
4) Web Container는 jspService 메소드를 호출하여 사용자를 처리하고, 응답을 줌
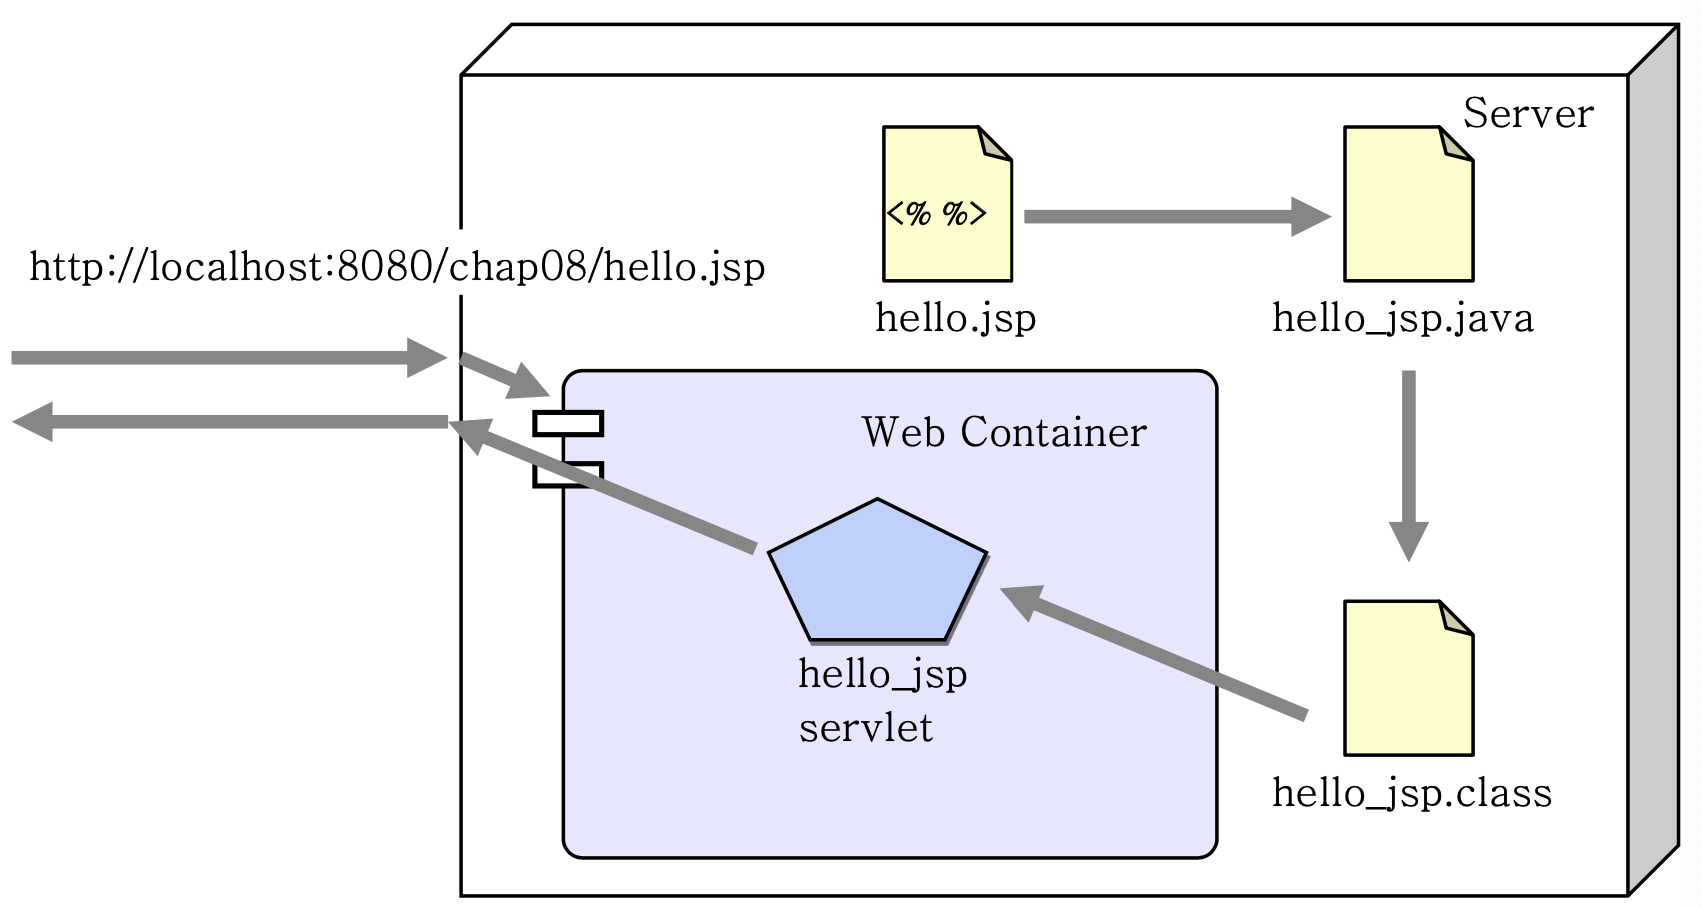
5) Web Container가 JSP Servlet 인스턴스를 제거할 때는, jspDestroy를 호출하여 마무리 작업을 함
3. JSP Scripting Element
1) 종류
- Comments : <%-- comments --%>
- Directive tag : <%@ directive %>
- Declaration tag : <%! decl %>
- Scriptlet tag : <% code %>
- Expression tag : <%= expr %>
2) 주석 종류
- HTML comments (XML도 동일)
- HTTP response로 보내지지만, 화면에는 보이지 않음 (소스 보기로 볼 수 있음)
- <!-- This is HTML Comments -->
- JSP page comments
- JSP 파일 내에서만 존재하고, servlet code로 바꿔질 때는 포함되지 않음
- <%-- This is JSP Comments -->
- Java comments
- servlet code에는 존재하나, HTTP response로 전해지지는 않음
- <% This is Java Comments %>
3) Directive Tag
- 전체 JSP page에 영향을 미치는 정보를 기술할 때 사용
- 문법
- <%@ DirectiveName [attr="value"]* %>
- Directive Types
- page
- <%@ page session="false" %>
- <%@ page contentType="text/html; charset=euc-kr" %>
- <%@ page import="java.io.*" %>
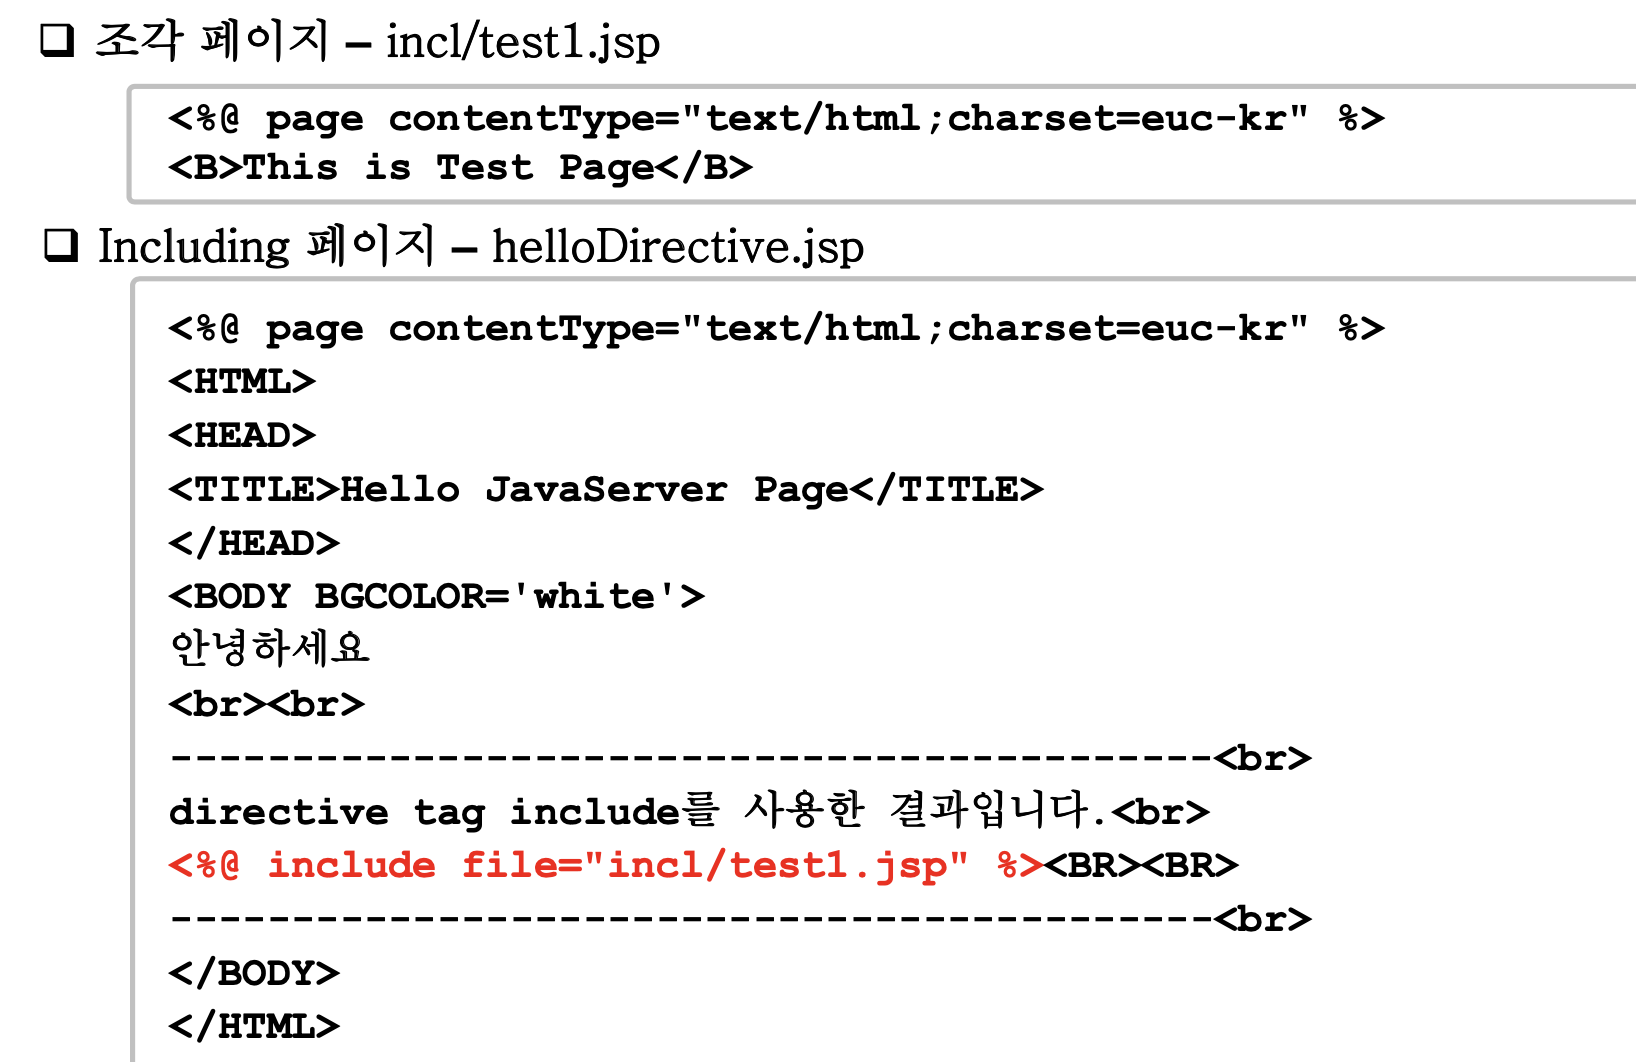
- include
- <%@ include file="incl/copyright.html"%>
- taglib
- page
4) Direction Tag
- Servlet 클래스의 멤버변수/멤버메서드에 해당하는 코드를 작성하게 해주는 tag
- 문법
- <%! JavaClassDeclaration %>
- 멤버변수 선언
- <%! public static final String DEFAULT_NAME="World"; %>
- <%! int counter = 0; %>
- 멤버메서드 선언
- <%! public String getName(HttpServletRequest req) { return req.getParameter("name"); } %>
5) Scriptlet Tag
- jspServlet 메서드의 로컬 변수와 코드를 작성하는 tag
- 문법
- <% JavaCode %>
- 로컬변수 선언
- <% int i = 0; %>
6) Expression Tag
- out.print()의 역할
- ;을 붙이지 않음
- 문법
- <%= JavaExpression %>
4. Implicit Variables (내장 변수)
- Scriptlet tag와 Expression tag에서 사용할 수 있는 암시적으로 선언된 변수
- 종류
- request : HttpServletRequest 객체 참조 변수
- response : HttpServletResponse 객체 참조 변수
- out : JspWriter 객체 참조 변수
- session : HttpSession 객체 참조 변수
- application : ServletContext 객체 참조 변수
- config : Servlet Config 객체 참조 변수
- pageContext : 단일 요청의 환경에 대한 변수
- page : 자바 클래스의 this와 동일
- exception : 발생하는 Throwable 객체에 대한 참조 변수
5. Page Directive
1) 개념
- 한 JSP page 전체에 대한 지시구문을 선언함
- 여러 개의 page 구문을 사용할 수 있지만, import 속성을 제외하고 한 페이지에 한 번씩만 선언할 수 있음
- page 지시어는 JSP 파일의 어느 위치에 와도 상관 없으나, 가장 첫 부분에 사용하는 것이 좋음
<%@ page import="java.util.Date" %>
<%@ page contentType="text/html; charset=euc-kr" %>
2) 종류
- import
- 필요한 package를 import함
- 여러 package import시 , 기호로 구분
- <%@ page import="java.io.*, java.util.Date" %>
- session
- JSP 페이지를 HTTP 세션에 참여시킬지 여부를 정의함
- 값은 true (default) 또는 false
- <%@ page session="true" %>
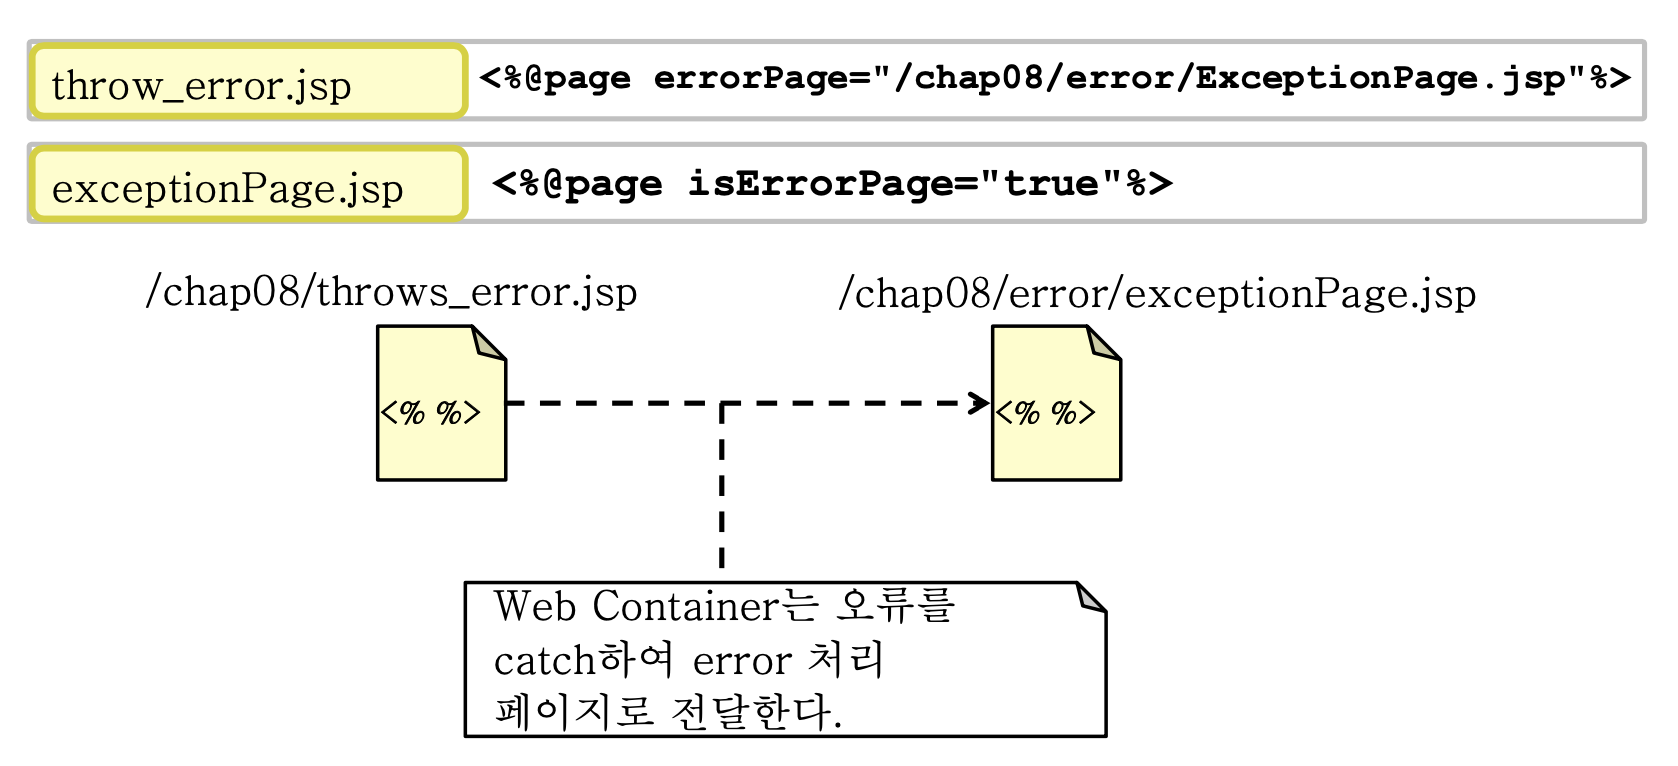
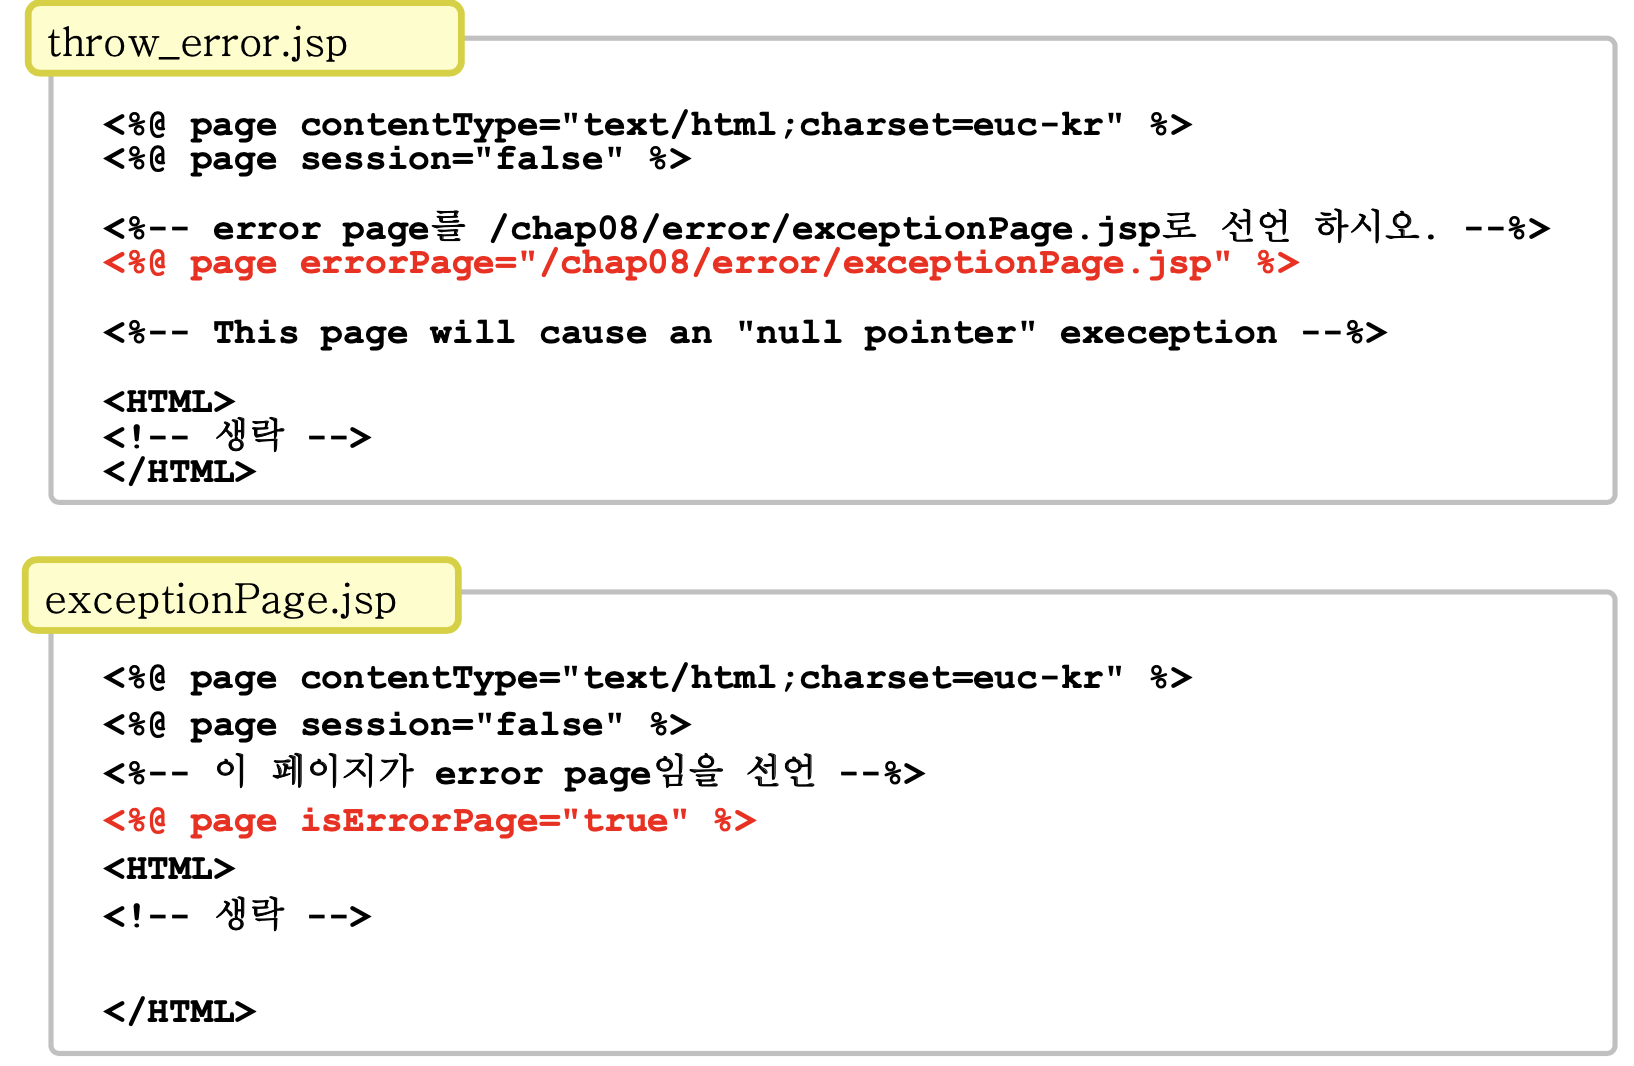
- errorPage
- 해당 JSP 페이지가 발생시키는 모든 runtime exception을 처리할 다른 JSP 페이지를 지정함
- 값은 현재 웹 계층에 상대적이거나, context root에 상대적인 URL
- <%@ page errorPage="error.jsp" %>
- <%@ page errorPage="/error/errorForm.jsp" %>
- isErrorPage
- 해당 JSP 페이지가 다른 JSP 페이지에 있는 errorPage 속성의 대상인지 정의함
- 값은 true 또는 false (default)
- true인 경우, exception 내장 변수를 참조할 수 있음
- <%@ page isErrorPage="false" %>
- contentType
- 출력 스트림의 MIME타입을 정의함
- <%@ page contentType="text/html; charset=euc-kr" %>
6. JSP Page Exception Handling
- JSP 페이지는 try-catch 블록 안에 넣을 수 없음
- JSP 페이지에서 오류 페이지를 지정해서 exception 처리를 맡김
- 하나의 JSP 페이지에 대해 오류 페이지를 하나만 지정할 수 있음
- 예외마다 각기 다른 오류 페이지를 지정할 수 없음
- 예외마다 각기 다른 오류 페이지를 지정할 수 없음
7. Debuggin JSP
- Translation time error
- Web Container가 JSP 페이지의 Scripting elements의 구문을 분석할 수 없을 때
- 🗒️ 예시 : %> 없이 <% 만 사용한 경우
- Compile time error
- 자바 문법 오류
- 🗒️ 예시 : 자바 문장을 끝낼 때 ;를 사용하지 않을 경우
- Runtime error
- 실행 도중, Exception이 발생한 경우
- 🗒️ 예시 : getParameter() 인자에 HTML form 태그에 없는 이름을 사용하면, getParameter()는 null을 return 하는데 이 값을 가지고 조작하는 경우 NullPointerException 발생
📕 MVC Pattern
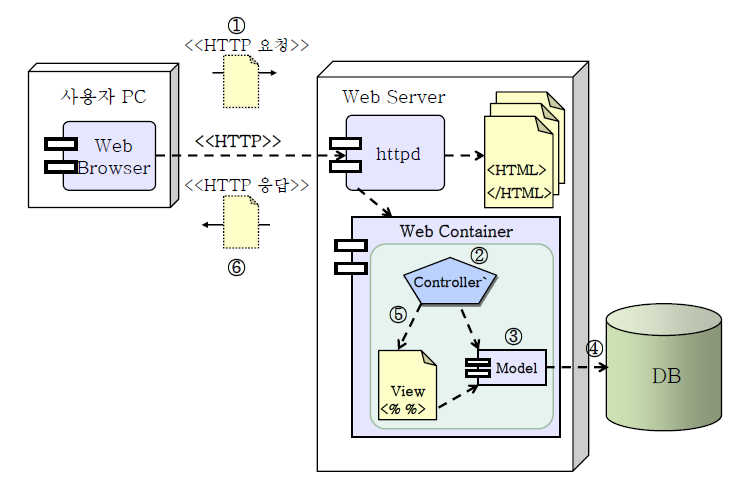
1. Model 2 Architecture
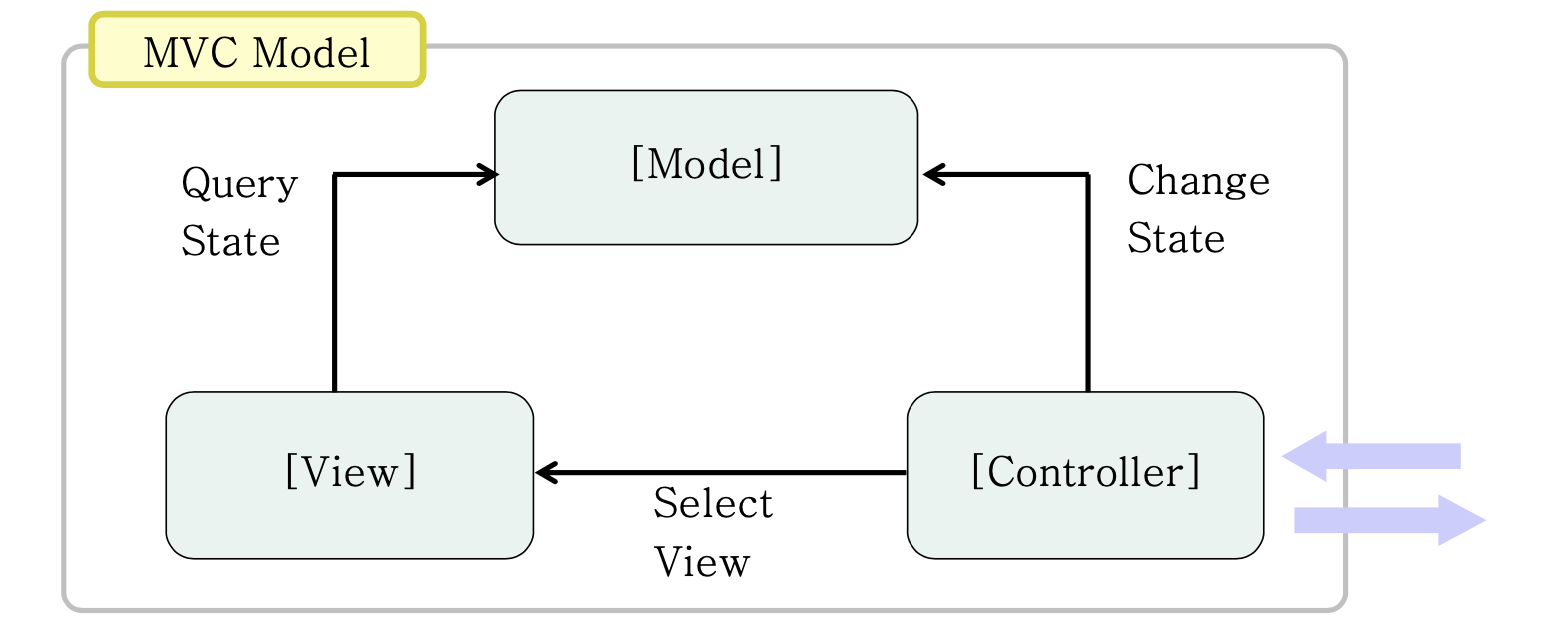
1) Model-View-Controller 설계
- Model : 비즈니스 로직 및 도메인 객체
- View : 사용자 인터페이스 (UI)
- Controller : UI에 대한 사용자 입력을 해석, Model 이용 Biz.Logic 수행, 응답 View 선택
2) Servlet과 JSP page
- Servlet
- Controller 역할
- 폼 데이터를 검증하고, 폼 데이터를 사용하여 모델을 갱신
- 응답으로 다음에 보여줄 View를 선택함
- JSP page
- View 역할
- Model로부터 응답을 생성하는데 필요한 데이터를 꺼내서 HTML 응답을 만들어냄
- 사용자 상호 작용이 가능한 HTML폼을 제공
- Java 클래스
- Model 역할
- 웹 응용 프로그램의 비즈니스 로직을 구현
3) Model 2 Architecture 특징
- 빠른 속도
- 쉬운 개발
- 플랫폼 간 호환성
- 확장성
- 효율적인 유지 보수 기능
4) Model 2 Architecture
- 동적 Page (JSP)인 경우
- 응답 view가 사용자 등록 메시지와 같이 동적으로 변화하는 경우 jsp로 작성
- RequestDispatcher : servlet이 request 정보를 다른 동적 자원인 servlet이나 jsp에게 forwarding 하게 해줌
- jsp 페이지에 누구에 대한 등록 성공인지에 대한 객체 정보를 jsp 페이지에 전달해야 함
- 정보를 전달되는 HttpServletRequest 객체에 실어 보냄 (setAttribute())
// 응답 view -> success.jsp // 전송 데이터 -> Customer 클래스의 ref 변수 cust RequestDispatcher view = req.getRequestDispatcher("/success.jsp"); req.setAttribute("cust", cust); view.forward(req, res); - 정적 Page (html)인 경우
- 응답 view가 단순 메시지로 구성 되어, 정적인 html로 작성된 경우
- 응답 view에 전달할 data가 필요 없고, 단순히 클라이언트에게 그 html을 전송만 해주면 됨
- HttpServletResponse가 갖고 있는 sendRedirect()를 이용함
// 응답 view가 msg.html인 경우
response.sendRedirect("/msg.html");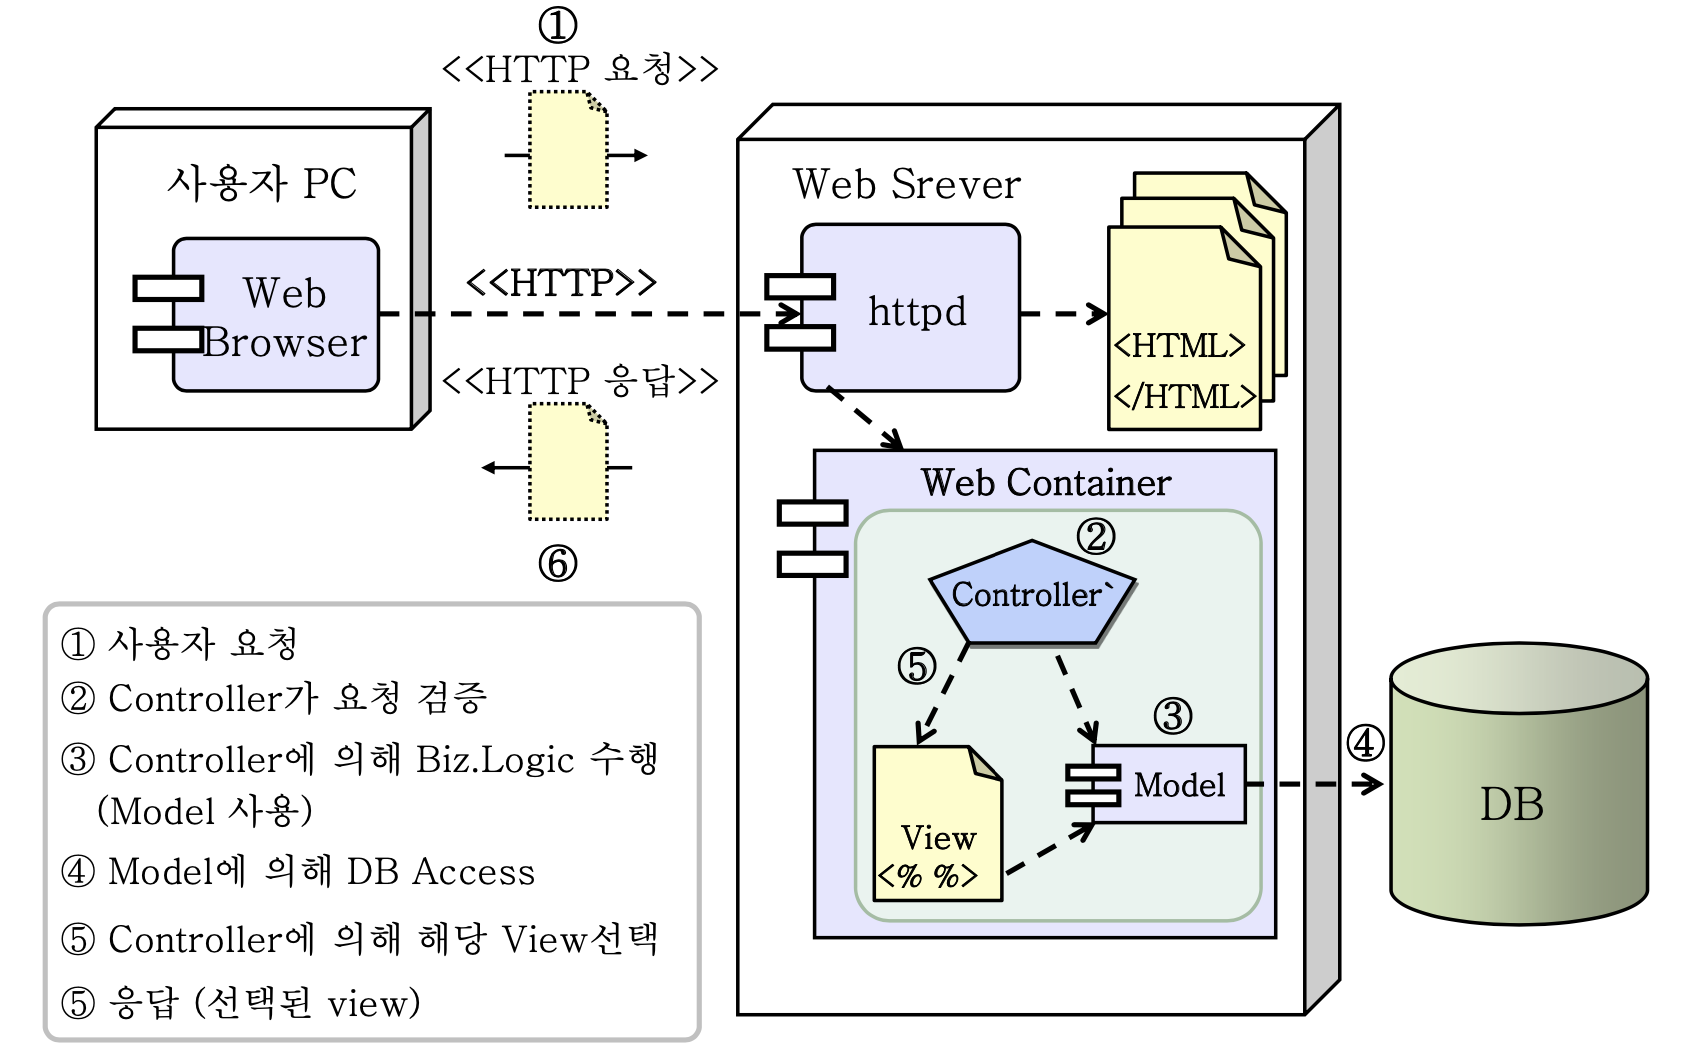
📕 Web Application DB 통합
1. Model tier
1) Model tier
- 비즈니스 로직 및 도메인 객체에 대한 내용을 담고 있음
- 데이터를 Database 혹은 File 등을 통해 얻고, 결과를 저장함
- 현 Model tier의 이슈
- 파일을 통해 데이터를 관리하다가 DB로 변경할 수 있음
- DB 컬럼 이름 변경 등의 Database Schema가 변경될 수 있음
➡️ Biz.Logic은 동일하지만 모델 클래스를 수정해야 함
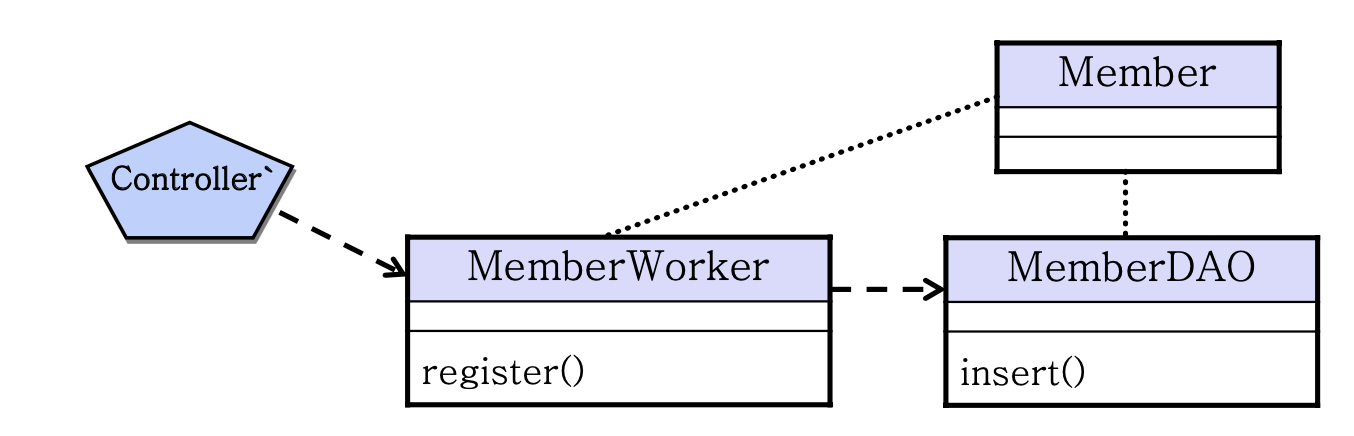
2) DAO patter 적용 Model tier
- DAO (Data Access Object) Pattern
- Database Access 코드를 갖는 클래스를 따로 구현하는 것
- Biz.Logic과 DB Access 코드가 분리되어 짐
- DB 변경에 따른 코드 수정을 최소화 해야함
- Model tier
- Business Service : DAO class를 통해 데이터를 Domain Object에 담고, Biz.Logic 수행
- Domain Object : 데이터를 담는 클래스
- DAO class : Database Access 코드를 갖는 클래스
2. Connection Pool
1) DB Connection Pooling
- Pooling
- 미리 데이터베이스 Connection을 여러 개 만들어서 특정 공간에 저장해 놓고, 여러 사용자가 필요할 때마다 하나씩 꺼내서 사용하고 다시 집어넣는 방식
- Pooling 기법
- Connection을 생성해서 보관
- Connection에 대한 요청이 들어오면, 보관중인 Connection 중 하나를 넘겨줌
- 사용이 끝난 Connection을 다시 보관
- Connection Pooling의 장점
- 속도 향상
- 자원 공유
- Connection 객체 제어
2) Connection 객체의 보관과 사용
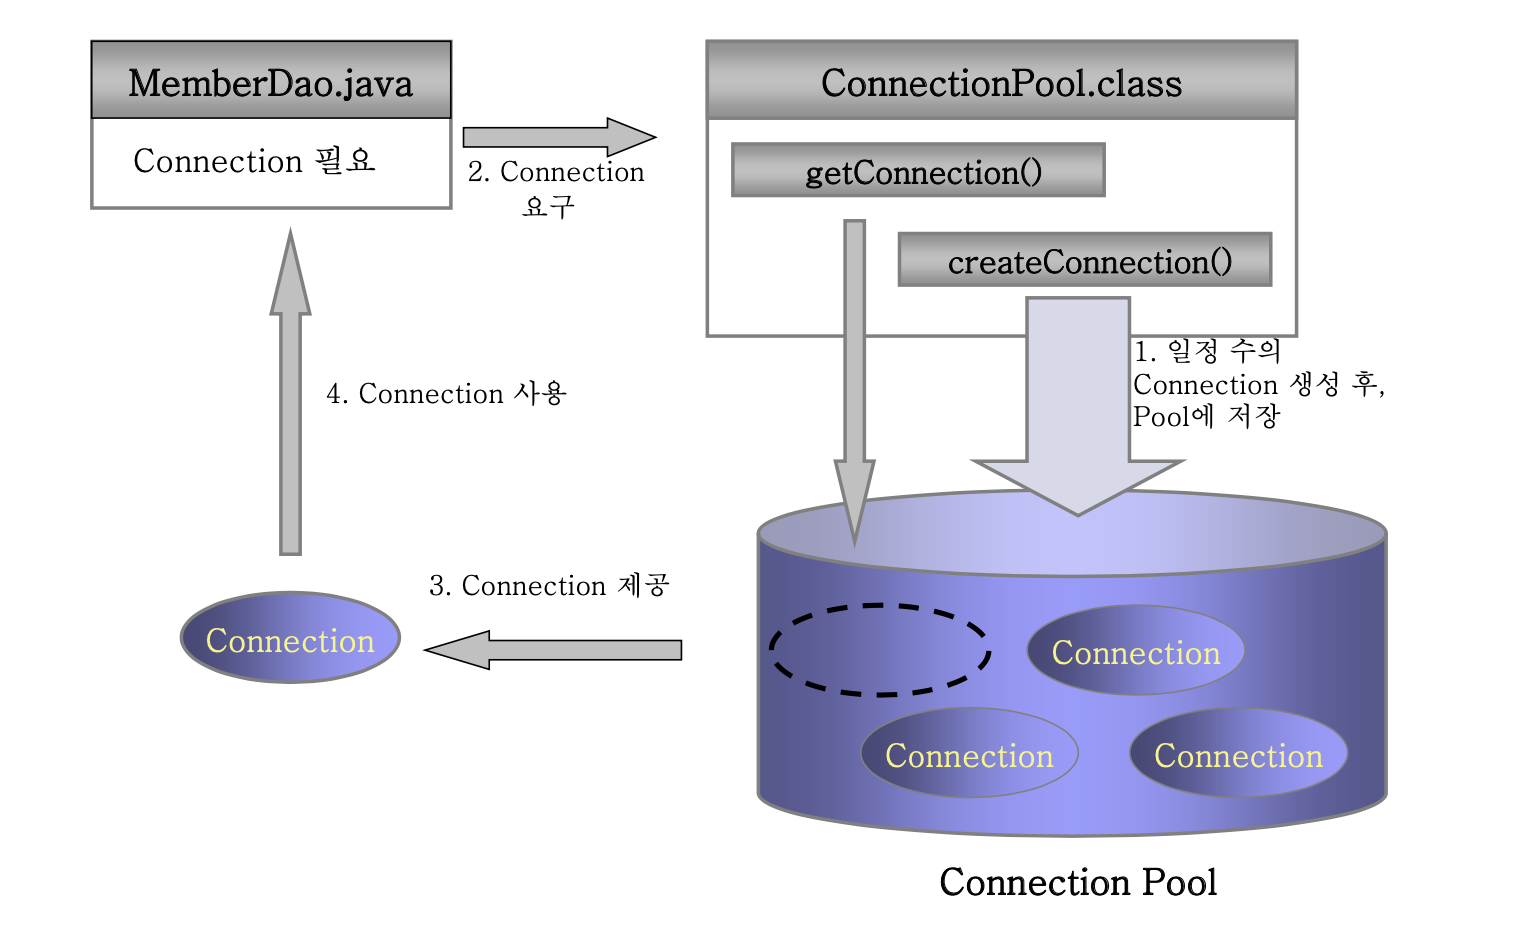
3) Connection 객체의 반환 및 저장
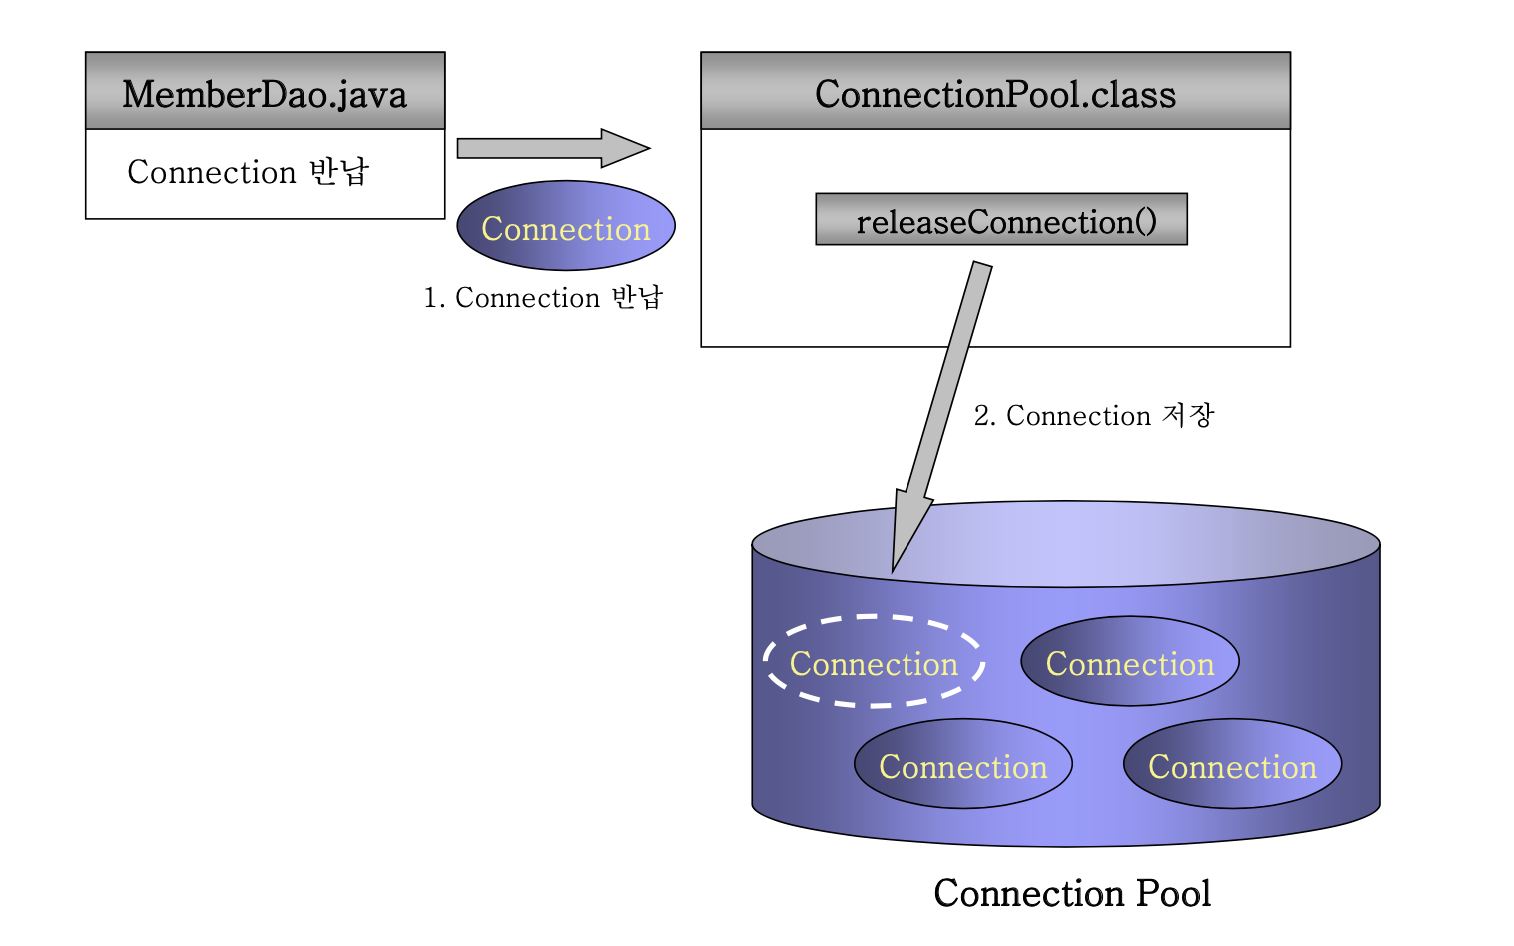
4) Connection Pool 과정

3. JSP Page Fragments
1) 개념
- 복잡한 레이아웃을 가지는 Page의 경우, 공통 되는 일부분을 다른 파일로 저장한 후 그 파일을 포함시킬 수 있음
- 배너, 로고 등의 공통 부분을 추가함
- 각 페이지의 일관된 모양을 유지할 수 있음
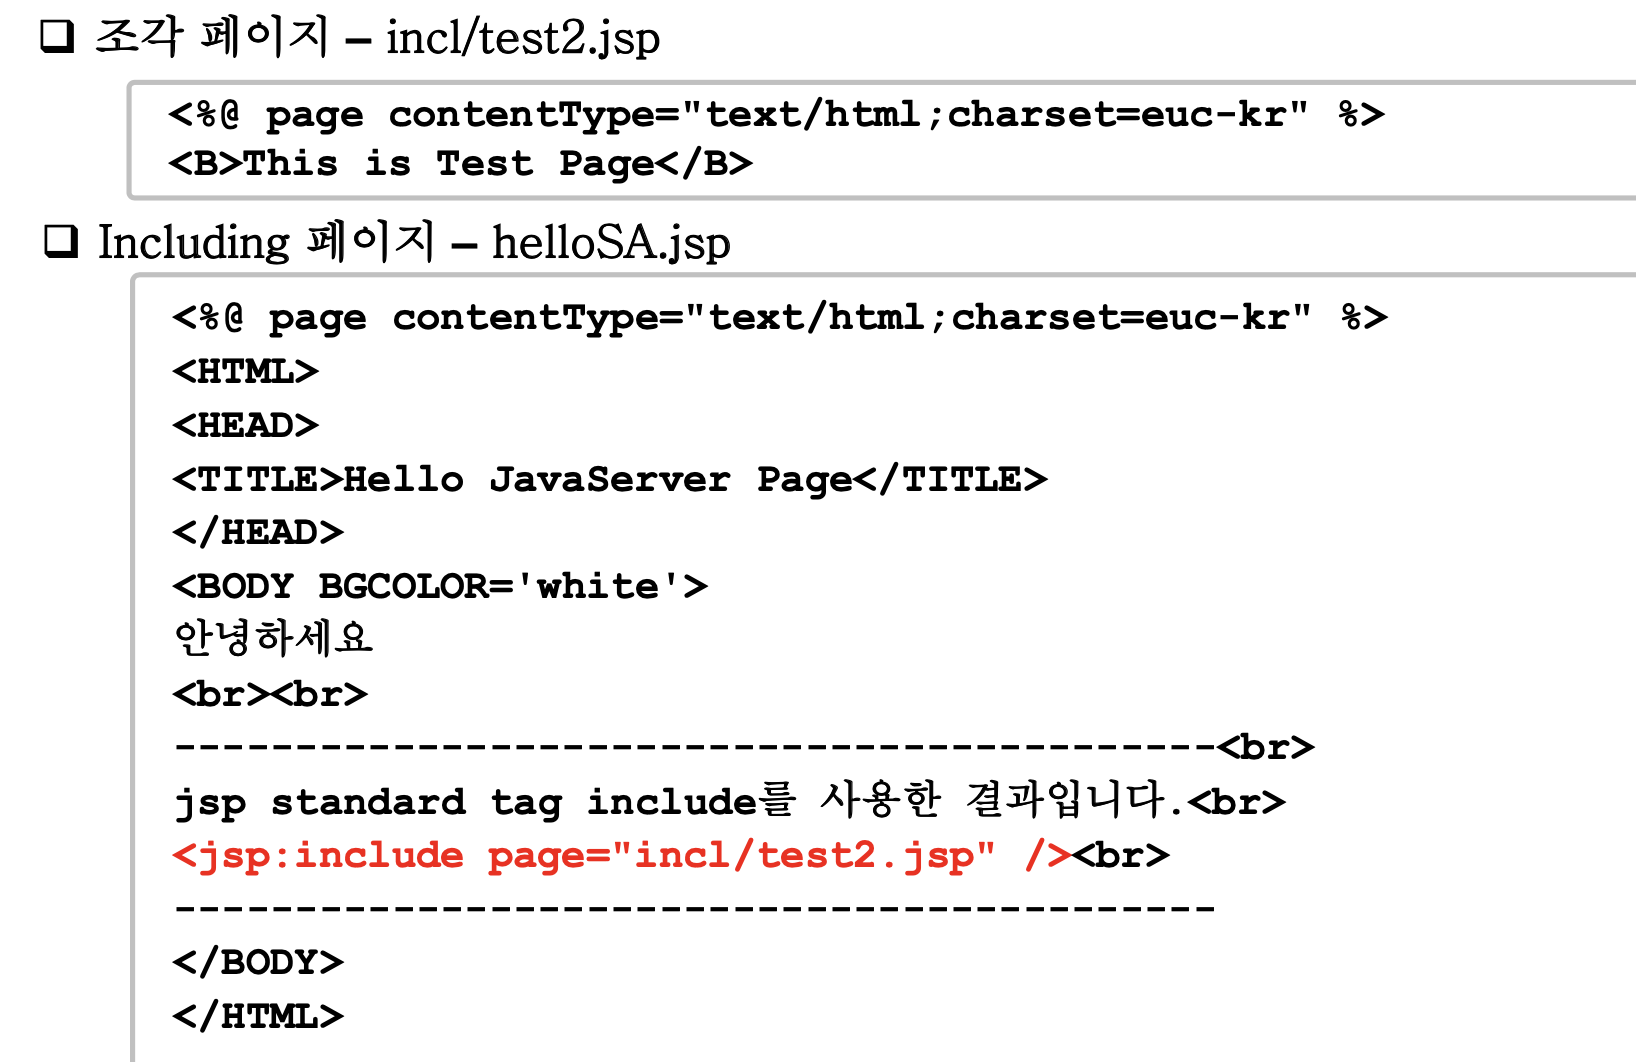
- 조각(fragment) 페이지 포함하는 방법
- HTML, 혹은 JSP 페이지의 일부분
- <HTML> 또는 <BODY> 태그가 있으면 안됨
- <%@ include file="fragmentURL" %>
- 생성되는 자바 파일은 1개
- 조각 페이지가 변경되어도 자동 반영되지 않음 (현재 버젼 반영됨)
- <jsp:include page="fragmentURL" />
- 생성되는 자바 파일은 2개
- 조각 페이지 동적 갱신
- 성능 저하 가능

Notion으로 이동 (https://24tngus.notion.site/3a6883f0f47041fe8045ef330a147da3?v=973a0b5ec78a4462bac8010e3b4cd5c0&pvs=4)