📒 Spring Boot (JPA)
📕 Spring Boot
1. Spring Boot 개념
1) Spring Boot 기능
- 단독 실행 가능한 스프링 어플리케이션 제작
- 내장된 Tomcat, Jetty, UnderTow 등 서버를 이용해서 별도의 서버를 설치하지 않고, 실행 가능
- 최대한 내부적으로 자동화된 설정 제공
- XML 설정 없이 단순한 설정 방식 제공
2) 스프링 부트 기술
- Data
- Batch
- Integration
- Web
- JDBC
- Security
3) 스프링 부트 프로젝트 실행
- 1️⃣ 실행 : Spring Boot App -> Run (mvnw spring-boot:run)
- 2️⃣ jar 생성 : mvnw package
- 3️⃣ jar 실행 : java -jar .\target\MySpringBoot3-0.0.1-SNAPSHOT.jar
4) Dependency
- 의존성 계층 구조
- Spring-boot-starter-* 라이브러리는 parent에서 버전을 명시해줌
<artifactId> spring-boot-starter-parent </artifactId> : pom.xml
	<artifactId> spring-boot-dependencies </artifactId>
	: spring-boot-starter-parent.pom
		<artifactId> spring-boot-dependencies </artifactId>
		: spring-boot-dependencies.pom
-Spring Boot에서 의존성 관리를 내부적으로 해줌
-
의존성 관계 설정 필요 줄음
-
의존성 버전 변경
- Spring Framework 버전 변경 목적
- Pom.xml 이용해 변경
<properties>
	<spring-framework.version>6.1.x</spring-framework.version>
</properties>
5) 프로젝트 구조
-
src/main/java : 자바 소스 파일
-
src/main/resources/application : 속성 값
-
src/main/resources/static : html, css 정적 파일
-
src/main/resources/templates : tsp, thymeleaf 동적 파일
-
src/test/java : 자바 테스트 파일
-
@SpringBootApplication
- 클래스 위치 : 디폴트 패키지
- 기능 : 어노테이션의 내부에 선언된 @ComponentScan으로 해당 클래스 기준으로 현 위치와 그 아래 위치까지 스프링 Bean을 나타내는 어노테이션이 선언된 클래스를 찾음 (entry point)
- = @SpringBootConfiguration + @ComponentScan + @EnableAutoConfiguration
- @SpringBootConfiguration
- @SpringBootConfiguration의 자체가 configuration 클래스
- 환경설정 빈을 표현
- @ComponentSacn
- project 생성시 설정해둔 default 패키지부터 scanning
- 스프링 프레임워크에서 스프링 빈을 나타내는 어노테이션(@Repository, @Configuration, @Service 등 )을 찾아서 스프링 빈으로 등록
- @EnableAutoConfiguration
- 사전에 정의한 라이브러리들을 스프링 Bean을 자동적으로 컨테이너에 등록하는 역할
- jar properties를 기반으로 자동으로 의존성 설정
- 스프링 부트가 제공하는 configuration 클래스를 자동으로 활성화
- Maven:org.springframework.boot:spring-boot-autoconfigure -> spring-autoconfigure-metadata.properties 파일에서 configuration 클래스 설정되어있는 것 확인
-
📋 실습 📋 MySpringBoot3Application.java
  package com.basic.myspringboot;

import org.springframework.boot.SpringApplication;
import org.springframework.boot.autoconfigure.SpringBootApplication;
import org.springframework.context.annotation.Bean;

@SpringBootApplication
public class MySpringBoot3Application {

	public static void main(String[] args) {
		SpringApplication.run(MySpringBoot3Application.class, args);
	}

	@Bean
	public String hello() {
		return new String("Hello 스프링부트");
	}
}
2. Spring Application
1) Port 번호 변경
- Port 번호 충돌이 발생될 경우 변경 필요
- Server.port 속성 변경 (server.port=8080)
2) Log Level 변경
- 기본 로그 레벨 : INFO
- 로그 레벨 DEBUG로 변경
- VM argument에 환경변수 추가
- Application -> Run Configuration -> VM arguments -> -Ddebug 추가
3) Banner 변경
- resources/banner.txt 추가
- gif/jpg/png
- ${spring-boot.version}, ${application.version} 변수 사용 가능
- 하단 코드 복사해서 banner.txt에 붙여넣기
- 소스 안에 자바 코드로 배너 설정 가능하지만 banner.txt가 우선순위가 더 높아 우선 적용됨
- 📋 실습 📋 banner.txt
,--. ,--. ,-----. ,--.
| `.' |,--. ,--.| |) /_ ,---. ,---. ,-' '-.
| |'.'| | \ ' / | .-. \| .-. | .-. |'-. .-'
| | | | \ ' | '--' /' '-' ' '-' ' | |
`--' `--'.-' / `------' `---' `---' `--'
`---'
Application Info : ${application.title} ${application.version}
Powered by Spring Boot ${spring-boot.version}
// application.title = pom.xml 파일의 <name>MySpringBoot3</name>
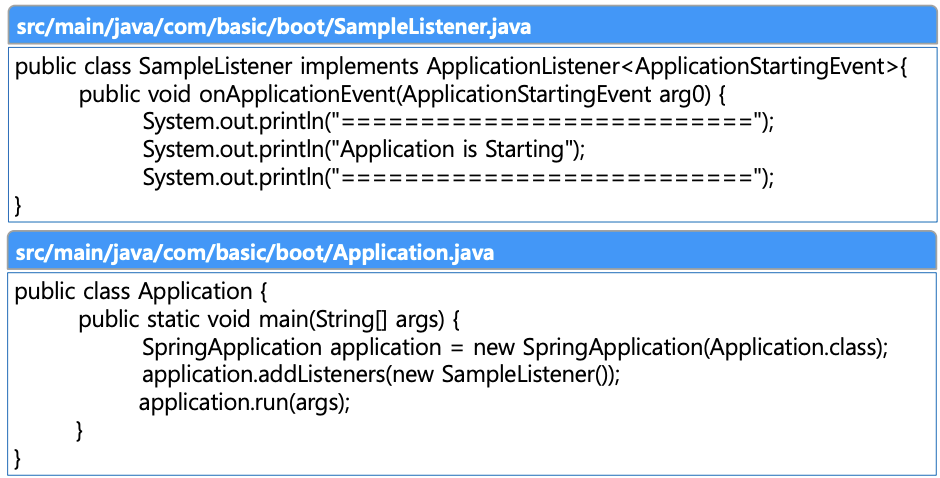
// application.version = pom.xml 파일의 <version>0.0.1-SNAPSHOT</version> (개발 프로젝트이 버전 설정 가능)4) 이벤트 리스너
- 스프링 부트 구동시 이벤트
- ApplicationStartingEvent
- 스프링 컨테이너가 생성되기 전에 생성되는 이벤트
- 해당 이벤트 처리하기 위해 SpringApplication 객체에 해당 리스너 추가해야함
- ApplicationListener<ApplicationStartingEvent>
- 리스너는 @Bean으로 등록할 수 없으므로 SpringApplication.addListener(new SampleListener()); 필요
- ApplicationStartedEvent
- 스프링 컨테이너가 만들어진 이후에 생성되는 이벤트
- 스프링 Bean 등록을 통해 이벤트 처리 가능
- ApplicationListener<ApplicationStartedEvent>
- ApplicationStartingEvent
5) 웹 어플리케이션 타입 지정
-
SpringApplication 객체를 통해 어플리케이션 타입 지정 가능
- SpringApplication 객체는 스프링 컨테이너의 인터페이스인 ApplicationContext를 개발자 대신 생성
- ApplicationContext의 구현체를 지정
-
종류
- WebApplicationType.SERVLET
- AnnotationConfigServletWebServerApplicationContext
- 톰캣 구동되고, 프로세스 종료되지 않음
- WebApplicationType.REACTIVE
- AnnotationConfigReactiveWebServerApplicationContext
- WebApplicationType.NONE
- AnnotationConfigApplicationContext
- 톰캣도 구동 안되고, 프로세스 종료됨
- Webapp이 아니니까 presentation 계층이 없는 data acess + business layer만 동작 구조가 됨
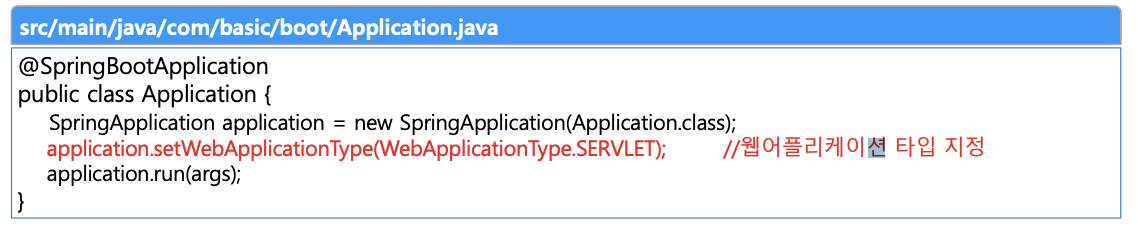
- WebApplicationType.SERVLET
-
스프링 부트를 웹 어플리케이션 프로젝트 ➡️ 일반 프로젝트 용도로 사용 용도 변경
- src/main/java/Application.java
-
📋 실습 📋 MySpringBoot3Application.java
package com.basic.myspringboot;

import org.springframework.boot.SpringApplication;
import org.springframework.boot.WebApplicationType;
import org.springframework.boot.autoconfigure.SpringBootApplication;
import org.springframework.context.annotation.Bean;

import javax.swing.*;

@SpringBootApplication
public class MySpringBoot3Application {

    public static void main(String[] args) {

        // SpringApplication.run(MySpringBoot3Application.class, args);
        SpringApplication application = new SpringApplication(MySpringBoot3Application.class);
        // WebApplication Type을 변경하기 위한 목적
        application.setWebApplicationType(WebApplicationType.SERVLET);
        // None : 더이상 WebApplication이 아님
        application.run(args);
    }
}
6) Command Argument 처리
-
SpringApplication 실행된 후에 arguments 값을 받거나, 무엇을 실행하고 싶을 때 사용
-
application이 실행되는지 인지하는 역할
-
tomcat 구동 확인하는 listner와 유사
- SpringApplication이 시작되면 run메서드가 실행됨
- 인터페이스 implement 받고, run 메서드 오버라이딩 해서 사용
- 오버라이딩시 람다식 사용 가능
- run 메서드를 만들고, @Order 사용하여 여러개의 run의 순서 설정 가능
- 순서가 낮을 수록 우선순위 높음
-
📋 실습 📋 MyRunner.java
package com.basic.myspringboot.runner;
import org.springframework.boot.ApplicationArguments;
import org.springframework.boot.ApplicationRunner;
import org.springframework.core.annotation.Order;
import org.springframework.stereotype.Component;
@Component
@Order(1)
public class MyRunner implements ApplicationRunner {
@Override
public void run(ApplicationArguments args) throws Exception {
// ApplicationArguments는 main메서드의 (String[] args) argument를 전달 받음
System.out.println("===> MyRunner.run");
}
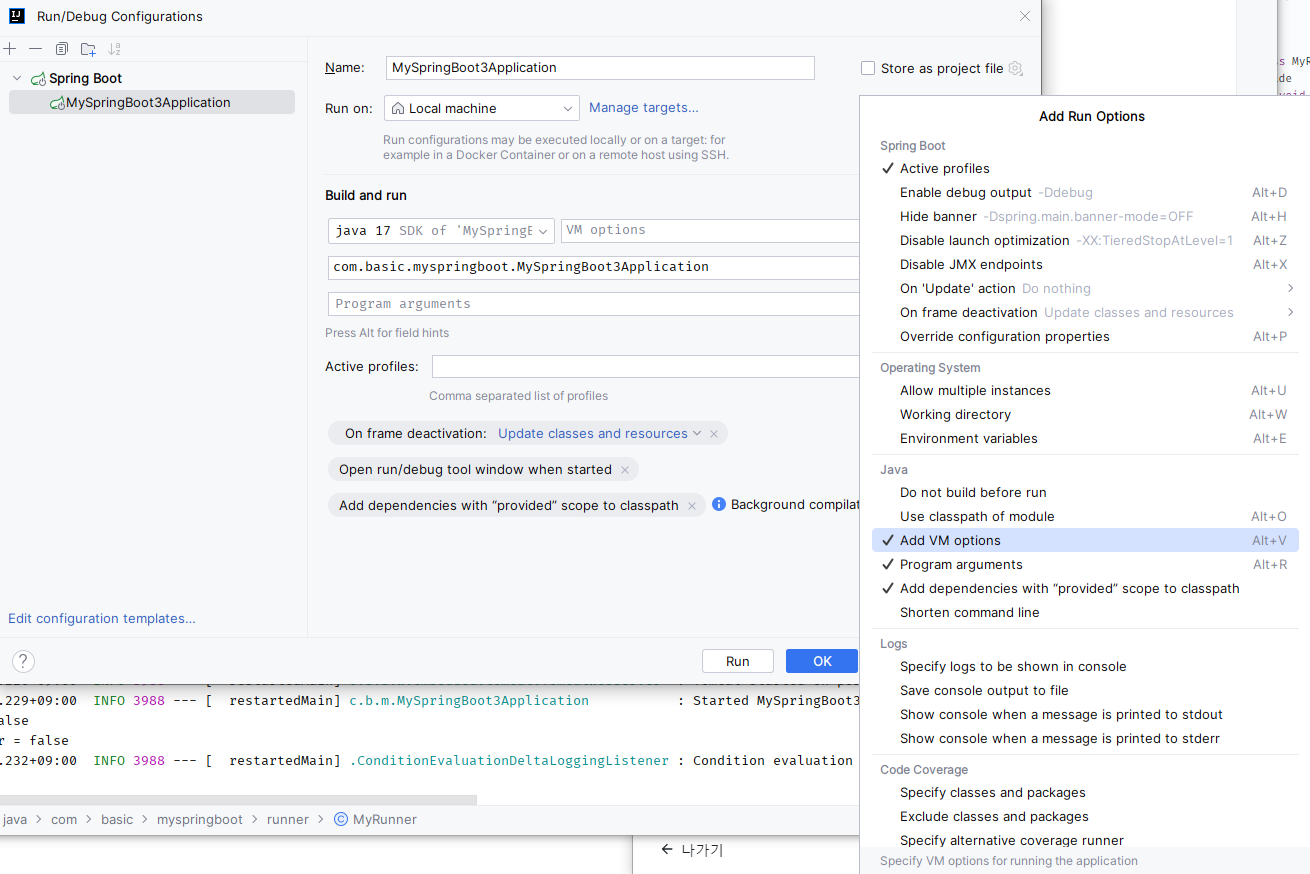
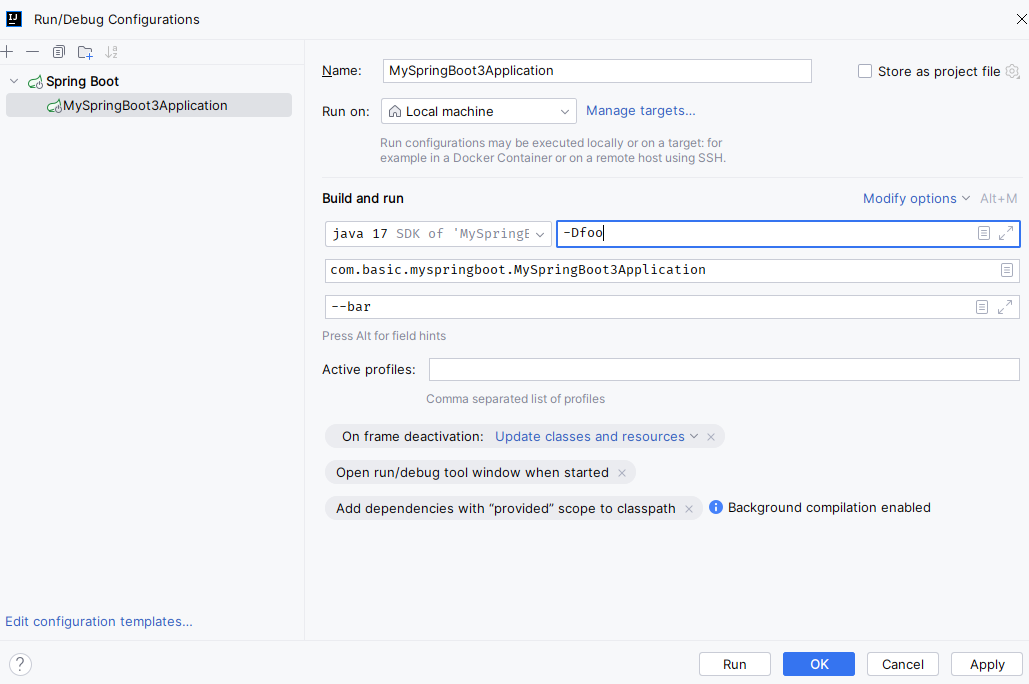
}- Program/VM argument 설정
- Program arguments (--bar 추가 ➡️ 처리)
- VM arguments (-Dfoo 추가 ➡️ 무시)
- program argumet(--bar) = true, vm arguments(-Dfoo) = false 결과 출력

3. 외부 설정
- Spring Boot Application의 환경설정 혹은 설정값 정할 수 있음
- 스프링부트 사용 외부 설정
- properties
- YAML
- 환경변수
- 커맨드 라인 인수
1) Properties 우선순위
- 유저 홈 디렉토리에 있는 spring-boot-dev-tools.properties
- 테스트에 있는 @TestPropertySource
- @SpringBootTest 애노테이션의 properties 애트리뷰트
4. 커맨드 라인 아규먼트 - SPRING_APPLICATION_JSON (환경 변수 또는 시스템 프로퍼티)에 들어있는 프로퍼티
- ServletConfig 파라미터
- ServletContext 파라미터
- java:comp/env JNDI 애트리뷰트
- System.getProperties() 자바 시스템 프로퍼티
- OS 환경 변수
- RandomValuePropertySource
- JAR 밖에 있는 특정 프로파일용 application properties
- JAR 안에 있는 특정 프로파일용 application properties
- JAR 밖에 있는 application properties
15. JAR 안에 있는 application properties - @PropertySource
- 기본 프로퍼티 (SpringApplication.setDefaultProperties)
2) properties 파일 설정
-
properties의 값은 @Value 어노테이션 사용
-
환경변수를 이용해 application.properties에서 설정
- 한글 사용할 경우 유니코드 변환 도구 이용
-
📋 실습 📋 application.properties
  #server.port=8087
  #스프링
  myboot.name=\uc2a4\ud504\ub9c1
  myboot.age=${random.int(1,100)}
myboot.fullName=${myboot.name} Boot- 📋 실습 📋 MyRunner.java
package com.basic.myspringboot.runner;

import org.springframework.beans.factory.annotation.Value;
import org.springframework.boot.ApplicationArguments;
import org.springframework.boot.ApplicationRunner;
import org.springframework.core.annotation.Order;
import org.springframework.stereotype.Component;

@Component
@Order(1)
public class MyRunner implements ApplicationRunner {
    @Value("${myboot.name}")
    private String name;

    @Value("${myboot.age}")
    private int age;

    @Value("${myboot.fullName}")
    private String fullName;

    @Override
    public void run(ApplicationArguments args) throws Exception {
        System.out.println("myboot.name = " + name);
        System.out.println("myboot.age = " + age);
        System.out.println("myboot.fullName = " + fullName);
    }
}
3) Environment
-
환경변수 키 값을 받아와 environmet의 getProperty 메소드 이용하여 환경변수 값 얻어옴
-
📋 실습 📋 MyRunner.java
package com.basic.myspringboot.runner;

  import org.springframework.beans.factory.annotation.Autowired;
  import org.springframework.beans.factory.annotation.Value;
  import org.springframework.boot.ApplicationArguments;
  import org.springframework.boot.ApplicationRunner;
  import org.springframework.core.annotation.Order;
  import org.springframework.core.env.Environment;
  import org.springframework.stereotype.Component;

  @Component
  @Order(1)
  public class MyRunner implements ApplicationRunner {
      @Autowired
      private Environment environment;

      @Override
      public void run(ApplicationArguments args) throws Exception {
          // 포트 번호 받아오기
          System.out.println("Port Number = " + environment.getProperty("local.server.port"));
      }
  }
4) Command Line Argument
- jar 실행시 argument 설정
- 🗒️ 예시 : java -jar jartest-0.0.1-SNAPSHOT.jar --myboot.name=springboot
- IP 등 다른 설정이 변동되었을 경우 소스를 수정하지 않고 command line 인자로 주기
- 해당 인자값이 소스 안에 있는 코드보다 우선순위가 높아서 해당 값이 적용
- 인자가 변동되었을 경우 반복적으로 jar 파일을 수정해야하는 번거로움 해소
- 📋 실습 📋 application.properties.java
myboot.name=test5) @ConfigurationProperties
- @ConfigurationProperties 프로퍼티 파일의 값을 받은 클래스 생성 ➡️ 클래스를 @Autowired 통해 자동 주입
- 프로퍼티 클래스를 작성하면 여러 프로퍼티 묶어서 읽어옴
- 프로퍼티 클래스를 Bean으로 등록해서 다른 Bean에 주입함
- application.properties에 똑같은 key값을 가진 property가 많은 경우에 프로퍼키 클래스를 작성함
- @Configuration 사용하기 위해 META 정보를 생성해주는 spring-boot-configuration-processor 의존성 설치
- pom.xml 수정
<dependency>
  <groupId>org.springframework.boot</groupId>
  <artifactId>spring-boot-configuration-processor</artifactId>
  <optional>true</optional>
</dependency> 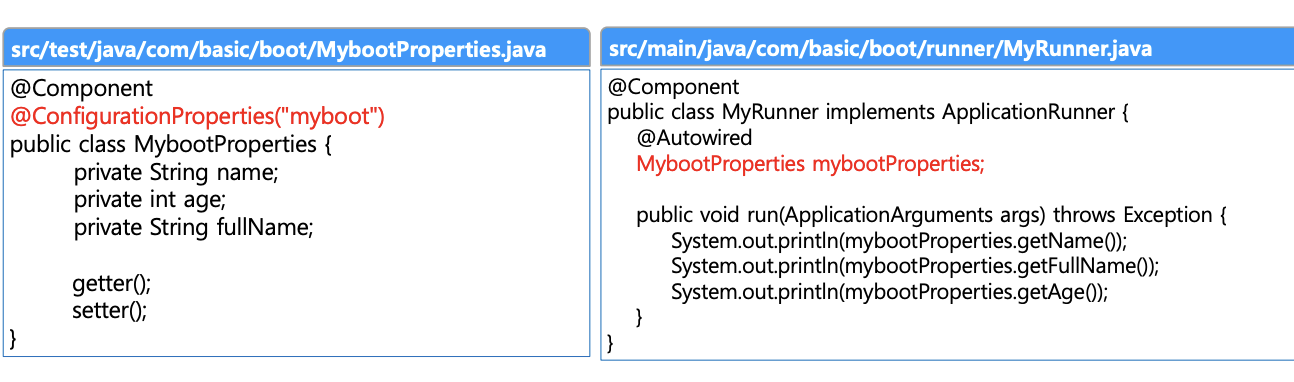
4. Spring Boot Profile
1) 개념
- 스프링 부트 어플리케이션의 런타임 환경 관리
- 어플리케이션 작동시 테스트/운영 환경 실행을 프로파일을 통해 관리
- 외부 설정 파일을 통해 관리
- spring.profiles.active 키 값으로 어떤 프로파일 활성화할 것인지 결정
- @Profile로 프로파일 기능 구현
- @Profile 인자값은 프로파일이 현재 인자값과 일치할 때 명시한 스프링 bean을 등록하라는 의미
- jar 실행시 argument 설정
- properties file보다 우선순위 높음
- 🗒️ 예시 : >java -jar jartest-0.0.1-SNAPSHOT.jar --spring.profiles.active=test
- properties file 생성 규칙
- application-{profile}.properties
- application-prod.properties / application-test.properties
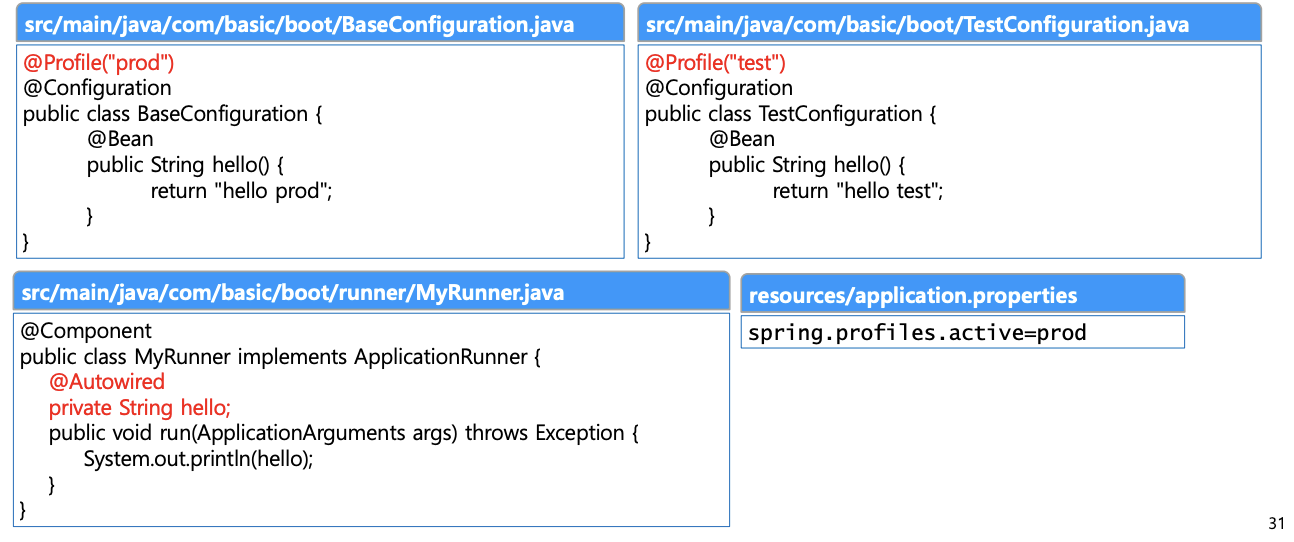
2) 실행
- 📋 실습 📋 TestConfig.java
package com.basic.myspringboot.config;

import com.basic.myspringboot.dto.Customer;
import org.springframework.context.annotation.Bean;
import org.springframework.context.annotation.Configuration;
import org.springframework.context.annotation.Profile;

@Profile("test") // 현재 어떤 환경인지 properties 파일에 설정 필요
@Configuration
public class TestConfig {
    @Bean
    public Customer customer() {
        return Customer.builder() // CustomerBuilder inner class
                .name("테스트모드")
                .age(10)
                .build(); // customer로 바꿔주는 기능

    }
}- 📋 실습 📋 ProdConfig.java
package com.basic.myspringboot.config;

import com.basic.myspringboot.dto.Customer;
import org.springframework.context.annotation.Bean;
import org.springframework.context.annotation.Configuration;
import org.springframework.context.annotation.Profile;

@Profile("prod") // 현재 어떤 환경인지 properties 파일에 설정 필요
@Configuration
public class ProdConfig {
    @Bean
    public Customer customer() {
        return Customer.builder() // CustomerBuilder inner class
                .name("운영모드")
                .age(50)
                .build(); // customer로 바꿔주는 기능

    }
}- 📋 실습 📋 application.properties
 현재 활성화 중인 환경 설정
spring.profiles.active=test- 📋 실습 📋 MyRunner.java
package com.basic.myspringboot.runner;

import com.basic.myspringboot.dto.Customer;
import org.springframework.beans.factory.annotation.Autowired;
import org.springframework.beans.factory.annotation.Value;
import org.springframework.boot.ApplicationArguments;
import org.springframework.boot.ApplicationRunner;
import org.springframework.core.annotation.Order;
import org.springframework.core.env.Environment;
import org.springframework.stereotype.Component;

@Component
@Order(1)
public class MyRunner implements ApplicationRunner {
    @Autowired
    private Customer customer;

    @Override
    public void run(ApplicationArguments args) throws Exception {
        System.out.println("Customer 현재 모드 = " + customer.getName());
 	}
} -
jar 실행
- java -jar .\target\MySpringBoot3-0.0.1-SANPSHOT.jar --spring.profiles.active=prod
-
DB도 모드에 따라 구분
- 개발 모드 : h2DB (application-test.properteis)
- 운영 모드 : mariaDB (application-prod.properties)
5. Logging
1) 개념
- 로깅 퍼사드
- 로거 API를 추상화한 인터페이스
- 로깅 퍼사드를 통해서 Logger를 사용하여 로깅 구현체를 교체하기 쉽도록함
- Commons Logging, SLF4j
- 로거
- 로깅 퍼사드 구현체들
- JUL(java.util.logging), Log4j2, Logback
- Spring Boot 로깅
- 로깅 순서 : Commons Logging ➡️ SLF4j ➡️ Logback
- 로그 레벨 종류
- Error
- Warn
- Info (default) : 운영 환경
- Debug : 개발 환경 (
--debug: 일부 핵심 라이브러리만 디버깅 모드) - Trace (
--trace: 전부 다 디버깅 모드)
- 컬러 출력
- spring.output.ansi.enabled
- 파일 출력
- logging.file
- logging.path
- 로그 레벨 조정
- logging.level.패키지 = 로그 레벨
2) 실행
- properties 속성 파일 구분
- 📋 실습 📋 application-test.properties
myboot.name=\uc2a4\ud504\ub9c1 TEST Mode

# 개발 log level = debug
logging.level.com.basic.myspringboot=debug- 📋 실습 📋 application-prod.properties
myboot.name=\uc2a4\ud504\ub9c1 PROD Mode

# 운영 log level = info
logging.level.com.basic.myspringboot=info- 테스트
- logger.info
- logger.debug
- 📋 실습 📋 MyRunner.java
package com.basic.myspringboot.runner;

import com.basic.myspringboot.dto.Customer;
import org.slf4j.Logger;
import org.slf4j.LoggerFactory;
import org.springframework.beans.factory.annotation.Autowired;
import org.springframework.beans.factory.annotation.Value;
import org.springframework.boot.ApplicationArguments;
import org.springframework.boot.ApplicationRunner;
import org.springframework.core.annotation.Order;
import org.springframework.core.env.Environment;
import org.springframework.stereotype.Component;

@Component
@Order(1)
public class MyRunner implements ApplicationRunner {
    @Value("${myboot.name}")
    private String name;

    @Value("${myboot.age}")
    private int age;

    @Value("${myboot.fullName}")
    private String fullName;

    @Autowired
    private Environment environment;

    @Autowired
    private Customer customer;

    //로거 생성
    Logger logger = LoggerFactory.getLogger(MyRunner.class);

    @Override
    public void run(ApplicationArguments args) throws Exception {
        // info
        logger.info("Logger 클래스 이름 {}", logger.getClass().getName()); // ch.qos.logback.classic.Logger
        logger.info("Customer 현재 모드 = {}", customer.getName());
        logger.info("Port Number = {}", environment.getProperty("local.server.port"));
        // 환경변수 받아오기
        logger.info("myboot.name = {}", name);
        logger.info("myboot.age = {}", age);
        logger.info("myboot.fullName = {}", fullName);


        // debug
        // ApplicationArguments는 main메서드의 (String[] args) argument를 전달 받음
        logger.debug("VM Argument foo = {} Program argument bar = {}",
                args.containsOption("foo")
                , args.containsOption("bar")
        );

    }
}
3) Log4j2 변경
- logback 빼고 log4j2로 변경
- pom.xml 수정
// 하단에 추가
<dependency>
  <groupId>org.springframework.boot</groupId>
  <artifactId>spring-boot-starter</artifactId>
  <exclusions>
    <exclusion>
      <groupId>org.springframework.boot</groupId>
      <artifactId>spring-boot-starter-logging</artifactId>
    </exclusion>
  </exclusions>
</dependency>
<!-- log4j2 -->
<dependency>
  <groupId>org.springframework.boot</groupId>
  <artifactId>spring-boot-starter-log4j2</artifactId>
</dependency>
📕 Spring Boot 데이터
1. Spring Data JPA
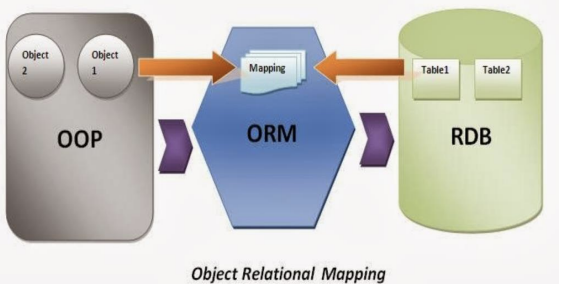
1) ORM (Object Relational Mapping)
- 객체와 DB 테이블이 매핑을 이루는 것
- 객체와 릴레이션을 맵핑할 때 발생하는 개념적 불일치 해결하는 프레임워크
- Mapping Rule
- Entity Class ⇔ Table
- Entity Object ⇔ Row(Record)
- Entity Variables ⇔ Columns
2) JPA (Java Persistence API)
- ORM을 위한 자바(EE) 표준
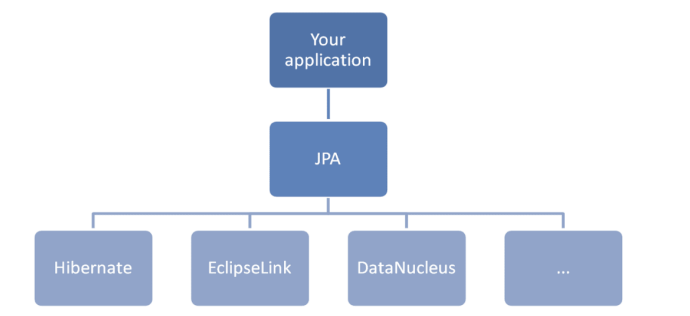
3) Spring Data JPA
-
Hibernate implements JPA
-
사용자가 Repository 인터페이스에 정해진 규칙대로 finder 메서드 작성
➡️ Spring이 해당 메서드 이름에 적합한 쿼리를 수행하는 구현체 만들어서 Bean으로 등록 -
JPA 기능
- Repository Bean 자동 생성
- 쿼리 메소드 자동 구현
- DAO 인터페이스만 생성 ➡️ access logic 자동 구현
- @EnableJpaRepositories
-
스프링 데이터 JPA 의존성 추가
- pom.xml 수정
<dependency>
  <groupId>org.springframework.boot</groupId>
  <artifactId>spring-boot-starter-data-jpa</artifactId>
</dependency>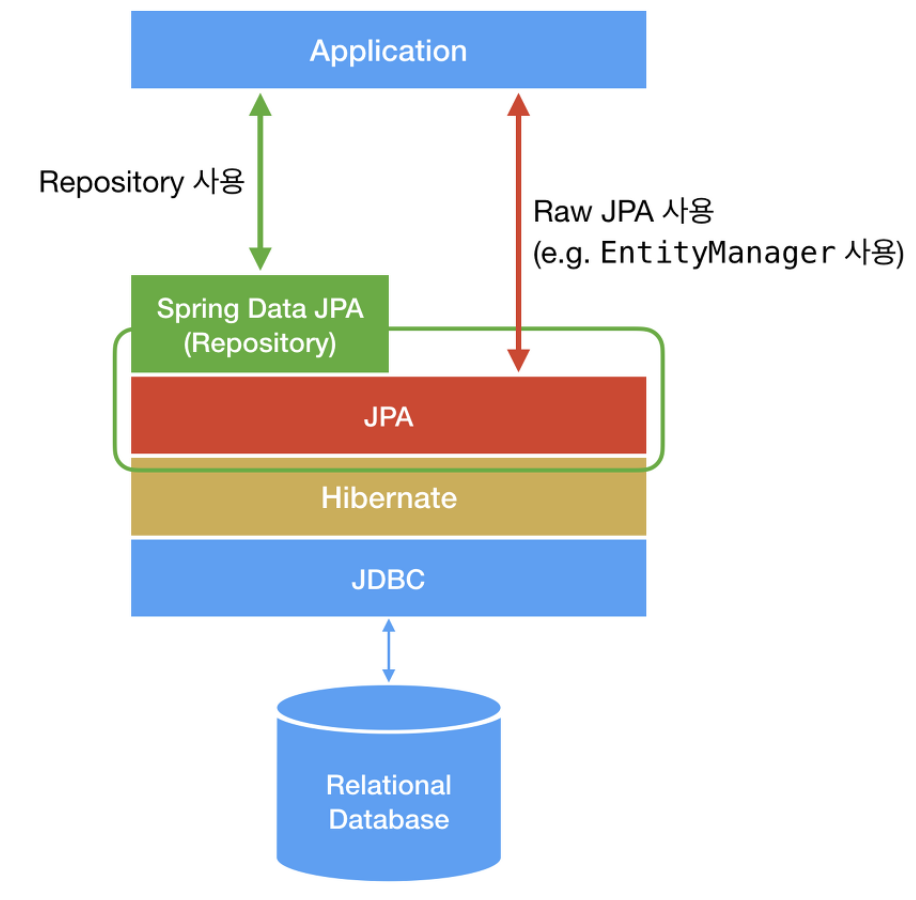
2. DB 연결
1) H2 데이터베이스
- In-Memory 데이터베이스
- Spring 지원 DB
- H2 (콘솔기능 제공)
- HSQL
- Derby
- H2 데이터베이스 의존성 추가
- pom.xml 수정
<dependency>
  <groupId>com.h2database</groupId>
  <artifactId>h2</artifactId>
  <scope>runtime</scope>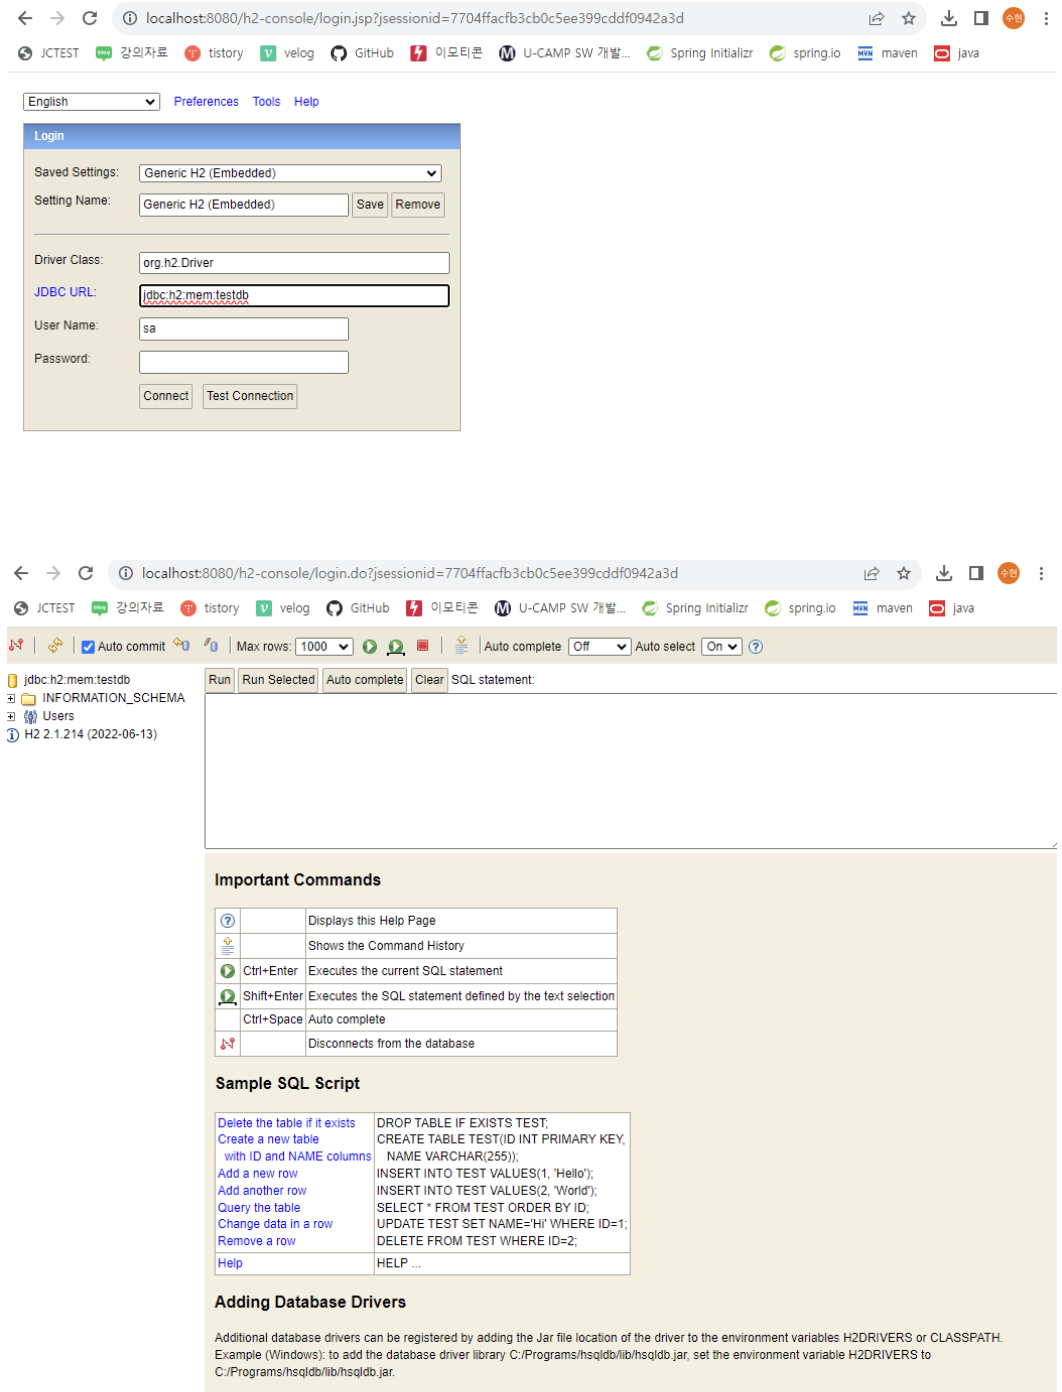
</dependency>- application.properties 설정
spring.datasource.url=jdbc:h2:mem:testdb
spring.datasource.driver-class-name=org.h2.Driver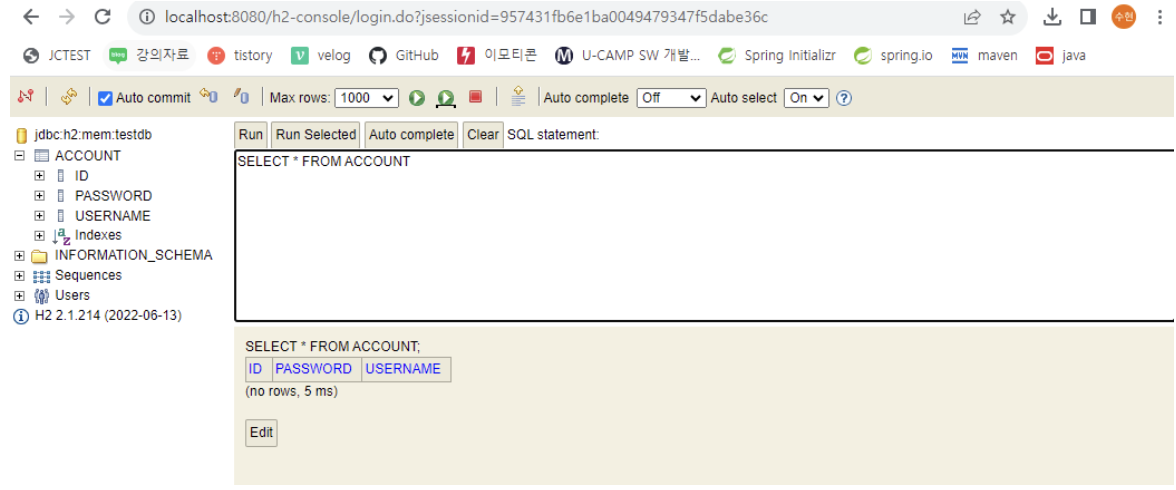
spring.datasource.username=sa- H2 데이터베이스 기본 연결 정보 확인
localhost:8080/h2-console입력- JDBC URL : jdbc:h2:mem:testdb 설정
- 테스트
- 📋 실습 📋 DatabaseRunner.java
package com.basic.myspringboot.runner;

import lombok.extern.slf4j.Slf4j;
import org.springframework.beans.factory.annotation.Autowired;
import org.springframework.boot.ApplicationArguments;
import org.springframework.boot.ApplicationRunner;
import org.springframework.core.annotation.Order;
import org.springframework.stereotype.Component;

import javax.sql.DataSource;
import java.sql.Connection;
import java.sql.DatabaseMetaData;

@Component
@Order(1)
@Slf4j // lombok에서 제공하고, 로깅퍼사드 기능 (로거 객체 만들지 않고 log로 사용 가능)
public class DatabaseRunner implements ApplicationRunner {
    @Autowired
    DataSource dataSource;

    @Override
    public void run(ApplicationArguments args) throws Exception {
        log.info("DataSource 구현 클래스명 {}",dataSource.getClass().getName());
        try (Connection connection = dataSource.getConnection()) {
            DatabaseMetaData metaData = connection.getMetaData();
            log.info("DB Product Name = {}", metaData.getDatabaseProductName());
            log.info("DB URL = {}",metaData.getURL());
            log.info("DB Username = {}",metaData.getUserName());

        }
    }
}
2) Maria 데이터베이스
- 스프링 부트가 지원하는 DBCP (DataBase Connection Pooling)
- HikariCP (기본)
- spring.datasource.hikari.*
- TomcatCP
- spring.dtasource.tomcat.*
- Commons DBCP2
- spring.datasource.dbcp2.*
- HikariCP (기본)
- MariaDB Client 의존성 추가
- pom.xml 수정
<dependency>
  <groupId>org.mariadb.jdbc</groupId>
  <artifactId>mariadb-java-client</artifactId>
  <version>2.7.3</version>
</dependency>- MariaDB 사용자 계정과 DB 생성
# root 계정으로 접속하여 사용자 계정과 DB 생성

mysql -u root –p
maria 입력 // password 입력
MariaDB [(none)]> show databases; 		// 데이터베이스 목록 확인
MariaDB [(none)]> use mysql; 			// mysql DB 사용
MariaDB [mysql]> create database boot_db; // boot_db DB 생성
MariaDB [mysql]> CREATE USER 'boot'@'%' IDENTIFIED BY 'boot'; // boot user 생성, boot password 지정
MariaDB [mysql]> GRANT ALL PRIVILEGES ON boot_db.* TO 'boot'@'%'; // boot DB의 권한 허용
MariaDB [mysql]> flush privileges; 			// grant 사용시 권한 적용을 위한 명령어
MariaDB [mysql]> select user, host from user; // 계정 조회, user는 system table
MariaDB [mysql]> exit; 					// 접속 종료

# boot 사용자 계정으로 접속한다.

mysql -u boot –p
boot 입력 // password 입력
use boot_db; - MariaDB DataSource 설정
- JPA에 의한 데이터베이스 자동 초기화 설정
- 📋 실습 📋 application-prod.properties
# MariaDB 접속 정보
spring.datasource.url=jdbc:mariadb://127.0.0.1:3306/boot_db
spring.datasource.username=boot
spring.datasource.password=boot
spring.datasource.driverClassName=org.mariadb.jdbc.Driver%

# JPA를 사용한 데이터베이스 초기화
spring.jpa.hibernate.ddl-auto=create
spring.jpa.show-sql=true

# DB Dialect 설정
spring.jpa.database-platform=org.hibernate.dialect.MariaDBDialect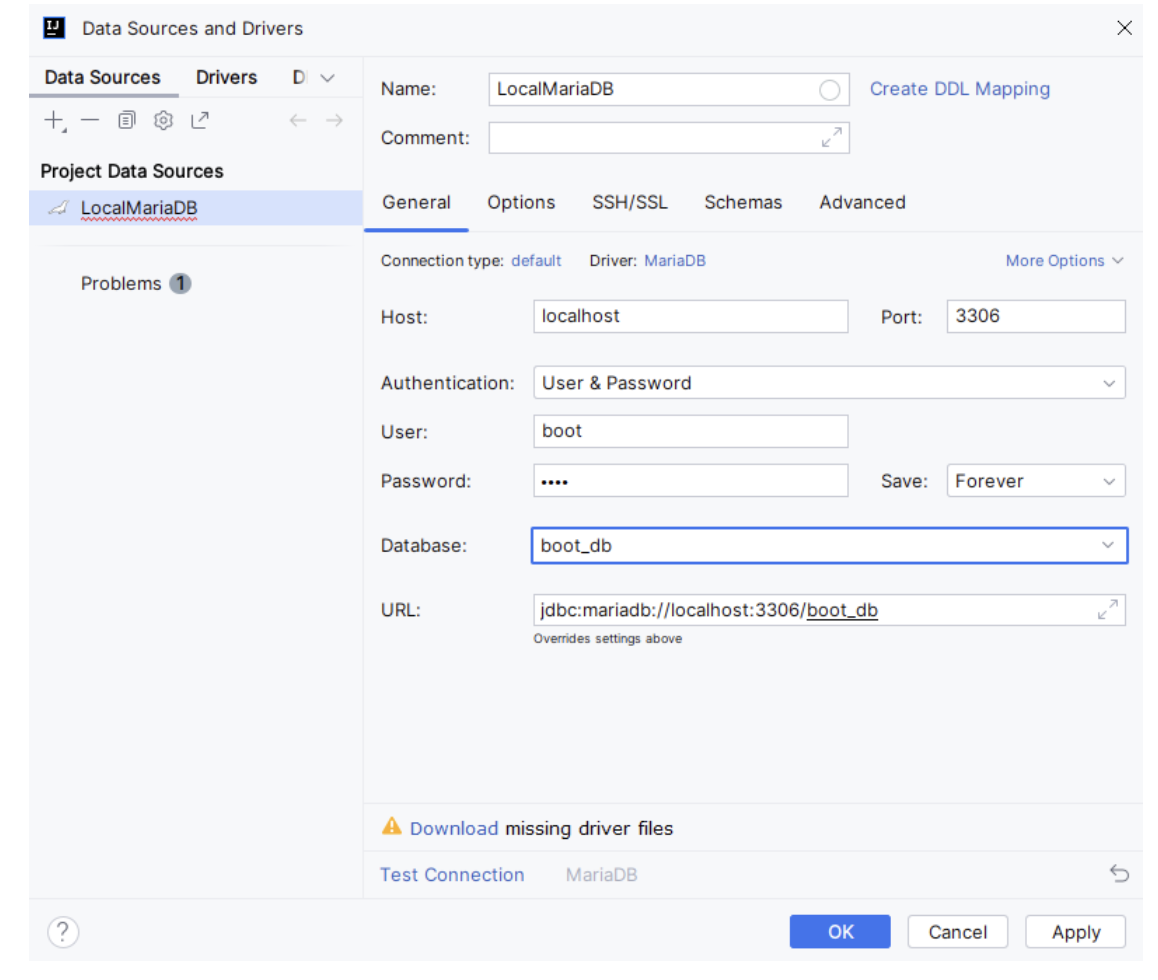
3) JPA 사용한 데이터베이스 초기화
- application.properties 파일에 설정
- spring.jpa.hibernate.ddl-auto=종류
- create
- JPA가 DB와 상호작용할 때 기존에 있던 스키마(테이블)을 삭제하고 새로 만드는 것
- create-drop
- JPA 종료 시점에 기존에 있었던 테이블을 삭제함
- update
- 기존 스키마는 유지 + 새로운 것만 추가 (변경된 부분만 반영)
- validate
- 엔티티와 테이블이 정상 매핑되어 있는지 검증
- none
➡️ create/create-drop/update는 개발모드에만 사용
- create
- spring.jpa.show-sql=true
- JPA가 생성한 SQL문을 보여줄 지에 대한 여부를 알려주는 속성
4) Dialect (방언) 설정
- application.properties 파일에 설정
- 특정 DB벤더의 기능을 추가하기 위해서 만든 것으로 사용하는 특정 벤더의 DBMS 사용이 가능함
- hibernamte에 사용 DB를 알려주면 그 DB의 특징에 맞춰서 최적화 하는 용도
- JPA에 어떤 DBMS를 사용하는지를 알려주는 방법
- JPA에 Dialect를 설정할 수 있는 추상화 방언 클래스를 제공하고 설정된 방언으로 각 DBMS에 맞는 구현체를 제공
- hibernate.dialect=org.hibernate.dialect.MariaDBDialect
5) table 생성
- users
create table users(
    id int(10) not null auto_increment primary key, // auto-increment : 자동으로 sequence한 값 증가, primary key : 기본키
    userid varchar(100) not null ,
    name varchar(100) not null ,
    gender varchar(10),
    city varchar(100)
);

alter table users add unique index users_userid_idx(userid); // unique : 중복 안됨

show index from users;

insert into users(userid,name,gender,city) values ('gildong','홍길동','남','서울');
commit;

insert into users(userid,name,gender,city) values ('dooly','둘리','여','부산');
commit; // mariaDB는 자동 commit- customer
create table customer(
	id int(10) not null auto_increment primary key,
	name varchar(100) not null,
	email varchar(100) not null,
	age int(10),
	entryDate date,
 	UNIQUE KEY uk_name (email)
);
alter table customer add unique(id);

insert into customer(name, email, age, entryDate) values ('gildong', 'gildong@naver.com', 20, '2023-10-01');
insert into customer(name, email, age, entryDate) values ('dooly', 'dooly@google.com', 25, '2023-10-05');
insert into customer(name, email, age, entryDate) values ('huidong', 'huidong@google.com', 18, '2023-09-05');
insert into customer(name, email, age, entryDate) values ('micole', 'micole@naver.com', 28, '2022-10-10');
insert into customer(name, email, age, entryDate) values ('ddochi', 'ddochi@google.com', 20, '2023-05-05');
commit;
3. Entity 클래스
1) 개념
-
@Entity
- Entity 클래스임을 지정하고, DB 테이블과 매핑하는 객체를 나타냄
- 이 객체는 DB 상에서 보통 table로 나타냄
-
@Id
- entity 기본키
-
@GenerateValue
- 기본키 값을 자동 생성됨을 나타낼 때 사용
- 자동 생성 전략
- AUTO : dialect 값에 따라서 기본키 자동 생성 전략이 지정 (account_seq Sequence 추가로 생성)
- IDENTITY : 기본키 생성을 데이터베이스에 위임하고, AUTO_INCREMENT를 이용해 기본키를 생성
- SEQUENCE : 유일한 값을 순서대로 생성하는 특별한 데이터베이스 오브젝트
- TABLE : 키 생성 전용 테이블을 생성해서 키 값을 관리
-
@Column
- Column은 안줘도 되지만 설정할게 있을 경우 사용
- name = 이름 : 지정하지 않을 경우 변수명이 컬럼명 자동 지정
- unique = true/false : 고유키, 중복 허용X
- nullable = true/false : null 값 허용
- updatable = true/false : 자동 업데이트 여부
-
@CreationTimeStamp
- 객체를 생성하면서 자동적으로 현재 시간 적용
LocalDateTime: 현재 시각 설정 가능
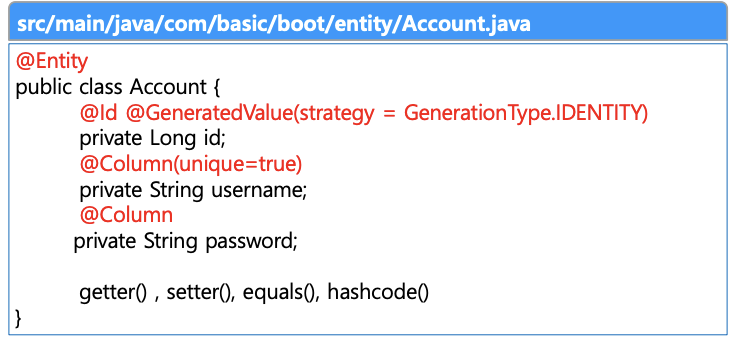
2) 실행
- Entity 패키지
- Account.java (테이블)
- 📋 실습 📋 Account.java
package com.basic.myspringboot.entity;

import jakarta.persistence.*;
import lombok.Getter;
import lombok.Setter;

@Getter
@Setter
@Entity
public class Account {
    @Id @GeneratedValue(strategy = GenerationType.AUTO)
    private Long id;

    @Column(unique = true, nullable = false)
    private String username;

    @Column(nullable = false)
    private String password;
}- Account 테이블 확인
4. Repository 인터페이스
1) 개념
- Spring-Data-JPA가 자동적으로 해당 문자열 인수 받아 DB 테이블과 매핑
- AccountRepository 구현체 따로 작성할 필요X
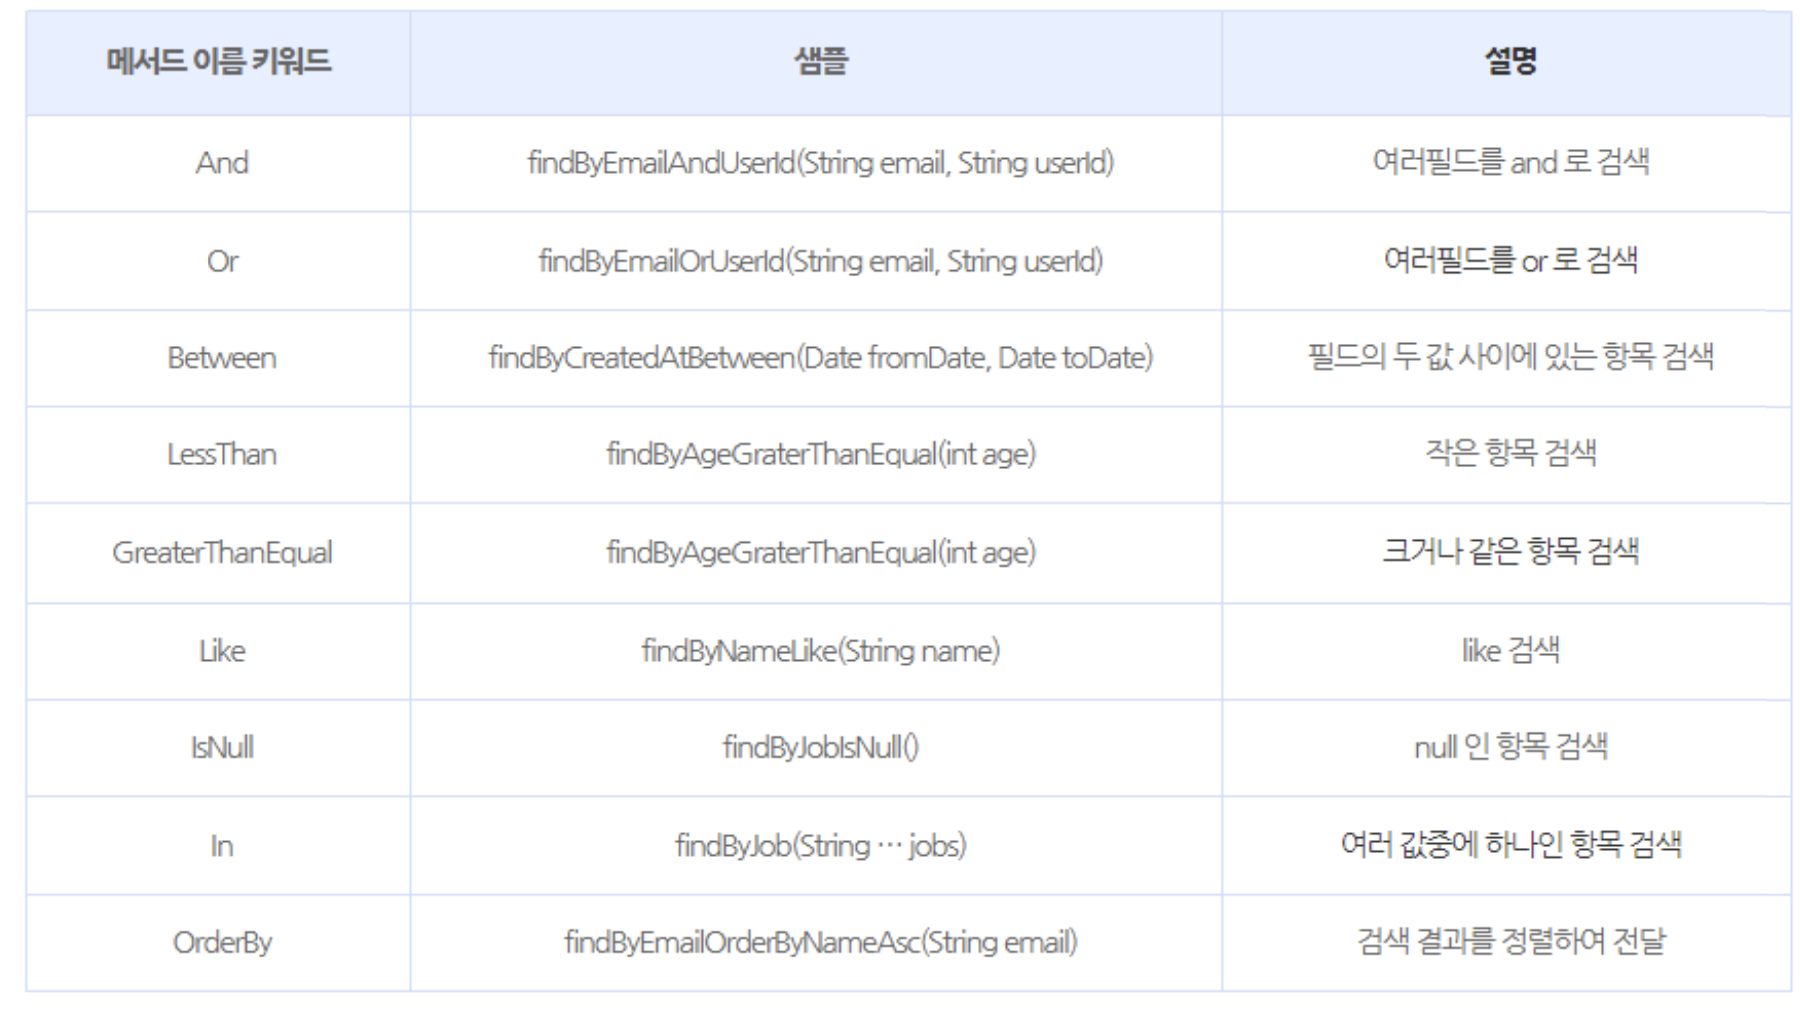
- Query Method에 포함 가능한 키워드
2) CrudRepository 메소드
- 등록
- <S extends T> S save(S entity);
- 리스트로 조회
- Iterable<T> findAll(); (CrudRepository)
- List<T> findAll(); (JpaRepository)
- PK로 조회
- Optional<T> findById(ID id);
- 삭제
- void delete(T entity);
- void deleteById(ID id);
- PK 존재 여부
- boolean existsById(ID id);
➡️ T 는 Entity 클래스의 Type
➡️ Optional은 null이 될 수도 있는 객체
➡️ pk를 사용해서만 조회 가능 (다른 컬럼으로 조회하고 싶을 경우 따로 sql문 작성 필요)
➡️ UPDATE : entity 객체 생성 후 setter 메서드 호출하여 값 변경하고 save
3) 실행
- 📋 실습 📋 AccountRepository.java
package com.basic.myspringboot.repository;

import com.basic.myspringboot.entity.Account;
import org.springframework.data.jpa.repository.JpaRepository;

import java.util.Optional;

public interface AccountRepository extends JpaRepository<Account, Long> {
    // < Entity 클래스, PK값 >
    // Insert, Delete, Select만 존재

    // select * from account where username = 'spring'
    Optional<Account> findByUsername(String username);
}
5. JPA 아키텍처

6. JPA 영속성 관리
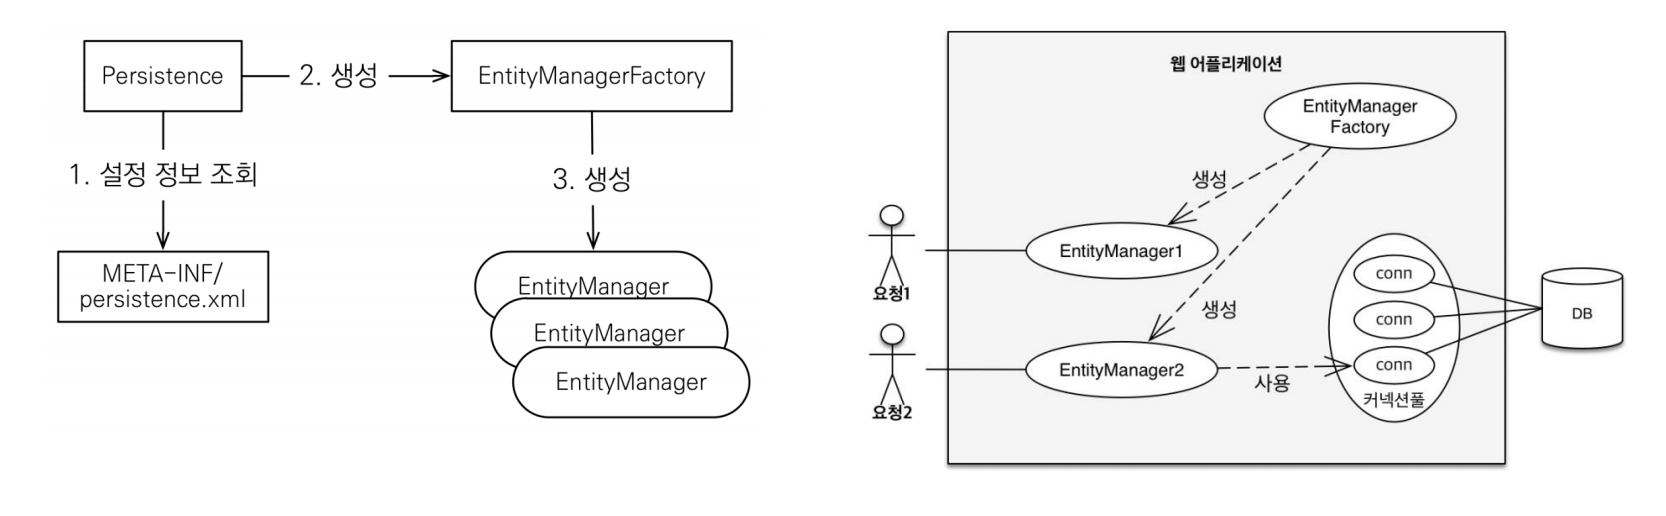
1) EntityManagerFactory와 EntityManager
- EntityMangerFactory는 1개만 생성해서 어플리케이션 전체에서 공유해서 사용
- JPA의 모든 데이터 변경은 반드시 트랜잭션 안에서 실행되어야함
- 웹 어플리케이션이 실행될 때 EntityMangerFactory를 통해서 EntityManager 생성
- 생성된 EntityManager는 내부적으로 DB Connection을 통해서 DB에 접근
2) PersistanceContext
- 영속성 컨텍스트
- EntityManager를 통해서 영속성 컨텍스트에 접근 가능
- 영속성 컨텍스트 내에는 JPA가 관리하는 영속성 객체(Entity)가 있음
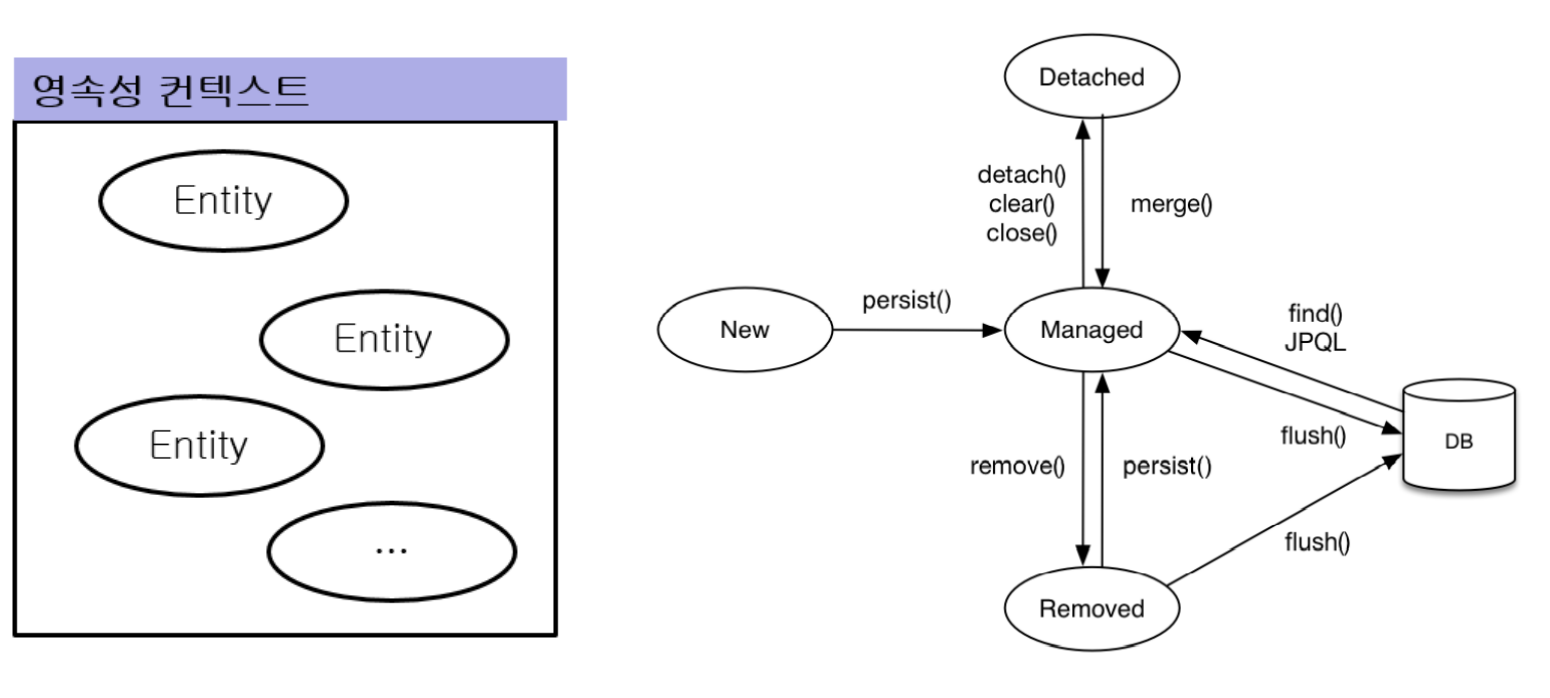
3) Entity 생명주기
- 비영속 (new/transient)
- 영속성 컨텍스트와 전혀 관계가 없는 새로운 상태
// 객체를 생성한 상태 (비영속)
Member member = new Member();
member.setId("member");
member.setUsername("회원");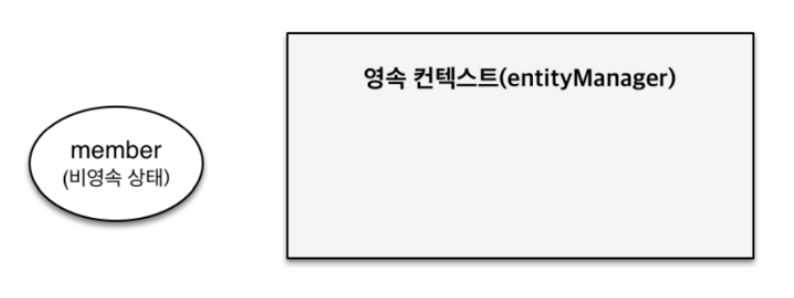
- 영속 (managed)
- 트랜잭션 범위의 영속성 컨텍스트에서 관리되는 상태
EntityManager em = emf.createEntityManager();
em.getTransaction().begin();

// 객체를 저장한 상태 (영속)
em.persist(member);
- 준영속 (detached)
- 영속성 컨텍스트에 저장되었다가 분리된 상태
- 더 이상 엔티티 객체는 관리가 안됨
// 회원 엔티티를 영속성 컨텍스트에서 분리, 준영속 상태
em.detach(member);- 삭제 (removed)
- 삭제된 상태
em.remove(member);4) 영속성 컨텍스트가 Entity를 관리할 때 사용하는 전략
- Entity 조회
- 1차 캐시에서 조회
- 데이터베이스에서 조회
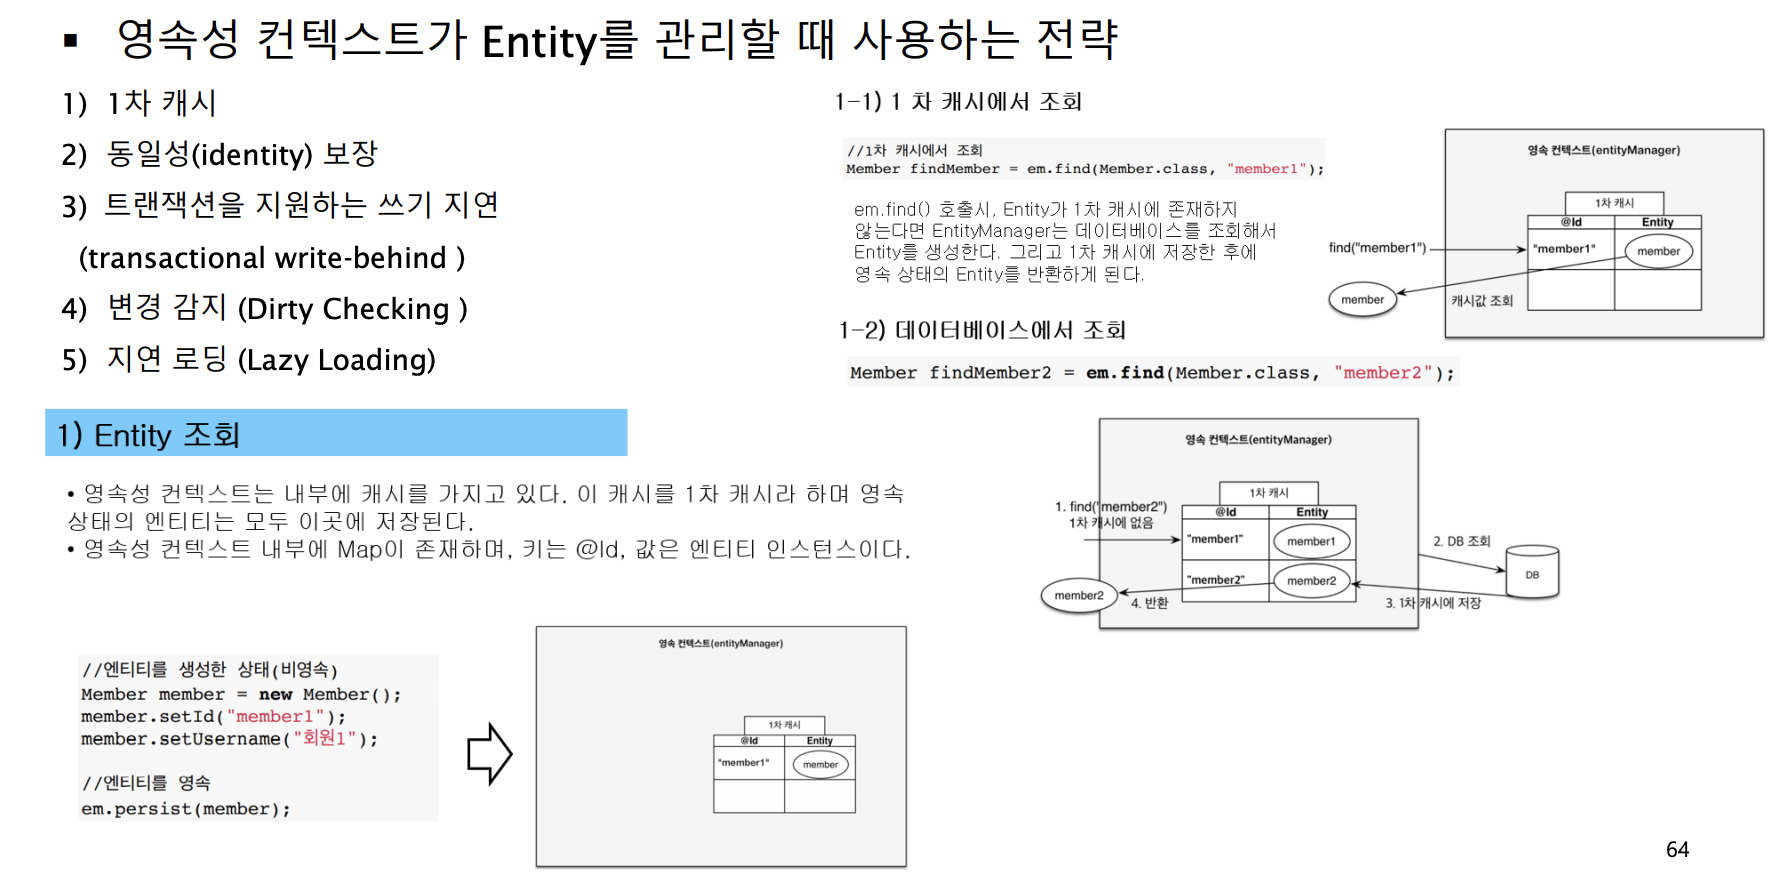
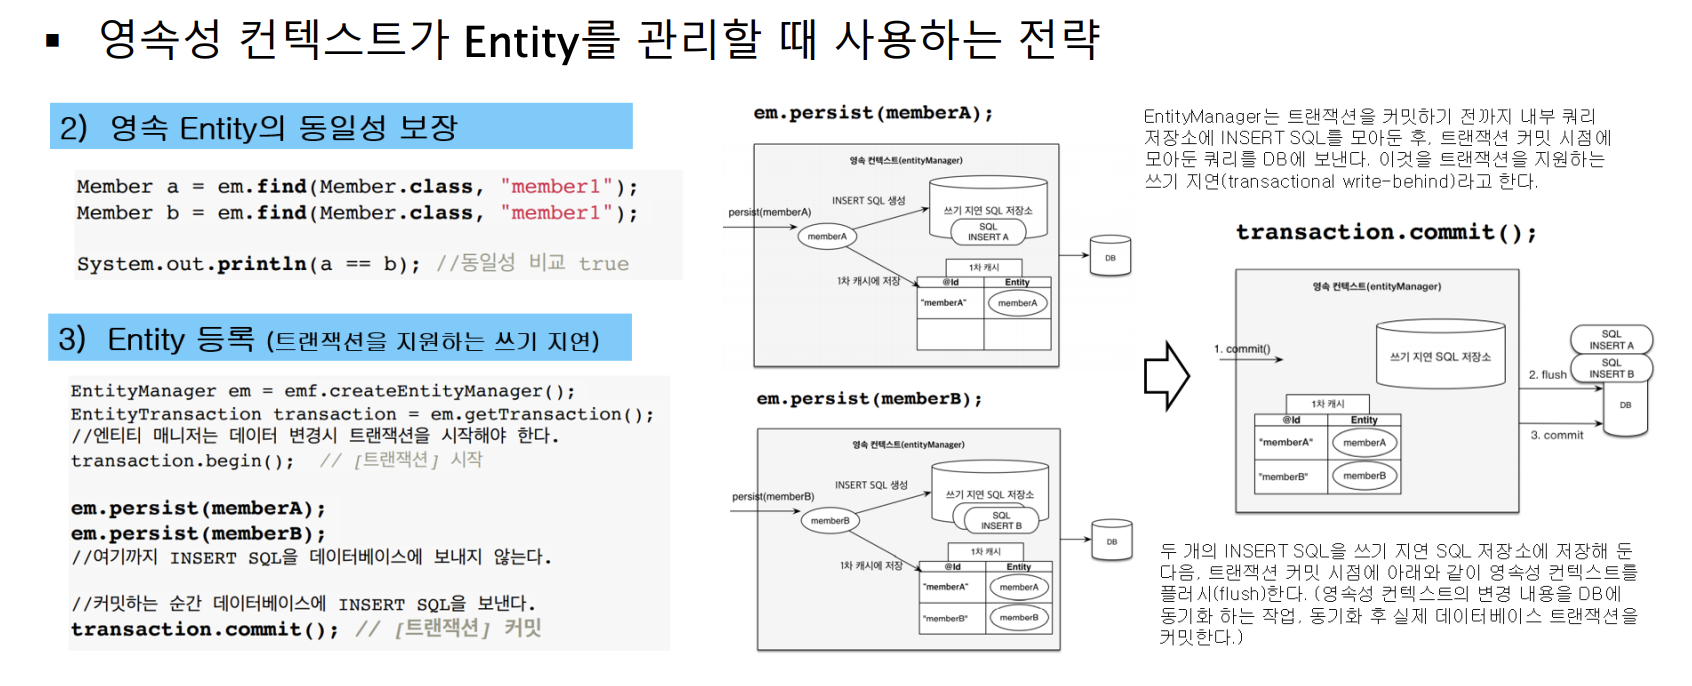
- 영속 Entity의 동일성 보장
- Entity 등록_트랜잭션을 지원하는 쓰기 지연 (transactional write-behind)
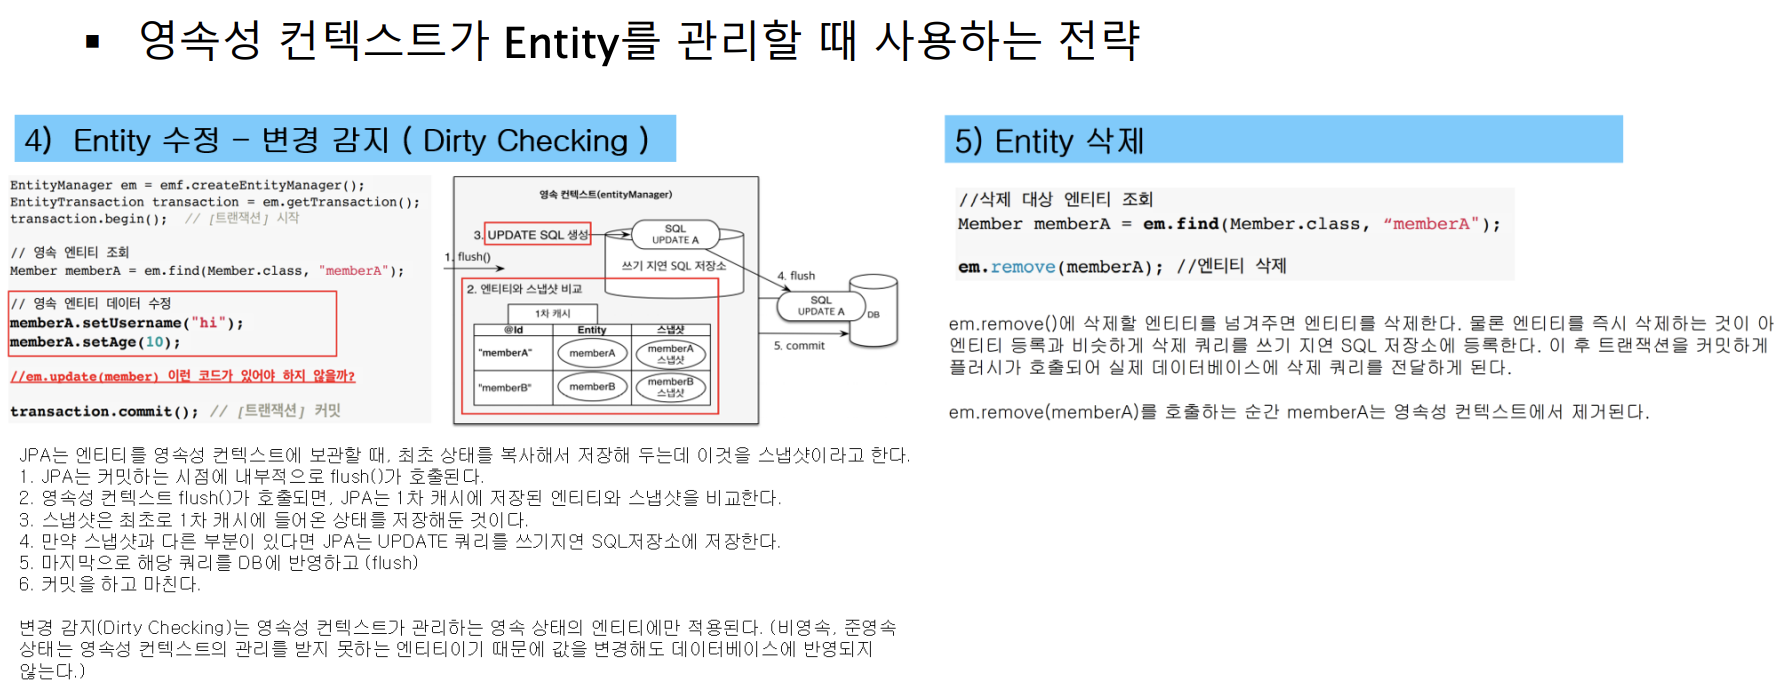
- Entity 수정_변경 감지 (Dirty Checking)
- Entity 삭제_지연 로딩 (Lazy Loading)
5) Flush
- 기능
- 영속성 컨텍스트의 변경 내용을 DB에 반영하는 작업
- 영속성 컨텍스트의 내용과 DB 내용이 동기화됨
- 특징은 영속성 컨텍스트를 비우지 않음
- 동작
- 변경 감지
- 수정된 엔티티를 쓰기 지연 SQL 저장소에 등록
- 쓰기 지연 SQL 저장소의 쿼리를 데이터베이스에 전송 (등록, 수정, 삭제 쿼리)
- 영속성 컨텍스트를 flush 하는 방법
- em.flush() 직접 호출
- em.commit() 플러시 자동 호출
- JPQL 쿼리 실행 플러시 자동 호출 (
em.setFlushMode(FlushModeType.COMMIT))
📕 Spring Boot Web MVC
1. Spring Boot Web MVC
1) 개념
- Spring MVC 설정을 하지 않아도 내부에 spring-boot-autoconfigure.jar 파일에 포함된 META-INF 디렉토리 내에 spring.factories의 org.springframework.boot.autoconfigure.web.servlet.webMVCAutoConfiguration에서 WebMVC와 관련된 자동 설정 클래스가 적용됨
2) RestController (JSON)
- JsonMessageConverter
- HTTP 요청 본문을 JSON 객체로 변경하거나, JSON 객체를 HTTP 응답 본문으로 변결할 때 사용
- {"username":"basic", "password":"123"} <-> User
- ViewResolver
- Controller에서 JSON 타입에 대한 정보를 명시하지 않아도 ContentNegotiationViewResolver를 통해 자동적으로 json 형식으로 데이터를 반환하도록 스프링 부트에서 제공함
- ViewResolver는 Converter와 연관되어 있어 Content-type을 기준으로 어떤 Converter 사용할지 결정
3) API (Application Programming Interface)
- 응용프로그램에서 데이터를 주고 받기 위한 방법
- 특정 사이트에서 데이터를 공유할 경우 어떠한 방식으로 정보를 요청해야 하는지, 어떠한 데이터를 제공받을 수 있을지에 대한 규격
4) REST (REpresentational State Transfer)
-
개념
- 분산 시스템 설계를 위한 아키텍처 스타일 (제약조건의 집합)
- 웹의 장점을 최대한 활용할 수 있고, HTTP 프로토콜의 의도에 맞게 디자인된 아키텍처
-
필요 이유
- 분산 시스템
- 큰 어플리케이션을 모듈, 기능별로 분리하기 쉬워짐
- RESTful API를 서비스하면 다른 모듈/어플리케이션도 RESTful API를 통해 상호간 통신 가능
- WEB 브라우저 이외의 클라이언트를 위해 필요
- 웹 페이지를 위한 HTML 및 이미지 등 여러 클라이언트에서 데이터를 자유롭게 주고 받음
- 서버도 요청한 데이터를 보내기만 해서 가볍고, 유지보수성 좋음
- 분산 시스템
-
REST 구성요소
- HTTP URI (자원) + HTTP Method (행위)
- URI : 정보의 자원 (명사형)
- Method : 자원에 대한 행위 (GET/POST/PUT/DELETE)
-
REST 제약조건
- Client/Server 구조
- 클라이언트와 서버가 독립적
- Stateless (무상태)
- 서버에서 클라이언트의 세션과 쿠키가 같은 context를 저장하지 않으므로 구현이 단순함
- Cache (캐시 처리 가능)
- HTTP가 가진 캐시 처리 기능을 그대로 적용 가능
- Layered System (계층화)
- REST 서버는 다른 계층으로 구성 가능
- 보안, 로드 밸런싱, 암호화 계층을 추가해 구조상의 유연성 둘 수 있음
- Uniform Interface (인터페이스 일관성)
- URI(자원)은 유일하게 식별 가능
- HTTP Method로 표현을 담기
- 메시지는 스스로 설명 (self-descriptive)
- 하이퍼링크로 어플리케이션의 상태가 전이(HATEOAS) 되어야함
- Client/Server 구조
5) Restful API
- RESTful
- 제약조건의 집합(REST 아키텍처 원칙)을 모두 만족하는 API
- URI(자원 명시, 명사형) + METHOD(자원 제어 명령, GET/POST/PUT/DELETE)
- Restful API 방식
- 글 읽기 : GET
- 글 등록 : POST
- 글 삭제 : DELETE
- 글 수정 : PUT
2. RestController
1) RestController
-
@RestController
- @Controller와는 다르게 리턴값에 자동으로 @ResponseBody가 붙음
- HTTP 응답데이터(body)에 자바 객체가 매핑되어 전달
- @RestController = @Controller + @ResponseBody
-
@RequestBody
- 변환된 데이터를 요청(request)에 담아서 컨트롤러의 메서드의 아규먼트로 매핑 해주는 역할
- JSON -> Java Object (역직렬화) 변환 처리는 Jackson이 담당함
- 클라이언트에서 서버로 필요한 데이터를 요청하기 위해 JSON 데이터를 요청 본문에 담아서 서버로 보내면, 서버에서는 @RequestBody 어노테이션을 사용하여 HTTP 요청 본문에 담긴 값들을 자바객체로 변환시켜, 객체에 저장
-
@ResponseBody
- 변환된 데이터를 응답(response) body에 담아주는 역할
- Java Object -> JSON (직렬화) 변환 처리는 Jackson이 담당
- 서버에서 클라이언트로 응답 데이터를 전송하기 위해 @ResponseBody 어노테이션을 사용하여 자바 객체를 HTTP 응답 본문의 객체로 변환하여 클라이언트로 전송
2) RequestMapping
- @RequestMapping
@RequestMapping(value="경로", method=RequestMethod.GET)
@RequestMapping(value="경로", method=RequestMethod.POST) - @PostMapping (등록)
- http://localhost:8080/users
- header : content-type:application/json
- body :{ "name":"스프링", "email":"spring@a.com" }
@PostMapping("경로")- @GetMapping (조회)
- 목록 조회 : http://localhost:8080/users
- ID로 조회 : http://localhost:8080/users/{id}
- email로 조회 : http://localhost:8080/users/email/spring@a.com
@GetMapping("경로")- @DeleteMapping (삭제)
@DeleteMapping("경로")- @PutMapping (수정)
- 모든 항목 전체수정
- header : content-type:application/json
- body : http://localhost:8080/users/1 { "name":"Spring", "email":"spring@a.com" }
@PutMapping("경로")- @PatchMapping
- 부분 항목 수정
- header : content-type:application/json
- body : http://localhost:8080/users/{email}/{ "name":"Spring" }
@PatchMapping("경로")3) Entity와 Repository
- Entity
- 📋 실습 📋 User.java
package com.basic.myspringboot.entity;

import jakarta.persistence.*;
import lombok.Getter;
import lombok.Setter;
import org.hibernate.annotations.CreationTimestamp;

import java.time.LocalDateTime;

@Entity
@Table(name = "users")
@Getter @Setter
public class User {
    @Id
    @GeneratedValue(strategy = GenerationType.IDENTITY)
    private Long id;

    @Column(nullable = false)
    private String name;

    @Column(unique = true, nullable = false)
    private String email;

    @Column(nullable = false, updatable = false)
    @CreationTimestamp
    private LocalDateTime createdAt = LocalDateTime.now();
}- Repository
- 📋 실습 📋 UserRepository.java
package com.basic.myspringboot.repository;

import com.basic.myspringboot.entity.User;
import org.springframework.data.jpa.repository.JpaRepository;

import java.util.List;
import java.util.Optional;

public interface UserRepository extends JpaRepository<User, Long> {
    Optional<User> findByEmail(String email);

    List<User> findByName(String name);
}
4) Controller
-
controller 패키지 생성
-
📋 실습 📋 UserBasicRestController.java
package com.basic.myspringboot.controller;

import com.basic.myspringboot.entity.User;
import com.basic.myspringboot.exception.BusinessException;
import com.basic.myspringboot.repository.UserRepository;
import org.springframework.beans.factory.annotation.Autowired;
import org.springframework.http.HttpStatus;
import org.springframework.web.bind.annotation.*;

import java.util.List;
import java.util.Optional;

import static org.springframework.util.ClassUtils.isPresent;

@RestController
@RequestMapping("/users")
public class UserBasicRestController {
    @Autowired
    private UserRepository userRepository;

    @PostMapping
    public User create(@RequestBody User user) {
        return userRepository.save(user);
    }

    @GetMapping
    public List<User> getUsers() {
        return userRepository.findAll();
    }

    @GetMapping("/{id}")
    public User getUser(@PathVariable Long id) {
        Optional<User> optionalUser = userRepository.findById(id);
        // 하단과 동일 코드
//        if(optionalUser.isPresent()) {
//            User user = optionalUser.get();
//            return user;
//        }

        // orElseThrow(Supplier) Supplier의 추상메서드가 T get()
        User user = optionalUser.orElseThrow(() -> new BusinessException("User Not Found", HttpStatus.NOT_FOUND));
        return user;
    }

    // 그냥 (/{email}) 할 경우 숫자인지 문자열인지 인식 못함
    @GetMapping("/email/{email}")
    public User getUserByEmail(@PathVariable String email) {
        return userRepository.findByEmail(email)
                            .orElseThrow(() -> new BusinessException("요청하신 email에 해당하는 User가 없습니다", HttpStatus.NOT_FOUND));
    }

}
5) ResponseEntity
- Body + Http Status Code + Header 한번에 담아서 응답을 주는 객체
- 서버가 웹 토큰등을 요청받았을 때 응답 헤더에 토큰을 추가해서 전달 -> 클라이언트는 전달받은 응답 헤더를 확인하여 토큰 사용
3. 예외 처리
1) 예외 처리
- Spring Boot에서 ExceptionHandler를 기본적으로 등록하여 Exception 처리
- 기본 예외 처리기는 스프링에서 자동적으로 등록하는 BasicErrorController에서 관리
- 에러 발생시 JSON 형식으로 리턴
- 커스텀 Exception 핸들러, 커스텀 Exception 클래스를 만들어서 예외 처리
- 스프링 @MVC 예외 처리 방법
- @ExceptionHandler
- 메서드가 컨트롤러 내부의 예외 처리
- @ControllerAdvice
- 클래스의 객체가 컨트롤러에서 발생하는 Exception을 전문적으로 처리하는 클래스라는 것을 명시
- @ExceptionHandler
- BasicErrorController
- 스프링 부트가 제공하는 기본 예외 처리기 역할 담당
- HTML과 JSON 응답 지원
- org.springframework.boot.autoconfigure.web.servlet.error.BasicErrorController
- HTTP 에러 코드
- HTTP Status(에러) 코드 값에 따른 에러 페이지 작성 디렉토리
- src/main/resources/static/error
- 404.html
- 5xx.html
- HTML 문서의 파일명이 상태코드와 같거나, 5xx 같이 패턴을 맞춰 생성
- HTTP Status(에러) 코드 값에 따른 에러 페이지 작성 디렉토리
2) 사용자 정의 Exception 클래스
- 에러 처리
- 에러 처리를 위해 람다식 사용
- 📋 실습 📋 BusinessException.java
import org.springframework.http.HttpStatus;

public class BusinessException extends RuntimeException {

	private static final long serialVersionUID = 1L;
    private String message;
    private HttpStatus httpStatus;

    public BusinessException(String message) {
        //417
        this(message, HttpStatus.EXPECTATION_FAILED);
    }

    public BusinessException(String message, HttpStatus httpStatus) {
        this.message = message;
        this.httpStatus = httpStatus;
    }

    public String getMessage() {
        return this.message;
    }

    public HttpStatus getHttpStatus() {
        return httpStatus;
    }
}- 시스템 에러 대비 코드
- 📋 실습 📋 SystemException.java
import org.springframework.http.HttpStatus;

public class SystemException extends RuntimeException {
	private static final long serialVersionUID = 1L;
	private String message;
    private HttpStatus httpStatus;
    private Throwable throwable;

    public SystemException(Exception e) {
        this(e.getMessage(), HttpStatus.INTERNAL_SERVER_ERROR);
    }

    public SystemException(String message) {
        this(message, HttpStatus.INTERNAL_SERVER_ERROR);
    }

    public SystemException(String message, Throwable t) {
    	this.message = message;
    	this.throwable =t;
    }

    public SystemException(Throwable t) {
    	this.throwable = t;
    }

    public SystemException(String message, HttpStatus httpStatus) {
        this.message = message;
        this.httpStatus = httpStatus;
    }

    public String getMessage() {
        return this.message;
    }

    public HttpStatus getHttpStatus() {
        return httpStatus;
    }

    public Throwable getThrowable() {
    	return this.throwable;
    }
}
3) @RestControllerAdvice
- @RestControllerAdvice
- 각 클래스별로 공통적으로 처리해야할 경우 추가
- @BusinessHandler
- exception의 메시지와 상태코드 확인하여 메시지를 키로 사용하여 BusinessException의 맞는 메시지 출력
- Advice
- 📋 실습 📋 DefualtExceptionAdvice.java
import org.slf4j.Logger;
import org.slf4j.LoggerFactory;
import org.springframework.http.HttpStatus;
import org.springframework.http.ResponseEntity;
import org.springframework.http.converter.HttpMessageNotReadableException;
import org.springframework.web.bind.annotation.ExceptionHandler;
import org.springframework.web.bind.annotation.RestControllerAdvice;

import java.util.HashMap;
import java.util.Map;

@RestControllerAdvice
public class DefaultExceptionAdvice {
	private final Logger LOGGER = LoggerFactory.getLogger(DefaultExceptionAdvice.class);


    @ExceptionHandler(BusinessException.class)
    protected ResponseEntity<Object> handleException(BusinessException e) {
        Map<String, Object> result = new HashMap<String, Object>();
        result.put("message", "[안내] " + e.getMessage());
        result.put("httpStatus", e.getHttpStatus().value());

        return new ResponseEntity<>(result, e.getHttpStatus());
    }

    @ExceptionHandler(SystemException.class)
    protected ResponseEntity<Object> handleException(SystemException e) {
        Map<String, Object> result = new HashMap<String, Object>();
        result.put("message", "[시스템 오류] " + e.getMessage());
        result.put("httpStatus", e.getHttpStatus().value());

        return new ResponseEntity<>(result, e.getHttpStatus());
    }

    //숫자타입의 값에 문자열타입의 값을 입력으로 받았을때 발생하는 오류
    @ExceptionHandler(HttpMessageNotReadableException.class)
    protected ResponseEntity<Object> handleException(HttpMessageNotReadableException e) {
        Map<String, Object> result = new HashMap<String, Object>();
        result.put("message", e.getMessage());
        result.put("httpStatus", HttpStatus.BAD_REQUEST.value());

        return new ResponseEntity<>(result, HttpStatus.BAD_REQUEST);
    }

    @ExceptionHandler(Exception.class)
    protected ResponseEntity<Object> handleException(Exception e) {
        Map<String, Object> result = new HashMap<String, Object>();
        ResponseEntity<Object> ret = null;

        if (e instanceof BusinessException) {
        	BusinessException b = (BusinessException) e;
        	result.put("message", "[안내]\n" + e.getMessage());
        	result.put("httpStatus", b.getHttpStatus().value());
        } else if ( e instanceof SystemException) {
    		SystemException s = (SystemException)e;
            result.put("message", "[시스템 오류]\n" + s.getMessage());
            result.put("httpStatus", s.getHttpStatus().value());
            ret = new ResponseEntity<>(result, s.getHttpStatus());

            LOGGER.error(s.getMessage(), s);
    	 } else {
    		String msg = "예상치 못한 문제가 발생했습니다.\n관리자에게 연락 하시기 바랍니다.";
	        result.put("message", msg);
	        result.put("httpStatus", HttpStatus.INTERNAL_SERVER_ERROR.value());
	        ret = new ResponseEntity<>(result, HttpStatus.INTERNAL_SERVER_ERROR);
	        e.printStackTrace();

            LOGGER.error(e.getMessage(), e);
    	}
        return ret;
    }
}
4. RestController (XML)
1)
2)
3)
4)
5)
5.
1)
2)
3)
4)
5)
📕 Thymeleaf
1.
1)
2)
3)
4)
5)
2.
1)
2)
3)
4)
5)
📖 참고 📖
- 🗒️ 예시
1️⃣2️⃣3️⃣4️⃣5️⃣6️⃣7️⃣
⬆️⬇️➡️
- 📋 실습 📋 .java
- 📋 실습 📋 MySpringBoot3Application.java
- 📋 실습 📋 application-test.properties
- 📋 실습 📋 application-prod.properties
- 📋 실습 📋 MyRunner.java
📕 Spring Boot Actuator
1.
1)
2)
3)
4)
5)
2.
1)
2)
3)
4)
5)
📖 참고 📖
- 🗒️ 예시
1️⃣2️⃣3️⃣4️⃣5️⃣6️⃣7️⃣
⬆️⬇️➡️
📕 Spring Boot Security
1.
1)
2)
3)
4)
5)
2.
1)
2)
3)
4)
5)
📖 참고 📖
- 🗒️ 예시
1️⃣2️⃣3️⃣4️⃣5️⃣6️⃣7️⃣
⬆️⬇️➡️
