
📒 개발자 필수 지식
📕 데이터 교환 형식
1. JSON과 직렬화와 역질렬화
-
1) JSON (JavaScript Object Notation)
- JavaScript 객체 문법으로 구조화된 데이터 교환 형식
- python, javascript, java 등 여러 언어에서 데이터 교환 형식으로 사용
- 객체 문법이 아닌 단순 배열, 문자열도 표현 가능
-
2) JavaScript 객체 문법
- 키(key)와 값(value)으로 구성
- 이미 존재하는 키를 중복선언하면 나중에 선언한 해당 키에 대응한 값이 덮어 쓰이게됨
- 🗒️ 예시 : {key : value}
{
"name" : "soohykim"
"age" : 30
"name" : "king" // 마지막 키 값만 존재
}
-
3) 데이터 + 교환 형식
- 데이터는 추상적인 아이디어에서부터 시작해 구체적인 측정까지 다양한 의미로 사용
- 실험, 조사, 관찰 등으로 부터 얻은 사실/자료를 의미
-
4) 여러 언어에서 사용
- 객체, 해시테이블, 딕셔너리 등 각 언어에 맞게 변환되어 사용
- 독립적
- 🗒️ 예시
참고 python 예시const fs = require('fs') const path = require('path') const a = fs.readFileSync(path.join(__dirname,"a.json")) console.log(a) console.log(JSON.parse(a)) //json.parse를 통해 json을 (javascript)JSONobject로 변환 int cnt = 0; if(b[0].name.firstname == "ju") { cnt++; } console.log(cnt) console.log(b[0].name.firstname) json in javascipt = javascript object json in python = dict
-
5) 단순 배열, 문자열 표현
- 단순 배열 : [1, 2, 3, 4]
- 문자열 : "히히히히히히"
-
6) 실습
- 지브리 OST 리스트
- 마녀 배달부 키키/따스함에 둘러쌓인다면
- 하울의 움직이는 성/세계의 약속
- 작품명 : 노래 >> name:song
// 배열은 []로 표현 ([0], [1]로 접근) // 객체는 다른 타입을 가지고 있어도 되지만, 맞춰주는게 좋음 // 해당 Key에 대한 value는 .key 또는 ["key"] 접근하여 빼냄 const a = { "지브리OST리스트" : [ // 스키마 (타입) 구축 { "name" : "마녀 배달부 키키", "song" : "따스함에 둘러쌓인다면" }, { "name" : "하울의 움직이는 성", "song" : "세계의 약속" } ] } console.log(a.지브리OST리스트[0]) console.log(a.지브리OST리스트[0].name) console.log(a.지브리OST리스트[0]["song"]) /* { name: '마녀 배달부 키키', song: '따스함에 둘러쌓인다면' } 마녀 배달부 키키 따스함에 둘러쌓인다면 */ - 이름 : 큰돌
- 좋아하는 것 : 아령, 바나나
- 아령 : 10kg, 육각형
- 바나나 : 초록색
{
	"name" : "kundol",
	"like" : {
		"아령" : {
			"weight" : "10kg",
			"feature" : "육각형"
		},
		"바나나" : {
			"color" : "초록색"
		}
	}
}
- 지브리 OST 리스트
-
7) JSON 타입
- javascript object와 유사
- undefined, 메서드 등 포함X
- 종류
- 수 (Number)
- 문자열 (String)
- 참/거짓 (Boolean)
- 배열 (Array)
- 객체 (Object)
- null
-
8) JSON 직렬화, 역직렬화
- 직렬화는 외부의 시스템에서도 사용할 수 있도록 byte 형태로 데이터를 변환하는 기술
- 직렬화 : JSON.stringify() (JS ➡️ JSON)
- 역직렬화 : JSON.parse()
-
9) JSON의 활용
- JSON은 프로그래밍 언어와 프레임워크 등에 독립적
- 서로 다른 시스템간에 데이터를 교환하기 좋음
- API의 반환형태, 시스템을 구성하는 설정파일에 활용
- 🗒️ 예시
- 업비트의 API : https://docs.upbit.com/reference
- package.json : https://docs.npmjs.com/cli/v9/configuring-npm/package-json
2. XML
-
1) XML (Extensible Markup Language) 개념
- 마크업 형태를 쓰는 데이터교환형식
- markup : 태그 등을 이용하여 문서/데이터 구조를 나타내는 방법 (속성 부여도 가능)
-
2) XML 구성
- 1️⃣ : 프롤로그(버전, 인코딩)
- 2️⃣ : 루트요소 (단 1개 존재)
- 3️⃣ : 하위 요소들
<?xml version="1.0" encoding="UTF-8"?>
<OSTList>
<OST like="1">
<name>마녀 배달부 키키</name> <song>따스함에 둘러쌓인다면</song>
</OST>
<OST like="2">
<name>하울의 움직이는 성</name> <song>세계의 약속</song>
</OST>
</OSTList>
-
3) HTML과 XML 비교
- 1️⃣ : 용도
- HTML : 데이터 표시
- XML : 데이터 저장 및 전송
- 2️⃣ 태그
- HTML : 미리 정의된 태그 사용
- XML : 고유한 태그 만들고 정의 가능
- 3️⃣ 대/소문자
- HTML : 대/소문자 구분
- XML : 대/소문자 구분X<!DOCTYPE html> <html lang="en"> <head> <meta charset="UTF-8"> <meta http-equiv="X-UA-Compatible" content="IE=edge"> <meta name="viewport" content="width=device-width, initial-scale=1.0"> <title>Document</title> </head> <body> <p></p> <div></div> </body> </html>
- 1️⃣ : 용도
-
4) JSON과 XML 비교
- XML
- 닫힌 태그가 계속 들어가서, JSON에 비해 무거움
- Javascript Object로 변화하기 위해서 JSON보다 복잡
- XML
-
5) XML 활용
- sitemap.xml
- 서비스 내의 모든 페이지들을 리스트업한 데이터
- Goolge등 검색했을 때 해당 페이지가 상단에 뜨기 위해 SEO(Search Engine Optimization, 검색 엔진 최적화) 사용
- Google DB에 서비스의 페이지들이 토큰화되어 저장
- 사이트가 매우 크거나, 서로 링크가 종속적으로 연결되지 않은 경우 크롤러가 일부 페이지를 누락하는 것을 방지 (sitemap 제출하여 모든 페이지 크롤링)<?xml version="1.0" encoding="UTF-8"?> <urlset xmlns="http://www.sitemaps.org/schemas/sitemap/0.9"> <url> <loc>http://www.example.com/foo.html</loc> <lastmod>2018-06-04</lastmod> </url> <url> <loc>http://www.example.com/abc.html</loc> <lastmod>2018-06-04</lastmod> </url> </urlset>
- sitemap.xml
📕 API
1. 개념
-
1) API (Application Programming Interface)
- 둘 이상의 컴퓨터 프로그램이 서로 통신하는 방법
- 통신 방법, 데이터 종류 등에 대한 방법(HTTP, HTTPS 프로토콜 사용할지, GET,POST 방식)이 정의된 컴퓨터 사이에 있는 중계 계층
- 라이브러리 및 프레임워크를 설명하는 명세서 (웹 상에서 WEB API, Web Socket API를 의미)
-
2) 인터페이스
- 서로 다른 2개의 시스템, 장치간 정보나 신호를 주고받을 때의 접점
- 컴퓨터의 내부서버가 어떻게 구현되어있는지 상관없이 인터페이스를 통해 통신 가능
-
3) API 작동 방식
- 사용자가 브라우저를 통해 서버에 요청을 하게 되면, API가 중계계층 역할을 하며 요청 처리
- 직접 서버의 데이터베이스에 접근하는 것을 방지함

-
4) API 장점
- 제공자는 서비스의 중요한 부분(DB 설계 구조, DB 테이블 정보, 서버 상수값 등)을 드러내지 않고 보이고 싶은 부분만 노출 가능
- 사용자는 해당 서비스가 어떻게 구현되는지 알 필요없이 필요한 정보만 받을 수 있음
- Open API의 경우 앱 개발 프로세스 단순화 (시간과 비용 절약)
- 내부 프로세스가 수정될 때 API를 매번 수정하지X
➡️ 내부 DB, 서버의 로직이 변경되어도 매번 사용자가 앱을 업데이트하는 일이 줄어듦 (DB튜닝) - 제공자는 데이터를 한 곳에 모을 수 있음
-
5) API 종류
- private : 내부적으로 사용
- 주로 해시키를 하드코딩하고, 이를 기반으로 서버간 통신
- 비즈니스 파트너와도 사용되어 비밀스럽게 해당 파트너와 해시키를 공유해 통신
- public : 모든 사람이 사용 가능
- 많은 트래픽을 방지하기 위해 하루 요청수의 제한, 계정당 몇개 등으로 관리
- private : 내부적으로 사용
2. 실습 OPEN API 이용해 온도 예측
- OPEN API를 이용해 온도 예측 (날씨 예측을 위한 수치모델, 인공지능모델 없이 실행)
- https://www.chartjs.org/이용
- 소스코드
<!DOCTYPE html> <html lang="en"> <head> <meta charset="UTF-8"> <meta http-equiv="X-UA-Compatible" content="IE=edge"> <meta name="viewport" content="width=device-width, initial-scale=1.0"> <title>Document</title> <style> canvas { width: 100% !important; } </style> </head> <body> <canvas id="myChart"></canvas> </body> <script src="https://cdn.jsdelivr.net/npm/chart.js"></script> <script> const OPEN_API = "https://api.open-meteo.com/v1/forecast?latitude=37.57&longitude=1 26.98&hourly=temperature_2m¤t_weather=true&timezone=Asia%2FT okyo" const draw = (res) => { const opt = { year: 'numeric', month: 'numeric', day: 'numeric', hour: 'numeric' } res.hourly.time = res.hourly.time.map(e => { return new Intl.DateTimeFormat("ko-KR", opt).format(new Date(e)) }) const data = { labels: res.hourly.time, datasets: [{ label: '서울의 온도차트', data: res.hourly.temperature_2m, borderColor: 'rgb(255, 99, 132)', backgroundColor: 'rgba(255, 99, 132, 0.5)', pointStyle: 'circle', pointRadius: 10, pointHoverRadius: 15 }] } const ctx = document.getElementById('myChart').getContext('2d'); const myChart = new Chart(ctx, { type: 'line', data: data }); } window.onload = async () => { const ret = await fetch(OPEN_API).then(res => res.json()) draw(ret) } /* load : 스타일시트 및 이미지와 같은 모든 종속 리소스를 포함하여 전체 페이지가 로드될 때를 말합니다. */ </script> </html>
3. 실습 Node.js를 이용한 간단한 API 구축
- API 장점 구현
- 내부 프로세스 수정되어도 API 수정이 안되도록 함
- 내부(DB, 서버 로직)가 변경이 되어도 사용자에게 영향을 주지 않고 변경 가능
- a.json
{
	"name" : "kundol",
	"tall" : "200"
}- b.js
const express = require('express')
const app = express()
const port = 3000
const fs = require('fs')
app.get('/', (req, res) => {
	const f = JSON.parse(fs.readFileSync("a.json",
{encoding:"utf-8"}))
	const data = {
		"name" : f.name
	}
	res.send(data)
})
app.listen(port, () => {
	console.log(`http://127.0.0.1:${port}`)
})
📖 참고 📖 node.js 설치
- 비동기적 이벤트 주도 방식
- 논블로킹 I/O 모델을 사용하는 구글의 V8 엔진을 장착한 자바스크립트 런타임
- node.js는 자바스크립트 런타임으로, 자바스크립트로 만든 프로그램 실행 가능
📖 참고 📖 express 모듈 설치
npm install express
- node.js에서 동작하는 웹 프레임워크 중 많이 사용되며 라우팅 설정, 미들웨어 설정, 정적자원서버 설정 등이 쉬운 프레임워크
- 라우팅
- URI(또는 URL) 및 특정한 HTTP 요청 메소드(GET, POST 등)인 특정 엔드포인트에 대한 클라이언트 요청에 애플리케이션이 응답하는 방법을 결정
- URI 분석
- http://127.0.0.1:3000
- 프로토콜 : HTTP
- IP : 127.0.0.1 (루프백IP)
- port : 3000
- port는 사실 숨겨져 있음
- https port : 443 (기본 포트)
- http port : 80 (기본 포트)
📕 클라우드
1. 가상머신
- 1) 전통적 배포방식
- 물리적인 컴퓨터 1대에 1개의 OS를 깔고, 여러가지 프로그램을 설치하는 방식
- 계정을 나눠 여러명의 사용자가 이용할 수 있도록 할 수 있지만 어떤 프로그램을 설치했을 때 다른 앱에 영향을 미침
- 2) 가상화 배포방식
- 가상머신을 기반으로 배포하는 것
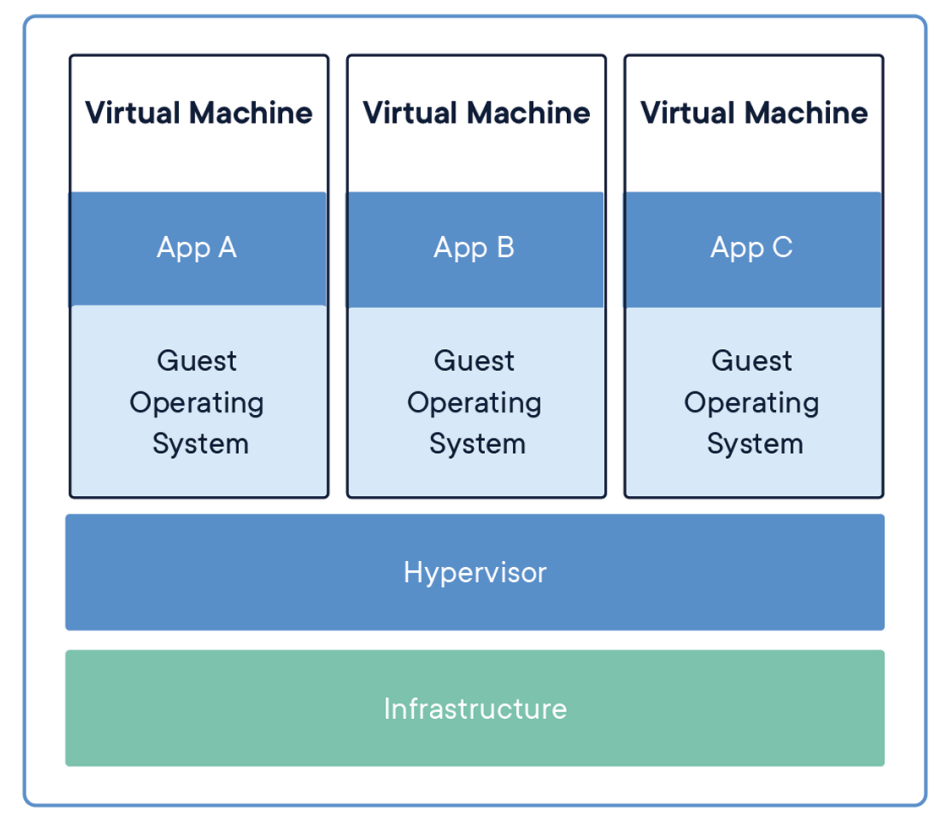
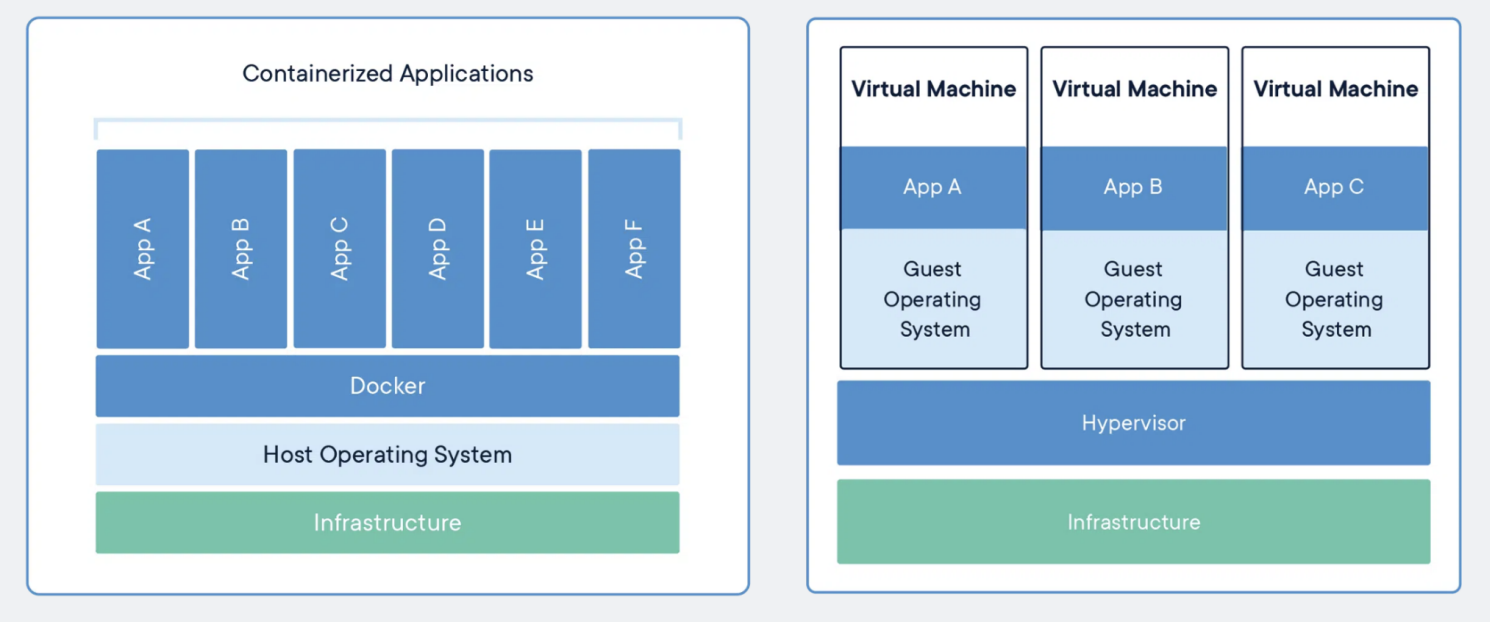
- 계정을 나누는 것이 아니라 한 대의 컴퓨터를 가지고 여러 개의 OS를 구동 가능 (CPU, RAM을 물리적으로 바꾸는 것이 아니라 설정만으로 수행 가능)
- 중간에 있는 하이퍼바이저는 하나의 시스템 상에서 가상 컴퓨터를 여러 개 구동할 수 있도록 하는 중간 계층
- 하이퍼바이저 위에 여러 개의 가상머신을 구축할 수 있고, 가상머신 위에 OS와 앱이 올라가는 형태로 가상머신을 독립적으로 수행
- 3) 가상머신 특징
- 독립적으로 가상머신이 구축되어 서로 전혀 상호작용하지 않고, 한 가상머신위의 프로그램은 다른 가상머신위으 프로그램에서 볼 수 없는 형태(샌드박스)
- 장점 : 가상화 기술로 1대의 하드웨어로 여러 명의 사용자에게 독립적으로 클라우드 서비스 가능
- 단점 : OS가 공유되지 않아 가상머신에 일일히 OS를 설치해야 함
2. 오프프레미스(off-premise)와 온프레미스(on-premise)
- 1) 클라우드
- 공급자가 호스팅하고 인터넷을 통해 사용자에게 제공되는 인프라/플랫폼/소프트웨어
- 자체 인프라나 하드웨어 설치 없이 애플리케이션과 리소스에 쉽고 싸게 이용 가능

- 2) 오프프레미스 방식
- 클라우드
- 서버를 직접 구매할 때 고려해야할 전력, 위치, 서버 셋팅, 확장성을 고민하지 않고 서비스 운영에만 집중 가능
- 3) 온프레미스 방식
- 기업이나 개인이 자체 시설에서 보유하고 직접 유지 관리하는 프라이빗 데이터 센터(IDC)
- 네트워크 선까는 것부터 서버, 데이터베이스 설치 하는 것
- 🗒️ 예시 : 네이버의 데이터센터
- 프리쿨링을 통한 전기 절약 가능
- 프리쿨링은 서버실 온도를 조절하기 위해 쓰는 냉각수를 전기가 아닌 외부 찬 공기를 이용해 만드는 방식
- 데이터 냉각시설의 효율화를 위해 강원도에 위치
3. IaaS와 PaaS와 SaaS
-
1) IaaS (Infrastructure-as-a-Service)
- 인프라형 클라우드 서비스
- 클라우드가 인프라 제공
- 장점 : 유연하며 플랫폼에 종속되지 않음, 이식성 높음
- 단점 : node.js, MariaDB 등 개발자가 직접 설치해야함, 운영비 효율 낮음
- 🗒️ 예시 : AWS의 EC2, NCP
-
2) PaaS (Platform-as-a-Service)
- 플랫폼형 클라우드 서비스
- 클라우드가 플랫폼을 제공
- 장점 : node.js, MariaDB 등 설치되어 있어 간편하게 서비스 이용 가능, 모니터링과 CI/CD 제공
- 단점 : 유연하지 않고 플랫폼에 종속됨, 이식성 낮음
- 🗒️ 예시 : heroku
-
3) SaaS (Software as a Service)
- 서비스형 클라우드 서비스
- 서비스를 클라우드서비스로부터 제공받아 사용
- 🗒️ 예시 : 구글DOCS
- 클라우드를 통해 다른 컴퓨터에서도 쉽게 작업 가능
- 다른 사람과의 실시간 공유작업이 가능함

4. 컨테이너와 도커
-
1) 컨테이너
- 애플리케이션이 한 컴퓨팅 환경에서 다른 컴퓨팅 환경으로 빠르고 안정적으로 실행되도록 코드와 모든 종속성을 패키징하는 소프트웨어의 표준 단위
- 장점 : OS를 공유하기 때문에 빠르고, 경량화 되어있으며 격리성 좋음
- 단점 : OS에 문제가 생기면 다른 앱에 영향을 미침
-
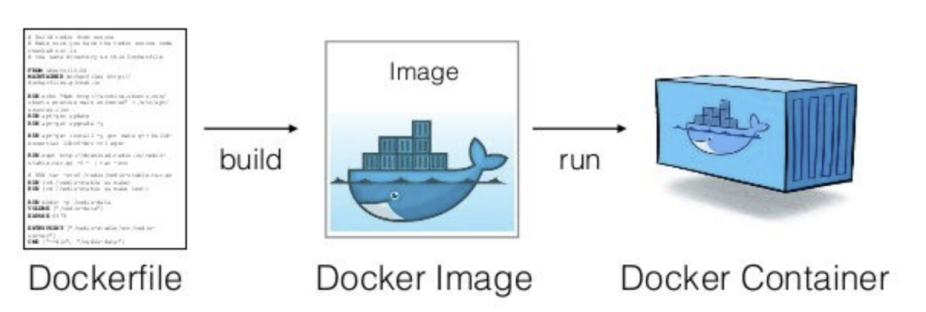
2) 도커
- 컨테이너 배포에 필요한 기능을 모두 제공하는 플랫폼
- 애플리케이션 구동에 필요한 환경설정관련 절차를 도커파일에 작성하고 그 후 빌드를 하면 도커이미지가 생성이 되고 도커이미지를 실행시키면 도커컨테이너가 만들어짐
- 도커컨테이너에 설정된 프로그램, 데이터 등이 실제 컴퓨팅자원 위에서 돌아가게 됨
-
2) 도커 과정
- 1️⃣ 도커파일 : 패키지, 환경변수설정 등을 기록한 파일, 이를 빌드해 도커이미지로 변환
- 2️⃣ 도커이미지 : 컨테이너 실행에 필요한 파일과 설정값, 데이터 등을 포함된 상태값 (불변)
- 하나의 이미지에서 여러 개의 컨테이너를 생성할 수 있음
- 컨테이너 상태와는 무관하게 이미지는 그대로 존재함
- 예를 들어 1대의 서버에 환경설정해야 한다면 미리 만들어 놓은 이미지를 다운받아서 이를 통해 컨테이너만 만듦
- 3️⃣ 도커컨테이너 : 컨테이너가 실행시키면 도커이미지에 설정된 프로그램, 데이터 등이 실제 컴퓨팅자원과 연결됨
- 이미지와 컨테이너는 독립적
-
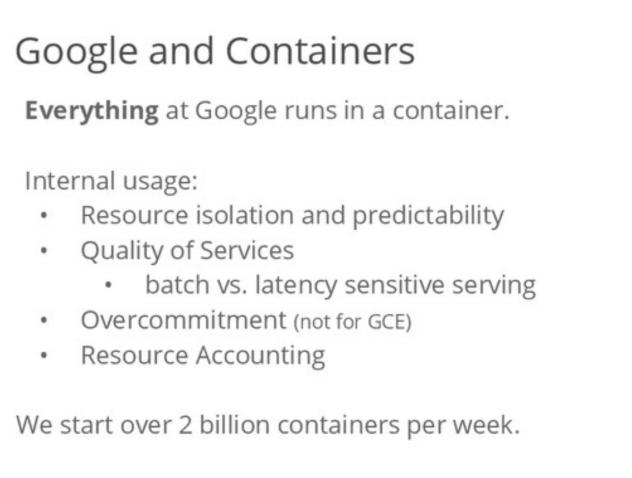
3) 도커 활용사례
- 도커컨테이너를 기반으로 클라우드에 컨테이너 배포방식으로 서비스가 운영됨
- 🗒️ 예시 : 구글에서 만드는 서비스 대부분 도커 컨테이너 기반하여 사용
📘 CI/CD
1. CI (Continuous Integration / Delivery & Deployment)
-
1) 개념
- 개발자가 코드를 합치고 배포하는 것을 시스템 없이 수동으로 할 경우
- dev 서버에 누가 배포해서 기존 환경에서 수행안됨
- 함수 테스트 안하고 배포하여 해당 부분 에러 발견
- 개발자가 코드를 합치고 배포하는 것을 시스템 없이 수동으로 할 경우
-
2) CI/CD 파이프라인
- 코드구축부터 시작해서 배포까지 일련의 과정
- 코드배포까지 좀 더 체계적으로 하고, 테스트가 강제됨
- 파이프라인 자체 내에 테스트가 있기 때문에, 테스트 없으면 코드 머지자체가 안되게 만듦
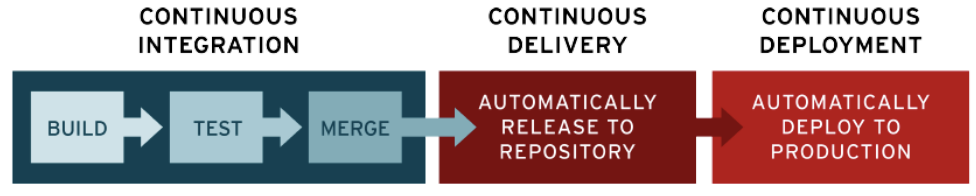
- continuous integration : 코드를 빌드하고 테스트한 후 합침
- continuous delivery : 해당 레퍼지토리에 릴리스함
- continuous deployment : 프로덕션 (실제 서비스에 배포함)
-
3) 빌드
- 🗒️ 예시 : webpack
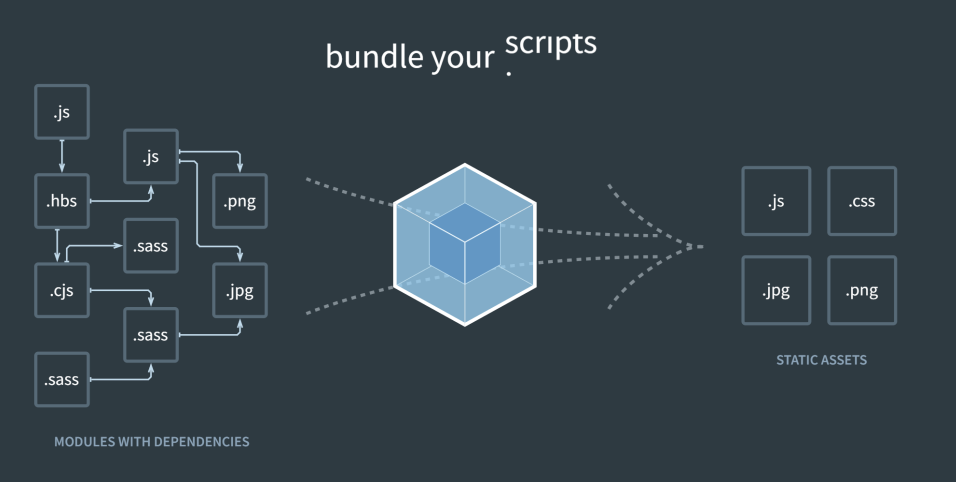
- 🗒️ 예시 : webpack
-
4) 테스트
- 함수 등 작은 단위를 테스팅
- 단위 테스트, 통합 테스트(모듈을 통합할 때 테스트), 엔드투엔드 테스트(사용자가 서비스를 사용하는 상황을 가정해서 테스트), 코드 보안 테스트
- 🗒️ 예시 : mocha
-
5) 머지
- git이나 svn을 이용해 머지
- 충돌을 최소화하기 위해 코드를 작은 이슈단위로 나눠서 머지함
- 충돌시에는 서로 화면공유하면서 합의하에 충돌을 해결
-
6) 배포
- 사용자를 위한 서비스 배포
- 내부적으로 QA엔지니어나 관리자 페이지를 위한 배포
- 데이터웨어하우스로부터 데이터를 가공해서 백엔드 개발자를 위한 배포
-
7) 툴
- github action, genkins, circle ci
- heroku를 통해 CI, CD설정 없이 자동 가능 (heroku + github action 설정 가능)
📖 참고 📖 클래스와 객체와 인스턴스의 차이
- ✏️ 클래스
- 객체를 만들어 내기 위한 틀
- 만들어 낼 객체의 속성과 메서드의 집합을 담아 놓은 것
- ✏️ 객체
- 클래스로부터 만들어지는 실체
- 클래스로 선언된 변수
- ✏️ 인스턴스
- 객체가 메모리에 할당이 된 상태
- 런타임에 구동되는 객체
- AWS의 클라우드의 가상서버
- ✏️ 실습
- java
public class Person {
	// 멤버변수(속성)
	String name;
	int IQ;
	int str;
	// constructor
	public Person(String name, int IQ, int str){
		this.name = name;
		this.IQ = IQ;
		this.str = str;
	}
	public Person(){
		this.name = "alanwalker";
		this.IQ = 100;
		this.str = 100;
	}
	// 메서드
	public void levelup(){
		this.IQ = this.IQ + 1;
		this.str = this.str + 1;
		System.out.println(this.name + "의 지능과 힘이 증가했습니다!" + this.IQ + " / " + this.str);
	}
	public static void main(String[] args) {
		Person a = new Person(); // 객체 >> 인스턴스
		a.levelup();
		Person b; // 객체
		b = new Person("홍철", 1, 1000); // 인스턴스
		b.levelup();
	}
}
- javascript
class Person {
	constructor(name = "alanwalker", IQ = 100, str = 100) {
		this.name = name;
		this.IQ = IQ;
		this.str = str;
	}
	levelup() {
		this.IQ++;
		this.str++;
		console.log(this.name + "의 지능과 힘이 증가했습니다! " + this.IQ + " / " + this.str);
	}
}
const a = new Person();
a.levelup();
const b = new Person("홍철", 1, 1000);
b.levelup();
📖 참고 📖 static 키워드
- ✏️ 개념
- 클래스의 인스턴스가 아닌 클래스에 속하고, 클래스의 변수, 메서드 등을 공유하는데 사용
- 해당 클래스로 만들어지는 객체사이에서 중복되는 메서드, 속성을 효율적으로 정의하는데 사용
- 단순히 전역변수가 아니라 클래스 내의 static 키워드로 선언하여 클래스 객체들끼리 사용되는 메서드/속성
- ✏️ 단점
- 변수, 블록, 메서드 등은 선언과 동시에 미리 heap영역이 아닌 Method area 메모리 영역에 할당
- 프로그램이 종료될 때까지 GC에 의해 메모리가 회수되지 않음
➡️ 클래스가 객체로 쓰이지 않는다면 메모리 낭비- ✏️ 실습
- java
public class Person {
	// 멤버변수(속성)
	String name;
	int IQ;
	int str;
	private static final String GUDOC = "큰돌의 터전"; // final은 상수 정의에 사용 (재할당 불가능)
	// constructor
	public Person(String name, int IQ, int str){
		this.name = name;
		this.IQ = IQ;
		this.str = str;
	}
	public Person(){
		this.name = "alanwalker";
		this.IQ = 100;
		this.str = 100;
	}
	// 메서드
	public void levelup(){
		this.IQ = this.IQ + 1;
		this.str = this.str + 1;
		System.out.println(this.name + "의 지능과 힘이 증가했습니다!" + this.IQ + " / " + this.str);
	}
	// public void talk(Person a, Person b){
	// System.out.println(a.name + " & " + b.name + "이 대화를 시작했다!");
	// }
	private static void talk(Person a, Person b){
	System.out.println(a.name + " & " + b.name + "이 대화를 시작했다!");
	}
	public static void main(String[] args) {
		Person a = new Person(); // 객체 >> 인스턴스
		a.levelup();
		Person b; // 객체
		b = new Person("큰돌", 1000, 1); // 인스턴스
		b.levelup();
		Person.talk(a, b);
		System.out.println(Person.GUDOC);
	}
}
- javascript
class Person {
	constructor(name = 'alanwalker', IQ = 100, str = 100) {
		this.name = name;
		this.IQ = IQ;
		this.str = str;
	}
	levelup() {
		this.IQ += 1;
		this.str += 1;
		console.log(this.name + "의 지능과 힘이 증가했습니다! " + this.IQ + " / " + this.str);
	}
	static talk(a, b) {
		console.log(a.name + " & " + b.name + "이 대화를 시작했다!");
	}
	static GUDOC = "큰돌의 터전";
}
const a = new Person();
a.levelup();
const b = new Person("큰돌", 1000, 1);
b.levelup();
Person.talk(a, b);
console.log(Person.GUDOC);
📖 참고 📖 오버로딩과 오버라이딩
- ✏️ Overloading
- 이름이 같아도 매개변수 개수, 타입, 순서를 다르게 해서 같은 이름으로 여러 개의 함수를 정의할 수 있는 것
- 프로그램의 유연성을 높이고, 코드 깔끔함
- 같은 클래스 내에서 사용
class Calculator{
	void multiply(int a, int b){
		System.out.println("결과는 : "+(a * b) + "입니다.");
	}
	void multiply(int a, int b,int c){
		System.out.println("결과는 : "+(a * b * c) + "입니다.");
	}
	void multiply(double a, double b){
  		System.out.println("결과는 : "+(a * b) + "입니다.");
	}
}
public class MyClass {
	public static void main(String args[]) {
		int a = 1;
		int b = 2;
		int d = 4;
		Calculator c = new Calculator();
		c.multiply(a, b);
		c.multiply(a, b, d);
		double aa = 1.2;
		double bb = 1.4;
        c.multiply(aa, bb);
	}
}
- ✏️ Overriding
- 상위 클래스가 가지고 있는 메서드를 하위 클래스가 재정의 하는 것
- 상속 관계 클래스에서 사용되며, static, final로 선언한 메서드는 오버라이딩 불가능
class Animal{
	void eat(){
		System.out.println("먹습니다.");
	}
}
class Person extends Animal{
	@Override
	void eat(){
      System.out.println("사람처럼 먹습니다. ");
  }
}
public class MyClass {
	public static void main(String args[]) {
		Person a = new Person();
		a.eat();
	}
}
📖 참고 📖 추상화
- ✏️ 개념
- 복잡한 데이터, 구조, 시스템 등 핵심만을 가려내 덜 자세하게 만드는 것
- 복잡도 낮추는 방법
- ✏️ 데이터 추상화
- 어떠한 데이터의 공통점을 모으고, 차이점은 버림
- 객체들의 공통적인 특징을 묶어 카테고리화 시킴
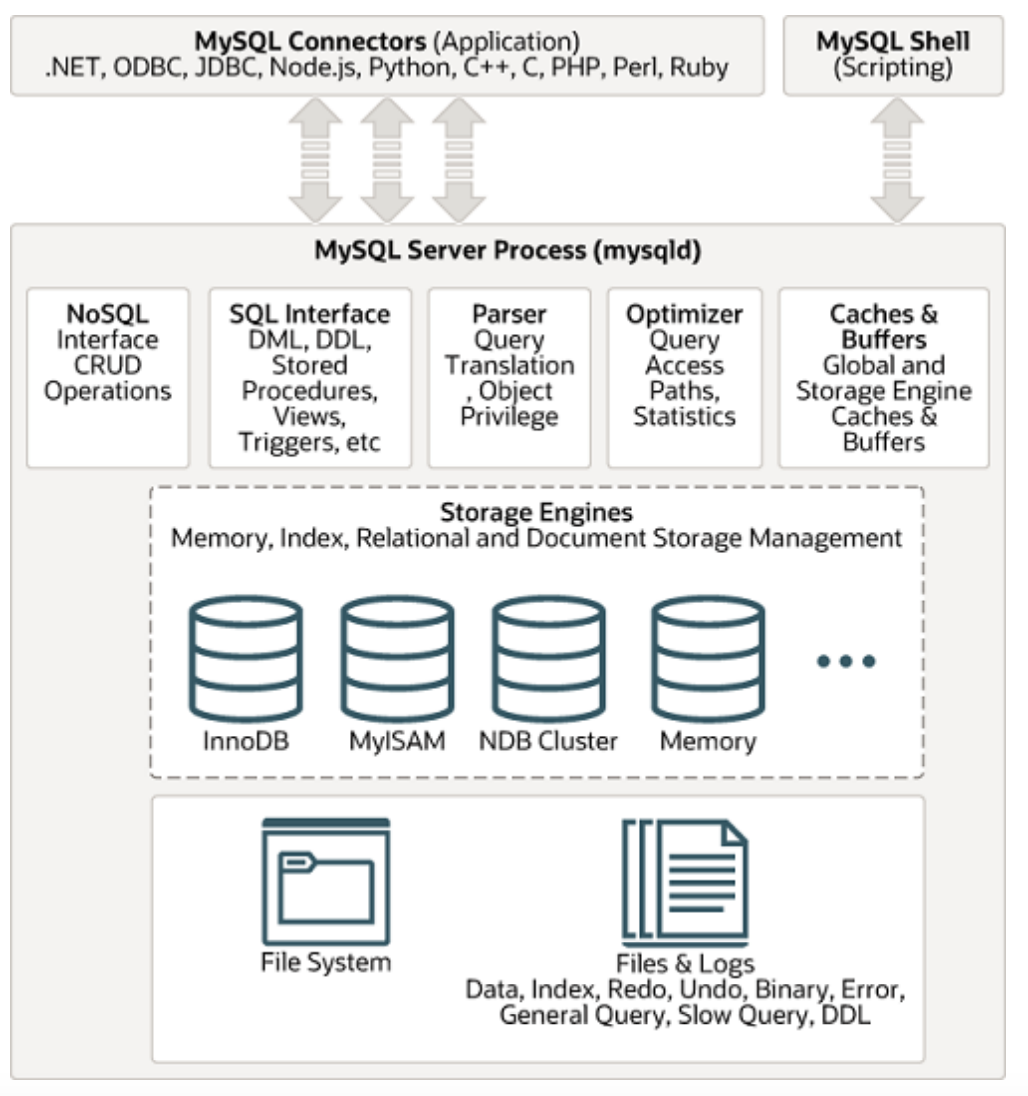
- ✏️ 프로세스 추상화
- 어떠한 내부 프로세스를 숨김
- 🗒️ 예시 : MySQL 아키텍처
- 실제 시스템에서의 추상화
- 데이터베이스가 어떻게 저장하는지 모르지만 insert, upset 쿼리로 데이터 저장 가능
abstract class Animal {
		public abstract void animalSound();
		public void sleep() {
			System.out.println("zzz");
		}
}
		class Pig extends Animal {
			public void animalSound() {
				System.out.println("꿀꿀꿀~");
			}
		}
		class Dog extends Animal {
			public void animalSound() {
				System.out.println("왈왈~");
			}
		}
		public class Main {
			public static void main(String[] args) {
				Pig a = new Pig();
				a.animalSound();
				a.sleep();
				Dog b = new Dog();
				b.animalSound();
				b.sleep();
			}
		}

Notion으로 이동 (https://24tngus.notion.site/3a6883f0f47041fe8045ef330a147da3?v=973a0b5ec78a4462bac8010e3b4cd5c0&pvs=4)