만들고자 하는 앱의 디자인에 apple에서 기본으로 제공하는 알림창이 어울리지 않을 때가 있습니다. 하지만 앱에서 사용되는 알림창이 한두가지도 아니고 모두 일일이 만들 순 없죠. 🥲 그렇다면 재사용 가능한 커스텀 알림창을 만들어 봅시다!
1. Custom Alert 디자인하기
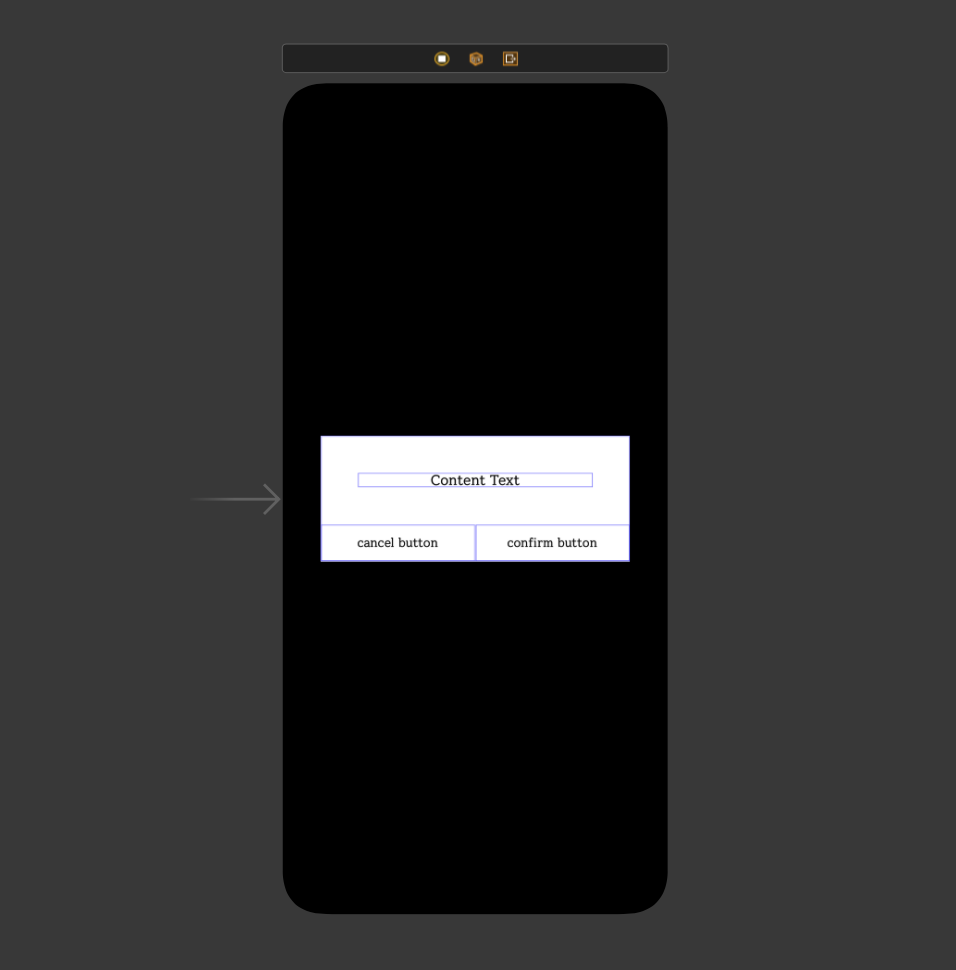
우선, 새로운 Storyboard 파일을 생성한 후, 원하는 디자인으로 커스텀 알림창을 만들어줍니다. 이때 ViewController의 배경색은 Clear 색상으로 설정하고 그 위에 불투명 뷰를 추가해줍니다. (저는 Black에 opacity를 0.5로 설정했습니다.)
2. ViewController 설정하기
알림창의 버튼 액션을 제외한 UI를 구현해줍니다.
AlertType을 정의해 확인 버튼만 있는 유형과, 확인 및 취소 버튼이 모두 있는 유형의 디자인을 따로 처리해주었습니다. 🥸
// file: CustomAlertViewController.swift

enum AlertType {
    case onlyConfirm    // 확인 버튼
    case canCancel      // 확인 + 취소 버튼
}

class CustomAlertViewController: UIViewController {

    @IBOutlet weak var alertView: UIView!
    @IBOutlet weak var textLabel: UILabel!
    @IBOutlet weak var cancelButton: UIButton!
    @IBOutlet weak var confirmButton: UIButton!

    var alertText = ""
    var cancelButtonText = ""
    var confirmButtonText = ""

    override func viewDidLoad() {
        super.viewDidLoad()

        // customAlertView 기본 세팅
        setCustomAlertView()

        switch alertType {

		// alertType에 따른 디자인 처리
        case .onlyConfirm:
            cancelButton.isHidden = true

            confirmButton.isHidden = false
            confirmButton.setTitle(confirmButtonText, for: .normal)
            confirmButton.widthAnchor.constraint(equalTo: alertView.widthAnchor, multiplier: 1).isActive = true

        case .canCancel:
            cancelButton.isHidden = false
            cancelButton.setTitle(cancelButtonText, for: .normal)

            confirmButton.isHidden = false
            confirmButton.setTitle(confirmButtonText, for: .normal)
            confirmButton.layer.maskedCorners = CACornerMask.layerMaxXMaxYCorner
            confirmButton.widthAnchor.constraint(equalTo: alertView.widthAnchor, multiplier: 0.5).isActive = true
        }
    }

    @IBAction func confirmButtonTapped(_ sender: Any) {
        // confirm button touch event
    }

    @IBAction func cancelButtonTapped(_ sender: Any) {
    	// cancel button touch event
    }

    private func setCustomAlertView() {

        /// customAlertView 둥글기 적용
        alertView.layer.cornerRadius = 20

        /// alert 내용 폰트 설정
        textLabel.text = alertText
        textLabel.textColor = alertTextColor
        textLabel.font = UIFont(name: myFont, size: 16)

        /// 취소 버튼 둥글기 적용 및 폰트 설정
        cancelButton.backgroundColor = cancelButtonColor
        cancelButton.layer.cornerRadius = 20
        cancelButton.layer.maskedCorners = CACornerMask.layerMinXMaxYCorner
        cancelButton.titleLabel?.textColor = alertTextColor
        cancelButton.titleLabel?.font = UIFont(name: myFont, size: 14)

        /// 확인 버튼 둥글기 적용 및 폰트 설정
        confirmButton.backgroundColor = confirmButtonColor
        confirmButton.layer.cornerRadius = 20
        confirmButton.layer.maskedCorners = CACornerMask(arrayLiteral: .layerMinXMaxYCorner, .layerMaxXMaxYCorner)
        confirmButton.titleLabel?.textColor = alertTextColor
        confirmButton.titleLabel?.font = UIFont(name: myFont, size: 14)
    }
}
3. Custom Alert의 버튼 이벤트 처리해주기
커스텀 알림창의 취소 버튼과 확인 버튼의 각각의 터치 이벤트를 처리해줍니다. 버튼의 이벤트를 처리할 수 있는 다양한 방법이 있지만, 저는 Delegate Pattern을 사용해 구현했습니다.
// file: CustomAlertViewController.swift

// Custom Alert의 버튼의 액션을 처리하는 Delegate입니다.
protocol CustomAlertDelegate {
    func action()   // confirm button event
    func exit()     // cancel button event
}

enum AlertType {
    case onlyConfirm    // 확인 버튼
    case canCancel      // 확인 + 취소 버튼
}

class CustomAlertViewController: UIViewController {

	var delegate: CustomAlertDelegate?

	...

    // 확인 버튼 이벤트 처리
    @IBAction func confirmButtonTapped(_ sender: Any) {
        self.dismiss(animated: true) {
            self.delegate?.action()
        }
    }

    // 취소 버튼 이벤트 처리
    @IBAction func cancelButtonTapped(_ sender: Any) {
        self.dismiss(animated: true) {
            self.delegate?.exit()
        }
    }

    ...
}
4. Custom Alert 사용성 높이기
여기까지만 구현해도 알림창이 필요한 어느 ViewController에서나 저희가 만든 Custom Alert를 사용할 수 있습니다. 바로 이렇게요!
// file: MainViewController.swift

let customAlertStoryboard = UIStoryboard(name: "CustomAlertViewController", bundle: nil)
let customAlertViewController = customAlertStoryboard.instantiateViewController(withIdentifier: "CustomAlertViewController") as! CustomAlertViewController

customAlertViewController.delegate = self

customAlertViewController.modalPresentationStyle = .overFullScreen
customAlertViewController.modalTransitionStyle = .crossDissolve
customAlertViewController.alertText = // "원하는 알림 텍스트"
customAlertViewController.alertType = // .원하는 알림 타입
customAlertViewController.cancelButtonText = // "원하는 취소 버튼 텍스트" (알림 타입에 따라 빈 값 넣기)
customAlertViewController.confirmButtonText = // "원하는 확인 버튼 텍스트"

self.present(customAlertViewController, animated: true, completion: nil)

extension MainViewController: CustomAlertDelegate { ... }
너무 길지 않나요?? 사용할 때마다 이렇게 긴 코드를 입력해야 한다면 재사용성이 너무나도 떨어지게 될 것이고, 실수를 유발하기도 쉬울 것입니다. 😡
이 문제는 extension과 where self를 이용해서 해결할 수 있습니다.
// file: CustomAlertViewController.swift

protocol CustomAlertDelegate { ... }

extension CustomAlertDelegate where Self: UIViewController {
    func show(
        alertType: AlertType,
        alertText: String,
        cancelButtonText: String? = "",
        confirmButtonText: String
    ) {

        let customAlertStoryboard = UIStoryboard(name: "CustomAlertViewController", bundle: nil)
        let customAlertViewController = customAlertStoryboard.instantiateViewController(withIdentifier: "CustomAlertViewController") as! CustomAlertViewController

        customAlertViewController.delegate = self

        customAlertViewController.modalPresentationStyle = .overFullScreen
        customAlertViewController.modalTransitionStyle = .crossDissolve
        customAlertViewController.alertText = alertText
        customAlertViewController.alertType = alertType
        customAlertViewController.cancelButtonText = cancelButtonText ?? ""
        customAlertViewController.confirmButtonText = confirmButtonText

        self.present(customAlertViewController, animated: true, completion: nil)
    }
}

enum AlertType { ... }

class CustomAlertViewController: UIViewController { ... }
CustomAlertDelegate에 extension으로 커스텀 알림창을 띄우는 함수를 선언합니다. 그리고 where self를 통해 UIViewController에 대한 제약 조건을 추가해줍니다. where self는 protocol의 extension을 특정 protocol을 상속했을 때만 사용될 수 있도록 하는 제약 조건 추가 기능입니다.
즉, UIViewController 제약 조건을 추가함으로써 show() 함수 내부에서 UIViewController의 메서드인 present()를 사용할 수 있게 되며, show() 메서드는 UIViewController를 상속받지 않은 곳에서는 사용할 수 없게 됩니다! 😯
5. Custom Alert 사용하기
이전보다 훨씬 더 간결한 코드로 Custom Alert를 띄울 수 있게 되었습니다. 🥳
// file: MainViewController.swift
class MainViewController: UIViewController {
override func viewDidLoad() {
super.viewDidLoad()
// Custom Alert 사용!
show(
alertType: .canCancel,
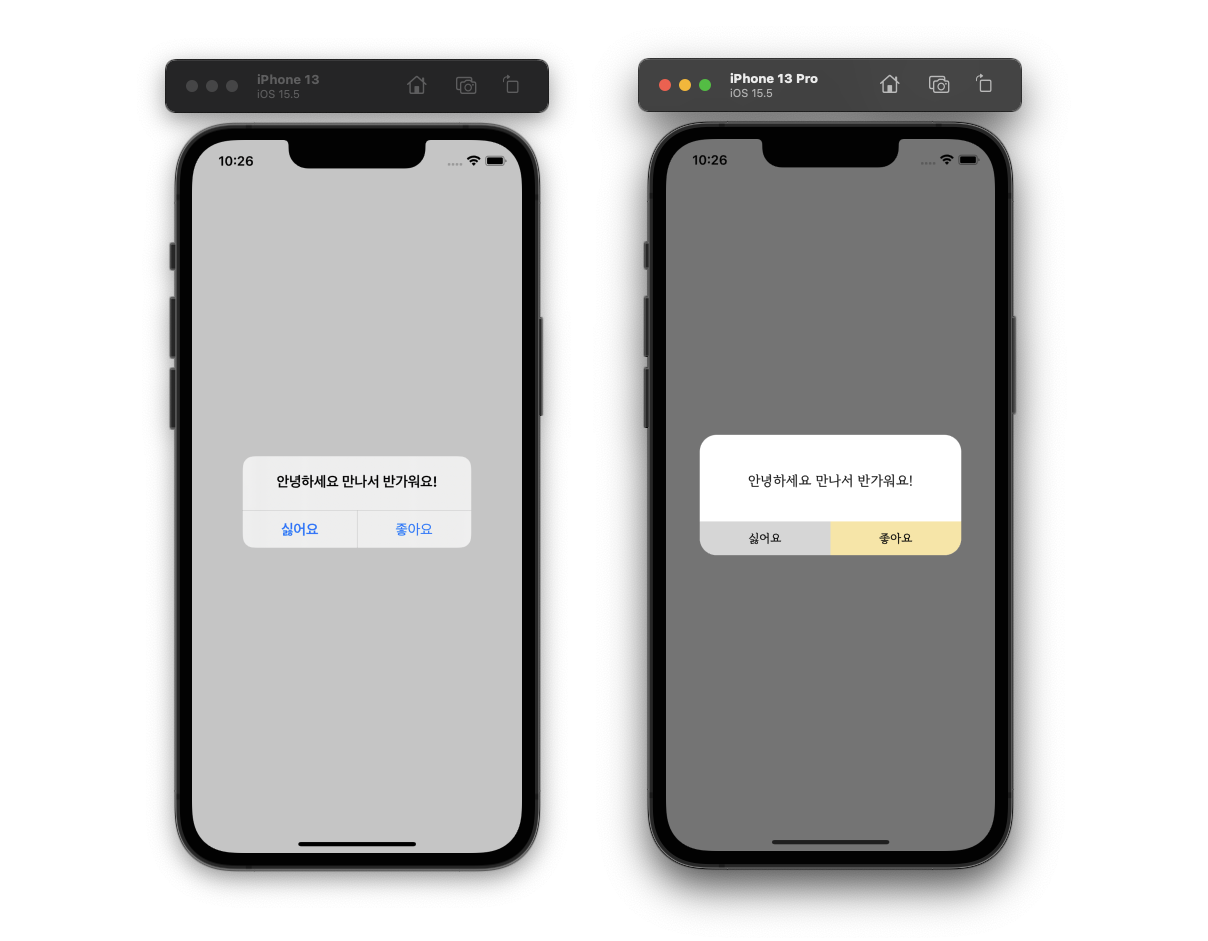
alertText: "안녕하세요 만나서 반가워요!",
cancelButtonText: "싫어요",
confirmButtonText: "좋아요"
)
}
}
// MARK: - CustomAlertDelegate
extension MainViewController: CustomAlertDelegate {
func action() {
// 확인 버튼 이벤트 처리
}
func exit() {
// 취소 버튼 이벤트 처리
}
}글 읽어주셔서 감사합니다. 😊
질문과 지적은 환영입니다!