[Python의 특징]
1) 운영체제에 상관없이 돌아가는 인터프리터 언어(플랫폼에 독립적)
컴파일러 vs. 인터프리터
- 컴파일러 : 소스 코드를 기계어로 먼저 번역 → 실행 속도 빠름, 한번에 많은 기억 장소 필요 ex) c, 자바
- 인터프리터 : 별도의 번역 과정 없이 소스 코드를 실행 시점에 해석. → 간단히 작성, 메모리가 적게 필요, 실행 속도가 느림 ex) 파이썬
( 파이썬은 처음에 c로 작성됨 → 실행 시 어셈블러와 같은 기계어 변환 과정을 거침. 조금 더 단순할 뿐!)
2) 객체 지향 동적 타이핑 언어
- 객체 지향 언어 : 실행 순서가 아닌 단위 모듈(객체) 중심으로 프로그램 작성.
- 동적 타이핑 언어 : 프로그램이 실행하는 시점에 프로그램이 사용해야 할 데이터에 대한 타입을 결정 ( 동적으로 데이터 타입 결정됨 )
Life is short. You need Python.
[List의 특징]
- 인덱싱(Indexing) : list에 있는 값들은 주소(offset)를 가짐 → 주소를 사용해 할당된 값 호출
- 슬라이싱(slicing) : list의 값들을 잘라서 씀. list의 주소 값을 기반으로 부분 값 반환
- 추가와 삭제 : append, extend, insert, remove, del 활용
- 다양한 Data Type이 하나의 List에 들어감
*파이썬은 해당 리스트 변수에는 리스트 주소 값이 저장됨 ('='의 의미는 메모리 주소에 해당 값을 할당한다는 의미)
- 리스트 copy
# 1차원 리스트 copy ( 다른 메모리 공간 )
t = [1,2,3,4,5]
t_copy = t[:]

# 2차원 리스트 copy
import copy
m = [[1,2,3],[4,5,6]]
m_copy = copy.deepcopy(m)
[Conditionals and Loops]
- a is b : a와 b의 메모리 주소를 비교하는 것 (파이썬에서 -5~256은 같은 메모리 주소 사용)
a = [1,2,3]
b = [:]
a is b  # False
논리 연산
- all() = and , any() = or
boolean_list = [True, False, True, True]
all(boolean_list) = False
any(boolean_list) = True
삼항 연산자
- 조건문을 사용하여 참일 경우와 거짓일 경우의 결과를 한줄에 표현
value = 12
is_even = True if value % 2 == 0 else False
print(is_even) # True
if name == "main":
- name은 현재 모듈의 이름을 담고 있는 내장 변수이다. 이 변수는 직접 실행된 모듈의 경우 main 이라는 값을 가지게 되며, 직접 실행되지 않고 import된 모듈은 모듈의 이름(파일명)을 갖는다.
- 즉, 위 조건문 아래에는 모듈 내에서만 사용하는 테스트 출력 등 직접 실행시켰을 때만 실행되길 원하는 코드를 넣어주면 된다.
참고 링크
- https://hyoje420.tistory.com/45
- https://stackoverflow.com/questions/419163/what-does-if-name-main-do
함수 작성 가이드 라인
- 함수는 가능하면 짧게 작성(줄 수를 줄일 것)
- 함수 이름에 함수의 역할, 의도를 명확히 드러낼 것
- 하나의 함수에는 유사한 역할을 하는 코드만 포함
- 인자로 받은 값 자체를 바꾸진 말 것 (원래 값에 변화가 생길 수 있음) → 임시 변수 선언
파이썬 컨벤션
conda install flake8
flake8 test.py # 코드 수정사항 보여줌

conda install black
balck test.py  # 알아서 조금 수정해줌
[Python Data Structure]
-
deque
-
deque는 기존 list보다 효율적인 자료구조 제공
from collections import deque

deque_list = deque()
for i in range(5):
    deque_list.append(i) # deque_list = [0,1,2,3,4]

deque_list.appendleft(10) # [10,0,1,2,3,4]
deque_list.rotate(1) # [4,10,0,1,2,3] : 1만큼 rotate
-
-
defaultdict
-
Dict type의 값에 기본 값을 지정, 신규 값 생성 시 사용하는 방법
from collections import defaultdict

d = defaultdict(object)  # Default dictionart 생성
d = defaultdict(lambda: 0) # Default 값을 0으로 설정

print(d["first"])  # "first"가 dict에 없지만 0 출력
-
Pythonic code
-
List Comprehension
-
기존 List를 사용하여 간단히 다른 List를 만드는 기법
result = [i for i in range(6)] print(result) # [0,1,2,3,4,5] # if문을 filter라 부름 result = [i for i in range(10) if i % 2 == 0] word_1 = "Hello" word_2 = "World" result = [i+j for i in word_1 for j in word2] # Nested For loop print(result) #['HW','Ho','Hr',...] # pprint : 예쁘게 출력 words = "The quick brown fox jumps over the lazy dog".split() import pprint pprint.pprint([ [w.upper(), w.lower()] for w in words]) -
Two dimensional vs One dimensional
case_1 = ["A","B","C"]
case_2 = ["C","E","A"]

[i+j for i in case_1 for j in case_2]
# ['AC','AE','AE','BC',...]  : one dimensional

[[i+j for i in case_1] for j in case_2] # case_2 먼저 돌아감
# [['AC','BC,'CC'],['AE',...],[...]] : two dimensional
-
-
enumerate
-
list의 element를 추출할 때 번호를 붙여서 추출
my_str = "ABCD"
{v : i for i , v in enumerate(my_str)}
# {'A':0, 'B':1, 'C':2, 'D':3}
-
-
Zip
-
두 개의 list 값을 병렬적으로 추출
math = (100, 90, 80)
kor = (90,90,70)
eng = (90,80,70)

# 각 학생의 평균 점수를 구할 수 있음
[sum(value) / 3 for value in zip(math, kor, eng)]
-
-
lambda
-
함수 이름 없이, 함수처럼 쓸 수 있는 익명함수
-
python3부터는 권장하지 않으나 여전히 많이 쓰임
(lambda x, y : x + y)(10,50) # 60
-
-
generator
-
iterable object를 특수한 형태로 사용해주느 함수
-
element가 사용되는 시점에 값을 메모리에 반환 ( yield를 사용해 한번에 하나의 element만 반환)
→ 메모리 절약 가능 ⇒ 대용량 데이터를 사용할 때 유용
-
-
가변 인자(variable-length)
-
개수가 정해지지 않은 변수를 함수의 파라미터로 사용하는 법
-
keyword argument와 함께, argument 추가 가능
-
Asterisk(*) 기호를 사용하여 함수의 parameter 표시
-
입력된 값은 tuple type으로 사용할 수 있음
-
가변 인자는 오직 한 개만 맨 마지막 파라미터 위치에 사용 가능
-
일반적으로 *args를 변수명으로 사용
-
기존 파라미터 이후에 나오는 값을 tuple로 저장
def asterisk_test(a, b, *args):
		return a+b+sum(args)

print(asterisk_test(1,2,3,4,5))
# (3,4,5)가 tuple형태로 args에 들어감
-
-
키워드 가변 인자
-
파라미터 이름을 따로 지정하지 않고 입력하는 방법
-
asterisk(*) 두 개를 사용하여 함수의 파라미터 표시
-
입력된 값은 dict type으로 사용할 수 있음
-
가변 인자는 오직 한 개만 기존 가변 인자 다음에 사용
def kwargs_test(**kwargs):
		print(kwargs) # {'first':3, 'second':4, ...}

kwargs_test(first = 3, second = 4, third = 5)
# 파라미터, 가변인자, 키워드 가변인자 순서 def kwargs_test(one, two=3, *args, **kwargs): print(one+two+sum(args)) print(kwargs) # {'first':3, 'second':4, ...} kwargs_test(1,2,3,4,5,first = 3, second = 4, third = 5)
-
-
asterisk - unpacking a container
-
tuple, dict 등 자료형에 들어가 있는 값을 unpacking
-
함수의 입력 값, zip 등에 유용하게 사용 가능
def asterisk_test(a, *args):def asterisk_test(a, *args):
		print(a, *args) # 1 2 3 4 5
		print(a, args) # 1 (2,3,4,5)
		print(type(args) # tuple

test = (2,3,4,5)
asterisk_test(1, *test)

print(*["1","2","3","4"]) # 1 2 3 4
def asterisk_test(a,b,c,d): print(a, b, c, d) # 10, 1, 2, 3 data = {"b":1, "c":2, "d":3} asterisk_test(10, **data)ex = ([1,2],[3,4],[5,6],[5,6]) # 하나의 튜플 for value in zip(*ex): print(value) # (1,3,5,5) # (2,4,6,6)
-
[Python Object Oriented Programming]
Attribute 추가하기
- Attribute 추가는 init, self와 함께
- init은 객체 초기화 예약 함수
class SoccerPlayer(object):
	def __init__(self, name, position, back_number):
		self.name = name
		self.position = position
self.back_number = back_number-
self : 생성된 인스턴스 자신을 의미
-
파이썬에서 __의 의미
-
는 특수한 예약 함수나 변수 그리고 함수명 변경(맨글링)으로 사용 ex) main, add, str, eq__
class SoccerPlayer(object):
	def __str__(self): # 객체에 print문을 적용하면 출력해주는 코드
		return "Hello, My name is %s. I play in %s in center"%\
(self.name, self.position)

	def __add__(self, other):
		return self.name + other.name

son = SoccerPlayer("son", "FW", 7)
park = SocerPlayer("park","WF",13)

print(son) # "Hello, My name is son. I play in FW in center"
son + park = "sonpark"
추가 참고 자료 : https://corikachu.github.io/articles/python/python-magic-method
-
OOP 특징
-
Inheritance (상속)
-
부모 클래스로부터 속성과 Method를 물려받은 자식 클래스를 생성하는 것
class Person(object): # 부모 클래스 선언
		def __init__(self, name, age):
				self.name = name
				self.age = age

class Korean(Person): # 부모 클래스 Person으로 부터 상속
		def __init__(self, name, age, gender):
			super().__init__(name, age) # super()는 부모 클래스 의미
			self.gender = gender  # 속성 값 추가

first_korean = Korean("young", 23)
print(first_korean.name) # young
-
-
Polymorphism (다형성)
- 같은 이름 메소드의 내부 로직을 다르게 작성 (같은 이름이지만 다른 역할을 수행하도록 함)
- Dynamic Typing 특성으로 파이썬에서는 같은 부모 클래스의 상속에서 주로 발생
-
Visibility (가시성)
-
객체의 정보를 볼 수 있는 레벨을 조절하는 것
-
누구나 객체 안의 모든 변수를 볼 필요는 없음
-
Encapsulation → 클래스 설계 시, 클래스 간 간섭/정보 공유 최소화
class Inventory(object):
		def __init__(self):
				# __items : private 변수로 선언해 타 객체가 접근 불가
				self.__items = []
-
-
property decorator
-
@property : 숨겨진 변수를 반환하게 해줌
# 함수를 변수명처럼 사용할 수 있게 해줌
# 내부의 글자를 접근할 수 있게 함
@property
def itmes(self):
		return self, items
-
-
Decorate
-
first-class object (일등 함수, 일급 객체)
- 변수나 데이터 구조에 할당이 가능한 객체
- 파라미터로 전달 가능, 리턴 값으로 사용
def square(x): return x*x f = square # 함수를 변수로 사용 f(5) -
Inner function (내재 함수)
- 함수 내에 또 다른 함수가 존재
-
decorator
- 복잡한 클로져 함수를 간단하게
- 원래 작업 앞뒤에 추가적인 작업을 사용 가능하도록 도와주는 역할
def star(func):
		def inner(*args, **kwargs):
				print(args[1] * 30)
				func(*args, **kwargs)
				print(args[1] * 30)
		return inner

@star
def printer(msg, mark):
		print(msg)
printer("Hello", "*")

"""
*********
Hello
*********
"""
-
Module and Project
Module
- 파이썬의 모듈은 .py 파일을 의미
- 같은 폴더에 모듈에 해당하는 .py 파일과 사용하는 .py 파일을 저장 후 import 문을 사용해서 모듈 호출
- namespace
- 모듈을 호출할 때 범위 정하는 방법
- 모듈 안에는 함수와 클래스 등이 존재할 수 있는데 그 중 필요한 내용만 골라 호출 가능
- from 과 import 키워드 사용
- Alias 설정하기 - 모듈 명을 별칭으로 사용 → 어디서 온 건지 확인 쉬움
- 모듈에서 특정 함수 또는 클래스만 호출
- 모듈에서 모든 함수 또는 클래스 호출
Package
-
하나의 대형 프로젝트를 만드는 코드의 묶음
-
다양한 모듈들의 합, 폴더로 연결됨
-
tqdm : loop이 얼마 남았는지 알려줌
ex) python tqdm test.py
[Numpy]
ndarray
- np.array 함수를 이용해 배열 생성
import numpy as np
test_array = np.array([1,2,3,4], float)-
List와의 차이점
-
numpy는 하나의 데이터 type만 배열에 넣을 수 있음
→ 다이나믹 타이핑 지원 X !!!
-
리스트보다 메모리 접근성이 좋음
-
메모리의 크기가 일정하기 때문에 공간을 잡기도 편리
# 리스트
a = [1,2,3]
b = [3,2,1]
print(a[0] is b[-1]) # True

# ndarray
a = np.array([1,2,3])
b = np.array([3,2,1])
print(a[0] is b[-1]) # False
-
Handling Shape
-
reshape
-
모양 변경, element의 개수는 동일
-
-1 : 사이즈를 기반으로 개수 선정
np.array(test_matrix).reshape(-1,2)⇒ 원소 개수가 8개면 (4, 2)의 크기로 알아서 조정됨
-
-
flatten : 다차원 array를 1차원으로 변환
-
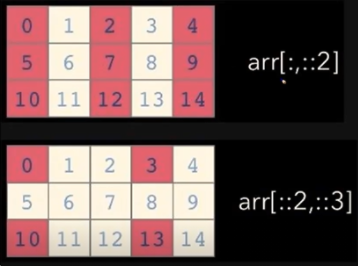
slicing

-
arange : list의 range와 같은 효과
-
zeros : np.zeros(shape=(10, ), dtype=np.int8)
-
empty : shape만 주어지고 비어있는 ndarray 생성 → 빈 공간에 이전에 존재하던 값이 그대로 반환 됨.
-
something_like : 기존 ndarray의 shape 크기 만큼 1, 0 또는 empty array 반환.
-
identity : 단위 행렬 생성 ex) np.identity(n=3, dtype=np.int8)
-
eye : 대각선이 1인 행렬, k로 시작 index 변경 가능 ex) np.eye(3,5,k=2)
-
diag : 대각 행렬의 값을 추출. k로 시작 index 변경 가능
-
random sampling : 데이터 분포에 따른 sampling으로 array를 생성
np.random.uniform(0,1,10).reshape(2,5) # 균등분포
np.random.normal(0,1,10).reshape(2,5) # 정규분포-
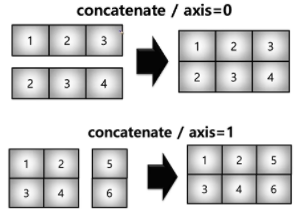
concatenate
-
numpy array를 붙이는 함수
1) vstack : 수직(vertical) 방향으로 붙임
2) hstack : 수평(horizontal) 방향으로 붙임
-
numpy array를 축을 기준으로 붙이는 함수

np.vstack((a, b)) np.concatenate((a,b), axis=0) -
newaxis : 축 추가
b = np.array([5,6]) b = b[np.newaxis,:] # = b.reshape(-1,2) -
timeit : 주피터 환경에서 코드의 퍼포먼스를 체크하는 함수
-
numpy 성능
-
fancy index : array를 index value로 사용해 값 추출
a = np.array([1,2,3,4,5])
b = np.array([0,0,1,2,3])
a[b] # bracket index -> array([1,1,2,3,4])

a.take(b) # = a[b]
-
