서블릿으로 가져온 파라미터는 항상 String타입이다.
@GetMapping("...")
public void myHandler(HttpServletRequest request) {
	String param = request.getParameter("...");
}
그런데 @RequestParam, @PathVariable등을 사용할 때 타입을 변경해서 가져올 수 있다.
@GetMapping("...")
public void myHandler(
	@PathVariable Integer id,
    @RequestParam Boolean isTrue
) {
	...
}
이것이 가능한 이유는 Spring이 내부적으로 Converter를 사용해 타입을 변경해 주기 때문이다.
Converter
말 그대로 타입을 변경해 주는 역할을 수행한다.
내부적으로 Converter가 작동하기 때문에, 따로 신경쓰지 않고도 파라미터를 원하는 타입으로 사용할 수 있는 것이다.
지금까지 말했던 Conveter는 org.springframework.core.convert.converter에 속한 Converter 인터페이스를 가리키는 것이다.
@FunctionalInterface
// S 타입 데이터가 들어오면, T 타입으로 만들겠다.
public interface Converter<S, T> {

	@Nullable
	T convert(S source);

	...

}
타입을 변경하고 싶으면 converter 구현체를 만든 뒤 Bean으로 등록해서 사용하면 된다.
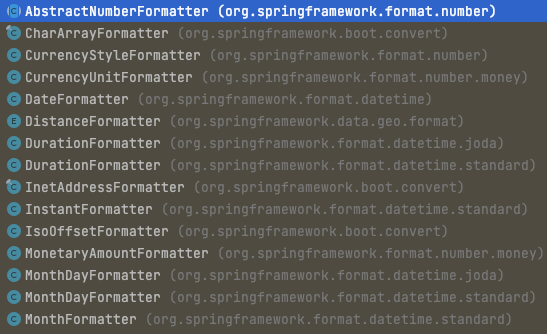
그런데 Spring은 웬만한 기본형 타입들에 대한 컨버터 구현체를 전부 만들어놨다.
 (사진에 포함된 것 말고도 더 많은 구현체들이 있다.)
두 가지 의문이 든다.
Q1. 내가 만든 컨버터는 다음 처럼 사용하면 되는걸까?
@GetMapping(...)
public void myHandler(HttpServletRequest request) {
	// 내가 정의한, Converter를 구현하는 String -> IpAddress(객체) 컨버터 구현체
	StringToIpAddressConverter converter = new StringToIpAddressConverter();
    // 컨버터를 사용해서 문자열을 IpAddress 객체로 만듦
    IpAddress ipAddress = converter.convert(request.getParmameter("ipAddress"));
    ...
}
딱 봐도 이건 아닌것 같다;;Q2. 스프링 컨버터는 어떻게 작동하는 것일까?
A. 스프링은 ConversionService를 제공해서 컨버터를 깔끔하게(?) 사용할 수 있도록 한다.
ConversionService
package org.springframework.core.convert;

import org.springframework.lang.Nullable;

public interface ConversionService {

    boolean canConvert(@Nullable Class<?> sourceType, Class<?> targetType);
    boolean canConvert(@Nullable TypeDescriptor sourceType, TypeDescriptor targetType);

    @Nullable
	<T> T convert(@Nullable Object source, Class<T> targetType);
	@Nullable
	Object convert(@Nullable Object source, @Nullable TypeDescriptor sourceType, TypeDescriptor targetType);
}ConversionService는
- 자신에게 등록된 컨버터들을 조회하면서,
변환할 수 있는가를 확인 한 뒤, - 적합한 컨버터가 있으면
변환한다.
코드로 살펴보자
DefaultConversionService cs = new DefaultConversionService();
# ConversionService에서 관리할 컨버터 등록
cs.addConverter(new StringToIpAddress());
cs.addConverter(new IpAddressToString());

# ConversionService에서 관리하는 컨버터를 사용해서 컨버팅
# 사용하는 입장에서는 어떻게 컨버팅 되는건지 알 필요 없다. (관심 X)
String stringAddress = cs.convert(new IpAddress("127.0.0.1", 8080), String.class);
IpAddress ipAddress = cs.convert("127.0.0.1:8080", IpAddress.class);DefaultConversionService는 스프링이 제공하는 ConversionService 구현체이다.
그리고 ConverterRegistry인터페이스를 상속받아, 자신이 관리하는 컨버터를 추가할 수 있다.
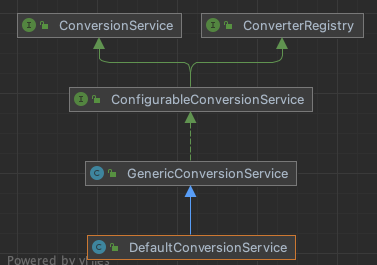
Interface Segregation Principle 관점
DefaultConversionService는 ConversionService, ConverterRegistry를 따로 구현한다. 즉, 컨버터 사용과 컨버터 등록을 각각 다른 인터페이스로 분리했다.
이로써 컨버터 사용하는 입장에서는 ConversionService만 의존하면 되고, 컨버터 등록하는 입장에서는 ConverterRegistry만 의존하면 된다.
Spring에 Converter 등록하기
import org.springframework.context.annotation.Configuration;
import org.springframework.web.servlet.config.annotation.WebMvcConfigurer;

@Configuration
public class WebConfig implements WebMvcConfigurer {

	@Override
    public void addFormatters(FormatterRegistry registry) {
        registry.addConverter(new IpAddressToStringConverter());
        registry.addConverter(new StringToIpAddressConverter());
	}
}
스프링은 자신이 사용하는 내부적인 ConverterService에 추가로 Converter를 등록한다.
사용자가 임의로 등록한 컨버터는 기존 스프링 제공 컨버터보다 높은 우선순위를 가진다.
다음과 같은 핸들러가 있을 때,
@GetMapping("/converter")
public void handler(@RequestParam("ipPort") IpAddress ipaddress) {
	...
}
다음과 같이 요청을 보내면 StringToIpAddress 컨버터가 작동한다.
localhost:8080/converter?ipPort=127.0.0.1:8080ArgumentResolver에서 ConversionService를 가지고 실제로 컨버팅하는 것이다.
ViewTemplate에서 Converter 사용하기
문자열로 넘어오는 데이터를 원하는 타입으로 컨버팅하는 과정을 알아봤다.
그런데 ViewTemplate을 만들 때는 거꾸로, 객체를 문자열로 만들어야 한다.
간략하게 설명하자면 Thymeleaf에서도 ConversionService를 사용해서 객체를 문자열로 변경할 수 있다.
모델에 데이터를 담아 넘겼다.
public String handler(Model model) {
	model.addAttribute("ipAddress", new IpAddress(...));
    return "template_name";
}
다음 처럼 꺼내 쓸 수 있다.
<ul>
  <li>
    <span th:text="${ipAddress}"></span> <!--객체의 toString 형태로 출력-->
  </li>
  <li>
    <span th:text="${{ipAddress}}"></span> <!--컨버터를 거친 결과값이 출력-->
  </li>
</ul>
겹중괄호 {{}}을 사용하면 ConversionService가 호출되어 적절히 컨버팅된다.
Formatter
Converter는 범용적으로 사용할 수 있는 반면, Formatter는 문자열 변환에 특화되었다.
import org.springframework.format.Formatter;
import java.text.NumberFormat;
import java.text.ParseException;
import java.util.Locale;
// Number: Integer, Float, Long 등의 부모 Class
// 문자열 특화이므로, String을 명시할 필요 없다.
public class NumberFormatter implements Formatter<Number> {
@Override
public Number parse(String text, Locale locale) throws ParseException {
// Locale 정보에 따라 자동으로 숫자 포맷팅 해주는 자바 기능
// EX: "1,000" -> 1000
NumberFormat instance = NumberFormat.getInstance(locale);
return instance.parse(text);
}
@Override
public String print(Number object, Locale locale) {
NumberFormat instance = NumberFormat.getInstance(locale);
// EX 1000 -> "1,000"
return instance.format(object);
}
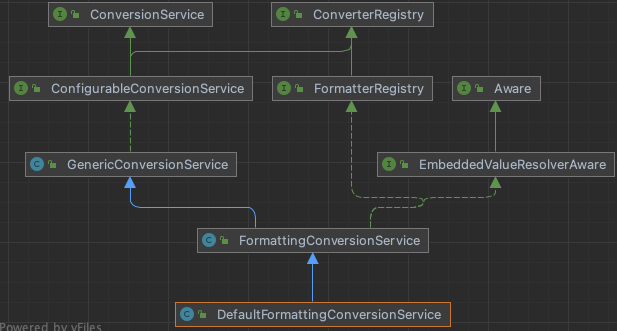
}DefaultFormattingConversionService
ConversionService는 컨버터만 등록할 수 있다.
그런데 포매터는 컨버터랑 크게 다를바가 없다.
그래서 스프링은 컨버터와 포매터를 결합한 DefaultFormattingConversionService을 제공한다.
DefaultFormattingConversionService cs = new DefaultFormattingConversionService();
// 컨버터 등록
cs.addConverter(...);
// 포매터 등록
cs.addFormatter(new NumberFormatter());

// 컨버터, 포매터 둘 다 동일한 메서드로 사용한다.
cs.convert("127.0.0.1:8080", IpAddress.class);
cs.convert("1,000", Long.class);
참고
스프링 부트는 DefaultFormattingConversionService을 상속받은 WebConversionService를 내부적으로 사용한다.
Spring에 Formatter 등록하기
import org.springframework.context.annotation.Configuration;
import org.springframework.web.servlet.config.annotation.WebMvcConfigurer;

@Configuration
public class WebConfig implements WebMvcConfigurer {

	@Override
    public void addFormatters(FormatterRegistry registry) {
        registry.addConverter(new IpAddressToStringConverter());
        registry.addConverter(new StringToIpAddressConverter());

        registry.addFormatter(new NumberFormatter());
	}
}
Formatter와 동일한 기능을 수행하는 Converter가 있으면, Converter가 높은 우선순위를 가진다.
스프링 제공 기본 Formatter
역시나 스프링은 다양한 Formatter를 제공해준다.
그런데 미리 정의된 Formatter는 기본 형식이 정해져 있으므로, 확장하기 어렵다.
이를 어노테이션으로 원하는 형식을 지정함으로써 해결할 수 있다.
대표적으로 @NumberFormat, @DateTimeFormate이 있다.
public class MyEntity {

	@NumberFormat(pattern = "###,###")
	private Long salary;

    @DateTimeFormat(pattern = "yyyy:MM:dd HH:mm:ss")
    private LocalDateTime hiredDate;
}공식문서를 참고하자
