✅오늘의 한 일
- 웹개발 종합반 강의 4주차 듣기
- 자바 중급 1편 강의 듣기
💻오늘의 학습
웹개발 종합반 강의 4주차
Firebase Firestore
4주차는 데이터베이스의 개념을 이해하고, Firebase를 사용해 데이터를 다루는 과정을 실습했다. 이전에 Firebase를 사용해서 프로젝트를 한 적이 있기 때문에 편하게 복습하는 기분으로 들었다.
- 파이어스토어(Firestore) : Google의 Firebase 플랫폼에 포함된
NoSQL문서 기반 데이터베이스. 문서(Document)와 컬렉션(Collection)이라는 계층적 구조로 데이터를 관리한다.- 컬렉션(Collection): 문서들의 집합으로, 문서들은 특정 컬렉션에 속하며 계층적으로 하위 컬렉션을 가질 수 있음.
- 문서(Document): JSON 형태의 필드(키-값) 쌍으로 구성된 단위.
- 필드(Field) : 문서 안에 있는 데이터의 작은 부분으로, 값으로 구성됨.
<script>에 type="module"을 추가하고, 다음 코드를 사용해 Firebase SDK 라이브러리를 가져오고, 구성 정보를 설정한다. 그 다음 Firebase 인스턴스를 초기화하면 준비가 끝난다.
// Firebase SDK 라이브러리 가져오기
import { initializeApp } from "https://www.gstatic.com/firebasejs/9.22.0/firebase-app.js";
import { getFirestore } from "https://www.gstatic.com/firebasejs/9.22.0/firebase-firestore.js";
import { collection, addDoc } from "https://www.gstatic.com/firebasejs/9.22.0/firebase-firestore.js";
import { getDocs } from "https://www.gstatic.com/firebasejs/9.22.0/firebase-firestore.js";
// Firebase 구성 정보 설정
const firebaseConfig = {
// 본인 설정 내용 채우기
};
// Firebase 인스턴스 초기화
const app = initializeApp(firebaseConfig);
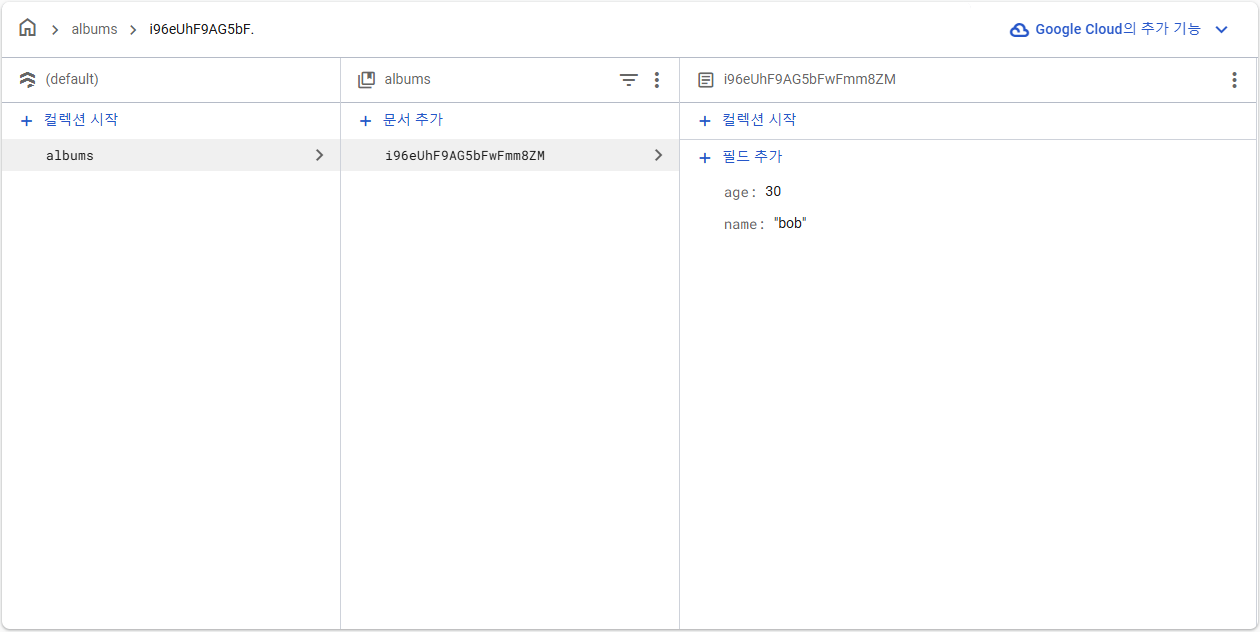
const db = getFirestore(app);데이터 추가는 다음과 같이 진행한다. id가 postingbtn인 버튼을 누르면 그 아래에 있는 코드가 실행된다. 해당 코드는 Firestore db에 내가 입력해둔 내용을 저장하는 것이다. 임의로 이름과 나이를 작성해 넣고 실행했다.
$("#postingbtn").click(async function () {
    let doc = {'name':'bob','age':30};
    await addDoc(collection(db, "albums"), doc);
})
버튼을 누르고 Firestore 페이지로 가면 다음과 같이 내가 작성한 그대로 데이터가 들어간 것을 볼 수 있다.
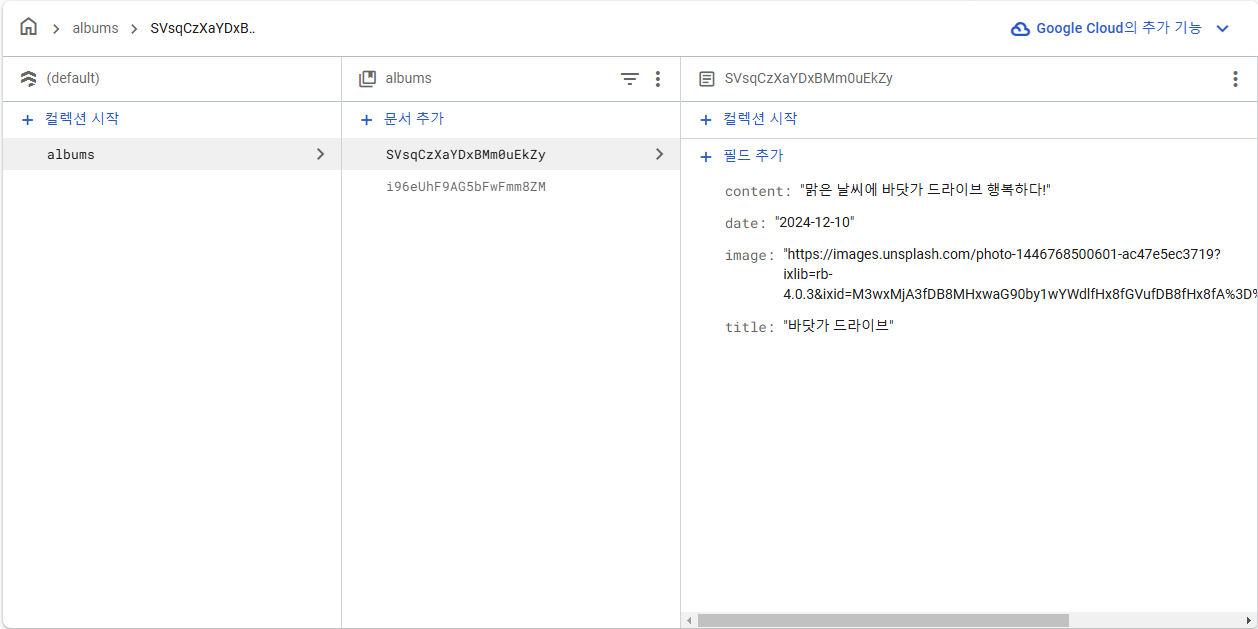
이번에는 임의의 데이터가 아니라, 값을 입력받고, 그 값을 저장하고자 한다. 처음 했던 방식과 똑같이 진행할 수 있다.
$("#postingbtn").click(async function () {
    let image = $('#image').val();
    let title = $('#title').val();
    let content = $('#content').val();
    let date = $('#date').val();

    let doc = {
        'image':image,
        'title':title,
        'content':content,
        'date':date
    };
    await addDoc(collection(db, "albums"), doc);
})
웹 페이지에서 값을 입력한 후, 버튼을 누르면 내가 입력한 대로 데이터가 저장된 것을 볼 수 있다.
자바 강의
날짜 및 시간 조회하기
LocalDateTime을 포함한 특정 시점의 시간을 제공하는 클래스는 모두 TemporalAccessor 인터페이스를 구현한다. 다음 예시와 같이 LocalDateTime에서 TemporalAccessor 인터페이스에 있는 get을 구현해서 사용할 수 있다.
public class GetTimeMain {

    public static void main(String[] args) {
        // 연, 월, 일, 시, 분, 초 하나하나가 <<필드>>
        LocalDateTime dt = LocalDateTime.of(2030, 1, 1, 13, 30, 59);
        System.out.println("YEAR = " + dt.get(ChronoField.YEAR));
        System.out.println("MONTH_OF_YEAR = " + dt.get(ChronoField.MONTH_OF_YEAR));
        System.out.println("DAY_OF_MONTH = " + dt.get(ChronoField.DAY_OF_MONTH));
        System.out.println("HOUR_OF_DAY = " + dt.get(ChronoField.HOUR_OF_DAY));
        System.out.println("MINUTE_OF_HOUR = " + dt.get(ChronoField.MINUTE_OF_HOUR));
        System.out.println("SECOND_OF_MINUTE = " + dt.get(ChronoField.SECOND_OF_MINUTE));

        System.out.println("== LocalDateTime 편의 메서드 제공 ==");
        System.out.println("YEAR = " + dt.getYear());
        System.out.println("MONTH_OF_YEAR = " + dt.getMonth()); // getMonth()로 하면 JANUARY로 출력
        System.out.println("DAY_OF_MONTH = " + dt.getDayOfMonth());
        System.out.println("HOUR_OF_DAY = " + dt.getHour());
        System.out.println("MINUTE_OF_HOUR = " + dt.getMinute());
        System.out.println("SECOND_OF_MINUTE = " + dt.getSecond());

        System.out.println("== 편의 메서드 없음 ==");
        System.out.println("MINUTE_OF_DAY = " + dt.get(ChronoField.MINUTE_OF_DAY));
        System.out.println("SECOND_OF_DAY = " + dt.get(ChronoField.SECOND_OF_DAY));
    }
}
get(TemporalField field)을 호출할 때는TemporalField의 구현체인ChronoField를 인수로 전달한다.- 자주 사용하는 기능은 편의 메서드를 제공하지만, 제공하지 않는 것도 있다. 그때는
get(TemporalField field)을 사용한다.
날짜 및 시간 조작하기
LocalDateTime을 포함한 특정 시점의 시간을 제공하는 클래스는 모두 Temporal 인터페이스를 구현한다. Temporal은 특정 시점의 시간을 조작하는 기능을 제공한다.
public class ChangeTimePlusMain {

    public static void main(String[] args) {
        LocalDateTime dt = LocalDateTime.of(2018, 1, 1, 13, 30, 59);
        System.out.println("dt = " + dt);

        LocalDateTime plusDt1 = dt.plus(10, ChronoUnit.YEARS);
        System.out.println("plusDt1 = " + plusDt1);

        LocalDateTime plusDt2 = dt.plusYears(10);
        System.out.println("plusDt2 = " + plusDt2);

        Period period = Period.ofYears(10);
        LocalDateTime plusDt3 = dt.plus(period);
        System.out.println("plusDt3 = " + plusDt3
        );
    }
}
plus(long amountToAdd, TemporalUnit unit)를 호출할 때 더하기 할 숫자와 시간의 단위(Unit)를 전달한다. 이때TemporalUnit의 구현체인ChronoUnit을 인수로 전달한다.
📝오늘의 회고
내일 병원 가야지..! 화이팅
📌내일의 할 일
- 웹개발 종합반 강의 듣기
- 자바 중급 1편 강의 듣기