커스텀 다이얼로그 만들기
다이얼로그를 만들다 보면 개발자가 원하는 형태로 만들고 싶을 때가 있다. 이럴때는 다이얼로그를 커스텀한다
커스텀 다이얼로그도 AlertDialog를 사용한다.
커스텀 다이얼로그를 어떻게 만드는지 알려면 먼저 LayoutInflater라는 클래스를 이해해야 한다.
LayoutInflater
LayoutInflater 클래스는 레이아웃 XML 파일을 코드에서 초기화(전개) 하는 기능을 제공한다.
- 초기화란 XML 파일에 선언한 뷰를 코드에서 이용하고자 생성하는 작업을 의미
XML 파일은 텍스트 파일일 뿐이며 결국 코드에서 이용하려면 XML에 선언한 대로 객체를 생성해서 메모리에 할당해야 한다.
XML 파일 초기화
// activity_one.xml
<LinearLayout xmlns:android="http://schemas.android.com/apk/res/android"
    xmlns:app="http://schemas.android.com/apk/res-auto"
    android:layout_width="match_parent"
    android:layout_height="match_parent"
    android:orientation="vertical">

    <Button
        android:layout_width="match_parent"
        android:layout_height="wrap_content"
        android:text="Button1"/>

    <Button
        android:layout_width="match_parent"
        android:layout_height="wrap_content"
        android:text="Button2"/>

</LinearLayout>
getSystemService() 함수로 LayoutInflater를 얻는다.
그리고 inflate() 함수를 호출하면서 초기화할 레이아웃 XML파일 정보를 매개변수로 전달한다.// mainAcitivity.kt val inflater = getSystemService(Context.LAYOUT_INFLATER_SERVICE) as LayoutInflater val rootView = inflater.inflate(R.layout.activity_one, null)초기화할 XML에 해당하는 바인딩 클래스의 inflate() 함수를 호출하면서 매개변수로 layoutInflater 객체를 전달만 해주면 자동으로 초기화되고 루트 뷰 객체를 얻을 수 있다.
커스텀 다이얼로그 구성
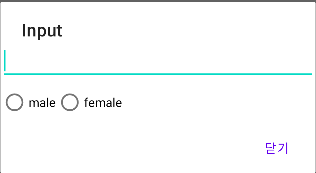
res/layout 폴더에 dialog_input.xml 파일을 작성한다.
// dialog_input.xml
<?xml version="1.0" encoding="utf-8"?>
<LinearLayout xmlns:android="http://schemas.android.com/apk/res/android"
    xmlns:app="http://schemas.android.com/apk/res-auto"
    android:layout_width="match_parent"
    android:layout_height="match_parent"
    android:orientation="vertical">
    <EditText
        android:layout_width="match_parent"
        android:layout_height="wrap_content"/>
    <RadioGroup
        android:layout_width="match_parent"
        android:layout_height="match_parent"
        android:orientation="horizontal">
        <RadioButton
            android:layout_width="wrap_content"
            android:layout_height="wrap_content"
            android:text="male" />
        <RadioButton
            android:layout_width="wrap_content"
            android:layout_height="wrap_content"
            android:text="female" />
    </RadioGroup>
</LinearLayout>
이제 이 XML 파일을 LayoutInflater로 초기화해서 다이얼로그에 적용하면 된다. AlertDialog의 setView() 함수에 매개변수로 뷰 객체를 전달하면 창의 내용 영역에 출력된다.
val dialogBinding = DialogInputBinding.inflate(layoutInflater)
AlertDialog.Builder(this).run {
    setTitle("Input")
    setView(dialogBinding.root)
    setPositiveButton("닫기", null)
    show()
}
참고
- Do it! 깡쌤의 안드로이드 프로그래밍 with 코틀린 (개정판)
