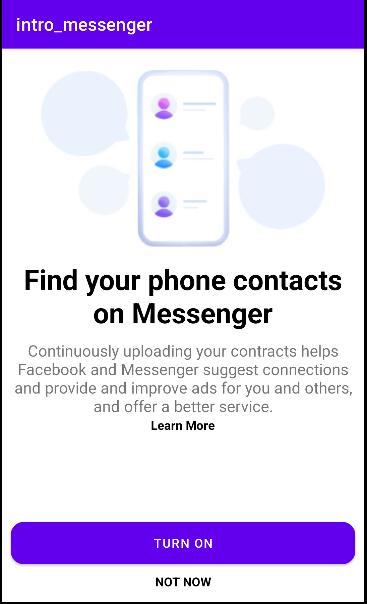
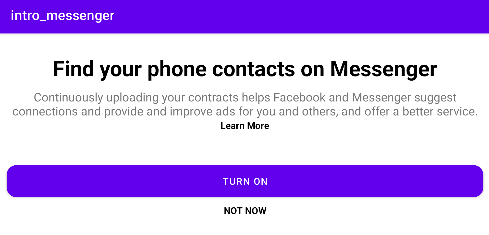
메신저 앱 인트로 화면 만들기
언어별 문자열 리소스 작성하기
+영어
<resources>
    <string name="app_name">intro_messenger</string>
    <string name="intro_main">
        Find your phone contacts on Messenger
    </string>
    <string name="intro_detail">
        Continuously uploading your contracts helps Facebook and Messenger suggest connections and provide and improve ads for you and others, and offer a better service.
    </string>
    <string name="intro_more">Learn More</string>
    <string name="intro_button">TURN ON</string>
    <string name="intro_delay">NOT NOW</string>
</resources>- 한국어
<resources>
    <string name="app_name">intro_messenger</string>
    <string name="intro_main">
        Messenger에서 휴대폰 연락처에 있는 사람들을 찾아보세요
    </string>
    <string name="intro_detail">
        연락처를 계속 업로드하면 Facebook 및 Messenger에서 연결된 연락처를 추천하고 회원님과 다른 사람들에게 더욱 관련성 높은 광고를 표시하여 더 나은 서비스를 제공하는 데 도움이 됩니다.
    </string>
    <string name="intro_more">더 알아보기</string>
    <string name="intro_button">설정</string>
    <string name="intro_delay">나중에 하기</string>
</resources>
세로 방향 화면 구성하기
<?xml version="1.0" encoding="utf-8"?>
<LinearLayout xmlns:android="http://schemas.android.com/apk/res/android"
    xmlns:app="http://schemas.android.com/apk/res-auto"
    android:layout_width="match_parent"
    android:layout_height="match_parent"
    android:gravity="center_horizontal"
    android:orientation="vertical">

    <ImageView
        android:layout_width="match_parent"
        android:layout_height="240dp"
        android:src="@drawable/intro" />

    <TextView
        android:layout_width="wrap_content"
        android:layout_height="wrap_content"
        android:text="@string/intro_main"
        android:gravity="center_horizontal"
        android:textStyle="bold"
        android:textSize="32sp"
        android:textColor="#000000"
        android:layout_marginLeft="10dp"
        android:layout_marginRight="10dp"/>

    <TextView
        android:layout_width="wrap_content"
        android:layout_height="wrap_content"
        android:text="@string/intro_detail"
        android:gravity="center_horizontal"
        android:layout_marginLeft="10dp"
        android:layout_marginRight="10dp"
        android:layout_marginTop="10dp"
        android:textSize="18sp"/>

    <TextView
        android:layout_width="wrap_content"
        android:layout_height="wrap_content"
        android:text="@string/intro_more"
        android:textColor="#000000"
        android:textStyle="bold" />

    <Button
        android:layout_width="match_parent"
        android:layout_height="wrap_content"
        android:background="@drawable/round_button"
        android:layout_marginLeft="10dp"
        android:layout_marginRight="10dp"
        android:text="@string/intro_button"
        android:layout_marginTop="100dp"/>

    <TextView
        android:layout_width="match_parent"
        android:layout_height="wrap_content"
        android:text="@string/intro_delay"
        android:gravity="center_horizontal"
        android:layout_marginRight="10dp"
        android:layout_marginLeft="10dp"
        android:textStyle="bold"
        android:textColor="#000000"
        android:layout_marginTop="10dp"/>

</LinearLayout>
가로 방향 화면 구성하기
<?xml version="1.0" encoding="utf-8"?>
<LinearLayout xmlns:android="http://schemas.android.com/apk/res/android"
    xmlns:app="http://schemas.android.com/apk/res-auto"
    android:layout_width="match_parent"
    android:layout_height="match_parent"
    android:gravity="center_horizontal"
    android:orientation="vertical">

    <TextView
        android:layout_width="wrap_content"
        android:layout_height="wrap_content"
        android:text="@string/intro_main"
        android:gravity="center_horizontal"
        android:textStyle="bold"
        android:textSize="32sp"
        android:textColor="#000000"
        android:layout_marginLeft="10dp"
        android:layout_marginRight="10dp"
        android:layout_marginTop="30dp"/>

    <TextView
        android:layout_width="wrap_content"
        android:layout_height="wrap_content"
        android:text="@string/intro_detail"
        android:gravity="center_horizontal"
        android:layout_marginLeft="10dp"
        android:layout_marginRight="10dp"
        android:layout_marginTop="10dp"
        android:textSize="18sp"/>

    <TextView
        android:layout_width="wrap_content"
        android:layout_height="wrap_content"
        android:text="@string/intro_more"
        android:textColor="#000000"
        android:textStyle="bold" />

    <Button
        android:layout_width="match_parent"
        android:layout_height="wrap_content"
        android:background="@drawable/round_button"
        android:layout_marginLeft="10dp"
        android:layout_marginRight="10dp"
        android:text="@string/intro_button"
        android:layout_marginTop="50dp"/>

    <TextView
        android:layout_width="match_parent"
        android:layout_height="wrap_content"
        android:text="@string/intro_delay"
        android:gravity="center_horizontal"
        android:layout_marginRight="10dp"
        android:layout_marginLeft="10dp"
        android:textStyle="bold"
        android:textColor="#000000"
        android:layout_marginTop="10dp"/>

</LinearLayout>
앱 실행하기
기기 한국어로 설정하기
에뮬레이터 실행 -> Settings 앱 실행 -> [System -> Languages & input -> Languages -> Add a language] 선택해서 한국어를 선택
그리고 순서를 1순위로 바꿔준다.

책에서는 RelativeLayout으로 만들었지만, 나는 LinearLayout으로 만들었다.
그래서 배치가 제대로 안돼서인지 버튼부분이 밖으로 삐져나간다.
RelativeLayout으로도 한번 만들어 봐야겠다.
참고
- Do it! 깡쌤의 안드로이드 프로그래밍 with 코틀린 (개정판)
