셋째 주 돌파
알고리즘은 여전히 오래 걸리고 어렵다.
자바는 알고리즘을 하고 보니까 어려운 건 맞지만 이해는 간다.
기초 문법이니까..
오늘부터 프로그래머스 문제를 2개정도 매일 풀어봐야겠다.
알고리즘_정렬
병합정렬(merge)
배열의 앞부분과 뒷부분의 그룹을 나누어 각각 정렬하고 두 그룹을 병합하는 정렬
분할정복 적용
- 분할정복:
문제를 작은 2개의 문제로 분리하고 각각을 해결한 다음, 결과를 모아서 원래의 문제를 해결하는 방법
ex) [5, 2, 6, 8, 1, 4, 3, 7]
-> [5, 2, 6, 8], [1, 4, 3, 7]
->[5, 2], [6, 8], [1, 4], [3, 7]
-> [5], [2], [6], [8], [1], [4], [3], [7]
------- ------- ------ ------- merge
-> [2, 5], [6, 8] ,[1, 4], [3, 7]
------------ -------------
-> [2, 5, 6, 8], [1, 3, 4, 7]
------------------------
-> [1, 2, 3, 4, 5, 6, 7, 8]
=>재귀함수로 표현할 수 있음
array = [5, 3, 2, 1, 6, 8, 7, 4]


def merge_sort(array):   #재귀
    if len(array) <=1:   #탈출조건
        return array
    mid= len(array) // 2
    left_array = merge_sort(array[:mid])
    right_array = merge_sort(array[mid:])
    return merge(left_array, right_array)
#결국 배열의 길이는 1이 되므로 k단계의 배열의 길이인 N/2^k=1-> k=log2N
#즉, k단계만큼 반복하는 데 각각 단계는 O(N)의 시간복잡도를 가진다.
#따라서 merge_sort함수의 시간복잡도는 O(NlogN)이다.

def merge(array1, array2): #O(N)
    result = []
    array1_index = 0
    array2_index = 0
    while array1_index < len(array1) and array2_index < len(array2):
        if array1[array1_index] < array2[array2_index]:
            result.append(array1[array1_index])
            array1_index += 1
        else:
            result.append(array2[array2_index])
            array2_index += 1

    if array1_index == len(array1):
        while array2_index < len(array2):
            result.append(array2[array2_index])
            array2_index += 1

    if array2_index == len(array2):
        while array1_index < len(array1):
            result.append(array1[array1_index])
            array1_index += 1

    return result


print(merge_sort(array))  # [1, 2, 3, 4, 5, 6, 7, 8] 가 되어야 합니다!

print("정답 = [-7, -1, 5, 6, 9, 10, 11, 40] / 현재 풀이 값 = ", merge_sort([-7, -1, 9, 40, 5, 6, 10, 11]))
print("정답 = [-1, 2, 3, 5, 10, 40, 78, 100] / 현재 풀이 값 = ", merge_sort([-1, 2, 3, 5, 40, 10, 78, 100]))
print("정답 = [-1, -1, 0, 1, 6, 9, 10] / 현재 풀이 값 = ", merge_sort([-1, -1, 0, 1, 6, 9, 10]))
스택(Stack)
한쪽 끝으로만 자료를 넣고 뺄 수 있는 자료 구조.
[컴퓨터인터넷IT용어대사전]
-
LIFO(Last In First Out): 데이터를 한 곳에서만 넣어다 뺄 수 있어 가장 처음에 넣은 데이터는 가장 늦게 나오게 되는 형태의 자료구조 -
데이터 넣고 뽑는 걸 자주하는 자료 구조이다.
-
왜 스택을 사용하는가?
넣은 순서를 쌓아두고 있기 때문이다.
예를들어 직전에 했던 행동을 되돌리고 싶을 때 사용하는 되돌리기 기능(Ctrl + Z)를 위해서는 했던 행동들을 순서대로 기억해야 하므로 스택을 사용한다.
스택 기능
push(data) : 맨 앞에 데이터 넣기
pop() : 맨 앞의 데이터 뽑기 (없애기)
peek() : 맨 앞의 데이터 보기
isEmpty(): 스택이 비었는지 안 비었는지 여부 반환해주기
class Node:
    def __init__(self, data):
        self.data = data
        self.next = None


class Stack:
    def __init__(self):
        self.head = None  #head를 통해 넣고 빼고 작업

    def push(self, value):
        new_head = Node(value)
        new_head.next = self.head
        self.head = new_head

    # pop 기능 구현
    def pop(self):
        if self.is_empty():                  # 만약 비어있다면 에러!
            return "Stack is empty!"
        delete_head = self.head              # 제거할 node 변수 잡기. 안잡으면 head 변경할 떄 값 사라져서 반환 못함
        self.head = self.head.next           # 그리고 head 를 현재 head 의 다음 걸로
        return delete_head                   # 제거할 node 반환

    def peek(self):
        if self.is_empty():                 #비어있을 떄 조건 필수!
            return "Stack is empty!"
        return self.head.data

    # isEmpty 기능 구현
    def is_empty(self):
return self.head is None- 파이썬에서는 list를 이용해서 스택 사용 가능
stack = []            # 빈 스택 초기화
stack.append(4)       # 스택 push(4)
stack.append(3)       # 스택 push(3)
top = stack.pop()     # 스택 pop
print(top) # 3!range함수: range(시작하는 점, 끝나는 점, 어떻게 연산을 하나씩 줄여갈건가)
큐(Queue)
한쪽 끝으로 자료를 넣고, 반대쪽에서는 자료를 뺄 수 있는 선형구조.
[컴퓨터인터넷IT용어대사전]
FIFO(First In First Out): 가장 처음에 넣은 자료가 가장 처음에 나오는 자료구조.like 놀이공원 줄
새로 들어가는 자료를 맨 뒤로 넣고 뺄 땐 맨 앞에서 뺀다.
큐 기능
enqueue(data) : 맨 뒤에 데이터 추가하기
dequeue() : 맨 앞의 데이터 뽑기
peek() : 맨 앞의 데이터 보기
isEmpty(): 큐가 비었는지 안 비었는지 여부 반환해주기
class Node:
    def __init__(self, data):
        self.data = data
        self.next = None


class Queue:
    def __init__(self):
        self.head = None
        self.tail = None

    def enqueue(self, value):
        new = Node(value)
        if self.is_empty():
            self.head = new
            self.tail = new
            return

        self.tail.next = new
        self.tail = new


    def dequeue(self):
        if self.is_empty():
            return "Queue is Empty"
        delete_head = self.head
        self.head = self.head.next
        return delete_head.data

    def peek(self):
        if self.is_empty():
            return "Queue is Empty"
        return self.head.data

    def is_empty(self):
        return self.head is None
해시
해시 함수(hash function) 또는 해시 알고리즘(hash algorithm) 또는 해시함수알고리즘(hash函數algorithm)은 임의의 길이의 데이터를 고정된 길이의 데이터로 매핑하는 함수이다. 해시 함수에 의해 얻어지는 값은 해시 값, 해시 코드, 해시 체크섬 또는 간단하게 해시라고 한다. 그 용도 중 하나는 해시 테이블이라는 자료구조에 사용되며, 매우 빠른 데이터 검색을 위한 컴퓨터 소프트웨어에 널리 사용된다 [위키백과]
- 파이썬에서 hash(object) 로 제공

- 딕셔너리에서 내부적으로 배열을 사용하기에 해시함수를 이용해 구현 가능
class Dict:
def __init__(self):
self.items = [None] * 8
def put(self, key, value): #딕셔너리에 새로운 키, 밸류 추가
index = hash(key) % len(self.items)
self.items[index] = value
def get(self, key): #키값에 따른 밸류값 얻기
index = hash(key) % len(self.items)
return self.items[index]
my_dict = Dict()
my_dict.put("test", 3)
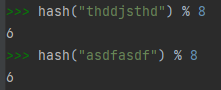
print(my_dict.get("test")) # 3이 반환되어야 합니다!충돌(collicion)
- 해시 값이 같을 경우 같은 어레이의 인덱스로 매핑이 되어서 데이터를 덮어 써버리는 결과가 발생
- 해결
1) 링크드리스트 사용방식== 체이닝(Chaining)
# "thddjsthd" -> self.items[6] = [("thddjsthd", "test")]
# "asdfasdf" -> self.items[6] = [("thddjsthd", "test")] -> [("asdfasdf", "test33] 노드로 연결
# 키값도 저장해야 값을 찾을 수 있음

class LinkedTuple:
    def __init__(self):
        self.items = List()

    def add(self, key, value):
        self.items.append((key, value))

    def get(self, key):
        for k, v in self.items:
            if k == key:
                return v


class LinkedDict:
    def __init__(self):
        self.items = []
        for i in range(8):
            self.items.append(LinkedTuple())

    def put(self, key, value):
        index = hash(key) % len(self.items)
        self.items[index].add(key, value)

    def get(self, key):
        index = hash(key) % len(self.items)
        return self.items[index].get(key)
이런 형태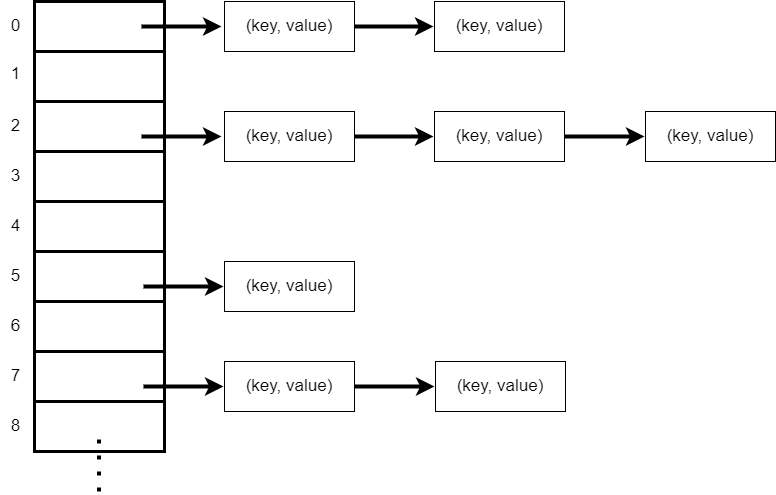
2) 배열의 다음 남는 공간에 넣기 == 개방주소법
해시함수 예제
- 출석체크
all_students = ["나연", "정연", "모모", "사나", "지효", "미나", "다현", "채영", "쯔위"]
present_students = ["정연", "모모", "채영", "쯔위", "사나", "나연", "미나", "다현"]

# 현재 학생을 모든 학생에서 제외한다
def get_absent_student(all_array, present_array):
    student_dict = {}
    for key in all_array:
        student_dict[key] = True

    for key in present_array:
        del student_dict[key]

    for key in student_dict.keys():
        return key

print(get_absent_student(all_students, present_students))
자바 문법
객체지향언어
- 객체지향 프로그래밍: 객체들 간의 상호작용을 코드로 표현한 것
- 캡슐화가 중요
클래스 class
: 객체 속성 정의
- 멤버 변수(필드) : 클래스 내부의 정보
인스턴스 instance
: 클래스로부터 만들어진 객체
- 한 번 생성되고 나면 그 자체의 상태를 가지고 변화
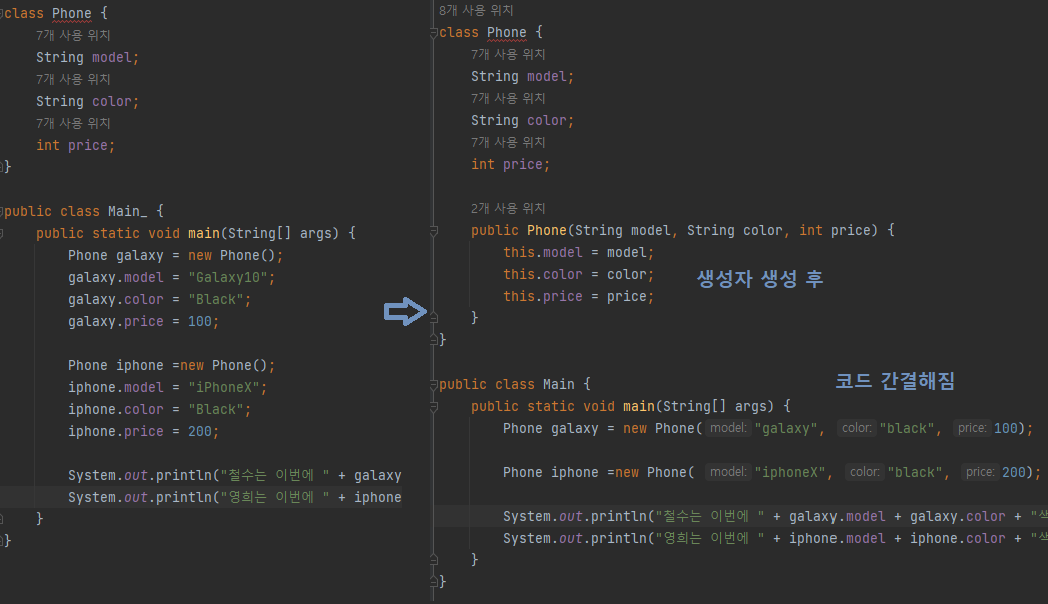
class Phone {
    String model;
    String color;
    int price;
}

public class Main {
    public static void main(String[] args) {
        Phone galaxy = new Phone();
        galaxy.model = "Galaxy10";
        galaxy.color = "Black";
        galaxy.price = 100;

        Phone iphone =new Phone();
        iphone.model = "iPhoneX";
        iphone.color = "Black";
        iphone.price = 200;
Phone 클래스 안에 model, color, price가 변수로 정의되어있음
그 클래스를 활용하여 galaxy. iphone 인스턴트 생성
인스턴스의 멤버변수에 접근할 때는 [생성된 인스턴스.멤버변수] 의 형식을 사용하면 된다.
메소드 method
: 어떠한 작업을 수행하는 코드를 하나로 묶어 놓은 것
메소드가 필요한 이유
- 재사용성
- 중복된 코드 제거
- 프로그램 구조화
메소드 작성 룰
- 동사로 시작
- camel case로 작성
형식
반환타입 메소드이름 (타입 변수명,타입 변수명, ...){
    수행되어야 할 코드
}
// 반환타입 : 결과의 자료형 결정

int add(int x, int y) {
    int result = x + y;
    return result;
}- 예제
class Calculation {               //클래스 선언
    int add (int x, int y) {
        return x + y;
    }
    int subtract (int x, int y) {
        return x - y;
    }
}

public class Main {
    public static void main(String[] args) {
        Calculation calculation = new Calculation();    //인스턴스생성
        int addResult = calculation.add(1, 2);
        int subtractResult = calculation.subtract(5, 3);

        System.out.println(addResult);        //3
        System.out.println(subtractResult); //2
    }
}
생성자
- 형식
클래스이름 (타입 변수명, 타입 변수명, ...){
    인스턴스 생성 될 때에 수행하여할 코드
    변수의 초기화 코드
}- class 이름이랑 똑같은 이름으로 지어야 함
- return 값은 없음
- 인스턴스 변수의 이름과 지역 변수의 이름이 같을 경우 변수 앞에
this를 사용하여 구분
인스턴스 변수의 기본값
class DefaultValueTest {
    byte byteDefaultValue;
    int intDefaultValue;
    short shortDefaultValue;
    long longDefaultValue;
    float floatDefaultValue;
    double doubleDefaultValue;
    boolean booleanDefaultValue;
    String referenceDefaultValue;
}

public class Main {
    public static void main(String[] args) {
        DefaultValueTest defaultValueTest = new DefaultValueTest();
        System.out.println("byte default: " + defaultValueTest.byteDefaultValue);
        System.out.println("short default: " + defaultValueTest.shortDefaultValue);
        System.out.println("int default: " + defaultValueTest.intDefaultValue);
        System.out.println("long default: " + defaultValueTest.longDefaultValue);
        System.out.println("float default: " + defaultValueTest.floatDefaultValue);
        System.out.println("double default: " + defaultValueTest.doubleDefaultValue);
        System.out.println("boolean default: " + defaultValueTest.booleanDefaultValue);
        System.out.println("reference default: " + defaultValueTest.referenceDefaultValue);
    }
}
> Task :Main.main()
byte default: 0
short default: 0
int default: 0
long default: 0
float default: 0.0
double default: 0.0
boolean default: false
reference default: null상속
: 기존 클래스를 재사용하는 방식 중 하나
- 특징
- 부모클래스에서 정의된 필드와 메소드를 물려 받음
- 새로운 필드와 메소드 추가 불가.
- 부모 클래스에서 물려받은 메소드 수정 가능
class Animal {
    String name;

    public void cry() {
        System.out.println(name + "is crying.");
    }
}
class Dog extends Animal {  //상속의 형식
    Dog(String name) {
        this.name = name;
    }

    public void swim() {
        System.out.println(name + "is swimming.");
    }
}

public class Main {
    public static void main(String[] args) {
        Dog dog = new Dog("코코");
        dog.cry();
        dog.swim();

        Animal dog2 = new Dog("미미");
        dog2.cry();
        dog2.swim();   //Compile Error. Animal 클래스로 인스턴스가 생생되어서 Dog클래스에 있는 생성자는 호출 못함.
        }
}- 실제 객체를 만들 때 사용한 자식타입에 있는 함수는 부모타입의 변수로 사용할 때 호출 불가.
- 여러 클래스 상속 불가. 부모는 오직 하나
super: 참조변수. 부모 클래스의 멤버와 자식 클래스의 멤버 이름이 같을 경우 사용하여 부모 클래스의 멤버에 접근 가능super(): 부모 클래스의 생성자를 호출할 때 사용
overloading
: 한 클래스 내에 동일한 이름의 메소드 정의
- 조건
- 동일한 이름의 메소드
- 매개변수 개수 or 타입이 달라야함
 int add(int x, int y, int z) {
        return x+y+z;
    }
    long add(int a, int b, int c){
         return a+b+c;
    }
//컴파일 에러. 개수가 같음

int add(int x, int y, int z) {
    int result = x + y + z;
    return result;
}

long add(int a, int b, long c) {
    long result = a + b + c;
    return result;
}

int add(int a, int b) {
    int result = a + b;
    return result;
}
// 오버로딩 조건에 부합
overriding
: 부모클래스에 있는 메소드를 똑같이 자식클래스에 정의하여 부모클래스에 ㅣ있는 메소드를 엎어버려서 없는 셈 치는 것
- 예제
class Animal {
    String name;
    String color;

    public Animal(String name) {
        this.name = name;
    }
    public void cry() {
        System.out.println(name + " is crying");
    }
}

class Dog extends Animal {
    public Dog(String name) {
        super(name);
    }

    @Override   //annotation
    public void cry() {
        System.out.println(name + "is barking");
    }
}

public class Main {
    public static void main(String[] args) {
        Animal dog = new Dog("코코");
        dog.cry();
    }
}
//> 코코is barking
overloading vs overriding
| overloading | overriding |
|---|---|
| 기존에 없던 새로운 메소드 정의 | 상속 받은 메소드 내용 변경 |
접근제어자(access modifier)
: 멤버 변수/함수/클래스 앞에 붙어 사용
: 외부에서의 접근을 제한.
- private : 같은 클래스 내에서만 접근 가능
- default(nothing) : 같은 패키지 내에서만 접근 가능
- protected : 같은 패키지 내, 다른 패키지의 자손클래스에서 접근이 가능
- public : 접근 제한이 전혀 없음
접근 범위 정리
(좁음) (넓음)
private → default → protected → public
Main.java
import pkg.ModifierTest;   //다른 패키지의 클래스 참조 시 import
                           //패키지이름.클래스이름 덩어리를 실제 클래스로 인식

class Child extends ModifierTest {
    void callParentProtected() {   //package private
        System.out.println("Call my parent's protected method");
        super.messageProtected();
    }
}


public class Main {
    public static void main(String[] args) {
        ModifierTest modifierTest = new ModifierTest();
        modifierTest.messageOutside();
//        modifierTest.messageInside();          //compile error. ModifierTest의 private
//        modifierTest.messageProtected();       //compile error. ModifierTest의 protected
//        modifierTest.messagePackagePrivate();  //compile error. ModifierTest의 package private
//접근제어자를 통해 접근할 수 있는 범위 제한
        Child child = new Child();
        child.callParentProtected();
    }
}
ModifierTest.java
package pkg;    //package 선언부 추가

public class ModifierTest {
    private void messageInside() {
        System.out.println("This is private modifier");
    }

    public void messageOutside() {
        System.out.println("This is public modifier");
        messageInside();
    }

    protected void messageProtected() {
        System.out.println("This is protected modifier");
    }

    void messagePackagePrivate() {
        System.out.println("This is package private modifier");
    }
}
why 접근제어자?
- 객체지향 프로그래밍에선 객체들간의 관계에 따라서 접근 할 수 있는 것과 아닌 것, 권한을 구분할 필요가 생긴다.
- 클래스 내부에 선언된 데이터의 부적절한 사용으로부터 보호
- 접근 제어자는 캡슐화가 가능할 수 있도록 돕는 도구임
캡슐화(encapsulation): 클래스 내부 변수와 메소드를 하나로 묶고 일부 은닉
추상클래스
: 추상 메소드를 선언할 수 있는 클래스
- 상속받는 자식클래스 없이는 인스턴스 생성 불가
- 추상메소드 : 설계만 되어 있고 구현체가 없는 것
- 자식클래스에서 구현
- 형식
abstract 리턴타입 메소드이름();
abstract class Bird {
    private int x, y, z;

    void fly(int x, int y, int z) {
        printLocation();
        System.out.println("이동합니다.");
        this.x = x;
        this.y = y;
        if(flyable(z)){
            this.z = z;
        }else {
            System.out.println("그 높이로는 날 수 없습니다.");
        }
        printLocation();

    }
    abstract boolean flyable(int z);  // 추상클래스
    public void printLocation() {
        System.out.println("현재위치 {" +x+ ", " +y+ ", " +z+ "}" );
    }
}

class Pigeon extends Bird {
    @Override
    boolean flyable(int z) {    //자식클래스에서 구현된 추상클래스
        return z < 10000;
    }
}

class Peacock extends Bird {

    @Override
    boolean flyable(int z) {    //자식클래스에서 구현된 추상클래스
        return false;
    }
}

public class Main {
    public static void main(String[] args) {
        Bird pigeon = new Pigeon();
        Bird peacock = new Peacock();
        System.out.println("---비둘기---");
        pigeon.fly(1, 1, 3);
        System.out.println("---공작새---");
        peacock.fly(1,1,3);
        System.out.println("---비둘기---");
        pigeon.fly(3, 3, 30000);
    }
}
인터페이스(Interface)
: 객체의 특정 행동의 특징을 정의
- 접근제어자, 리턴타입, 메소드 이름만 정의. 함수의 내용은 없음
- 인터페이스를 구현하는 클래스는 인터페이스에 존재하는 함수의 내용({} 중괄호 안의 내용)을 반드시 구현해야함
- 형식
interface 인터페이스명{
    public abstract void 추상메서드명();
}

//ex)
interface MyInterface {
    void myMethod(int x);
}
interface Flyable{
void fly(int x, int y, int z); //필드 없이, 메소드만 정의
}
//implements 구현하다
class Pigeon implements Flyable{ //상속과는 다르게 여러 개의 인터페이스 구현 가능
private int x,y,z; //필드정의
@Override
public void fly(int x, int y, int z) {
printLocation();
System.out.println("날아갑니다.");
this.x = x;
this.y = y;
this.z = z;
printLocation();
}
public void printLocation() {
System.out.println("현재 위치 (" + x + ", " + y + ", " + z + ")");
}
}
public class Main {
public static void main(String[] args) {
Flyable pigeon = new Pigeon();
pigeon.fly(1, 2, 3);
}
}인터페이스 vs 추상클래스
| 인터페이스 | 추상클래스 |
|---|---|
| 구현하려는 객체의 동작 명세 | 클래스 상속받아 이용 및 확장 |
| implements | extends |
| 다중상속 | 단일상속 |
| 메소드 시그니처(이름, 파라미터, 리턴 타입)에 대한 선언만 가능 | 추상메소드에 대한 구현 가능 |
마무리
오늘부터 프로그래머스 코딩테스트 문제를 풀어보기로 하자.
하루치 분량이 정해져 있어서 좋은 것 같다.
자바 문법은 강의를 들으면 알겠는데
예제 문제같은 건
내가 작성이 안된다..ㅠ
응용하는 방법을 아직 모르겠다..ㅎ
알고리즘도 역시.
생각은 해보지만 그게 코드로 구현이 안되서 아쉽다.
그래도 내가 생각한 방법이랑 비슷한 방법으로 튜터님이 코드를 구현하면
약간 기분 좋다ㅋㅋㅋ
내일도 화이팅 😉
내배캠 튜터님이 자바에서
변수 선언할 때 자료형은 기본형보다 참조형으로 쓰는게 좋다고 하신다.
제공되는 함수를 쓰는게 좋으므로..
int 대신 Integer로...✏
참조
super와 super()
스파르타코딩클럽 <쉽게 배우는 알고리즘 KDT 실무형 스프링 백엔드 엔지니어 양성과정 1회차>
스파르타코딩클럽 <Java 실무 기초 KDT 실무형 스프링 백엔드 엔지니어 양성과정 1회차>