스프링에서의 빈(bean) 등록은 애플리케이션에서 사용할 객체를 스프링 컨테이너가 관리할 수 있도록 등록하는 과정입니다. 빈은 스프링 컨테이너에 의해 생성되고, 필요할 때 주입되며, 생명주기를 관리받습니다.
1. 빈 등록 방법
스프링에서 빈을 등록하는 방법은 크게 세 가지로 나눌 수 있습니다.
1.1 @Component 스캔
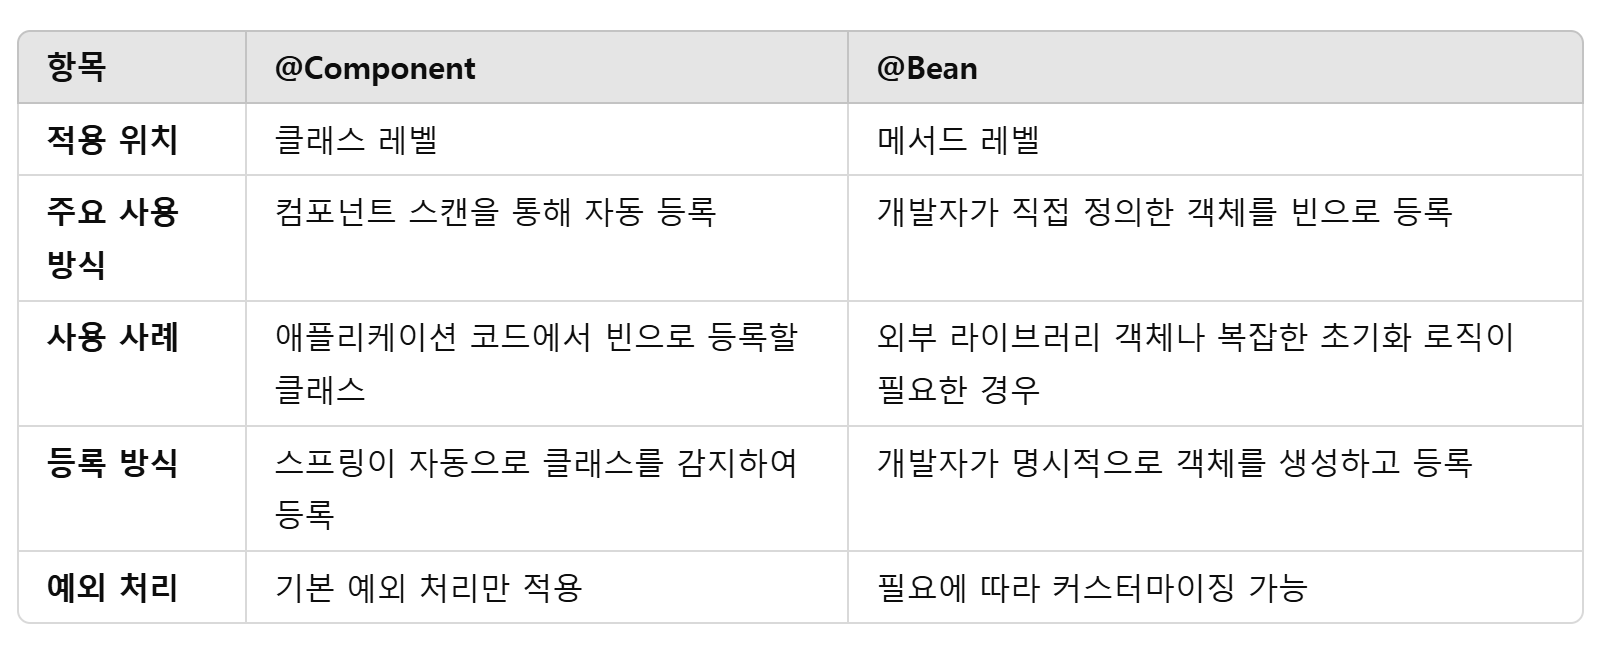
클래스에 @Component(또는 파생 어노테이션)를 사용하고, 해당 클래스가 컴포넌트 스캔 경로에 포함되면 자동으로 빈으로 등록됩니다.
주요 어노테이션:
- @Component: 일반적인 빈 등록
- @Service: 비즈니스 로직을 처리하는 클래스에 사용
- @Repository: 데이터 접근 계층에서 사용 (추가적인 예외 변환 기능 제공)
- @Controller: MVC 패턴에서 컨트롤러 역할
@Component
public class MyService {
public void doSomething() {
System.out.println("Doing something...");
}
}
- 컴포넌트 스캔 설정 (@ComponentScan)
@ComponentScan은 @SpringBootApplication에 포함되어 있다
@SpringBootApplication
public class MyApp {
public static void main(String[] args) {
SpringApplication.run(MyApp.class, args);
}
}
1.2 @Bean을 사용한 등록
@Configuration이 붙은 클래스 내에서 @Bean 메서드를 사용하여 직접 빈을 정의하고 등록합니다.
@Configuration
public class AppConfig {
@Bean
public MyService myService() {
return new MyService();
}
}
1.3 XML 설정
XML 파일에 태그를 사용해 빈을 등록합니다. 이는 과거 방식으로, 현재는 잘 사용되지 않습니다.
  <beans xmlns="http://www.springframework.org/schema/beans"
       xmlns:xsi="http://www.w3.org/2001/XMLSchema-instance"
       xsi:schemaLocation="http://www.springframework.org/schema/beans
                           http://www.springframework.org/schema/beans/spring-beans.xsd">
    <bean id="myService" class="com.example.MyService" />
</beans>
2. 빈의 스코프
스프링 빈은 기본적으로 싱글톤(singleton) 스코프로 등록되지만, 다른 스코프도 지원합니다.
- singleton (기본값): 애플리케이션 컨텍스트당 한 개의 인스턴스.
- prototype : 요청 시마다 새로운 인스턴스 생성.
- request : HTTP 요청당 한 개의 인스턴스 (웹 애플리케이션 전용).
- session : HTTP 세션당 한 개의 인스턴스 (웹 애플리케이션 전용).
@Bean
@Scope("prototype")
public MyService myService() {
return new MyService();
}
3. 빈 의존성 주입
등록된 빈은 스프링의 의존성 주입(DI) 메커니즘에 의해 다른 빈에서 사용될 수 있습니다.
주요 주입 방법:
1. 생성자 주입 (권장)
@Service
public class MyController {
private final MyService myService;
public MyController(MyService myService) {
this.myService = myService;
}
}
2. 필드 주입
@Service
public class MyController {
@Autowired
private MyService myService;
}
3. Setter 주입
@Service
public class MyController {
private MyService myService;
@Autowired
public void setMyService(MyService myService) {
this.myService = myService;
}
}
4. 등록된 빈 조회
컨테이너에서 빈을 조회하려면 ApplicationContext를 사용합니다.
@SpringBootApplication
public class MyApp {
public static void main(String[] args) {
ApplicationContext context = SpringApplication.run(MyApp.class, args);
MyService myService = context.getBean(MyService.class);
myService.doSomething();
}
}
5. Component vs Bean의 차이점
일반적인 애플리케이션 클래스는 @Component를 사용하여 간단하게 등록하고, 특수한 객체 생성 로직이나 외부 클래스는 @Bean으로 처리합니다.