
1. Routing
1) Routing이란?
네트워크에서의 라우팅
- 어떤 네트워크 안에서 통신 데이터를 보낼 때 최적의 경로를 선택하는 과정
- 여기서 최적의 경로란 주어진 데이터를 가장 짧은 거리 또는 빠른 시간 안에 전송할 수 있는 경로
웹 개발에서의 라우팅
- 사용자가 A라는 화면에서 B라는 화면으로 넘어가는 네비게이션을 관리하는 기능
- 사용자가 요청한 URL 또는 이벤트를 해석하여 페이지를 전환하기 위한 일련의 행위
- 브라우저의 history 관리를 위해서 각 페이지는 브라우저의 주소창에 구별 가능한 URL이 있어야함
2) Routing in SSR
- 전통적인 라우팅 방식
- link tag (a tag)로 동작하는 기본적인 웹페이지의 동작 방식
- URL로 서버로 요청을 보내면 그에 맞는 응답으로 완성된 HTML 문서를 클라이언트에 제공
- Routing에 대한 결정권을 서버가 가짐
3) Routing in SPA / CSR
- 서버는 하나의 HTML만을 제공
- 하나의 HTMl문서에 자바스크립트 코드를 통해 사용자에게 필요한 화면을 제공
- 이미 하나의 URL만을 가지고 있음
SPA에서 라우팅이 필요한 이유
- 유저가 URL을 통한 페이지의 변화를 감지할 수 없음 (사용성이 좋지 않음)
- 페이지가 무엇을 렌더링 중인지 파악할 수 없음
- 뒤로 가기 기능(history 관리)를 사용할 수 없음
2. Vue Router
- Vue.js의 공식 라이브러리
- 브라우저의 hashchange 이벤트나 History API를 사용하여 현재 컴포넌트의 상태를 업데이트
1) Vue CLI에서 Vue Router 시작하기
$ vue create {프로젝트 이름}   // Vue 프로젝트 생성
$ cd {프로젝트 이름(디렉토리 이름)}  // 디렉토리 이동
$ vue add router   // Vue CLI에서 router plugin 적용
Vue router를 추가하게 되면 history mode를 사용할 것인지 물어본다. 'yes'를 선택한다.
history mode?
- 브라우저의 History API를 활용한 방식
- History mode를 사용하지 않으면 Hash mode(#를 사용한 방식)로 설정됨
2) Router의 기본 요소
폴더 구조
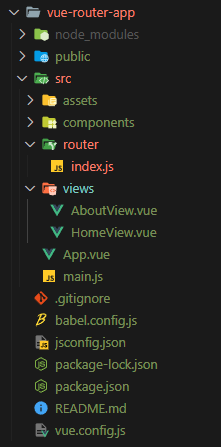
{프로젝트 이름}/src/에 router와 views 폴더가 추가된 것을 볼 수 있다.
router-link
아래 코드블록은 공식 문서에서 퍼온 것으로, router-link와 router-view의 기능과 사용법을 알 수 있다.
<div id="app">
  <h1>Hello App!</h1>
  <p>
    <!-- use the router-link component for navigation. -->
    <!-- specify the link by passing the `to` prop. -->
    <!-- `<router-link>` will render an `<a>` tag with the correct `href` attribute -->
    <router-link to="/">Go to Home</router-link>
    <router-link to="/about">Go to About</router-link>
  </p>
  <!-- route outlet -->
  <!-- component matched by the route will render here -->
  <router-view></router-view>
</div>- a태그와 비슷한 기능을 수행하여 URL을 이동시킨다.
- 각
router-link태그는src/router/index.js의routes에 등록된 컴포넌트와 매핑된다. - History mode에서
router-link는 클릭 이벤트를 차단하여 a 태그와 달리 페이지가 재렌더링 되지 않도록 한다. (새로고침 차단) to속성 : 해당router-link의 목표 경로- HTML에서 a 태그로 렌더링되지만, 필요에 따라 다른 태그로 바꿀 수 있다.
router-view는 실제 컴포넌트가 렌더링되는 곳
src/router/index.js
// src/router/index.js
import Vue from 'vue'
import VueRouter from 'vue-router'
import HomeView from '@/views/HomeView'

// 경로와 컴포넌트가 매핑되는 곳
const routes = [
  {
  	path: '/',
    name: 'home',
    component: HomeView
  }
]

const router = new VueRouter({
  mode: 'history',
  base: process.env.BASE_URL,
  routes
})

export default router- 라우터에 관련된 정보 및 설정이 작성되는 곳
- Django에서의
urls.py에 해당 - routes에 URL과 컴포넌트를 매핑
src/views
router-view에 들어갈 컴포넌트를 추가할 폴더- routes와 매핑되는 컴포넌트는 다른 컴포넌트와 구분하기 위해 파일명을 'View'로 끝내는 것을 권장
- router와 연결되지 않을 컴포넌트는
src/commponents/폴더에 추가한다.
3. Vue Router에서 주소를 이동하는 2가지 방법
- 선언적 방식 네비게이션
- 프로그래밍 방식 네비게이션
1) 선언적 방식 네비게이션
// App.vue

<template>
  <div id="app">
    <nav>
    	<router-link to="/">Home</router-link> |
		<router-link to="/about">About</router-link>
    </nav>
    <router-view/>
  </div>
</template>router-link의to속성으로 해당 태그를 클릭했을 때 이동할 주소를 전달- routes에 등록된 주소와 매핑된 컴포넌트로 이동
Named Routes
// src/router/index.js

const routes = [
  {
  	path: '/',
    name: 'home',
    component: HomeView
  },
  {
  	path: '/about',
    name: 'about',
    component: AboutView
  }
]
// App.vue
<template>
<div id="app">
<nav>
<router-link to="{ name: 'home' }">Home</router-link> |
<router-link to="{ name: 'about' }">About</router-link>
</nav>
<router-view/>
</div>
</template>- 이름을 가지는 routes
src/router/index.js에 routes를 선언할 때 지정해 준 이름을router-link의to속성에 객체로 전달
2) 프로그래밍 방식 네비게이션
// AboutView.vue

<template>
  <div class="about">
    <h1>This is an about page</h1>
	// 클릭하면 home으로 이동
    <button @click="toHome">Home</button>
  </div>
</template>

<script>
  export default {
    name: 'AboutView',
    methods: {
      toHome() {
        this.$router.push({ name: 'home'})
      }
    }
  }
</script>- Vue Instance내부에서 라우터 인스턴스에
$router로 접근 - 브라우저의 history stack에 이동할 URL을 넣는 방식으로
this.$router.push를 사용하여 다른 URL로 이동 - history stack에 기록이 남기 때문에 뒤로 가기 기능 사용 가능
<router-link :to="..."를 클릭하는것과$router.push(...)호출하는 것은 같은 동작!

better than more