안녕하세요!
이제 연말을 맞아 회고를 하고 있는데, 그동안 경험하고 개발했던 내용을 차곡차곡 정리하고자 합니다. 올해 글또활동의 메인 주제로 LLM을 꼽았는데요, 제가 공부했었던 내용을 정리해보겠습니다.
LLM이 이제는 대세를 넘어서 주류로 자리를 잡았는데요, 회사에서 Data scientist로 일하고 있지만 저희 회사는 추천 모델링에 LLM을 그렇게 중요하게(?) 여기지는 않는 것 같아요. 그래서 아쉬운 마음에 사이드 프로젝트로 다뤄봤는데요, 오늘은 Bert를 소개하고, Bert 모델을 fine-tuning하여 classification task를 수행해보겠습니다.
Bert란?
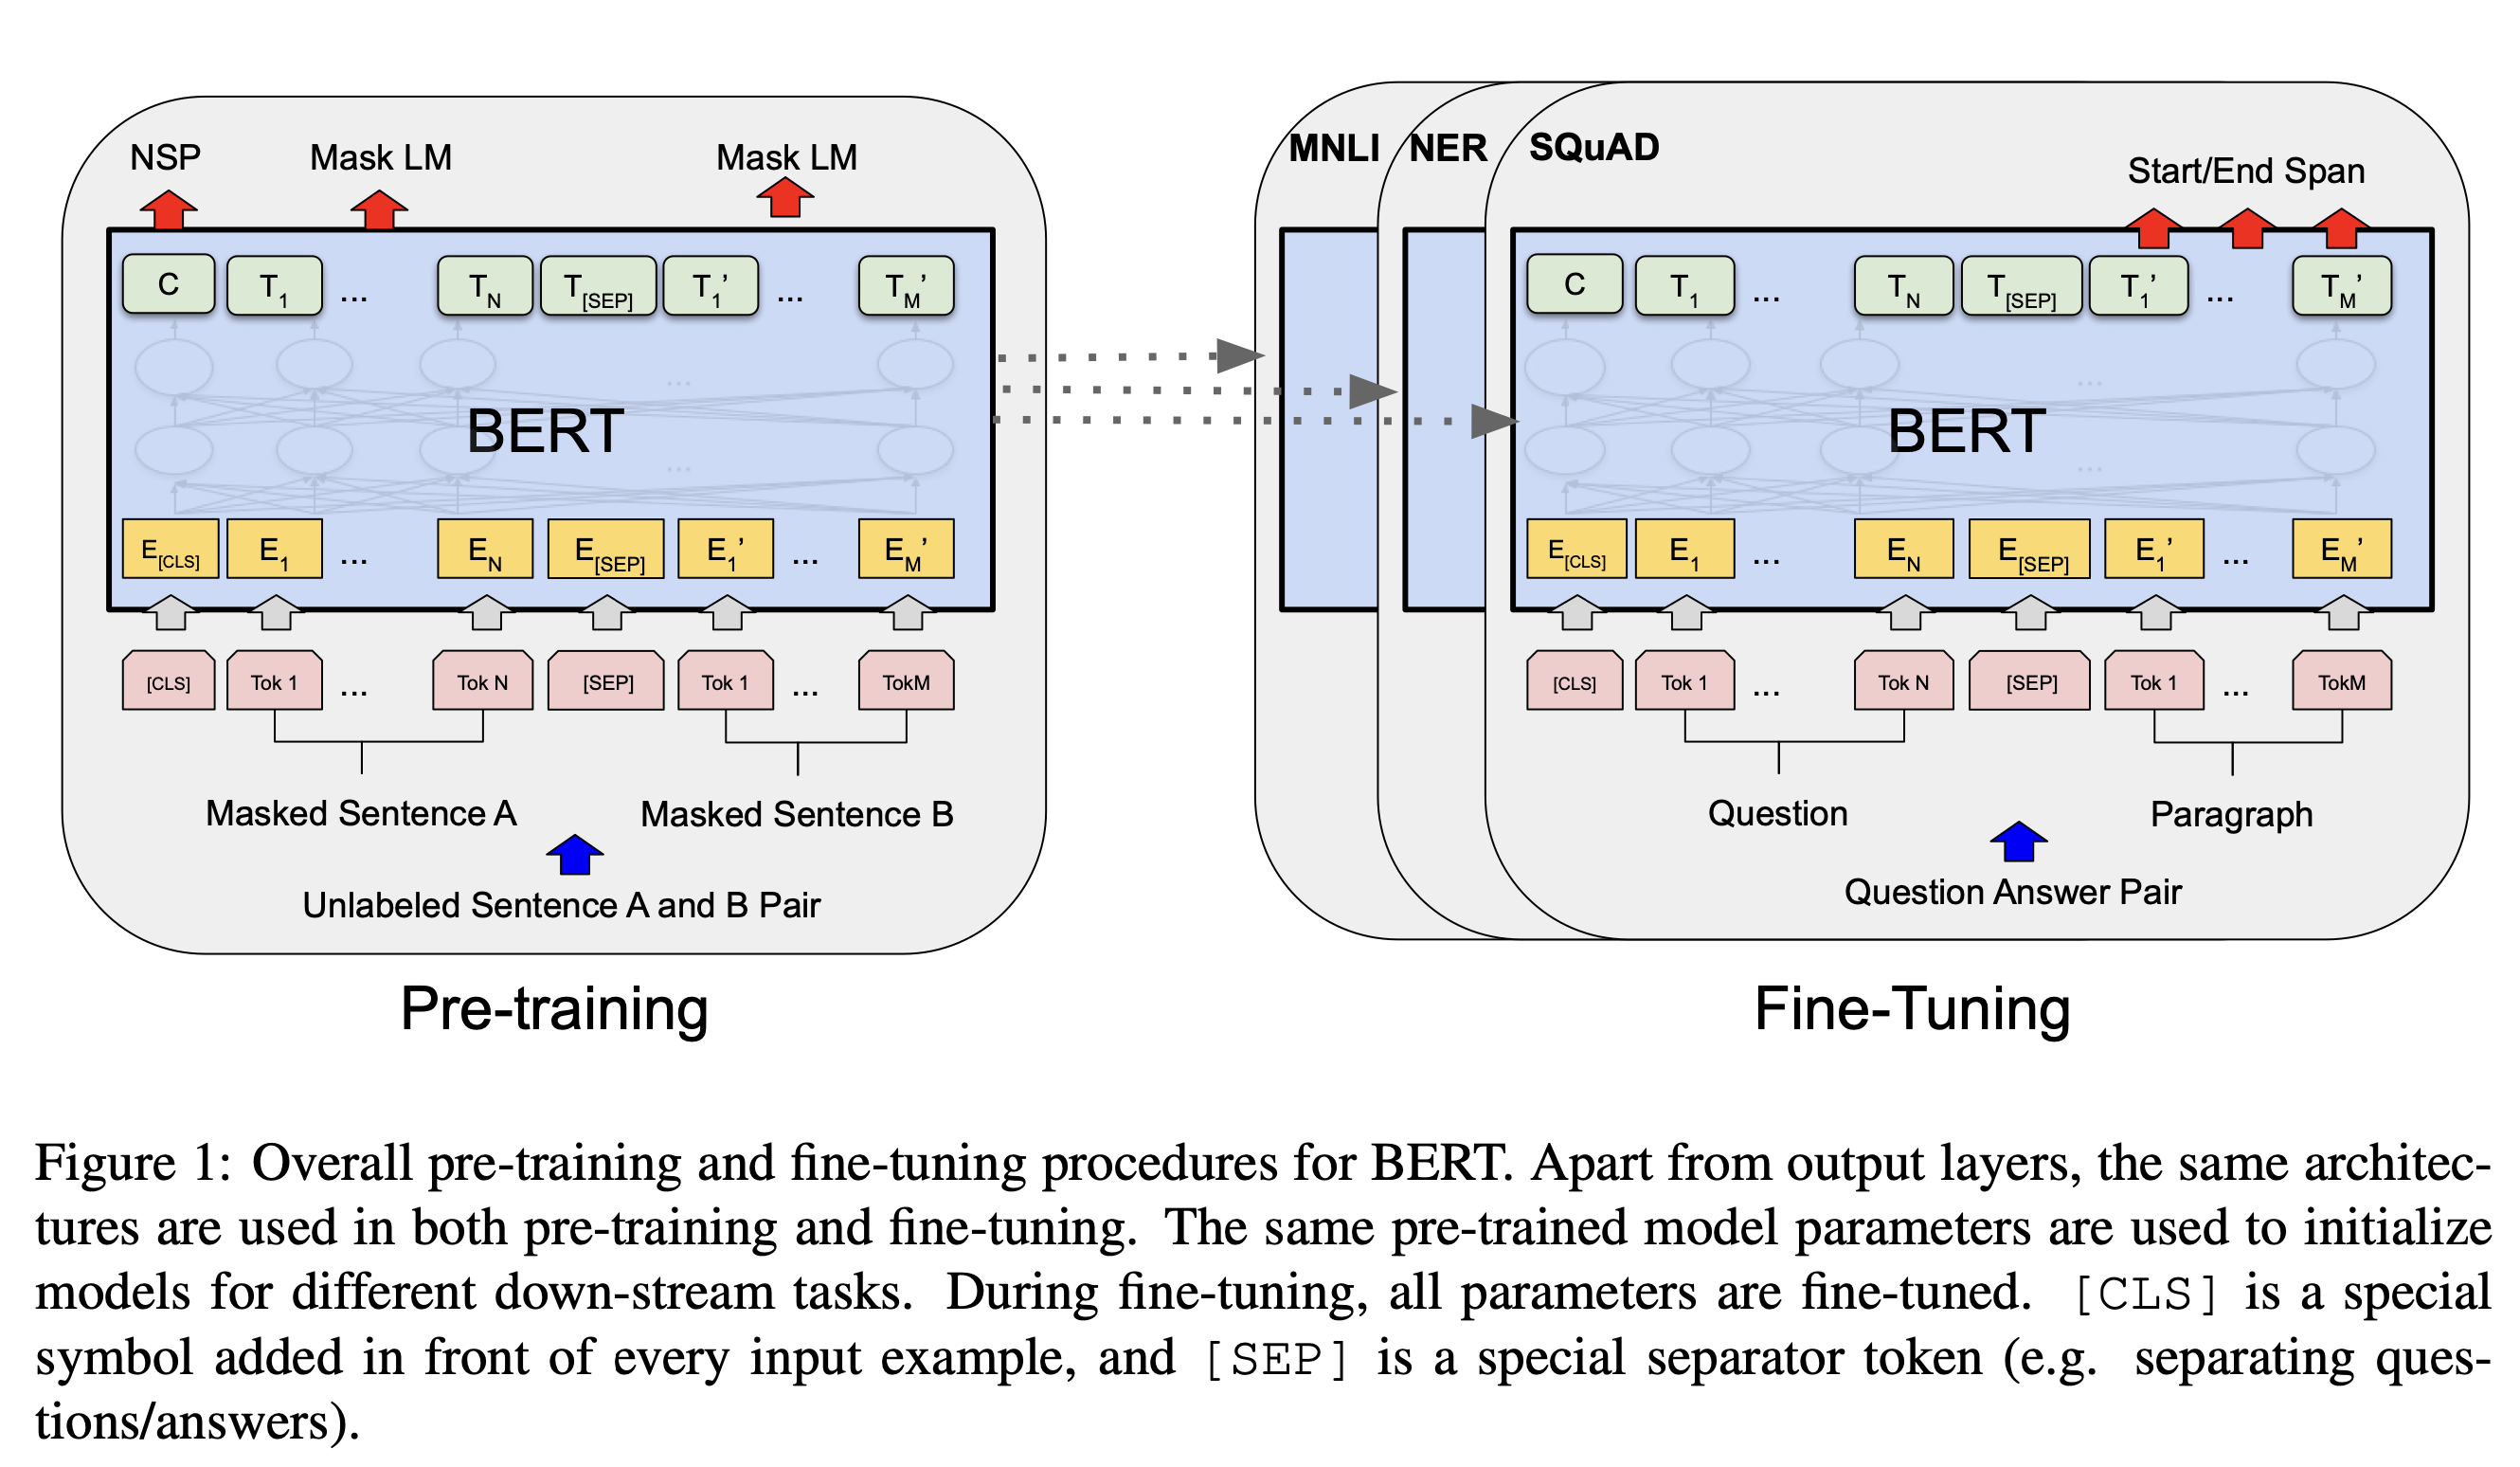
- 양방향(Bi-directional) 트랜스포머 모델
- 앞뒤 단어의 context 고려
- 감성분석, 자연어처리 등의 task에 강점
- 트랜스포머의 인코더를 사용하여 input을 word단위로 vectorize한 후, 각 word vector와 context 간의 관례를 나타내는 vector를 계산함
Bert Fine-tuning
GPT가 이렇게 관심을 받기 전까지는 Bert가 많은 관심을 받고 있었는데요, 지금은 GPT한테 좀 밀린 것 같다는 생각이 듭니다. 그래도, Bert와 GPT의 강점은 다르고, 문맥 이해 등의 자연어에 대한 이해는 Bert가 더 잘하기 때문에 적합한 task에 쓰면 되겠습니다.
1. Data
1.1 Data Load
저는 Kaggle의 Resume 데이터셋을 다운받아서 Resume를 보고 Job을 분류하는 Classification을 수행 했습니다.(간단하게 하실 분들은 huggingface datasets 라이브러리에서 제공하는 데이터셋을 추천! ex."ag_news" " 영문 뉴스 기사 분류)
먼저 데이터를 로드합니다. 데이터 로드 후에 간단한 결측값/통계량/샘플 등을 확인하여 데이터를 파악합니다.
import pandas as pd

data = pd.read_csv('./data.csv')
test = pd.read_csv('./test.csv')
제가 다운받은 데이터는 이렇게 생겼네요
b'John H. Smith, P.H.R.\\n800-991-5187 | PO Box 1673 | Callahan, FL 32011 | info@greatresumesfast.com\\n\\nApproachable innovator with a passion for Human Resources.\\n\\nSENIOR HUMAN RESOURCES PROFESSIONAL\\nPersonable, analytical, flexible Senior HR Professional with multifaceted expertise. Seasoned Benefits Administrator with\\nextensive experience working with highly paid professionals in client-relationship-based settings. Dynamic team leader\\ncapable of analyzing alternatives and identifying tough choices while communicating the total value of benefit and\\ncompensation packages to senior level executives and employees.\\n\\nCORE COMPETENCIES\\nBenefits Administration \\xe2\\x80\\x93 Customer Service \\xe2\\x80\\x93 Cost Control \\xe2\\x80\\x93 Recruiting \\xe2\\x80\\x93 Acquisition Management \\xe2\\x80\\x93 Compliance Reporting\\nRetention \\xe2\\x80\\x93 Professional Services \\xe2\\x80\\x93 Domestic & International Benefits \\xe2\\x80\\x93 Collaboration \\xe2\\x80\\x93 Adapt...1.2 Data preprocessing
데이터가 많이 noisy하기 때문에 전처리를 해줍니다.
- 바이너리 문자열 형식 제거
- 텍스트에 바이너리 형식의 문자열이 있는 경우 이를 utf-8로 디코딩
- 줄바꿈 제거
- Resume 텍스트 내 \n 제거 및 공백으로 대체
- 이메일 주소/URL 제거
- 이메일 주소 혹은 URL이 텍스트에 포함되어있는 경우가 있음. 학습에 도움이 되지 않으므로 제거
- 주소형식 제거
- 주소 정보도 학습에 도움이 되지 않으므로 제거
- 16진수 이스케이프 문자 제거
- /x로 시작하는 16진수 이스케이프 문자 제거
- Lemmatization 사용
- 표제어 추출
- 특수문자 및 불필요한 공백 제거
- 동일한 문자가 3번이상 반복되는 경우 제거
- 불용어(stopwords) 제거
- 어간추출
- 너무 짧은 텍스트는 학습에 도움되지 않으므로 제거
from sklearn.model_selection import train_test_split
import re
import pandas as pd
from nltk.corpus import stopwords
from nltk.stem import PorterStemmer
from sklearn.feature_extraction.text import TfidfVectorizer

# nltk의 불용어 리스트 사용
import nltk
nltk.download('stopwords')
nltk.download('wordnet')
stop_words = set(stopwords.words('english'))


from sklearn.model_selection import train_test_split
import re

from nltk.stem import WordNetLemmatizer
lemmatizer = WordNetLemmatizer()

def lemmatize_text(text):
    return ' '.join([lemmatizer.lemmatize(word) for word in text.split()])

def preprocess(text):
    # 바이너리 문자열 형식 제거
    if isinstance(text, bytes):
        text = text.decode('utf-8', errors='ignore')

    # '\\n' 문자열 제거
    text = text.replace('\\n', ' ')  # '\\n'을 공백으로 대체

    # 이메일 주소 제거
    text = re.sub(r'\S+@\S+', ' ', text)  # 이메일 주소 제거
    # 전화번호 제거
    text = re.sub(r'\b\d{10}\b|\(?\d{3}\)?[-.\s]?\d{3}[-.\s]?\d{4}', ' ', text)  # 전화번호 제거
    # 주소 형식 제거 (숫자와 문자로 구성된 간단한 주소 형식)
    text = re.sub(r'\d{1,5}\s\w+\s\w+', ' ', text)

    # 특수 문자 제거 및 불필요한 공백 제거
    text = re.sub(r'\\x[0-9a-fA-F]{2}', ' ', text)  # \x로 시작하는 16진수 문자 제거
    text = re.sub(r'www\.\S*?\.com', ' ', text)  # www로 시작해서 .com으로 끝나는 문자열 제거
    text = re.sub(r'[^\w\s]', ' ', text)  # 특수 문자 제거
    text = re.sub(r'\s+', ' ', text)  # 여러 공백을 하나로 변환

    # 동일한 문자가 3번 이상 반복되는 경우 제거
    text = re.sub(r'(.)\1{2,}', ' ', text)  # 동일한 문자가 3번 이상 반복되는 경우 공백으로 대체

    # 불용어 제거
    text = ' '.join(word for word in text.split() if word.lower() not in stop_words)

    return text.lower().strip()[1:]


data['Resume'] = data['Resume'].apply(lemmatize_text) #어간추출
data['Resume'] = data['Resume'].apply(lambda x: preprocess(x) if isinstance(x, str) or isinstance(x, bytes) else x)
data['Resume'] = data['Resume'].astype(str)
data = data[data['Resume'].apply(lambda x: len(x.split()) > 10)] # 너무 짧은 텍스트 제거
1.3 Label encoding and data split
Category를 label encoding 해주고 학습을 위해 데이터를 Dataset 형태로 변환 후 train / validation split을 합니다.
from sklearn.preprocessing import LabelEncoder
from datasets import Dataset

# label encoding
label_encoder = LabelEncoder()
data['Category'] = label_encoder.fit_transform(data['Category'])

# Dataset 형식으로 전환
dataset = Dataset.from_pandas(data[['Resume', 'Category']])
dataset = dataset.rename_column('Category', 'labels')

# train data / validation data split
dataset = dataset.train_test_split(test_size=0.2, seed=42)
train_dataset = dataset['train']
test_dataset = dataset['test']

print(f"Train data 개수:{len(dataset['train'])}")
print(f"Validation data 개수:{len(dataset['test'])}")
2. Train
2.1 Load Pre-trained model
from transformers import AutoTokenizer, AutoModelForSequenceClassification, TrainingArguments, Trainer

# model, tokenizer 구축
model_name = "bert-base-uncased"
tokenizer = AutoTokenizer.from_pretrained(model_name)
model = AutoModelForSequenceClassification.from_pretrained(model_name, num_labels=25)
model
저는 AutoModelForSequenceClassification을 사용했는데요, 이 모델은 Sequence classification을 위해 설계된 구조를 가지고 있습니다. model_name은 미리 학습된 bert모델을 지정하기 위함
- Model과 tokenizer 로드 :
- bert-base-uncased" : base는 모델 크기이고, (12-layer, 768-hidden, 12-heads, 110M parameters)uncase는 대소문자를 구분하지 않는 토크나이저 및 모델이라는 뜻입니다. 상황에 맞게 모델을 지정하면 됩니다.
- AutoModelForSequenceClassification : Sequence Classfication을 위해 설계된 구조이며 num_labels는 class 종류의 수 입니다.
- AutoModelForSequenceClassification Fine-tuning 모델 구조
- bert-base-uncased model : 12 layers, 768 hidden size, 12 attention head, 110M parameters
 (bert): BertModel(
    (embeddings): BertEmbeddings(
      (word_embeddings): Embedding(30522, 768, padding_idx=0)
      (position_embeddings): Embedding(512, 768)
      (token_type_embeddings): Embedding(2, 768)
      (LayerNorm): LayerNorm((768,), eps=1e-12, elementwise_affine=True)
      (dropout): Dropout(p=0.1, inplace=False)
    )
    (encoder): BertEncoder(
      (layer): ModuleList(
        (0-11): 12 x BertLayer(
          (attention): BertAttention(
            (self): BertSdpaSelfAttention(
              (query): Linear(in_features=768, out_features=768, bias=True)
              (key): Linear(in_features=768, out_features=768, bias=True)
              (value): Linear(in_features=768, out_features=768, bias=True)
              (dropout): Dropout(p=0.1, inplace=False)
            )
            (output): BertSelfOutput(
              (dense): Linear(in_features=768, out_features=768, bias=True)
              (LayerNorm): LayerNorm((768,), eps=1e-12, elementwise_affine=True)
              (dropout): Dropout(p=0.1, inplace=False)
            )
          )
          (intermediate): BertIntermediate(
            (dense): Linear(in_features=768, out_features=3072, bias=True)
            (intermediate_act_fn): GELUActivation()
          )
          (output): BertOutput(
            (dense): Linear(in_features=3072, out_features=768, bias=True)
            (LayerNorm): LayerNorm((768,), eps=1e-12, elementwise_affine=True)
            (dropout): Dropout(p=0.1, inplace=False)
          )
        )
      )
    )
    (pooler): BertPooler(
      (dense): Linear(in_features=768, out_features=768, bias=True)
      (activation): Tanh()
    )
  )
  (dropout): Dropout(p=0.1, inplace=False)
  (classifier): Linear(in_features=768, out_features=25, bias=True)
)
- bert-base-uncased model : 12 layers, 768 hidden size, 12 attention head, 110M parameters
2.2 Encoding
# encoding
def encode(data):
 return tokenizer(data['Resume'], truncation=True, padding='max_length', max_length=256)

# 데이터셋 인코딩
train_dataset = train_dataset.map(encode, batched=True)
test_dataset = test_dataset.map(encode, batched=True)
- encoding : hugging face의 톸나이저 객체를 사용하여 tokenizing하는 함수.
- truncation = True : 지정된 max_length보다 긴 텍스트는 자름.
- padding='max_length': 모든 텍스트를 동일한 길이(max_length=256)로 패딩.
- max_length=256: 토큰화된 문장의 최대 길이를 256으로 설정
- 데이터셋 인코딩
- train_dataset.map:encode 함수를 훈련 데이터셋(train_dataset)의 각 샘플에 적용.- batched=True: 여러 샘플을 한 번에 처리하여 속도를 높임.
- 결과적으로 train_dataset과 test_dataset에 input_ids와 attention_mask가 추가됨.
이렇게 개별 텍스트로 인코딩 된 결과를 확인할 수 있습니다.
print(encode(train_dataset[0])['input_ids'])print('extensive experience working highly paid professional client relationship')
print(encode({"Resume":"extensive experience working highly paid professional client relationship"}))
extensive experience working highly paid professional client relationship
{'input_ids': [101, 4866, 3325, 2551, 3811, 3825, 2658, 7396, 3276, 102, 0, 0, 0, 0, 0, 0, 0, 0, 0, 0, 0, 0, 0, 0, 0, 0, 0, 0, 0, 0, 0, 0, 0, 0, 0, 0, 0, 0, 0, 0, 0, 0, 0, 0, 0, 0, 0, 0, 0, 0, 0, 0, 0, 0, 0, 0, 0, 0, 0, 0, 0, 0, 0, 0, 0, 0, 0, 0, 0, 0, 0, 0, 0, 0, 0, 0, 0, 0, 0, 0, 0, 0, 0, 0, 0, 0, 0, 0, 0, 0, 0, 0, 0, 0, 0, 0, 0, 0, 0, 0, 0, 0, 0, 0, 0, 0, 0, 0, 0, 0, 0, 0, 0, 0, 0, 0, 0, 0, 0, 0, 0, 0, 0, 0, 0, 0, 0, 0, 0, 0, 0, 0, 0, 0, 0, 0, 0, 0, 0, 0, 0, 0, 0, 0, 0, 0, 0, 0, 0, 0, 0, 0, 0, 0, 0, 0, 0, 0, 0, 0, 0, 0, 0, 0, 0, 0, 0, 0, 0, 0, 0, 0, 0, 0, 0, 0, 0, 0, 0, 0, 0, 0, 0, 0, 0, 0, 0, 0, 0, 0, 0, 0, 0, 0, 0, 0, 0, 0, 0, 0, 0, 0, 0, 0, 0, 0, 0, 0, 0, 0, 0, 0, 0, 0, 0, 0, 0, 0, 0, 0, 0, 0, 0, 0, 0, 0, 0, 0, 0, 0, 0, 0, 0, 0, 0, 0, 0, 0, 0, 0, 0, 0, 0, 0, 0, 0, 0, 0, 0, 0, 0, 0, 0, 0, 0, 0], 'token_type_ids': [0, 0, 0, 0, 0, 0, 0, 0, 0, 0, 0, 0, 0, 0, 0, 0, 0, 0, 0, 0, 0, 0, 0, 0, 0, 0, 0, 0, 0, 0, 0, 0, 0, 0, 0, 0, 0, 0, 0, 0, 0, 0, 0, 0, 0, 0, 0, 0, 0, 0, 0, 0, 0, 0, 0, 0, 0, 0, 0, 0, 0, 0, 0, 0, 0, 0, 0, 0, 0, 0, 0, 0, 0, 0, 0, 0, 0, 0, 0, 0, 0, 0, 0, 0, 0, 0, 0, 0, 0, 0, 0, 0, 0, 0, 0, 0, 0, 0, 0, 0, 0, 0, 0, 0, 0, 0, 0, 0, 0, 0, 0, 0, 0, 0, 0, 0, 0, 0, 0, 0, 0, 0, 0, 0, 0, 0, 0, 0, 0, 0, 0, 0, 0, 0, 0, 0, 0, 0, 0, 0, 0, 0, 0, 0, 0, 0, 0, 0, 0, 0, 0, 0, 0, 0, 0, 0, 0, 0, 0, 0, 0, 0, 0, 0, 0, 0, 0, 0, 0, 0, 0, 0, 0, 0, 0, 0, 0, 0, 0, 0, 0, 0, 0, 0, 0, 0, 0, 0, 0, 0, 0, 0, 0, 0, 0, 0, 0, 0, 0, 0, 0, 0, 0, 0, 0, 0, 0, 0, 0, 0, 0, 0, 0, 0, 0, 0, 0, 0, 0, 0, 0, 0, 0, 0, 0, 0, 0, 0, 0, 0, 0, 0, 0, 0, 0, 0, 0, 0, 0, 0, 0, 0, 0, 0, 0, 0, 0, 0, 0, 0, 0, 0, 0, 0, 0, 0], 'attention_mask': [1, 1, 1, 1, 1, 1, 1, 1, 1, 1, 0, 0, 0, 0, 0, 0, 0, 0, 0, 0, 0, 0, 0, 0, 0, 0, 0, 0, 0, 0, 0, 0, 0, 0, 0, 0, 0, 0, 0, 0, 0, 0, 0, 0, 0, 0, 0, 0, 0, 0, 0, 0, 0, 0, 0, 0, 0, 0, 0, 0, 0, 0, 0, 0, 0, 0, 0, 0, 0, 0, 0, 0, 0, 0, 0, 0, 0, 0, 0, 0, 0, 0, 0, 0, 0, 0, 0, 0, 0, 0, 0, 0, 0, 0, 0, 0, 0, 0, 0, 0, 0, 0, 0, 0, 0, 0, 0, 0, 0, 0, 0, 0, 0, 0, 0, 0, 0, 0, 0, 0, 0, 0, 0, 0, 0, 0, 0, 0, 0, 0, 0, 0, 0, 0, 0, 0, 0, 0, 0, 0, 0, 0, 0, 0, 0, 0, 0, 0, 0, 0, 0, 0, 0, 0, 0, 0, 0, 0, 0, 0, 0, 0, 0, 0, 0, 0, 0, 0, 0, 0, 0, 0, 0, 0, 0, 0, 0, 0, 0, 0, 0, 0, 0, 0, 0, 0, 0, 0, 0, 0, 0, 0, 0, 0, 0, 0, 0, 0, 0, 0, 0, 0, 0, 0, 0, 0, 0, 0, 0, 0, 0, 0, 0, 0, 0, 0, 0, 0, 0, 0, 0, 0, 0, 0, 0, 0, 0, 0, 0, 0, 0, 0, 0, 0, 0, 0, 0, 0, 0, 0, 0, 0, 0, 0, 0, 0, 0, 0, 0, 0, 0, 0, 0, 0, 0, 0]}
[CLS] extensive experience working highly paid professional client relationship [SEP] [PAD] [PAD] [PAD] [PAD] [PAD] [PAD] [PAD] [PAD] [PAD] [PAD] [PAD] [PAD] [PAD] [PAD] [PAD] [PAD] [PAD] [PAD] [PAD] [PAD] [PAD] [PAD] [PAD] [PAD] [PAD] [PAD] [PAD] [PAD] [PAD] [PAD] [PAD] [PAD] [PAD] [PAD] [PAD] [PAD] [PAD] [PAD] [PAD] [PAD] [PAD] [PAD] [PAD] [PAD] [PAD] [PAD] [PAD] [PAD] [PAD] [PAD] [PAD] [PAD]...
2.3 Training
TrainingArguments 객체에 학습 설정을 저장하고 Trainer 객체를 initialize해서 학습에 필요한 것들(모델, 데이터셋, 토크나이저 등) 을 지정하고, .train()을 실행해서 학습을 수행합니다.
# 학습 설정
from transformers import TrainingArguments

args = TrainingArguments(
    output_dir="output",
    evaluation_strategy="epoch",
    learning_rate=2e-5,
    per_device_train_batch_size=16,
    per_device_eval_batch_size=16,
    num_train_epochs=10,
    weight_decay=0.01,
)

# Trainer 초기화
trainer = Trainer(
    model=model,
    args=args,
    train_dataset=train_dataset,
    eval_dataset=test_dataset,
    tokenizer=tokenizer,
)

# 학습
trainer.train()

# 학습된 모델 저장
trainer.save_model("./output/resume_bert")
3.Test
이제 학습이 완료되었으니 testset에 trainset과 마찬가지로 전처리를 적용하고 evaluation을 수행합니다.
3.1 Test data preprocessing
# Preprocess test data

test['Resume'] = test['Resume'].apply(lemmatize_text) #어간추출
test['Resume'] = test['Resume'].apply(lambda x: preprocess(x) if isinstance(x, str) or isinstance(x, bytes) else x)
test['Resume'] = test['Resume'].astype(str)
3.2 Prediction
테스트셋에 대해서 모델의 prediction 값을 추출합니다. 이제 정답set과 비교하여 정확도를 비롯한 여러가지 metric을 비교할 수 있습니다.
# Load
model = AutoModelForSequenceClassification.from_pretrained("./output/resume_bert")  # Assumed latest checkpoint

# Encode test dataset
def encode_for_prediction(data):
    return tokenizer(data, truncation=True, padding='max_length', max_length=256, return_tensors='pt')

import torch
predictions = []
train_embeddings = []

for resume in test['Resume']:
    inputs = encode_for_prediction(resume)
    with torch.no_grad():
        outputs = model(**inputs)
    logits = outputs.logits
    predicted_label = torch.argmax(logits, axis=1).item()
    predictions.append(predicted_label)

    # # 임베딩 벡터 추출)
    # embedding = outputs.last_hidden_state.mean(dim=1).squeeze().numpy()
    # train_embeddings.append(embedding