1. 깡통 서버 만들기
2. DB 연결하기
공부하며 느낀점
참조한 사이트
생각해보니 항상 팀과제로 서버를 만들어서 처음부터 혼자 구현을 해본적이 없다.
이 기회에 해보자.
설치 해야 할 라이브러리들
npm init -y
npm i express dotenv sequelize
1. 깡통 서버 만들기
//  app.js

const express = require("express");
const app = express();

const { Server } = require("http");

const http = Server(app);

app.use(express.json());

module.exports = http;
웹 개발에서 가장 많이 사용되는 프레임 워크인 express를 사용하고, http에서 Server클래스를 가져온다.
만들어낸 서버를 http라는 모듈로 내보낸다.
//  Server.js

const http = require("./app.js");

const port = 3000;
http.listen(port, () => {
  console.log(port, "포트로 서버가 열렸어요!");
});
app.js에서 가져온 http 모듈로 3000번 포트로 서버를 연다.
서버를 클래스로 선언하기
//  app.js

const express = require("express");

class MyApp {
  constructor() {
    this.app = express();
    this.http = require("http").createServer(this.app);
    this.app.use(express.json());
  }

  getApp() {
    return this.app;
  }

  getHttpServer() {
    return this.http;
  }
}

module.exports = MyApp;MyApp이라는 이름의 클래스로 선언해서 모듈로 내보낸다.
.Server 와 .createServer 의 차이
- .cerateServer : http 모듈에서 제공하는 HTTP 서버를 생성하여, 서버 객체를 반환하는 메서드이다.
//  Server.js

const MyApp = require("./app.js");

const port = 3000;
const myApp = new MyApp();

myApp.getHttpServer().listen(port, () => {
  console.log(port, "포트로 서버가 열렸어요!");
});
클래스를 불러 온 뒤, 클래스에서 객체를 생성해야지 인스턴스 매서드(getHttpServer()) 를 사용할 수 있다.
하나로 합치기
//  app.js

const express = require("express");

class App {
  constructor() {
    this.app = express();
    this.http = require("http").createServer(this.app);
    this.app.use(express.json());
  }

  getApp() {
    return this.app;
  }

  getHttpServer() {
    return this.http;
  }

  listen(port) {
    getHttpServer().listen(port, () => {
      console.log(port, "포트로 서버가 열렸어요!");
    });
  }
}

const port = 3000;
const app = new App();
app.listen(port);
파일 하나로 끝낼 것이기 때문에 module로 내보내는 것은 불필요하다.
서버를 여는 것은 클래스 밖에서 클래스 안에 .listen을 불러와서 처리한다.
클래스를 객체로 불러와야하기 때문에 const app = new App(); 는 유지되며, 포트 번호도 똑같이 설정한다. const port = 3000;
.listen 을 콜백함수로 부르던 것은 클래스 안의 인스턴스 메서드로 구현한다.
2. DB 연결하기
- 우선DB를 만들자
평소 하던대로 아마존 AWS의 RDS로 만들었다.
연결할 때TIMEOUT이 뜬다면 퍼블릭 엑세스를 예로 하지 않고 서버를 만든 것일 수 도 있다.
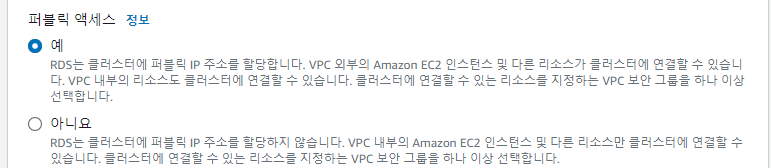
DB 수정으로 들어가서 예로 바꿔주자.
- 모델을 만들고 마이그레이션을 적용하자
//  DB/models/index.js

const Item = require("./item.js");

module.exports = [Item];
// DB/models/item.js
const DataTypes = require("sequelize").DataTypes;
const connector = require("../db.js");
const Item = connector.sequelize.define(
"item",
{
id: {
type: DataTypes.INTEGER,
primaryKey: true,
allowNull: false,
autoIncrement: true,
},
name: {
type: DataTypes.STRING,
unique: true,
allowNull: false,
},
price: {
type: DataTypes.INTEGER,
allowNull: false,
},
type: {
type: DataTypes.ENUM({
values: ["coffee", "juice", "food"],
}),
allowNull: false,
},
amount: {
type: DataTypes.INTEGER,
allowNull: true,
defaultValue: 0,
},
},
{ timestamps: true }
);
module.exports = Item;// DB/dbSequelize.js
const { Sequelize } = require("sequelize");
const config = require("../config/config.js");
require("dotenv").config();
const env = process.env;
class dbSequelize {
constructor() {
this.sequelize = new Sequelize(env.MYSQL_DB, env.MYSQL_ID, env.MYSQL_PW, {
host: env.MYSQL_HOST,
dialect: env.MYSQL_DIALECT,
});
}
connectDB() {
this.sequelize
.sync()
.then(() => {
console.log("DB 연결 성공");
})
.catch((error) => {
console.error(error);
throw new Error("DB 연결 실패");
});
}
testConnectDB() {
this.sequelize
.authenticate()
.then(() => {
console.log("테스트 연결 성공");
})
.catch((error) => {
console.error(error);
throw new Error("테스트 연결 실패");
});
}
}
const dbConnect = new dbSequelize();
module.exports = dbConnect;// config/config.js
require("dotenv").config();
const env = process.env;
module.exports = {
development: {
username: env.MYSQL_ID,
password: env.MYSQL_PW,
database: env.MYSQL_DB,
host: env.MYSQL_HOST,
dialect: env.MYSQL_DIALECT,
},
production: {
username: env.MYSQL_ID,
password: env.MYSQL_PW,
database: env.MYSQL_DB,
host: env.MYSQL_HOST,
dialect: env.MYSQL_DIALECT,
},
test: {
username: env.MYSQL_ID,
password: env.MYSQL_PW,
database: env.MYSQL_DB_TEST,
host: env.MYSQL_HOST,
dialect: env.MYSQL_DIALECT,
},
};npm install -g sequelize-cli - Sequelize CLI 설치
sequelize migration:generate --name <마이그레이션명> - 마이그레이션 만들기
sequelize db:migrate - 마이그레이션 적용하기
공부하며 느낀점
참조한 사이트