🙌🏻 해당 글은 김시훈님의 mongoDB 기초부터 실무까까지의 강의 노트입니다.
MongoDB 핵심 - 적절한 내장(denormalize)
지난 레슨에서는 get API에 대해 다루었다. 이번 레슨에는 '내장'이라고 하는 populate보다 더 MongoDB스러운 방식에 대해 탐구할 것이다. 자식문서를 부모 문서에 내장시켜버리는 것을 말한다. 더 쉽게 설명하면, 애초에 DB에 데이터를 저장할 때 클라이언트에서 사용할 모양으로 저장해버리는 것이다. 예를 들어 Blog를 저장할 때, 그 내부에 User도 함께 저장하는 것이다. 이럴 경우 단 한 번의 request로 호출이 가능하다. 물론 이 경우 R은 간소해지고 속도가 빨라지지만 CUD 작업이 조금 복잡해진다.
- 일반 사례:
N+1 Problem발생, 엄청난 요청이 필요하다 - populate 사례: 블로그, 유저, 코멘트 등이 많아도 단계별로 한 번씩 모아서 요청.
- 내장 사례: 단 한 번의 요청
수정된 faker 적용하기
이제 부모 콜렉션에 자식 콜렉션을 내장해버릴 것이기 때문에, 한 번에 데이터를 생성해줄 수 없다.
왜냐하면 예를 들어 블로그 데이터를 생성해준다고 할 때, 블로그 안에 이제 유저와 코멘트 정보가 모두 들어가줘야 한다. 근데, 코멘트 id를 가져오려면 코멘트가 이미 만들어져있어야 하는 건데, 코멘트 id가 생성되는 시점은 new Comment가 실행되고 나서임!
모쪼록 그래서 API를 통해 이제 더미데이터를 만들어줘야 한다.
내장의 경우 이렇게 많은 것들이 달라진다.
Comment POST API 수정하기
내장할 것!
- 블로그 작성자
- 블로그에 달리 코멘트
- 코멘트 작성자
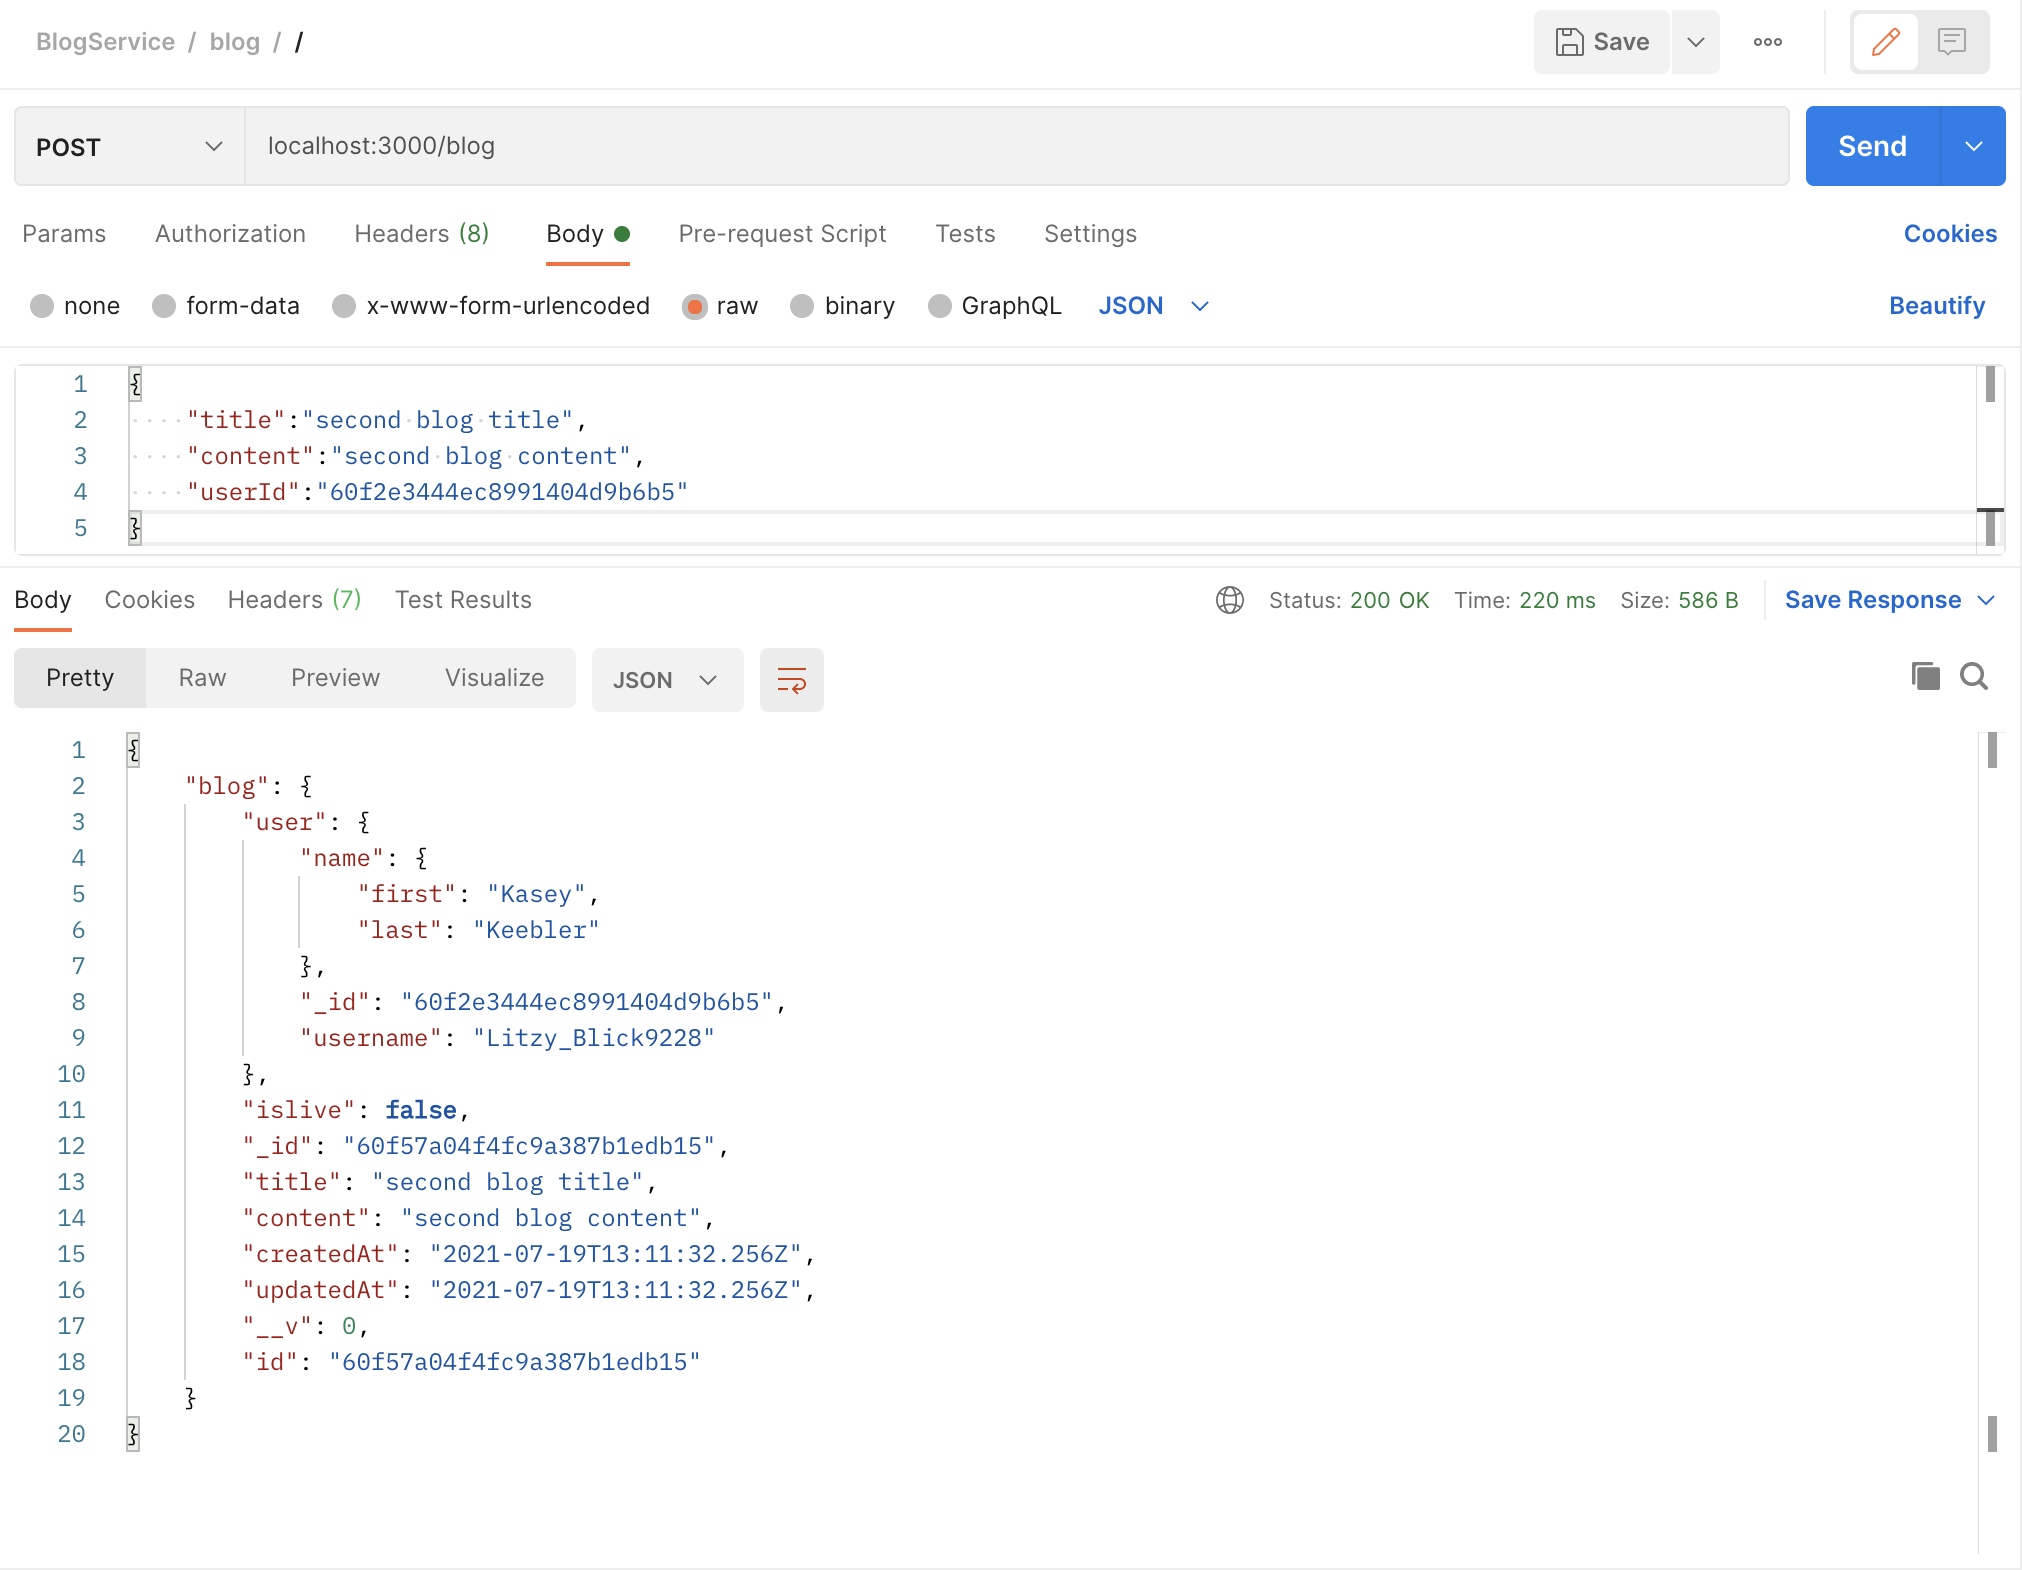
우선 블로그 모델을 수정해준다.
// 원본
const BlogSchema = new Schema(
  {
    title: { type: String, required: true },
    content: { type: String, required: true },
    islive: { type: Boolean, required: true, default: false },
    user: { type: Types.ObjectId, required: true, ref: "user" },
  },
  { timestamps: true }
);
이제 유저 부분에 아이디를 넣어주는 것이 아니라, 그냥 UserSchema를 통째로 넣어버린다. 수정하면 아래와 같다.
// 수정본
const BlogSchema = new Schema(
  {
    title: { type: String, required: true },
    content: { type: String, required: true },
    islive: { type: Boolean, required: true, default: false },
    user: {
      _id: { type: Types.ObjectId, required: true, ref: "user" },
      username: { type: String, required: true },
      name: {
        first: { type: String, required: true },
        last: { type: String, required: true },
      },
    },
  },
  { timestamps: true }
);
이렇게 수정해주면 아래와 같이 포스트맨에서 확인할 수 있다!

이제 블로그 API가 아니라 후기API를 수정해주어야 한다!
await Blog.updateOne({ _id: blogId }, { $push: { comments: comment } });그러나 사실 무조건 $push로 내장해주어야 하는 것은 아니고, populate와 적절히 조합해서 사용해주어야 한다. 현재 내장을 연습하는 것은 보통 블로그를 쓰는 것은 한 번이지만, 조회하는 건 수백, 수천, 수만 번이기 때문이다. 때문에 쓸 때 작업을 많이 하더라도, 읽기를 빠르게 하자는 결론을 낼 수 이쓴ㄴ 것이다.
모쪼록 코멘트도 추가해주자!
const BlogSchema = new Schema(
  {
    title: { type: String, required: true },
    content: { type: String, required: true },
    islive: { type: Boolean, required: true, default: false },
    user: {
      _id: { type: Types.ObjectId, required: true, ref: "user" },
      username: { type: String, required: true },
      name: {
        first: { type: String, required: true },
        last: { type: String, required: true },
      },
    },
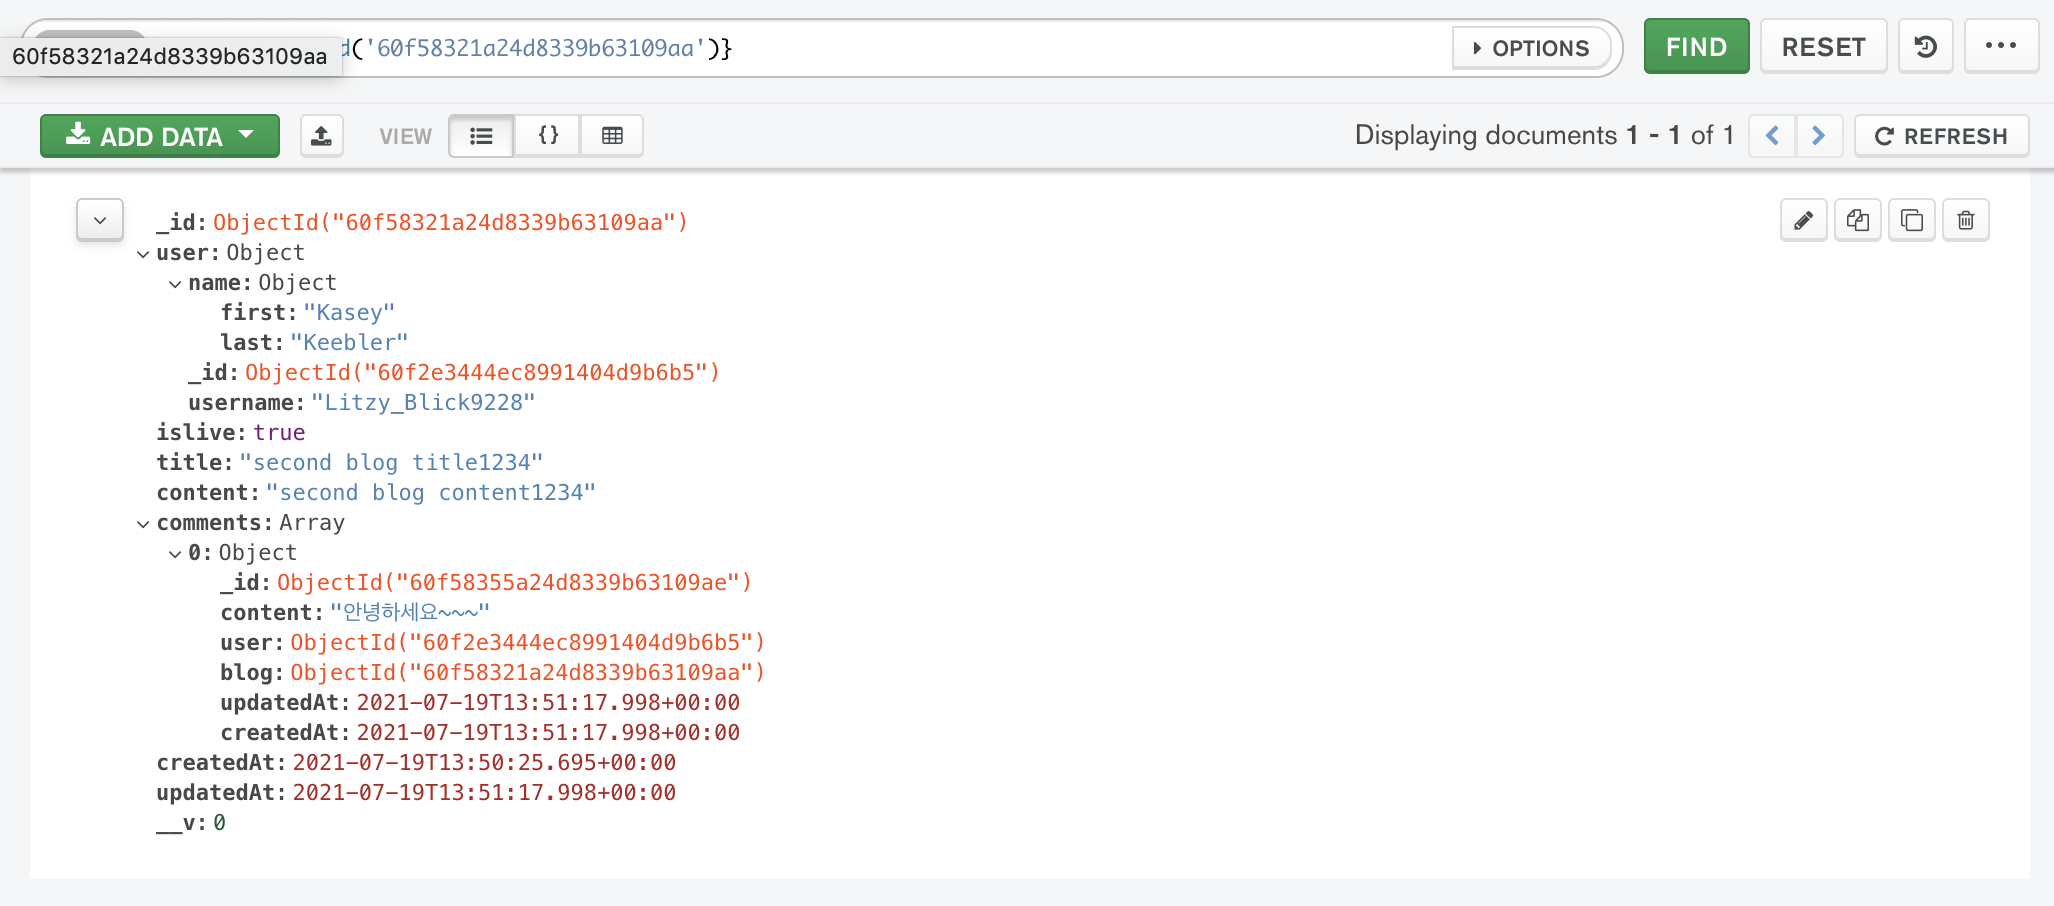
    comments: [CommentSchema],
  },
  { timestamps: true }
);
수정해주고 나면 아래와 같이 mongoDB 콤파스에서 내장되어있는 결과를 확인할 수 있다.

Blog에 Comment 내장하기
사실 블로그에 Comment는 이미 내장했고, 이제 comment에 사용자 정보를 저장할 것이다. 그런데 내장을 해줄 때 무조건 객체 형태로 다 저장할 수도 있지만, 이 정보를 가공해서 보여줄 수도 있다. 예를 들면 아래서 살펴볼 FullName으로의 가공도 가능하고, 아이디에 별표쳐서 일부만 보여주는 가공도 가능하다.
먼저 스키마를 수정한다.
const CommentSchema = new Schema(
  {
    content: { type: String, required: true },
    user: { type: Types.ObjectId, required: true, ref: "user" },
    userFullName: { type: String, required: true },
    blog: { type: Types.ObjectId, required: true, ref: "blog" },
  },
  { timestamps: true }
);
그리고 API도 마저 수정토록 한다.
// ...
    const comment = new Comment({
      content,
      user,
      userFullName: `${user.name.first} ${user.name.last}`,
      blog,
    });
    await Promise.all([
      comment.save(),
      Blog.updateOne({ _id: blogId }, { $push: { comments: comment } }),
    ]);
    return res.send({ comment });
  } catch (err) {
    return res.status(400).send({ err: err.message });
  }
});
Nesting 성능 테스트
// 비효율적인 방법:
// - blogLimit 20일 때: 6초
// - blogLimit 50일 때: 15초
// populate 사용하는 방법:
// - blogLimit 20일 때: 0.8초
// - blogLimit 50일 때: 0.7초
// - blogLimit 200일 때: 2초
// nesting 사용하는 방법
// - blogLimit 20일 때: 0.1~2초
// - blogLimit 50일 때: 0.2~3초
// - blogLimit 200일 때: 0.3초
"$" 내장된 특정 문서 수정하기
create는 완료했고, 이제 update를 수정할 차례이다.
댓글 수정하기
commentRouter.patch("/:commentId", async (req, res) => {
  const { commentId } = req.params;
  const { content } = req.body;
  if (typeof content !== "string")
    return res.status(400).send({ err: "content is required" });

  const [comment] = await Promise.all([
    Comment.findOneAndUpdate({ _id: commentId }, { content }, { new: true }),
    // 이거 자바스크립트 문법이 아니라, 몽고디비 문법임!
    // 넘나 좋은 문법...
    Blog.updateOne(
      { "comments._id": commentId },
      { "comments.$.content": content }
    ),
  ]);
  return res.send({ comment });
});
updateMany
이제 유저 정보를 수정할 거다. 위에서 다룬 댓글 수정하기보다 까다롭다. 댓글은 댓글 하나만 수정을 하면 된다. 근데 유저를 수정할 때는 해당 유저가 쓴 글부터 댓글들에 있는 모든 이름을 다 수정해야 한다. (내장을 해놓았기 때문에 이런 귀찮은 일이 벌어지는 것!)
먼저 블로그 작성자 부터 수정해주자!
    let user = await User.findById(userId);
    if (age) user.age = age;
    if (name) {
      user.name = name;
      // 블로그의 유저 정보가 바뀌었을 떄!
      Blog.updateMany({ "user._id": userId }, { "user.name": name });
    }
몽고디비 문법 팁!

제외한 나머지 불러오는 문법 $ne
(await 항상 까먹지 말고 잘 쓰자!)
arrayFilter
이제 후기에 있는 유저네임도 수정을 해보자!
    let user = await User.findById(userId);
    if (age) user.age = age;
    if (name) {
      user.name = name;
      // 블로그의 유저 정보가 바뀌었을 떄!
      // 블로그 작성자 유저정보 수정하기!
      await Blog.updateMany({ "user._id": userId }, { "user.name": name });
      // 코멘트의 유저 정보 수정하기!
      // 이 부분이 어려움!!
      await Blog.updateMany(
        {},
        { "comments.$[element].userFullName": `${name.first} ${name.last}` },
        // 필터 여러 개 걸려면, 배열 안에 조건 객체로 또 넣어주면 됨!
        { arrayFilters: [{ "element.user": userId }] }
      );
    }
$pull, $elemMatch
이제 마지막으로 delete도 다루어준다!
  await Blog.updateOne(
    { "comments._id": commentId },
    { $pull: { comments: { content: "hello", state: true} } }
  );
이렇게 쓰면 조건-콘텐츠가 헬로이거나 스테이트가 트루거나-이 둘중에 하나만 만족해도 pull이 됨! 둘다 충족되는애들을 없애주고 싶으면, elemMatch 쓰면 됨!
  await Blog.updateOne(
    { "comments._id": commentId },
    { $pull: { comments: { $elemMatch: { content: "hello", state: true } } } }
  );
결국 현재 레슨에서 다루고 있는 블로그의 경우 위 문법을 사용하지는 않고, 아래와 같이 수정해주면 된다!
코멘트 삭제하기
commentRouter.delete("/:commentId", async (req, res) => {
  const { commentId } = req.params;
  const comment = await Comment.findOneAndDelete({ _id: commentId });

  // 블로그에서 코멘트를 제외시키는 코드
  // push는 추가 pull은 삭제!
  await Blog.updateOne(
    { "comments._id": commentId },
    { $pull: { comments: { _id: commentId } } }
  );
  return res.send({ comment });
});
User 삭제하기
이제 유저 삭제할 것이다.
문제는 유저가 쓴 모든 것을 지워야 한다는 것이다!
    const { userId } = req.params;
    if (!mongoose.isValidObjectId(userId))
      return res.status(400).send({ err: "invalid userId" });
    const user = await User.findOneAndDelete({ _id: userId });
    // 블로그 삭제
    await Blog.deleteMany({ "user.id": userId });
    // 후기삭제 (블로그 안에 있는 후기를 없애주는 것이기 떄문에 update임)
    await Blog.updateMany(
      { "comments.user": userId },
      { $pull: { comments: { user: userId } } }
    );
    // 후기 자체를 삭제
    await Comment.deleteMany({ user: userId });
스키마 설계
데이터를 내장해야 할 때도 있고, 포퓰레이트로 관계로 내버려둬야 할 때도 있다. 그 기준이 무엇이냐!
첫 번째 기준
개별적으로 읽을 떄가 많으면 "관계"로 저장
내장하려는 문서가 자주 바뀌면 "관계"로 저장
같이 불러올 때가 많으면 "내장"으로 저장
읽기 비중이 CUD보다 더 높으면 "내장"으로 저장
두 번째 기준 (1:N 관계일 때)
-
N < 100 이면 내장 (복제도 가능함)
-
100 < N < 1000 이면 부분(id만) 내장
-> 별도의 인덱스 없이 빨리 탐색할 수 있게 됨! -
1000 < N 관계로 저장 (나라(1)와 국민(N)일때)
(이거 내장하면 문서가 겁나~~ 무거워짐ㅠ) -
N을 다양한 조건으로 탐색이면 관계로 저장
그리고 확실하지 않을 때는 일단 관계로 저장한다.
