Eureka & Gateway 설정
1. Eureka란?
"모든 서비스가 자신의 위치(IP, Port)를 등록하고 다른 서비스가 찾을 수 있게 해주는 중앙 등록소"
- 넷플릭스가 개발하고 Spring Cloud에 기여한 오픈소스 서비스 디스커버리 도구
- 마이크로서비스 환경에서 서비스 인스턴스의 위치 정보를 중앙 집중식으로 관리하며, 동적 서비스 탐색과 상태 모니터링 기능을 제공
1.1 아키텍처 구성
[Eureka Server Cluster]
      ⇅      ⇅
[Service A Instance]
      ⇅      ⇅
[Service B Instance]
1.2 설정 파일
application.properties
server.shutdown=graceful
spring.lifecycle.timeout-per-shutdown-phase=10s

spring.application.name=eureka-server

# 스프링 시큐리티 기본 인증 설정
spring.security.user.name=admin
spring.security.user.password=1234


# 활성화할 프로필 설정
spring.profiles.active=peer1

# 유레카 클라이언트 설정
# 자신을 유레카 서버에 등록하지 않음 (서버 모드)
eureka.client.register-with-eureka=false

# 레지스트리 정보를 로컬에 캐싱하지 않음 (서버 모드)
eureka.client.fetch-registry=false


# 유레카 서버 설정
# 서비스 등록 정보 캐시 갱신 주기 (밀리초)
eureka.server.response-cache-update-interval-ms=5000
# 등록된 서비스 중 비정상 서비스 제거 주기 (밀리초)
eureka.server.eviction-interval-timer-in-ms=5000- graceful : 서버 종료 시 진행 중인 요청을 처리한 후 종료하는 그레이스풀 셧다운 방식을 사용
- 그레이스풀 셧다운시 최대 10초까지 대기
- 서버 실행될 포트
application-peer1.properties & peer2
peer 1
# 서버 포트 설정
server.port=8761
# 유레카 인스턴스 호스트명
eureka.instance.hostname=peer1
# 유레카 서버 URL 설정 (클러스터링)
eureka.client.service-url.defaultZone=http://admin:1234@peer2:8762/eureka/
# 자신을 유레카 서버에 등록 (클러스터링 모드)
eureka.client.register-with-eureka=true
# 레지스트리 정보를 로컬에 캐싱 (클러스터링 모드)
eureka.client.fetch-registry=true
peer2
# 서버 포트 설정
server.port=8762
# 유레카 인스턴스 호스트명
eureka.instance.hostname=peer2
# 유레카 서버 URL 설정 (클러스터링)
eureka.client.service-url.defaultZone=http://admin:1234@peer1:8761/eureka/
# 자신을 유레카 서버에 등록 (클러스터링 모드)
eureka.client.register-with-eureka=true
# 레지스트리 정보를 로컬에 캐싱 (클러스터링 모드)
eureka.client.fetch-registry=true- peer1 & peer2 2개의 유레카 서버가 서로 연결되어 서비스 레지스트리 정보를 동기화
- 이를 통해 peer1이 다운되더라도 peer2가 서비스 디스커버리 기능을 계속해서 제공
- 30초 간격으로 서로 레지스트리 정보를 복제
- 모든 유레카 서버는 동일한 서비스 인스턴스 정보를 유지
클라이언트 측 로드 밸런싱
- 클라이언는 두개의 유레카 서버를 설정 파일에서 지정
eureka.client.service-url.defaultZone=http://admin:1234@localhost:8761/eureka,http://admin:1234@localhost:8762/eureka클라이언트는 이 목록에서 하나의 서버를 선택해서 요청을 보냄
- 기본적으로 라운드 로빈 방식으로 유레카 서버를 선택
첫 번째 요청 → Peer1 (http://localhost:8761)

두 번째 요청 → Peer2 (http://localhost:8762)

세 번째 요청 → 다시 Peer1

---
Peer1이 다운된 경우 → Peer2로 요청 전환

Peer2도 다운된 경우 → 서비스 디스커버리 실패
이 방식은 클라이언트와 유레카 서버 간 트래픽을 분산시켜 부하를 줄이는 데 도움을 줌
1.3 Eureka - SecurityConfig
@EnableWebSecurity(debug = false)
@Configuration
public class SecurityConfig {
    @Bean
    public SecurityFilterChain filterChain(HttpSecurity http) throws Exception {
        http.csrf(AbstractHttpConfigurer::disable);
        http.authorizeHttpRequests(authorizeRequests ->
            authorizeRequests.anyRequest().authenticated()
        );

        http.httpBasic(Customizer.withDefaults());
        return http.build();
    }
}- 유레카 서버는 서버-서버간 통신에 사용되기 때문에 불필요한 보안 계층인 CSRF 보호를 비활성화
- Basic Auth로 최소한의 보안 유지
2. Gateway란?
모든 요청의 단일 입구. 적절한 서비스로 안내하고, 보안 검사도 담당2-1. 아키텍처 구성
[Client]
  ↓ HTTPS
[API Gateway] : 모든 요청의 단일 진입점
  ⇅
[Eureka Server]
  ⇅
[Microservices]
2-2. 설정 파일
# 서버 포트 설정
server.port=8080

# 애플리케이션 이름 설정 (유레카에 등록될 서비스 이름)
spring.application.name=api-gateway

# 서비스 디스커버리 활성화 (유레카를 통한 서비스 자동 발견)
spring.cloud.gateway.discovery.locator.enabled=true
# 서비스 ID를 소문자로 변환 (URL 경로에서 대소문자 구분 없이 사용)
spring.cloud.gateway.discovery.locator.lower-case-service-id=true

# 유레카 서버 주소 설정 (클러스터링된 두 서버 모두 등록)
eureka.client.service-url.defaultZone=http://admin:1234@localhost:8761/eureka,http://admin:1234@localhost:8762/eureka
# IP 주소 사용 (호스트명 대신)
eureka.instance.prefer-ip-address=true

# 로깅 레벨 설정 (게이트웨이 디버깅용)
logging.level.org.springframework.cloud.gateway=DEBUG
logging.level.reactor.netty=DEBUG- 서비스 이름 소문자로 통일
- 커넥션 풀 유휴 시간 기본값 45초
2-3. RouteLocatorConfig
@Configuration
public class RouteLocatorConfig {

    @Bean
    public RouteLocator myRoute(RouteLocatorBuilder builder) {
        return builder.routes()
                .route("auth-service", r -> r
                        .path("/auth/**")
                        .uri("lb://AUTH-SERVICE"))
                .route("blog-service", r -> r
                        .path("/blog/**")
                        .uri("lb://BLOG-SERVICE"))
                .build();

    }
}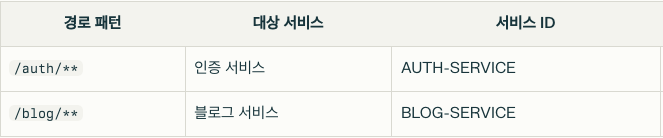
- /auth로 시작하는 모든 경로에 대한 요청은 AUTH-SERVICE를 유레카 서비스 목록에서 찾아 로드밸런싱을 통해 하나의 인스턴스로 요청 전달
예시
GET /auth/login → AUTH-SERVICE/auth/login
POST /blog/posts → BLOG-SERVICE/blog/posts
2-4. 동작흐름
- 클라이언트 요청 : GET http://localhost:8080/auth/login
- 게이트웨이 라우팅 : /auth/** 경로 매칭 -> AUTH-SERVICE로 라우팅 결정
- Eureka 조회 : 유레카 서버에서 AUTH-SERVICE의 등록된 인스턴스 목록을 가져옴
- 로드 밸런싱 : 인스턴스중 하나를 선택 (예: http://auth-service-instance:8081)
- 요청 전달 : 선택된 인스턴스의 /auth/login 엔드포인트로 요청 전달
2-5. 대시보드
유레카 서버 http://localhost:8761 에 접속하면 등록된 서비스들이 확인할 수 있다.
전체 동작 아키텍처
[Client]
│
▼
[API Gateway]
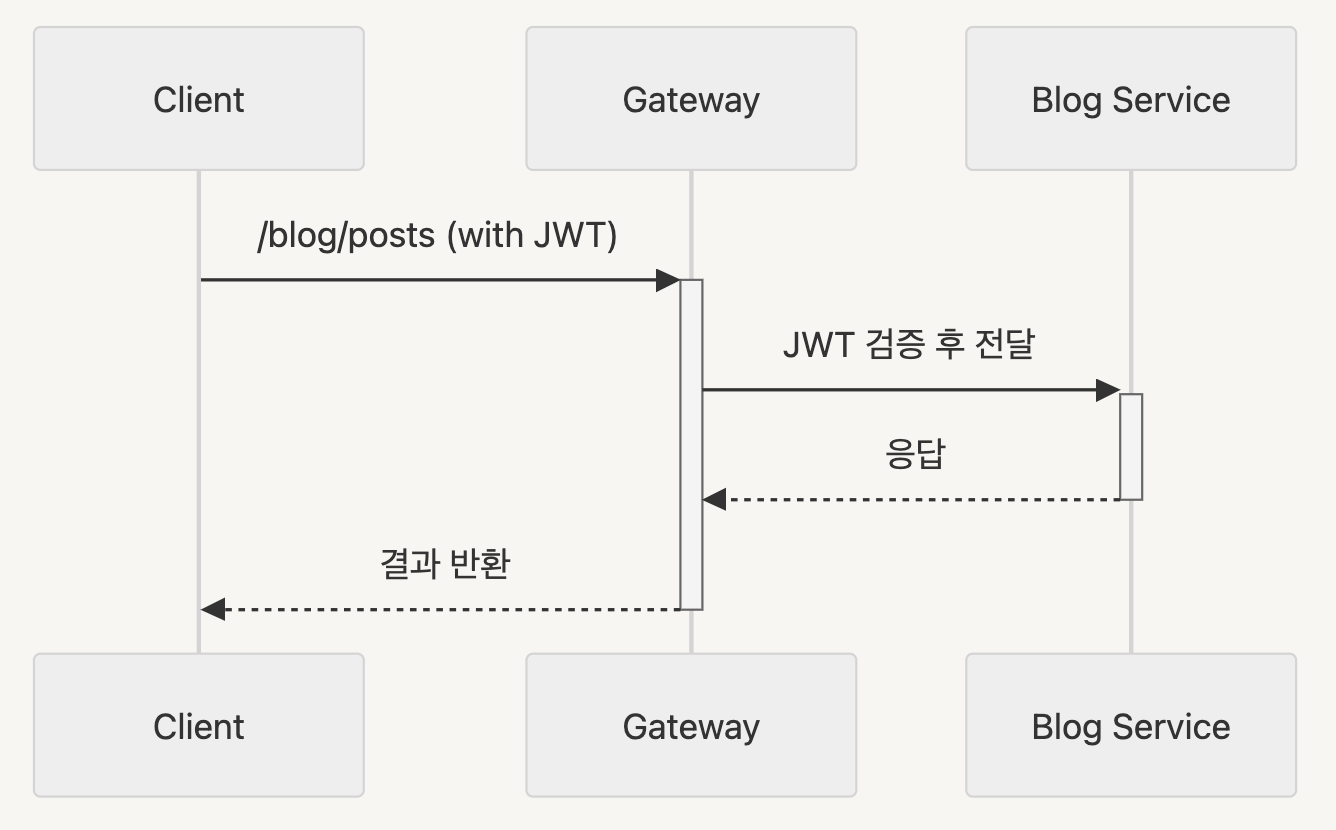
├──▶ [Auth Service] /auth/** (JWT 검증 X)
└──▶ [Blog Service] /blog/** (JWT 검증 O)
▲
│
[Service-to-Service Communication]
│
▼
[Eureka Server]1️⃣ 서비스 간 통신 방식
(1) 클라이언트<->서버 통신
모든 클라이언트 요청은 반드시 API Gateway를 통과
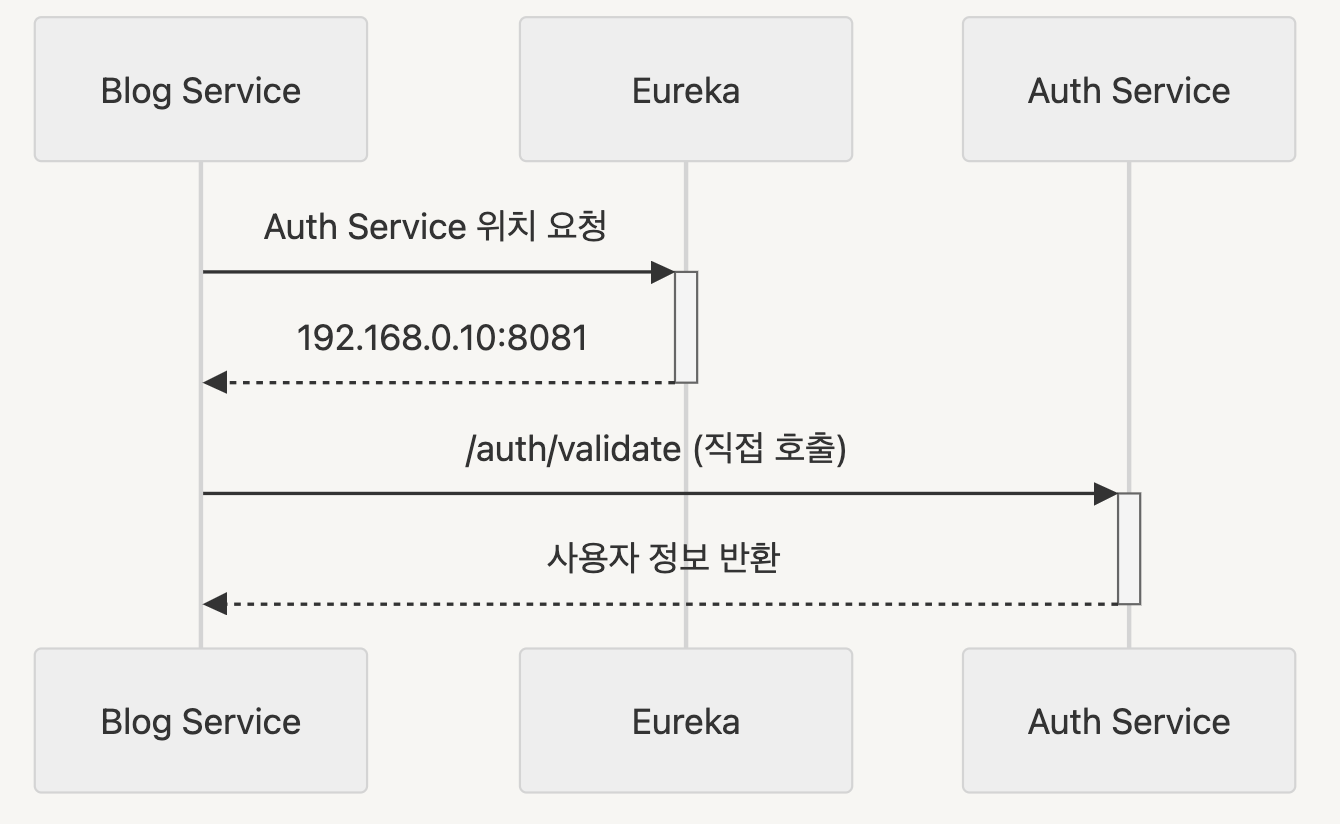
(2) 서버<->서버 통신
Eureka를 통한 직접 통신 (Gateway 경유하지 않음)
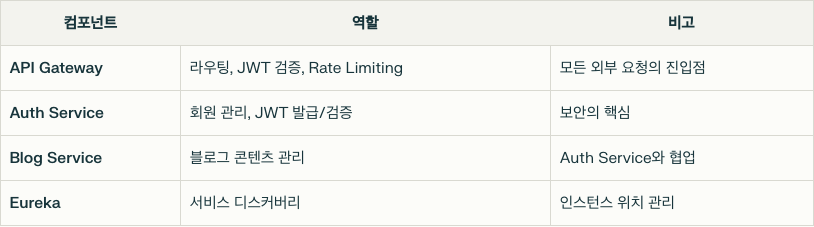
컴포넌트간 역할 분리