Monstache
Monstache는 MongoDB 컬렉션들을 Elasticsearch로 지속적으로 색인하는 Go언어로 개발된 sync 데몬입니다.
Monstache는 안정성을 추구하기 때문에 mongodb가 replicaset이 되어 있지 않으면 오류를 반환합니다.

간단한 예제를 통해 Monstache를 사용해보겠습니다.
실행 과정은 다음과 같습니다. 이번 예제에서는 docker을 사용하므로, 개별 설치 방법을 서술하지는 않습니다.
mongo 설치 및 replica 구성Elasticsearch 구성config.toml 설정monstache 실행
폴더 구조는 아래와 같습니다.
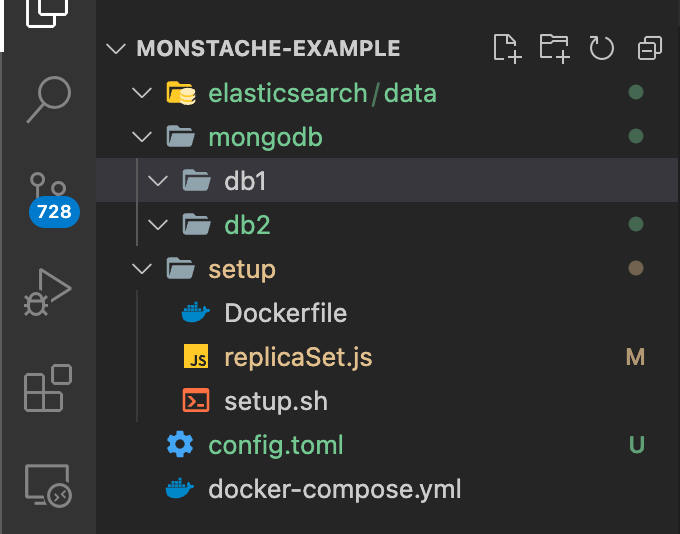
1. Dockerfile 작성
Elasticsearch 와 시각화 툴인 kibana, mongo replicaset과 monstache 정보를 입력해줍니다.
monstache 와 mongodb, Elasticsearch 버전은 위 버전 정보를 참고하여 맞춰주면 되고, kibana 버전은 Elasticsearch 버전과 동일한 것이 좋습니다.
version: '3'
services:
  elasticsearch:
    restart: always
    image: docker.elastic.co/elasticsearch/elasticsearch:7.10.0
    ports:
      - "9200:9200"
      - "9300:9300"
    environment:
      - ES_JAVA_OPTS=-Xms2048m -Xmx2048m
      - discovery.type=single-node
    ulimits:
      memlock:
        soft: -1
        hard: -1
    volumes:
      - ./elasticsearch/data:/usr/share/elasticsearch/data
    networks:
      - monstache-network

  kibana:
    restart: always
    image: docker.elastic.co/kibana/kibana:7.10.0
    expose:
      - 5601
    ports:
      - 5601:5601
    depends_on:
      - elasticsearch
    environment:
      - SERVER_PORT=5601
      - SERVER_NAME=kibana.example.org
      - ELASTICSEARCH_HOSTS=http://elasticsearch:9200
    networks:
      - monstache-network

  monstache:
    restart: always
    image: rwynn/monstache:rel6
    command: -f ./config.toml &
    volumes:
      - ./config/config.toml:/config.toml
    depends_on:
      - elasticsearch
      - mongodb1
      - mongodb2
    links:
      - elasticsearch
    ports:
      - "8080:8080"
    networks:
      - monstache-network

  mongodb1:
    restart: always
    image: mongo:latest
    container_name: mongo1
    expose:
      - "27017"
    ports:
      - "27018:27017"
    volumes:
      - ./mongodb/db1:/data/db
    command: mongod --replSet rp0
    networks:
      - monstache-network

  mongodb2:
    restart: always
    image: mongo:latest
    container_name: mongo2
    expose:
      - "27017"
    ports:
      - "27019:27017"
    volumes:
      - ./mongodb/db2:/data/db
    command: mongod --replSet rp0
    depends_on:
      - mongodb1
    networks:
      - monstache-network

  mongosetup:
    image: "setup-rspl:latest"
    depends_on:
      - mongodb1
    networks:
      - monstache-network

networks:
  monstache-network:
2. replicaset image 생성
setup 디렉토리 하위에서 mongodb replica set을 구성할 이미지를 생성합니다.
- Dockerfile
# Dockerfile
FROM mongo

WORKDIR /usr/src
RUN mkdir configs
WORKDIR /usr/src/configs

COPY replicaSet.js .
COPY setup.sh .

RUN chmod +x ./setup.sh

CMD ["./setup.sh"]- replicaSet.js
// replicaSet.js
config = {
    _id : "replication",
    members: [
      {_id:0,host : "mongo1:27017"},
      {_id:1,host : "mongo2:27017"},
    ]
  }
rs.initiate(config);
rs.conf();- setup.sh
#!/bin/bash
sleep 10 | echo Sleeping
mongo mongodb://mongo1:27017 replicaSet.js
위 파일을 전부 작성한 후 Dockerfile이 있는 위치에서 docker build -t setup-rspl . 을 실행합니다.
3. config.toml 작성
mongo-url = "mongodb://mongo1:27017,mongo2:27017/dbname?replicaSet=replication"
elasticsearch-urls = ["http://elasticsearch:9200"]
direct-read-namespaces = [ "db.collection", "test.test"] # 기존 구성되어있던 mongo에서 복사할 콜렉션
dropped-collections = false
dropped-databases = false
resume = false
resume-write-unsafe = true
index-as-update = true
index-oplog-time = true
verbose = true

[[script]]    # ES index명 설정
script = """
module.exports = function(doc, ns) {
    doc._meta_monstache = { index: ns.replace(".","-") };
    return doc;
}
"""mongo-url: 동기화 대상이 될 mongodb의 주소입니다.elasticsearch-urls: 동기화 대상이 될 elasticsearch의 주소입니다.direct-read-namespaces: 기존에 구성된 mongodb가 있다면, 이 설정에 복사할 컬렉션명을 명시해주어야합니다. 그렇지 않는다면 monstache 실행 이후로 추가되는 데이터에 대해서만 복사됩니다.dropped-collections: mongodb 에서 콜렉션을 삭제할 시 elasticsearch에도 삭제를 반영할 지 설정합니다. default 는 false 입니다.dropped-databases: mongodb 에서 DB를 삭제할 시 elasticsearch에도 삭제를 반영할 지 설정합니다. default 는 false 입니다.resume: 데이터 동기화 중 monstache가 중지되는 등의 문제로 중간에 멈추었을 경우, 재실행시 중지된 부분부터 실행할지에 대한 설정입니다. 해당 옵션을 true로 두면 mongodb에 monstache.monstache라는 콜렉션을 생성하여 mongodb 실행 정보를 저장합니다.index-as-update: mongodb에서 컬렉션에 업데이트가 일어날 때, elasticsearch에도에서도 새로운 데이터를 쌓는 구조가 아닌 해당 데이터에 업데이트로 처리합니다.
더 많은 설정에 관한 정보는 여기에서 확인할 수 있습니다. Appendix 에 공식 config example 를 참고하여 원하는 설정을 추가하시면 됩니다.
4. 실행
위 설정까지 끝났다면 docker을 실행합니다.
docker-compose.yml 이 있는 위치에서 docker-compose up -d 커맨드를 실행해줍니다.
Docker 없이 로컬에 설치
로컬에 이미 구성된 Mongo와 ES가 있고, Monstache 를 따로 설치하여 사용하고싶다면 아래 커맨드를 사용할 수 있습니다.
# monstache 다운로드
$ wget https://github.com/rwynn/monstache/releases/download/v6.7.4/monstache-98f8bc6.zip3

# 압축 해제
$ unzip monstache-98f8bc6.zip

# 압축 해제 후 생성된 build 폴더 내, 환경에 맞는 디렉토리로 이동
# darwin-amd64 / linux-amd64 / windows-amd64
$ cd build/linux-amd64

# config.toml 작성
$ vi config.toml

# 백그라운드로 monstache 실행
nohup ./monstache -f config.toml 2>&1 &
Ref.
MongoDB 4.x Real Time Sync to ElasticSearch 6.x +
[ MongoDB + ElasticSearch + Monstache ] 도커 기본 셋팅을 해보자
MongoDB to ElasticSearch Realtime sync
How to Use Monstache to sync MongoDb and Elasticsearch in real-time?
6. Elastic search — 데이터 indexing, 연동(monstache)
Appendix 🏷
CONFIG EXAMPLE
# connection settings

# connect to MongoDB using the following URL
mongo-url = "mongodb://someuser:password@localhost:40001,localhost2:40001,localhost3:40001"

# connect to the Elasticsearch REST API at the following node URLs
elasticsearch-urls = ["https://es1:9200", "https://es2:9200"]

# frequently required settings

# if you need to seed an index from a collection and not just listen and sync changes events
# you can copy entire collections or views from MongoDB to Elasticsearch
direct-read-namespaces = [ "db.collection", "test.test"]

# if you want to use MongoDB change streams instead of legacy oplog tailing use change-stream-namespaces
# change streams require at least MongoDB API 3.6+ # if you have MongoDB 4+ you can listen for changes to an entire database or entire deployment
# in this case you usually don't need regexes in your config to filter collections unless you target the deployment.
# to listen to an entire db use only the database name. For a deployment use an empty string.
change-stream-namespaces = ["mydb.mycollection", "db.collection", "test.test"]

# additional settings

# if you don't want to listen for changes to all collections in MongoDB but only a few
# e.g. only listen for inserts, updates, deletes, and drops from mydb.mycollection
# this setting does not initiate a copy, it is only a filter on the change event listener
namespace-regex = '^mydb\.mycollection$'

# compress requests to Elasticsearch
gzip = false

# generate indexing statistics
stats = true

# index statistics into Elasticsearch
index-stats = true

# use the following user name for Elasticsearch basic auth
elasticsearch-user = "someuser"

# use the following password for Elasticsearch basic auth
elasticsearch-password = "somepassword"

# use 4 go routines concurrently pushing documents to Elasticsearch
elasticsearch-max-conns = 4

# use the following PEM file to connections to Elasticsearch
elasticsearch-pem-file = "/path/to/elasticCert.pem"

# validate connections to Elasticsearch
elastic-validate-pem-file = true

# propogate dropped collections&databases in MongoDB as index deletes in Elasticsearch
dropped-collections = true
dropped-databases = true

# do not start processing at the beginning of the MongoDB oplog
# if you set the replay to true you may see version conflict messages
# in the log if you had synced previously. This just means that you are replaying old docs which are already
# in Elasticsearch with a newer version. Elasticsearch is preventing the old docs from overwriting new ones.
replay = false

# resume processing from a timestamp saved in a previous run
resume = true

# do not validate that progress timestamps have been saved
resume-write-unsafe = false

# override the name under which resume state is saved
resume-name = "default"

# use a custom resume strategy (tokens) instead of the default strategy (timestamps)
# tokens work with MongoDB API 3.6+ while timestamps work only with MongoDB API 4.0+
resume-strategy = 1

# exclude documents whose namespace matches the following pattern
namespace-exclude-regex = '^mydb\.ignorecollection$'

# turn on indexing of GridFS file content
index-files = true

# turn on search result highlighting of GridFS content
file-highlighting = true

# index GridFS files inserted into the following collections
file-namespaces = ["users.fs.files"]

# print detailed information including request traces
verbose = true

# enable clustering mode
cluster-name = 'apollo'

# do not exit after full-sync, rather continue tailing the oplog
exit-after-direct-reads = false