
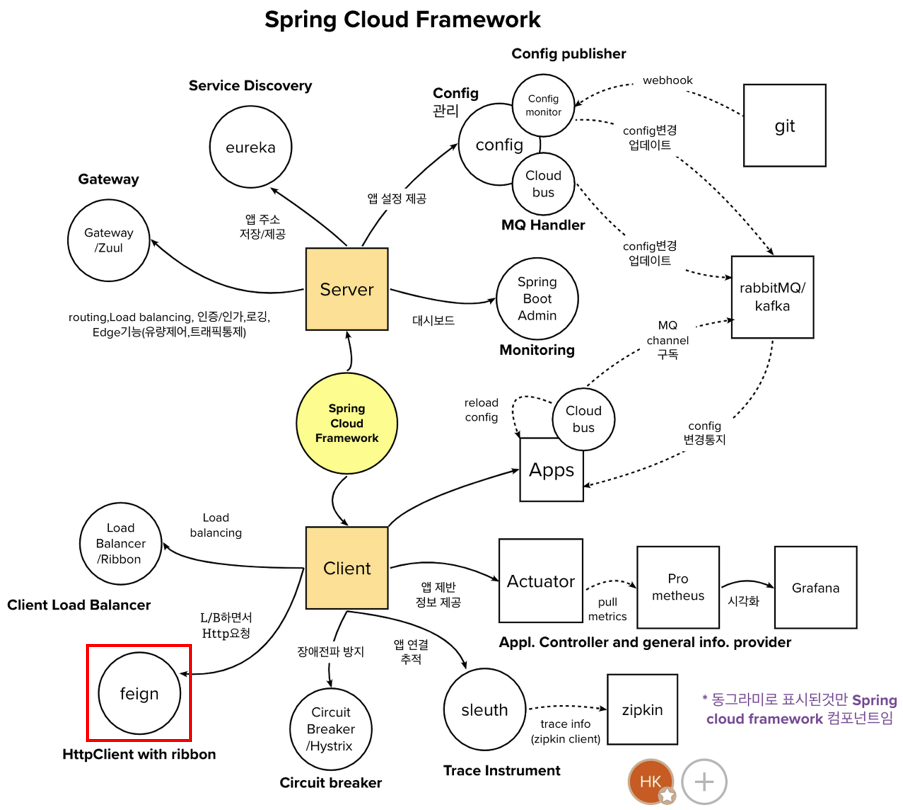
1. API 간 통신
지난 글들에서는 gateway와 eureka를 통해 msa 서비스를 구축하는 법을 알아봤습니다.
근데 개발을 해두고 나니 문제가 생겼습니다.
도메인 별로 서버를 나누니 User 데이터를 조회하려면 Auth 서버에서는 중복되는 Entity를 만들고 DB에 접근해야 하게 됐습니다. 이러한 방식은 msa의 원칙에도 반할 뿐더러, 결국 중복되는 코드가 늘어나게 됩니다. 때문에 Auth 서버는 User 서버에 요청을 보내 로그인을 시도한 유저의 대한 정보를 받아와야 합니다.
이렇듯 마이크로 서비스에서는 하나의 기능을 수행하기 위해서 각각의 마이크로서비스 인스턴스들이 유기적으로 상호작용을 해서 적절한 데이터를 사용자에게 내려주는 방식을 취합니다.
서버간 통신 방법에는 여러 가지가 있는데, 주로 사용되는 것은 다음과 같습니다.
동기: Rest Template, Feign Client (HTTP) / gRpc
비동기: Kafka, Amazon SQS 등 메세지브로커 (AMQP 프로토콜)
이번 프로젝트에서는 REST api 방식, 그 중 Spring Cloud Feign Client를 사용해 구현해 보겠습니다.
1.1. Feign Client 연결
Auth 서버에 의존성을 추가하고 @EnableFeignClients 어노테이션을 추가해줍니다.
build.gradle
implementation 'org.springframework.cloud:spring-cloud-starter-openfeign'UserApplication.java
@EnableFeignClients
@SpringBootApplication
public class UserApplication {
	public static void main(String[] args) {
		SpringApplication.run(UserApplication.class, args);
	}
}
1.2. 인터페이스 생성 및 서비스에서 호출
Http Endpoint로부터 데이터를 받아올 인터페이스를 만들어줍니다. FeignClient 어노테이션에 Eureka 에 register한 Instance 이름을 넣어주면 자동으로 매핑이 됩니다.
UserFeignClient.java
@FeignClient(name = "AUTH-USER-SERVER")
public interface UserFeignClient {
    @PostMapping("/email")
    UserResponseDto getUser(@RequestParam String email);
}
이제 서비스에서 클라이언트를 호출하면, User 서버의 해당 엔드포인트로 요청을 보내 데이터를 받아오게 됩니다.
AuthService.java
@Service
@RequiredArgsConstructor
public class AuthenticationService {
    ...
    private final UserServiceClient userServiceClient;

    @Transactional
    public TokenDto loginUsers(AuthenticationRequestDto dto) {

        UserResponseDto user = userServiceClient.getUser(dto.getEmail());

        String salt = user.getSalt();
        String password = saltUtil.encodePassword(salt,dto.getPassword());

        if(!user.getPassword().equals(password)){
            throw new BadRequestException(ExceptionType.INCORRECT_PASSWORD);
        }

        TokenDto tokenDto = jwtTokenProvider.generateToken(user);
        redisUtil.setDataExpire(user.getName(),tokenDto.getRefreshToken(), 60 * 30L);
        return tokenDto;
    }
}
2. Config 서버 구축
2.1. Spring Cloud Config
위 JWT 토큰키나 DataBase 설정처럼 각 마이크로 서비스에서 중복되는 설정들이 있습니다.
Spring Cloud Config 서버는 이러한 시스템의 환경 설정을 중앙화하고 실시간으로 변경 사항을 적용할 수 있도록 합니다. 때문에 수정사항이 있을 때 일일이 수정-빌드-재배포하는 부담을 안을 필요가 없습니다.
또한 패스워드나 secret key 등 민감 정보를 서비스 프로젝트에서 분리해 노출되지 않도록 하기 때문에 보안에 대한 부분 또한 개선할 수 있습니다.
Config 서버에서 사용할 설정파일을 관리하는 방법은 로컬 파일, git repository 등 여러 가지가 있으나, Spring Config에서는 git을 권장하기 때문에 해당 방법으로 진행했습니다.
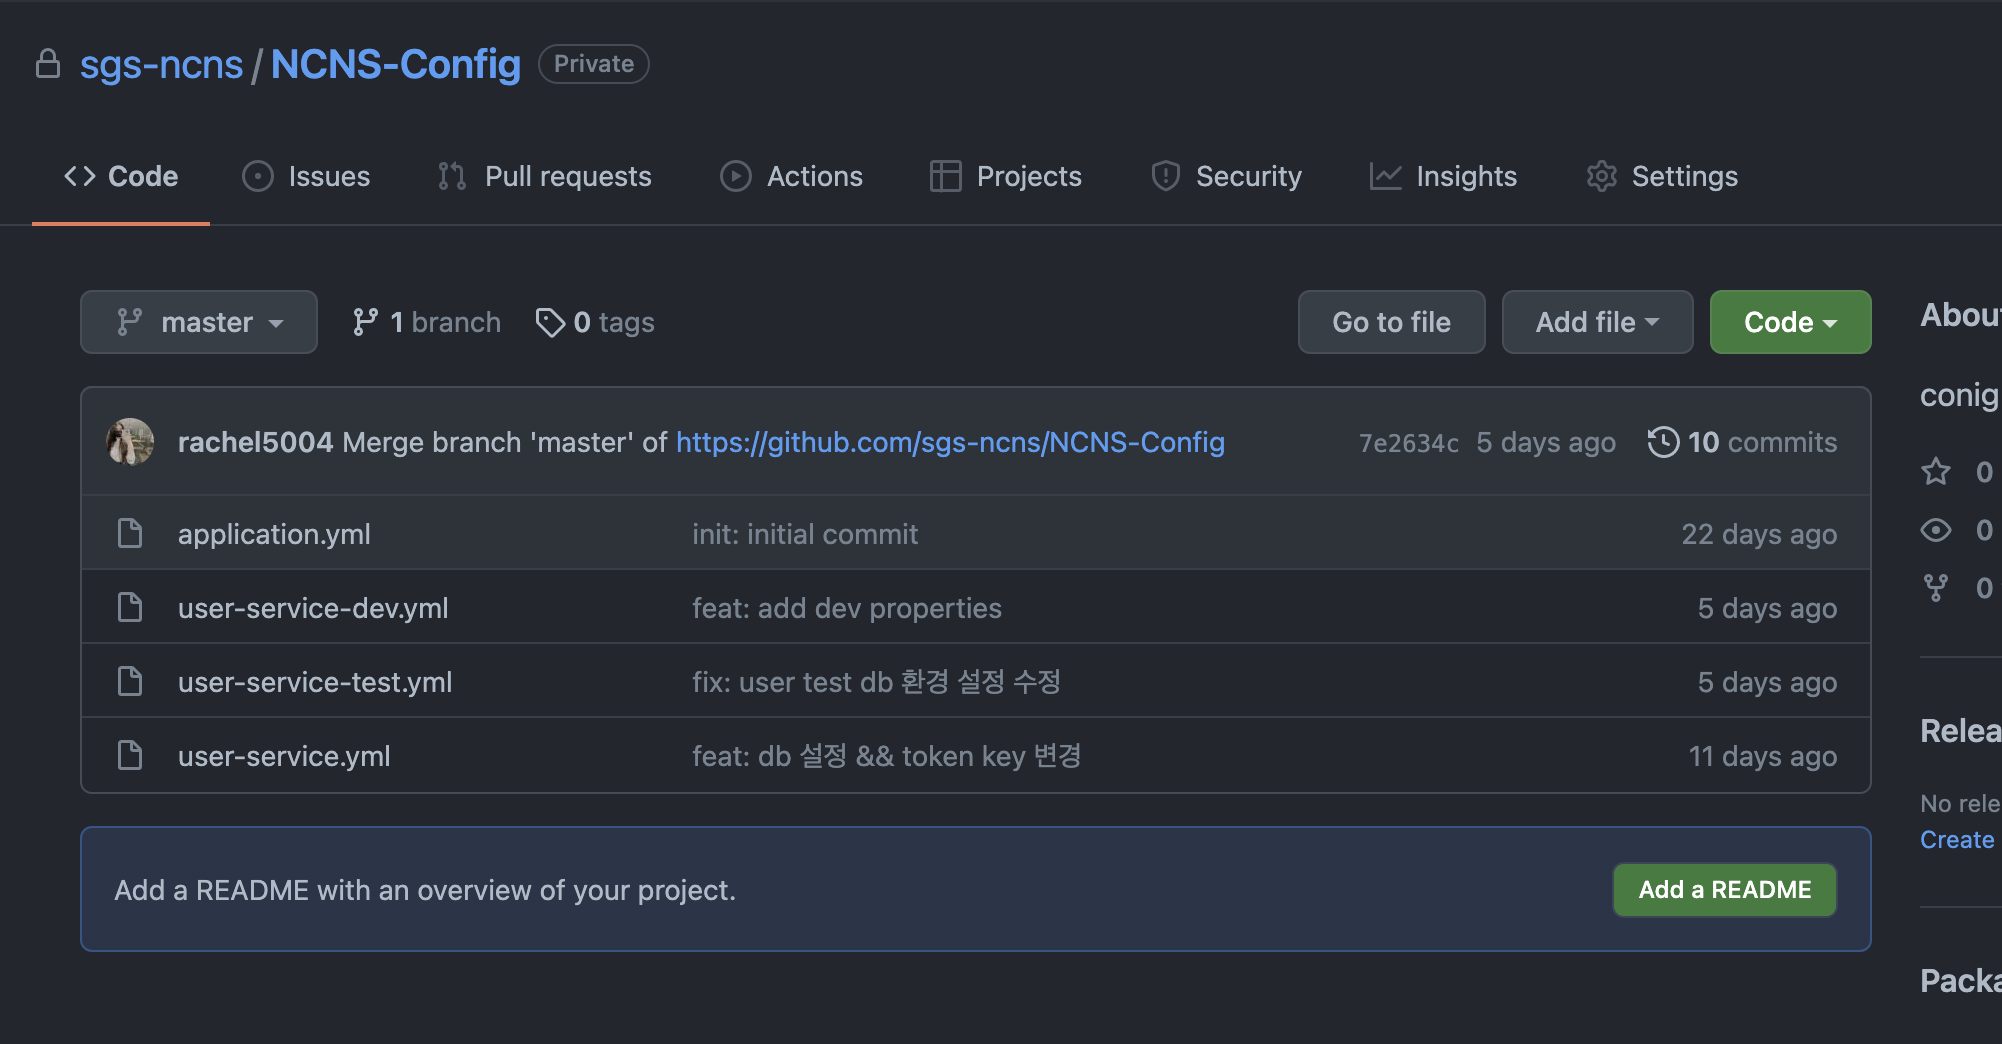
2.2. Git Repository 생성
우선 github 에 들어가서 원격 레포지토리를 생성하고, 환경별 설정 파일을 생성해줍니다.
yaml 파일의 이름은 ${ApplicationName}-${EnvironmentName}.yml로 설정해야 합니다.
이 이름을 기반으로 이후 http://CONFIG-SERVER/{ApplipcationName}/{EnvironmentName} 으로 접근하게 됩니다.
# application.yml (필수X)
default:
  owner: config-service's git folder
  content: properties for msa project

# user-service.yml
spring:
  datasource:
    url: jdbc:postgresql://localhost:5432/ncns_db
    username: username
    password: password
  jpa:
    properties:
      hibernate:
        dialect: org.hibernate.dialect.PostgreSQLDialect
        use_sql_comments: true
        format_sql: true
        show_sql: true
    hibernate:
      ddl-auto: update
    generate-ddl: true
token:
  key: tokenkey
default:
  message: user-service default properties


# user-service-test.yml
spring:
  datasource:
    url: jdbc:h2:mem:testdb
    username: sa
    password:
    driverClassName: org.h2.Driver
  jpa:
    show_sql: true
    properties:
      hibernate:
        dialect: org.hibernate.dialect.H2Dialect
token:
  key: tokenkey
default:
  message: user-service test profiles
2.3. Spring Cloud Config 프로젝트 생성
스프링 프로젝트를 생성해 다음 의존성과 @EnableConfigServer 어노테이션을 추가해줍니다.
build.gradle
implementation 'org.springframework.cloud:spring-cloud-config-server'ConfigApplication.java
@EnableConfigServer
@SpringBootApplication
public class ConfigApplication {

	public static void main(String[] args) {
		SpringApplication.run(ConfigApplication.class, args);
	}
}
config 서버의 application.yml 파일에 포트 등 기본설정과 각 서비스의 설정 정보가 저장되는 저장소(repository) 주소를 입력합니다.
해당 레파지토리가 Private일 경우 username과 password, 혹은 Token을 추가해야 합니다. (없거나 정보가 틀린 경우 요청 시 not authorized 에러 발생)
application.yml
server:
port: 9020
spring:
application:
name: config-service
cloud:
config:
server:
git:
uri: https://github.com/sgs-ncns/NCNS-Config
username: {username}
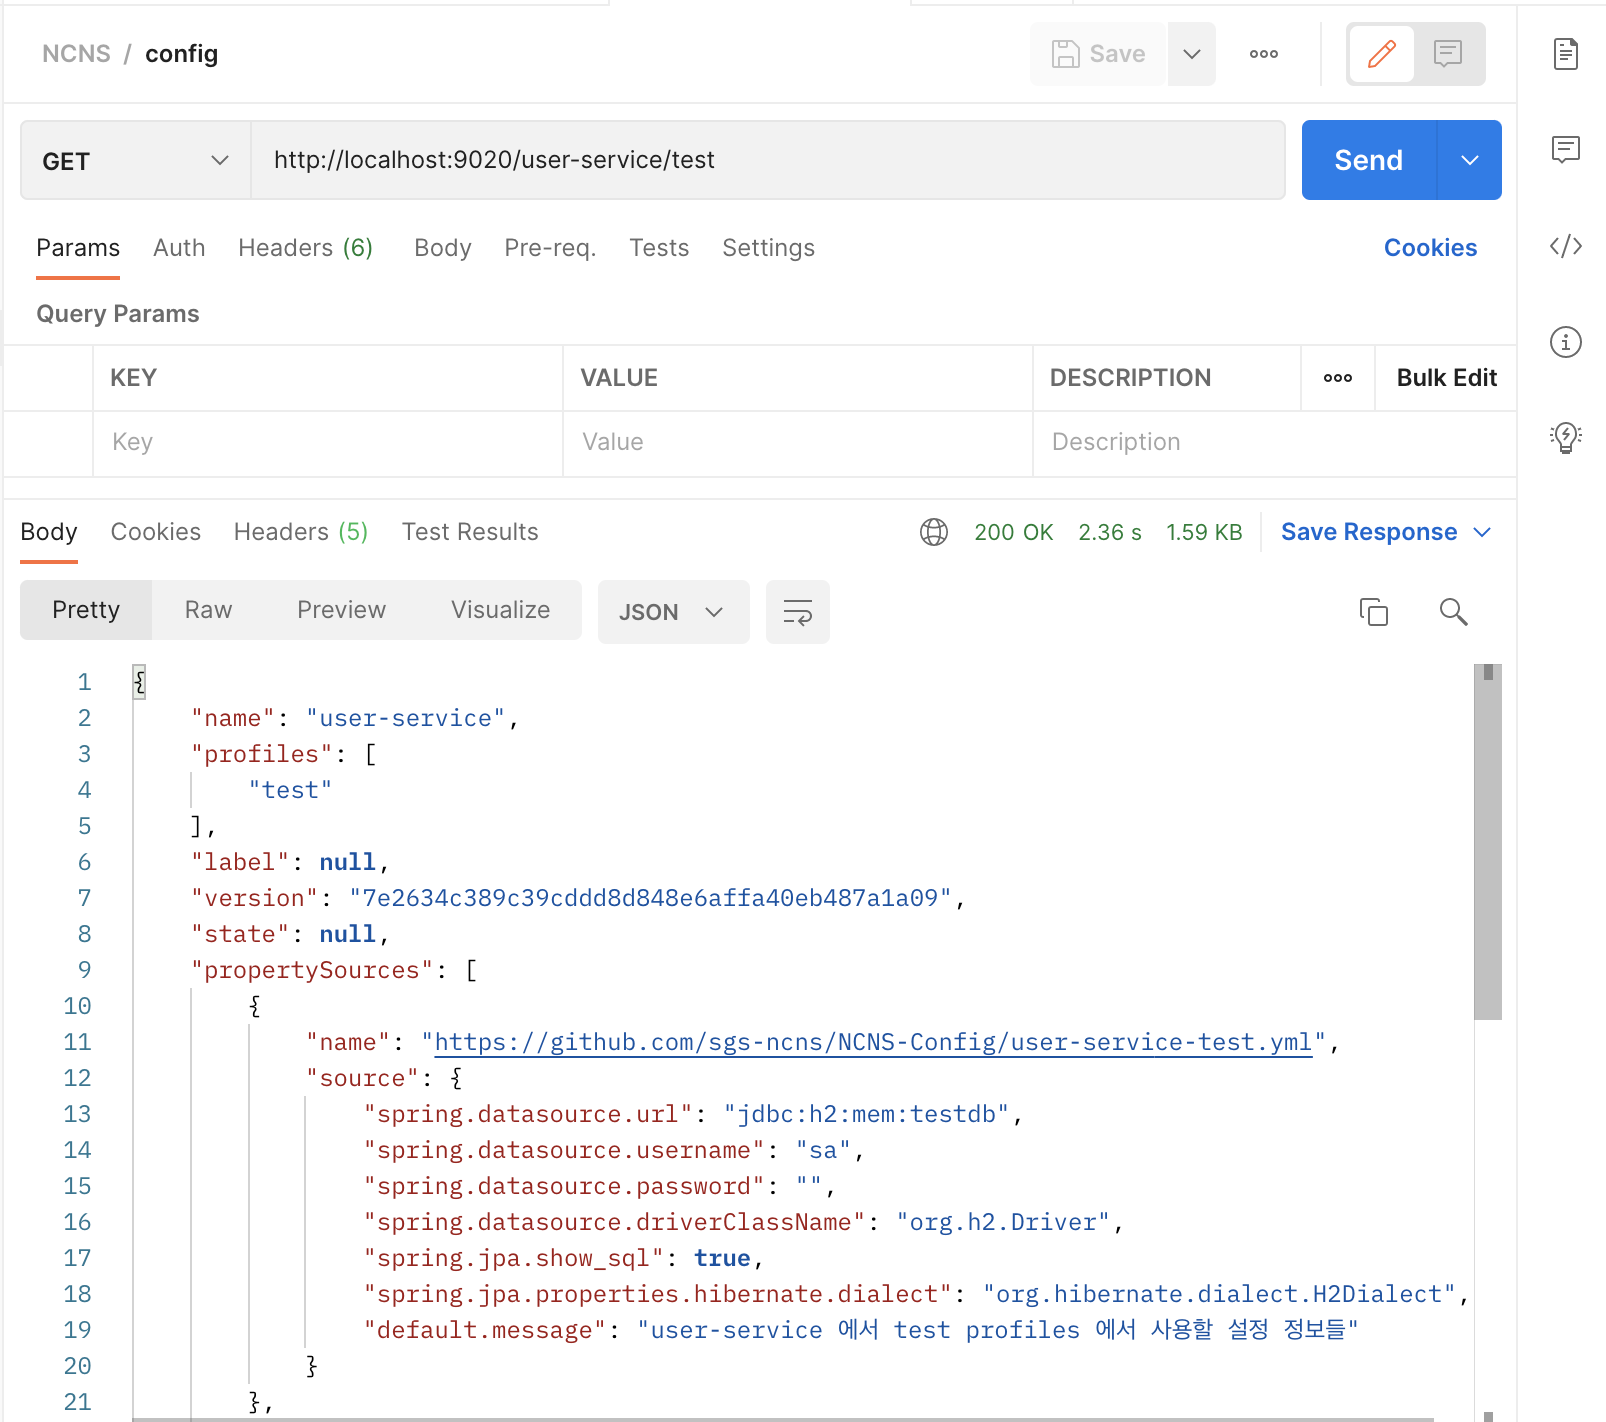
password: {password}서버를 실행시키고 http://localhost:9020/user-service/test에 GET 요청을 보내면 test 환경 설정 정보를 정상적으로 읽어오는 것을 확인할 수 있습니다.
2.4. Config Client 등록
Config 서버로부터 설정을 받아다 쓸 Client(User 서버 등)에 다음 의존성을 추가합니다.
build.gradle
implementation 'org.springframework.cloud:spring-cloud-starter-config'
implementation 'org.springframework.cloud:spring-cloud-starter-bootstrap'
bootstrap.yml 파일을 생성해 config server의 uri 를 명시해줍니다. 필요에 따라 profile을 지정해 사용합니다.
bootstrap.yml 에 작성된 내용은 application.yml보다 먼저 로드됩니다. 때문에 앱이 실행되기 전에 앞서 설정한 config 서버에서 설정 파일을 불러와서 실행하게 됩니다.
bootstrap.yml
spring:
  cloud:
    config:
      uri: http://localhost:9020
      profile: test
컨트롤러에 다음 EndPoint를 추가해 설정 정보가 제대로 주입됐는지 확인할 수 있습니다.
UserController.java
public class UserController {
    ...
    @GetMapping("/config")
    public String config(@Value("${spring.datasource.url}") String url,
                           @Value("${spring.datasource.username}") String username,
                           @Value("${spring.datasource.password}") String password,
                           @Value("${token.key}") String tokenKey) {
        return "url: " + url + "\n"
                + "username: " + username + "\n"
                + "password: " + password + "\n\n"
                + "token key: " + tokenKey;

    }
    ...
}
3. Config 서버 설정 정보 암호화
하지만 아무리 private 레포지토리에 올렸다고 해도 password 나 secret key 가 plain text로 올라가 있는 것은 좋지 않습니다.
때문에 Spring Cloud Config의 encrypt/decrypt와 Jasypt를 이용해 정보들을 암호화 할 것입니다.
3.1. Spring Cloud Config의 encrypt/decrypt
Config 서버에 다음 의존성을 추가해 bootstrap.yml을 사용할 수 있게 합니다.
build.gradle
implementation 'org.springframework.cloud:spring-cloud-starter-bootstrap'bootstrap 파일을 생성해 암호화 키를 입력합니다.
bootstrap.yml
encrypt:
  key: supersecretencryptkey
아래 엔드포인트로 암호화할 정보를 바디에 text로 담아 보내면 암호화된 문자열을 돌려줍니다.
암호화 : http://config-server.com/encrypt POST
복호화 : http://config-server.com/decrypt POST
이 문자열을 Config 레포지토리에 {ciper}encrypted-string 형식으로 넣어주면 적용완료입니다.
# user-service.yml
spring:
 datasource:
   url: jdbc:postgresql://localhost:5432/ncns_db
   username: "{cipher}76ccc5039cd999c9635904f3be4d0f9f7ecbc94445bf283e9df6c9d345d28d0f"
   password: "{cipher}a2ae0947fa5e86871198868db6ce2a660440b9fd37b5488ba85471e4b4f4f5d5"
 jpa:
   properties:
     hibernate:
       dialect: org.hibernate.dialect.PostgreSQLDialect
       use_sql_comments: true
       format_sql: true
       show_sql: true
   hibernate:
     ddl-auto: update
   generate-ddl: true
token:
 key: "{cipher}0edc3d96596eca424ca60bcdf73f05dd82abc7a6d6763a65d744df1e768e3d15"
default:
 message: user-service default profiles properties
3.2. Jasypt 암호화
하지만 여전히 bootstrap.yml에는 암호화키가 노출돼있습니다. 즉 누구나 디코딩해 원본 텍스트를 읽을 수 있는 상황입니다.
때문에 이 키도 Jasypt를 이용해 암호화를 해보겠습니다. 사실 Spring Cloud Config의 encrypt/decrypt 말고 이 Jasypt만 이용해서 전부 암호화를 해도 무방합니다.
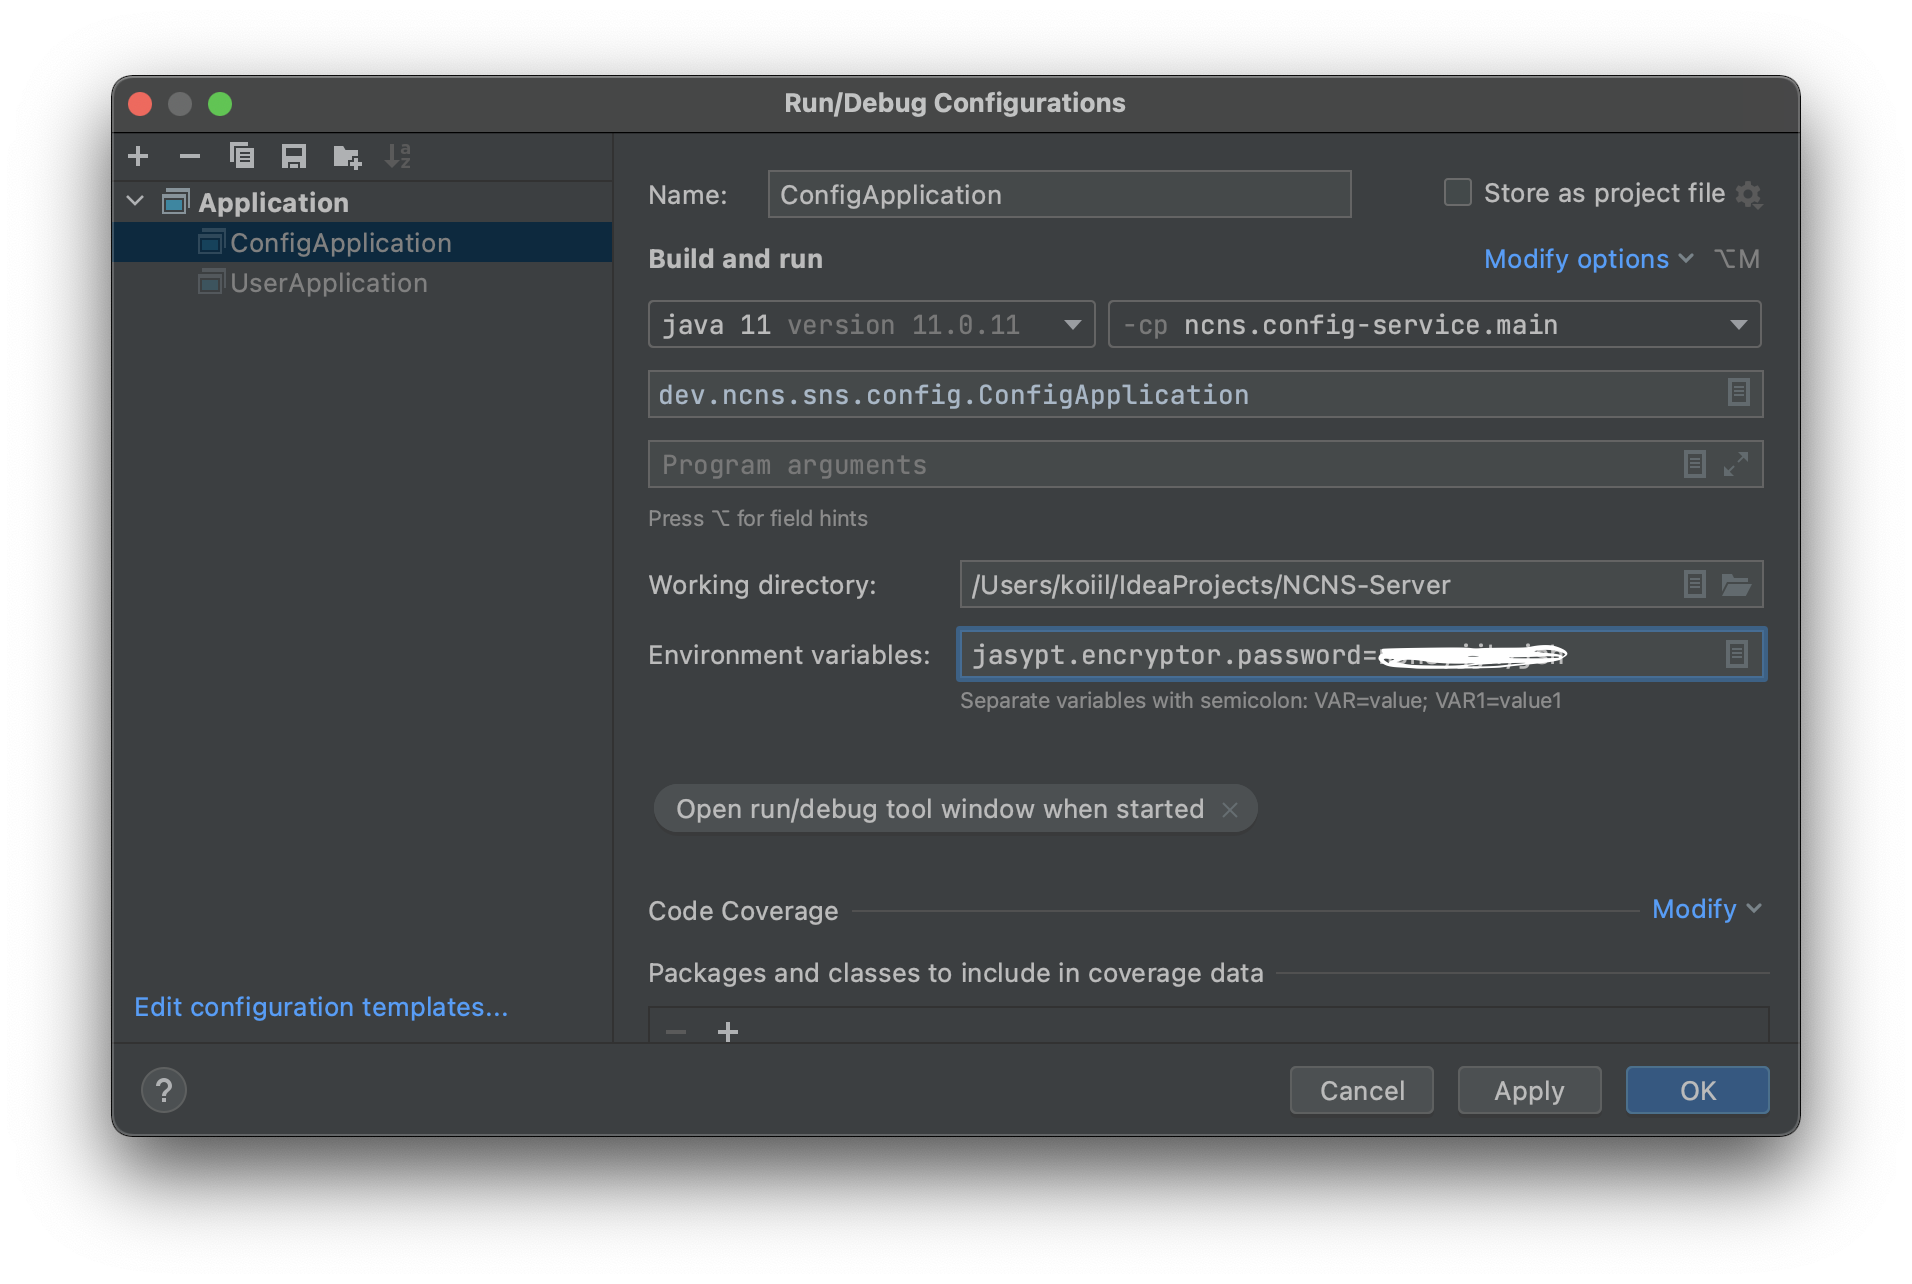
Jasypt를 사용할 때는 다음 의존성을 추가해준 뒤 jasypt.encryptor.password를 설정해줘야 합니다.
build.gradle
implementation 'com.github.ulisesbocchio:jasypt-spring-boot-starter:3.0.4'Configuration을 따로 생성해 Encryptor에 대해 상세하게 설정할 수 있지만, DefaultLazyEncryptor를 사용하면 단순히 프로젝트 환경 변수에 비밀번호만 등록해두어도 이상 없이 작동합니다.
@Configuration
public class JasyptConfig {

    @Bean("jasyptStringEncryptor")
    public StringEncryptor stringEncryptor() {
        PooledPBEStringEncryptor encryptor = new PooledPBEStringEncryptor();
        SimpleStringPBEConfig config = new SimpleStringPBEConfig();
        config.setPassword("password");
        config.setAlgorithm("PBEWITHHMACSHA512ANDAES_256");
        config.setKeyObtentionIterations("1000");
        config.setPoolSize("1");
        config.setProviderName("SunJCE");
        config.setSaltGeneratorClassName("org.jasypt.salt.RandomSaltGenerator");
        config.setIvGeneratorClassName("org.jasypt.iv.RandomIvGenerator");
        config.setStringOutputType("base64");
        encryptor.setConfig(config);
        return encryptor;
    }
}
이제 테스트 코드를 작성해 간단하게 암호화를 진행합니다!
Jasypt에서는 여러 종류의 encryptor을 지원하기 때문에, 본인에게 맞는 것을 선택해 사용하시면 됩니다.
JasyptEncryptTest.java
@ExtendWith(SpringExtension.class)
@SpringBootTest
public class EncryptTest {

    @Value("${jasypt.encryptor.password}")
    private String encryptorPassword;

    private String target;

    @Autowired
    private ConfigurableEnvironment configurableEnvironment;

    @BeforeEach
    private void beforeTest() {
        target = "plain-text";
    }

    @Test
    public void standardPBEStringEncryptorTest() {
        StandardPBEStringEncryptor encryptor = new StandardPBEStringEncryptor();
        encryptor.setPassword(encryptorPassword);
        System.out.println("StandardPBEStringEncryptor : " + encryptor.encrypt(target));
    }

    @Test
    public void defaultLazyEncryptorTest() {
        DefaultLazyEncryptor encryptor = new DefaultLazyEncryptor(configurableEnvironment);
        System.out.println("DefaultLazyEncryptor : " + encryptor.encrypt(target));
    }

    @Test
    public void pooledPBEStringEncryptorTest() {
        PooledPBEStringEncryptor encryptor = new PooledPBEStringEncryptor();
        encryptor.setPoolSize(1);
        encryptor.setPassword(encryptorPassword);
        System.out.println("PooledPBEStringEncryptor : " + encryptor.encrypt(target));
    }

}
암호화된 문자열은 ENC(encrypted-string) 형식으로 변경해줍니다.
bootstrap.yml
encrypt:
  key: ENC(7gkouBcaWqwM6iEDwLkmibJnTWyvmx4p3uwJqMS5wm5W8feVM54Emfi6WANVjmWm)
🚩 EOD
이로써 간단하게 MSA 프로젝트를 구성하는 글이 마무리됐습니다!
아직 수정하고 보완해야 할 부분이 많지만, 이번 프로젝트를 진행하면서 MSA를 사용하는 이유와 장단점을 알아갈 수 있었습니다 👏
또한 gateway 부터 암호화 도구까지 모든 것에서 정말 여러 가지 선택지가 있었는데, 하나씩 비교해보며 본인의 프로젝트에 필요한 요구사항이 무엇인지 분석해 적절한 기술을 채택하는 과정이 재밌었습니다.
보고 따라만 해도 어엿한 프로젝트를 완성할 수 있는 글로 다듬어서, 언젠가 이 글을 보게될 분들에게 도움이 될 수 있으면 좋겠습니다🥰
Ref.
OpenFeign vs Rest Template
How should I choose between gRPC and Kafka when building microservices?
마이크로서비스, 어떻게 구현할 것인가?
마이크로 서비스 아키텍처 IPC
마이크로 서비스 아키텍처의 통신
https://daddyprogrammer.org/post/4347/spring-cloud-msa-configuration-server/
[Spring Cloud Config] Application의 설정 정보 (application.yml) 를 중앙에서 관리하기 (by native repository)
[SC03] Spring Cloud Config 란 ?
Jasypt 암호화
[Spring Boot] 설정파일 암호화 (application.yml)