검증의 필요성
상품 관리 시스템에 새로운 요구사항이 추가되면 입력값 검증이 필수적이다. 가격과 수량에는 문자가 들어오면 오류로 처리하고, 상품명은 필수값이며 공백이 허용되지 않아야 한다. 또한 가격은 1000원 이상 100만원 이하, 수량은 9999 이하로 제한해야 한다. 비즈니스 로직 상으로는 가격과 수량을 곱한 값이 10,000원 이상이어야 한다.
웹 서비스에서 입력 오류가 발생할 때 대부분 간단한 경고문과 함께 다시 입력을 유도하는 방식을 사용한다. 이는 사용자 경험(UX)을 고려한 방식으로, 오류 페이지로 넘어가는 대신 사용자가 쉽게 문제를 해결할 수 있도록 한다. 컨트롤러는 이러한 검증을 수행하며, HTTP 요청이 정상적인지를 확인하는 중요한 역할을 한다.
검증은 클라이언트와 서버 모두에서 수행되어야 한다. 클라이언트 검증은 자바스크립트를 이용해 즉시 사용자에게 피드백을 제공하지만, 이는 조작이 가능해 보안에 취약하다. 따라서 서버 측 검증은 반드시 수행되어야 하며, 이를 통해 보안을 강화할 수 있다. 클라이언트 검증으로 사용자 경험을 높이고 서버 검증으로 보안을 보장하는 것이 가장 바람직한 접근 방식이다.
ValidationV1
곧바로 컨트롤러에 검증로직을 추가해보도록 한다. addItem()의 버전을 올려가며 더 우수한 기술들을 적용해본다.
@PostMapping("/add")
    public String addItem(@ModelAttribute Item item, RedirectAttributes redirectAttributes, Model model) {

        // 검증 오류 결과를 보관
        Map<String, String> errors = new HashMap<>();

        // 검증 로직
        if (!StringUtils.hasText(item.getItemName())) {
            errors.put("itemName", "상품 이름은 필수입니다.");
        }
        if (item.getPrice() == null || item.getPrice() < 1000 || item.getPrice() > 1000000) {
            errors.put("price", "가격은 1,000 ~ 1,000,000 까지 허용합니다.");
        }
        if (item.getQuantity() == null || item.getQuantity() >= 9999) {
            errors.put("quantity", "수량은 최대 9,999 까지 허용합니다.");
        }

        // 특정 필드가 아닌 복합 룰 검증
        if (item.getPrice() != null && item.getQuantity() != null) {
            int resultPrice = item.getPrice() * item.getQuantity();
            if (resultPrice < 10000) {
                errors.put("globalError", "가격 * 수량의 합은 10,000원 이상이어야 합니다. 현재 값 = " + resultPrice);
            }
        }
        //검증에 실패하면 다시 입력 폼으로

        if (!errors.isEmpty()) {
            log.info("errors = {}", errors);
            model.addAttribute("errors", errors);
            return "validation/v1/addForm";
        }

        //성공 로직

        Item savedItem = itemRepository.save(item);
        redirectAttributes.addAttribute("itemId", savedItem.getId());
        redirectAttributes.addAttribute("status", true);
        return "redirect:/validation/v1/items/{itemId}";
    }
에러발생시 에러를 담을 Map을 임시 메모리로 사용한다. 조건문으로 하여금 검증을 진행하고 Map에 에러를 담는다.
하나라도 에러가 존재한다면 모델에 "errors" : errors로 에러정보를 담아 바로 템플릿 리턴을 진행한다.
<div>
   <label for="price" th:text="#{label.item.price}">가격</label>
   <input type="text" id="price" th:field="*{price}" class="form-control" th:class="${errors?.containsKey('price')} ? 'form-control field-error' : 'form-control'">
   <div class="field-error" th:if="${errors?.containsKey('price')}" th:text="${errors['price']}">

   </div>
</div>
V1에 대응되는 addForm 템플릿이다. field-error css를 적절하게 부여하고 th:class에 삼항연산을 이용하여 class에 "field-error"를 부여하고 경고문구를 위한 th:if을 사용하여 에러에 price 키가 담겨있다면 태그를 활성화 시키도록 한다.
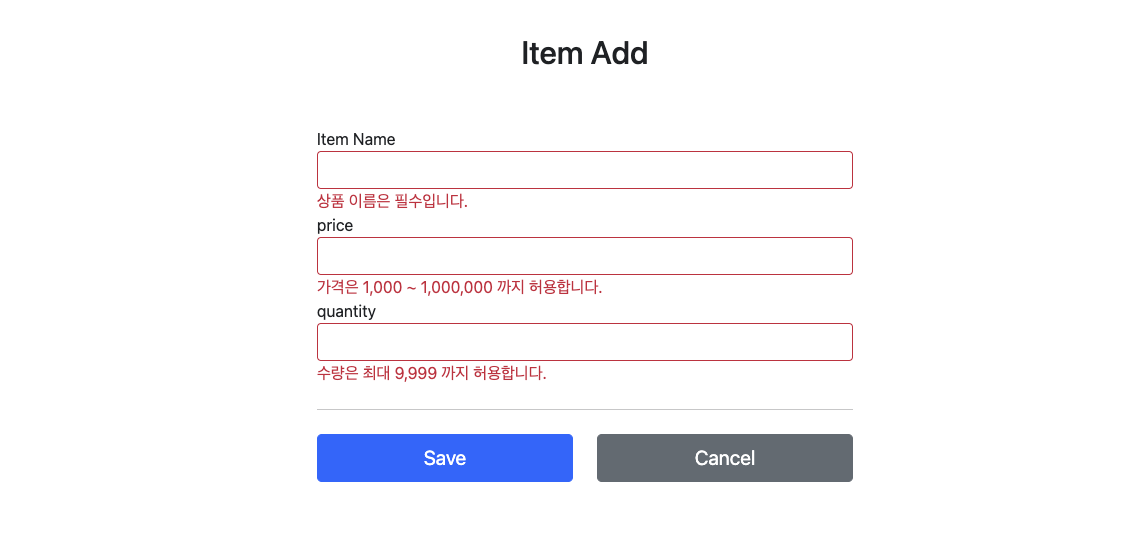 아무것도 입력하지 않았을 때 위와 같은 경고기능이 추가된 것이다. 검증 실패시 현재 폼이 에러 모델 데이터와 함께 제공되는 것이다.
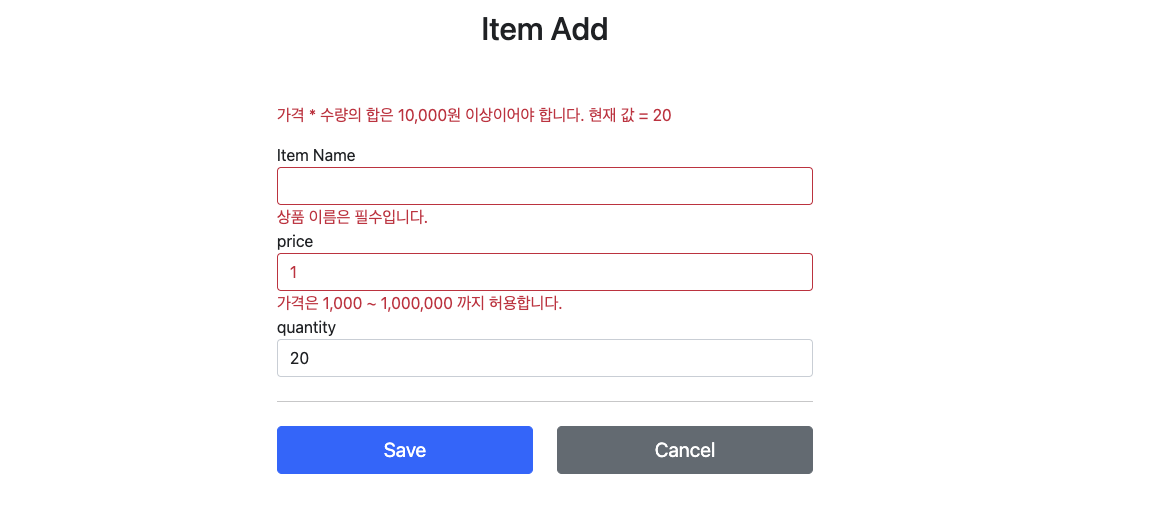
가격에 1과 수량에 20을 넣고 저장 버튼을 눌렀을 때의 화면이다. 여기서 주목해야할 점은 직전에 작성한 1,20이 input에서 유지되고 있다는 것이다. 이는 컨트롤러에서 이미 바인딩하고있는 Item 객체 때문이며 @ModelAttribute 로 모델에 자동적으로 담기고 th:field로 뿌려주고 있기 때문이다. 유저는 단지 빨간 부분만 변한 것으로 인지할 것이다.
참고 Safe Navigation Operator
만약 여기에서
errors가null이라면 어떻게 될까?
생각해보면 등록폼에 진입한 시점에는errors가 없다.
따라서errors.containsKey()를 호출하는 순간NullPointerException이 발생한다.errors?.은errors가null일때NullPointerException이 발생하는 대신,null을 반환하는 문법 이다.
th:if에서null은 실패로 처리되므로 오류 메시지가 출력되지 않는다.
ValidationV2
  @PostMapping("/add")
    public String addItemV2(@ModelAttribute Item item, BindingResult bindingResult, RedirectAttributes redirectAttributes, Model model) {

        // 검증 로직
        if (!StringUtils.hasText(item.getItemName())) {
            bindingResult.addError(new FieldError("item", "itemName", item.getItemName(), false, null, null, "상품 이름은 필수 입니다!!!!."));
        }
        if (item.getPrice() == null || item.getPrice() < 1000 || item.getPrice() > 1000000) {
            bindingResult.addError(new FieldError("item", "price", item.getPrice(), false, null, null, "가격은 1,000 ~ 1,000,000 까지 허용합니다."));
        }
        if (item.getQuantity() == null || item.getQuantity() >= 9999) {
            bindingResult.addError(new FieldError("item", "quantity", item.getQuantity(), false, null, null, "수량은 최대 9,999 까지 허용합니다."));
        }

        // 특정 필드가 아닌 복합 룰 검증
        if (item.getPrice() != null && item.getQuantity() != null) {
            int resultPrice = item.getPrice() * item.getQuantity();
            if (resultPrice < 10000) {
                bindingResult.addError(new ObjectError("item", "가격 * 수량의 합은 10,000원 이상이어야 합니다. 현재 값 = " + resultPrice));
            }
        }
        //검증에 실패하면 다시 입력 폼으로

        if (bindingResult.hasErrors()) {
            log.info("errors = {}", bindingResult);
            return "validation/v2/addForm";
        }

        //성공 로직

        Item savedItem = itemRepository.save(item);
        redirectAttributes.addAttribute("itemId", savedItem.getId());
        redirectAttributes.addAttribute("status", true);
        return "redirect:/validation/v2/items/{itemId}";
    }
V1에서의 문제점은 뷰 템플릿 코드가 매우 복잡해지며, 타입 오류 처리가 되지 않는다.(수량(int)가 들어와야할 곳에 문자열을 넣었을 경우) 숫자 타입에 문자가 들어오면 여전히 오류페이지를 보이고 있다.
BindingResult는 스프링이 제공하는 검증 오류 보관 객체이다. BindingResult가 파라미터에 존재한다면 @ModelAttribute에 데이터 바인딩시 타입 오류가 발생해도 컨트롤러가 호출된다.(이전에는 호출되지도 않고 바로 400에러)
바인딩 타입 오류 발생시 BindingResult에 스프링이 FieldError를 담아서 컨트롤러를 정상 호출 한다.
- BindingResult의 파라미터 위치는 항상 @ModelAttribute 파라미터 다음에 와야 한다
FieldError
FieldError는 두 가지 생성자를 제공한다.(ObjectError도 유사)
 public FieldError(String objectName, String field, String defaultMessage);
 public FieldError(String objectName, String field, @Nullable Object
 rejectedValue, boolean bindingFailure, @Nullable String[] codes, @Nullable
 Object[] arguments, @Nullable String defaultMessage)
objectName : 오류가 발생한 객체 이름
field : 오류 필드
rejectedValue : 사용자가 입력한 값(거절된 값)
bindingFailure : 타입 오류 같은 바인딩 실패인지, 검증 실패인지 구분 값
codes : 메시지 코드
arguments : 메시지에서 사용하는 인자
defaultMessage : 기본 오류 메시지
검증 조건문에서는 바인딩 실패가 아니므로 bindingFailure=false이다. rejectedValue에는 거절된 값이 들어온다. 이 값을 통해 오류 발생시 사용자가 입력했던 값을 다시 전달해준다.
th:field는 정상 상황에서는 모델 객체의 값을 사용하지만 오류 발생시 FieldError에서 보관한 값(rejectedValue)을 사용하여 값을 출력한다.
<div>
    <label for="price" th:text="#{label.item.price}">가격</label>
    <input type="text" id="price" th:field="*{price}" class="form-control" th:errorclass="field-error" placeholder="가격을 입력하세요">
    <div class="field-error" th:errors="*{price}">

    </div>
</div>
BindingResult를 사용할 경우 위와 같이 템플릿 코드를 간편하게 사용할 수 있다. th:field는 정상 상황에서는 Item의 price에 대응되며 BindingResult에 필드명:price 에러가 담겨있을 경우 거절된 값과 대응된다. price에러가 담겨 템플릿으로 넘어온 경우 th:errorclass가 작동하며 class의 속성에 field-error를 추가한다.
th:errors: 해당 필드에 오류가 있는 경우 태그를 출력(th:if의 편의 버전)th:errorclass:th:field에서 지정한 필드에 오류가 있으면class정보를 추가
ValidationV3
errors 메세지 파일 생성
messages.properties 를 사용해도 되지만, 오류 메시지를 구분하기 쉽게 errors.properties 라는 별도의 파일로 관리해보자. application.properties 에 spring.messages.basename=messages,errors 를 추가하여 두 파일 모두 인식하도록 한다.
errors에 등록한 메세지를 사용하도록 코드를 변경한다.
@PostMapping("/add")
    public String addItemV3(@ModelAttribute Item item, BindingResult bindingResult, RedirectAttributes redirectAttributes, Model model) {

        // 검증 로직
        if (!StringUtils.hasText(item.getItemName())) {
            bindingResult.addError(new FieldError("item", "itemName", item.getItemName(), false, new String[] {"required.item.itemName"}, null, null));
        }
        if (item.getPrice() == null || item.getPrice() < 1000 || item.getPrice() > 1000000) {
            bindingResult.addError(new FieldError("item", "price", item.getPrice(), false, new String[] {"range.item.price"}, new Object[]{1000, 1000000}, null));
        }
        if (item.getQuantity() == null || item.getQuantity() >= 9999) {
            bindingResult.addError(new FieldError("item", "quantity", item.getQuantity(), false, new String[] {"max.item.quantity"}, new Object[]{9999}, null));
        }

        // 특정 필드가 아닌 복합 룰 검증
        if (item.getPrice() != null && item.getQuantity() != null) {
            int resultPrice = item.getPrice() * item.getQuantity();
            if (resultPrice < 10000) {
                bindingResult.addError(new ObjectError("item", new String[] {"totalPriceMin"}, new Object[]{10000, resultPrice},  null));
            }
        }
        //검증에 실패하면 다시 입력 폼으로

        if (bindingResult.hasErrors()) {
            log.info("errors = {}", bindingResult);
            return "validation/v2/addForm";
        }

        //성공 로직

        Item savedItem = itemRepository.save(item);
        redirectAttributes.addAttribute("itemId", savedItem.getId());
        redirectAttributes.addAttribute("status", true);
        return "redirect:/validation/v2/items/{itemId}";
    }
오류 메세지 코드(String 배열 타입), 오류코드에서 쓰일 변수(오브젝트 배열 타입) 인자를 넘겨준다.
th:errors는 if의 역할도 하지만 Error객체에 메세지 코드까지 들어있을 경우 BindingResult의 로직으로 인해 오류 메세지를 받아 출력하는 기능까지 존재한다.
ValidationV4
V3 컨트롤러 코드를 보면 굉장히 복잡하다. FieldError 를 구성하는 것 자체가 많은 인자를 주입해야 하고 오브젝트 배열을 넘겨야 하는 등 꽤 복잡한 과정이 존재한다.
이러한 문제를 해결해줄 것이 rejectValue(), reject()이다. 이 두 메서드를 사용하여 기존 코드를 단순화 할 수 있다.
// 검증 로직
        if (!StringUtils.hasText(item.getItemName())) {
            bindingResult.rejectValue("itemName", "required");
            // rejectValue -> 필드에러 생성 해줌

        }
        if (item.getPrice() == null || item.getPrice() < 1000 || item.getPrice() > 1000000) {
            bindingResult.rejectValue("price", "range", new Object[]{1000, 1000000}, null);
        }
        if (item.getQuantity() == null || item.getQuantity() >= 9999) {
            bindingResult.rejectValue("quantity", "max", new Object[]{9999}, null);
        }
.addError(new FieldError(~~~))를 rejectValue()로 처리할 수 있었다.
errors.properties에 있는 코드를 직접 입력하지 않았음에도 error메세지를 잘 출력하고 있는 이유는 rejectValue()에 들어가는 errorCode 파라미터는 messageResolver에서 사용되기 때문이다.
축약된 오류 코드
FieldError()를 직접 다룰 때는 오류 코드를 전부 입력했다.(range.item.price) rejectValue()를 사용할 때는 오류 코드를 range로 간단하게 입력했다. 이렇게만 전달해도 메세지 설정 파일에서 적절한 메세지를 잘 고르는 것은 MessageCodeResolver덕이다. 뒤에서 자세히 알아본다.
Object 에러에는 reject()를 적용한다.
오류 코드와 메세지 처리
오류 코드를 만들 때는 .을 기준으로 다음과 같이 자세히 만들 수도 있고
required.item.itemName = 상품 이름은 필수 입니다.
또는 다음과 같이 단순하게 만들 수도 있다.
required = 필수 값 입니다.
단순한 오류 메시지와 세부적인 오류 메세지는 각각의 쓰임과 장단점이 존재한다. 이들을 잘 사용하는 가장 모범적인 방법은 범용적으로 사용하다가 세밀하게 작성해야할 경우에는 세밀한 내용이 적용되도록 메세지에 단계를 두는 것이다.
MessageCodeResolver
@Test
    void messageCodesResolverField() {
        String[] messageCodes = codesResolver.resolveMessageCodes("required", "item", "itemName", String.class);
        for (String messageCode : messageCodes) {
            System.out.println("messageCode = " + messageCode);
        }

        assertThat(messageCodes).containsExactly(
                "required.item.itemName",
                "required.itemName",
                "required.java.lang.String",
                "required"

        );
    }
위는 MessageCodeResolver의 로직을 알아보기 위한 테스트 코드이다.
MessageCodeResolver의 메서드 resolveMessageCodes(메세지코드, 타겟객체, 타겟객체 필드, 필드 타입)으로 메세지 코드를 "순서가 있는" 배열로 얻을 수 있다.
우선순위를 잘 보면 가장 구체적으로 보이는 "required.item.itemName"이 우선된다. 끝에는 가장 범용적인 required가 배치된다.
BindingResult가 이를 이용하는 방법은 다음과 같다.
- 전제 : BindingResult는 주입 시점부터 이미 앞에서 @ModelAttribute로 등록된 타겟 객체를 알고 있다.
- rejectValue 첫번째 인자 : 타겟 객체의 필드 명을 지정한다.
- rejectValue 두번째 인자 : 메세지 코드를 지정한다.
이렇게 되면 rejectValue()는 MessageCodeResolver(메세지코드, 타겟객체, 타겟객체 필드, 필드 타입)을 실행시킬 수 있다.
이를 통해 전달 받은 오류코드 배열을 인자로 하여 FieldError 객체를 생성해서 BindingResult에 구성한다.
여기까지 이해했다면 왜 FieldError객체의 오류코드를 받는 파라미터가 배열 타입으로 설계되었는 지 이해가 될 것이다.
이제 BindingResult에는 에러 객체가 존재하는 isError상태가 되어 템플릿으로 넘어간다.
th:errors는 이에 반응하여 오류가 있다면 에러 객체에 존재하는 배열 순서에 따라 오류 메세지 파일(errors.properties)를 순서대로 조사하여 랜더링한다.
타입 바인딩 오류 잡아내기
BindingResult를 사용하면 더 이상 객체와 관련해서 에러 페이지를 내보내는 일은 없을 것이다. 다만 Integer필드에 String을 전달할 경우 다음과 같은 화면을 볼 수 있다.
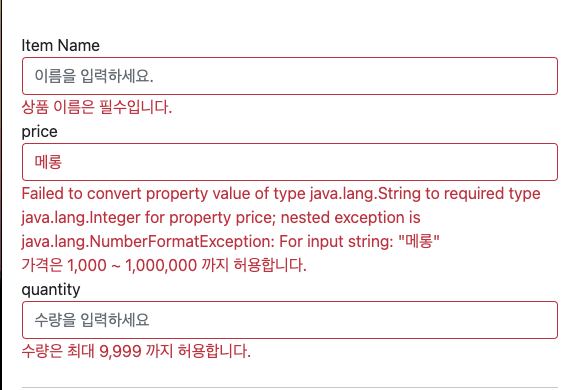
이때 price에 대한 정보를 보기 위해 IDE 콘솔을 보게 되면 다음과 같은 문구가 출력된다.
Field error in object 'item' on field 'price': rejected value [메롱];
codes [typeMismatch.item.price,typeMismatch.price,typeMismatch.java.lang.Integer,typeMismatch]; arguments
[org.springframework.context.support.DefaultMessageSourceResolvable: codes [item.price,price]; arguments [];
default message [price]]; default message [Failed to convert property value of type 'java.lang.String' to
required type 'java.lang.Integer' for property 'price'; nested exception is java.lang.NumberFormatException: For
input string: "메롱"]
위에서 MessageCodeResolver가 뱉은 메세지 코드는 다음과 같다.
typeMismatch.item.price,
typeMismatch.price,
typeMismatch.java.lang.Integer,
typeMismatch
모두 errors.properties에 존재하지 않기 때문에 defaultMessage(스프링 내장)가 출력된 것이다.
즉 우리는 위의 메세지 코드를 에러 프로퍼티스에 추가해주면 된다.
// errors.properties
typeMismatch.java.lang.Integer=숫자를 입력해주세요.
typeMismatch=타입 오류입니다.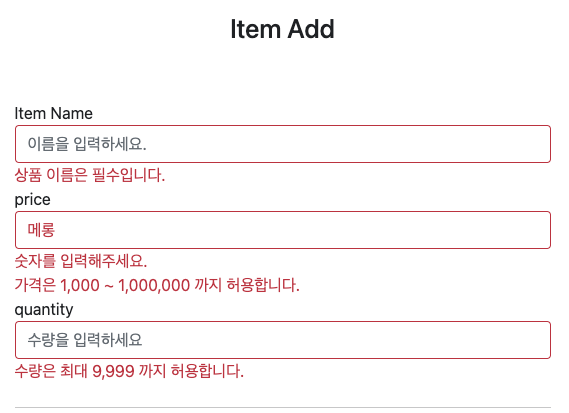
Validator
코드 관점에서 컨트롤러에서 검증로직이 차지하는 부분이 매우 비중이 높아졌다. 검증역할의 책임 분리를 위한 ItemValidator 클래스를 제작한다. 이 클래스는 검증 역할을 담당하며 Validator 인터페이스를 구현한다.
@Component
public class ItemValidator implements Validator {

    @Override
    public boolean supports(Class<?> clazz) {
        return Item.class.isAssignableFrom(clazz);
        // item == clazz
        // item == subItem
    }

    @Override
    public void validate(Object target, Errors errors) {
        Item item = (Item) target;

        // 검증 로직
        if (!StringUtils.hasText(item.getItemName())) {
            errors.rejectValue("itemName", "required");
            // rejectValue -> 필드에러 생성 해줌

        }
        if (item.getPrice() == null || item.getPrice() < 1000 || item.getPrice() > 1000000) {
            errors.rejectValue("price", "range", new Object[]{1000, 1000000}, null);
        }
        if (item.getQuantity() == null || item.getQuantity() >= 9999) {
            errors.rejectValue("quantity", "max", new Object[]{9999}, null);
        }

        // 특정 필드가 아닌 복합 룰 검증
        if (item.getPrice() != null && item.getQuantity() != null) {
            int resultPrice = item.getPrice() * item.getQuantity();
            if (resultPrice < 10000) {
                errors.reject("totalPriceMin", new Object[]{10000, resultPrice}, null);
            }
        }
    }
}- supports에서 들어온 객체가 올바른 타입인지 검증한다.
- validate에서 검증로직이 들어간다.
Error 타입은 BindingResult의 부모 타입이다.
  @PostMapping("/add")
    public String addItemV5(@ModelAttribute Item item, BindingResult bindingResult, RedirectAttributes redirectAttributes, Model model) {

        //검증
        itemValidator.validate(item, bindingResult);

        //실패시
        if (bindingResult.hasErrors()) {
            log.info("errors = {}", bindingResult);
            return "validation/v2/addForm";
        }

        //성공 로직

        Item savedItem = itemRepository.save(item);
        redirectAttributes.addAttribute("itemId", savedItem.getId());
        redirectAttributes.addAttribute("status", true);
        return "redirect:/validation/v2/items/{itemId}";
    }
위와 같이 컨트롤러 코드가 매우 짧아진 것을 볼 수 있다.
WebDataBinder
@InitBinder
    public void init(WebDataBinder dataBinder) {
        dataBinder.addValidators(itemValidator);
    }
위의 코드를 컨트롤러 클래스에 추가할 경우 우리는 컨트롤러를 더욱 간편하게 활용할 수 있다. 점점 추상화의 끝으로 가는 느낌이다.
@PostMapping("/add")
    public String addItemV6(@Validated @ModelAttribute Item item, BindingResult bindingResult, RedirectAttributes redirectAttributes, Model model) {

        //실패시
        if (bindingResult.hasErrors()) {
            log.info("errors = {}", bindingResult);
            return "validation/v2/addForm";
        }

        //성공 로직

        Item savedItem = itemRepository.save(item);
        redirectAttributes.addAttribute("itemId", savedItem.getId());
        redirectAttributes.addAttribute("status", true);
        return "redirect:/validation/v2/items/{itemId}";
    }
위와 같이 @Validated로 하여금 검증 코드를 주지 않고 인자에 애노테이션을 전달하는 것으로 검증을 수행할 수 있다.
위에서 공부한 매우 복잡한 검증절차를 모두 완료하여 BindingResult도 보이지 않게 템플릿에 전달할 수 있다.
WebDataBinder에 검증기를 등록한다. 검증기는 여러개 등록할 수 있고 @Validated는 알맞은 검증기를 찾아 검증을 진행한다. 이때 여러 검증기 중 타겟 객체에 알맞는 검증기를 찾기 위해Validator의 supports가 이용된다.
WebDataBinder를 클래스 수준이 아닌 글로벌 설정도 가능하지만 이렇게 글로벌로 설정하는 경우는 매우 드물다.