1. 프로젝트 생성
기본 셋팅
- IntelliJ 설치
- JAVA 11 설치
Start Spring io
-
Spring Boot 기반으로 Spring 관련 프로젝트를 만들어주는 사이트
-
Maven
-
Gradle
- 요즘 추세는 Maven → Gradle
-
Main VS Test
- Test
- 요즘 개발 트렌드에서는 test code 작성이 정말 중요하다.
- Test
InteliJ Default Port 번호 바꾸기
[IntelliJ] 아파치 톰캣 설정 및 JSP 실행 방법
Oracle Port 번호 바꾸기
Spring Boot 내장 웹 서버 설정 방법
-
application.properties 파일을 이용해서 톰캣의 Default port인 8080을 다른 포트번호로 변경할 수도 있다.
# application.properties server.port=8090 -
만약 0으로 포트번호를 지정하면 랜덤으로 사용가능한 비어있는 포트번호로 지정이 된다.
# application.properties
server.port=0
Java를 직접 실행하는것이 아니라 Gradle을 통해서 실행될 때가 있다. 고치려면?
- Ctrl + Alt + S 또는 File > Settings를 들어가서 Gradle을 검색한다.
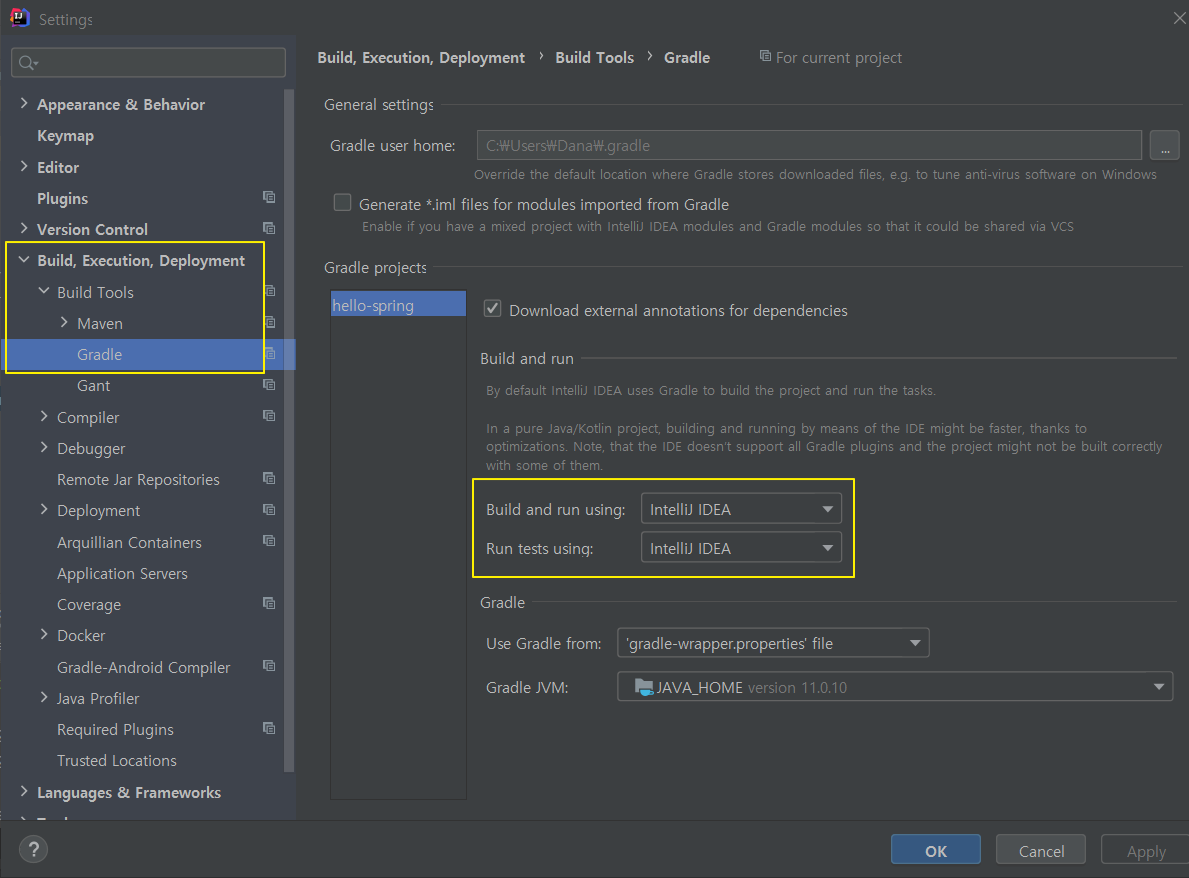
- 위 사진과 같이 노란 박스 안에 두 곳을 Gradle에서 intelliJ로 바꿔준다.
- RUN을 할때 gradle을 통해서 실행될 때가 있는데 설정을 이렇게 바꿔주면 intelliJ에서 바로 실행되기 때문에 속도가 빠르다.
2. 라이브러리 살펴보기
-
Spring boot starter web만 가져오면, web과 관련된 모든 필요한 것들을 자동으로 땡겨온다.
-
Gradle이 의존관계를
-
예전에는 개발할 때, Web server(WAS)를 직접 서버에 설치를 해놓고, 거기에 자바코드를 밀어넣는 형식으로 웹 서버와 개발 라이브러리를 완전히 분리해놓았다.
( → 톰캣 서버 설치하고~~ = 매우 힘든 작업이었음 )
-
요즘에는 소스 라이브러리에서 웹서버를 이미 들고 있다. ( embeded, 내장 웹 서버 )
⇒ Spring Boot를 쓰면 Spring core까지 다 땡겨와서 편하다 !!
log 관련하여...
- 실무에서는 System.out.println을 절대 쓰면 안된다.
- log로 출력을 해야한다... → 심각한 에러들을 따로 보면서 관리하는 것은 log를 통해 함
slf4j : 인터페이스
logback : 실제 log를 어떤 구현체로 출력을 할 것인지 정하는 것, 성능빠르고 기능지원도 다양
spring에서는 slf4j + logback을 default로 땡겨온다.
- test는 junit 테스트 프레임워크를 이용한다.
3. View 환경설정
Welcome Page 만들기
resources/static/index.html
<!DOCTYPE HTML>
<html>
<head>
 <title>Hello</title>
 <meta http-equiv="Content-Type" content="text/html; charset=UTF-8" />
</head>
<body>
Hello
<a href="/hello">hello</a>
</body>
</html>- 스프링 부트가 제공하는 Welcome Page 기능
static/index.html을 올려두면 Welcome page 기능을 제공한다.- https://docs.spring.io/spring-boot/docs/2.3.1.RELEASE/reference/html/spring-bootfeatures.html#boot-features-spring-mvc-welcome-page
thymeleaf 템플릿 엔진
- thymeleaf 공식 사이트: https://www.thymeleaf.org/
- 스프링 공식 튜토리얼: https://spring.io/guides/gs/serving-web-content/
- 스프링부트 메뉴얼: https://docs.spring.io/spring-boot/docs/2.3.1.RELEASE/reference/
html/spring-boot-features.html#boot-features-spring-mvc-template-engines
@Controller
public class HelloController {
 @GetMapping("hello")
 public String hello(Model model) {
 model.addAttribute("data", "hello!!");
 return "hello";
 }
}
resources/templates/hello.html
<!DOCTYPE HTML>
<html xmlns:th="http://www.thymeleaf.org">
<head>
 <title>Hello</title>
 <meta http-equiv="Content-Type" content="text/html; charset=UTF-8" />
</head>
<body>
<p th:text="'안녕하세요. ' + ${data}" >안녕하세요. 손님</p>
</body>
</html>
thymeleaf 템플릿엔진 동작 확인
-
실행: http://localhost:8080/hello
-
Oracle 포트를 8080으로 해두었기 때문에 8090으로 포트번호를 변경해서 확인한다.
-
But default값은 8080임.
-
동작 환경
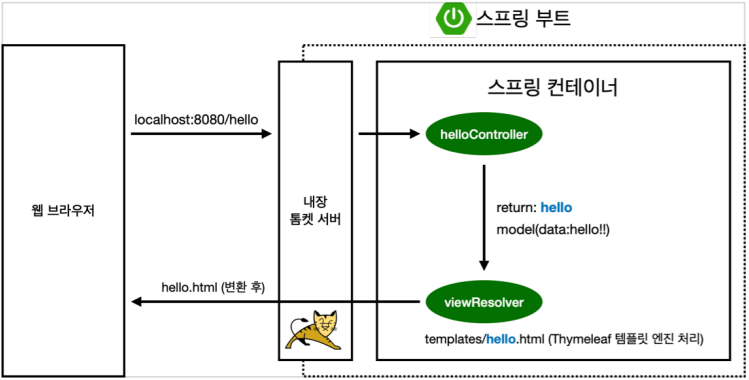
- 컨트롤러에서 리턴 값으로 문자를 반환하면 뷰 리졸버( viewResolver )가 화면을 찾아서 처리한다.
- 스프링 부트 템플릿엔진 기본 viewName 매핑
resources:templates/ +{ViewName}+ .html
4. Build하고 실행하기
윈도우 사용자 기준
- 콘솔로 이동 → 명령 프롬프트(cmd)로 이동
./gradlew gradlew.bat를 실행하면 됩니다.- 명령 프롬프트에서 gradlew.bat 를 실행하려면
gradlew하고 엔터를 치면 됩니다. gradlew build- 폴더 목록 확인 ls →
dir