Vanilla TypeScript로 React Class Component 구현해 보기
이 글의 목적은 바닐라 JavaScript (TypeScript)를 사용하여 React의 클래스 컴포넌트를 구현함으로써, React의 장점과 효율성을 깊이 있게 이해하는 것이다. 컴포넌트 기반 UI 구성과 생명주기 관리, 상태 관리를 직접 구현해 보겠다.
React Class Component
리액트 클래스 컴포넌트는 ES6 클래스 문법을 사용하여 정의되며, 리액트의 주요 기능인 상태 관리와 생명주기 메서드를 활용할 수 있다.
주요 생명주기 메서드
componentWillMount: 컴포넌트가 마운트되기 전 호출된다.componentDidMount: 컴포넌트가 마운트된 후 호출된다.componentWillUpdate: 컴포넌트가 업데이트되기 전 호출된다.componentDidUpdate: 컴포넌트가 업데이트된 후 호출된다.componentWillUnmount: 컴포넌트가 언마운트 되기 전에 호출된다.
구현 방법
인터페이스 정의
먼저, ComponentProps와 ComponentState 인터페이스를 정의하여 컴포넌트의 속성과 상태를 타입으로 명시했다.
export interface ComponentProps {
  [key: string]: any;
}

export interface ComponentState {
  [key: string]: any;
}
컴포넌트 클래스 정의
그 다음, Component 클래스를 정의했다. 이 클래스는 props와 state를 초기화하고 생명주기 메서드를 호출한다.
export class Component {
  props: ComponentProps;
  state: ComponentState;

  constructor(props: ComponentProps) {
    this.props = props;
    this.state = {};
    this.componentWillMount();
    this.render();
    this.componentDidMount();
  }
상태 관리 메서드
setState 메서드는 새로운 상태 객체를 기존 상태 객체와 병합하고, 컴포넌트가 업데이트되기 전과 후에 각각 componentWillUpdate와 componentDidUpdate 메서드를 호출한다. 그런 다음, 컴포넌트의 UI를 다시 렌더링한다.
  setState(newState: ComponentState) {
    this.componentWillUpdate();
    for (let key in newState) {
      if (newState.hasOwnProperty(key)) {
        this.state[key] = newState[key];
      }
    }
    this.render();
    this.componentDidUpdate();
  }
생명주기 메서드
컴포넌트가 마운트 및 업데이트될 때 호출되는 생명주기 메서드를 정의했다.
  componentWillMount() {
    // 컴포넌트가 마운트 되기 전 호출
  }

  componentDidMount() {
    // 컴포넌트가 마운트 된 후 호출
  }

  componentWillUpdate() {
    // 컴포넌트가 업데이트 되기 전 호출
  }

  componentDidUpdate() {
    // 컴포넌트가 업데이트 된 후 호출
  }

  componentWillUnmount() {
    // 컴포넌트가 언마운트 되기 전에 호출
    // 여기에 리소스 해제 로직 추가
  }
UI 렌더링 메서드
render 메서드는 컴포넌트의 UI를 렌더링한다.
  render() {
    // UI 렌더링 함수
  }
}
메인 컴포넌트 구현
MainPage 컴포넌트를 Component 클래스를 상속받아 구현했다. 이 컴포넌트는 state를 초기화하고, 생명주기 메서드를 오버라이드하여 로그를 출력한다.
import { Component, ComponentProps } from '../Component';
export default class MainPage extends Component {
constructor(props: ComponentProps) {
super(props);
this.state = { count: 0 };
}
componentWillMount() {
console.log('MainPage will mount');
}
componentDidMount() {
console.log('MainPage did mount');
}
componentWillUpdate() {
console.log('MainPage will update');
}
componentDidUpdate() {
console.log('MainPage did update');
}
render() {
const element = document.getElementById('root');
if (element) {
element.innerHTML = `
<div>
<p>Count: ${this.state.count}</p>
<button id="increment">Click me!</button>
</div>
`;
document.getElementById('increment')?.addEventListener('click', () => {
this.setState({ count: this.state.count + 1 });
});
}
}
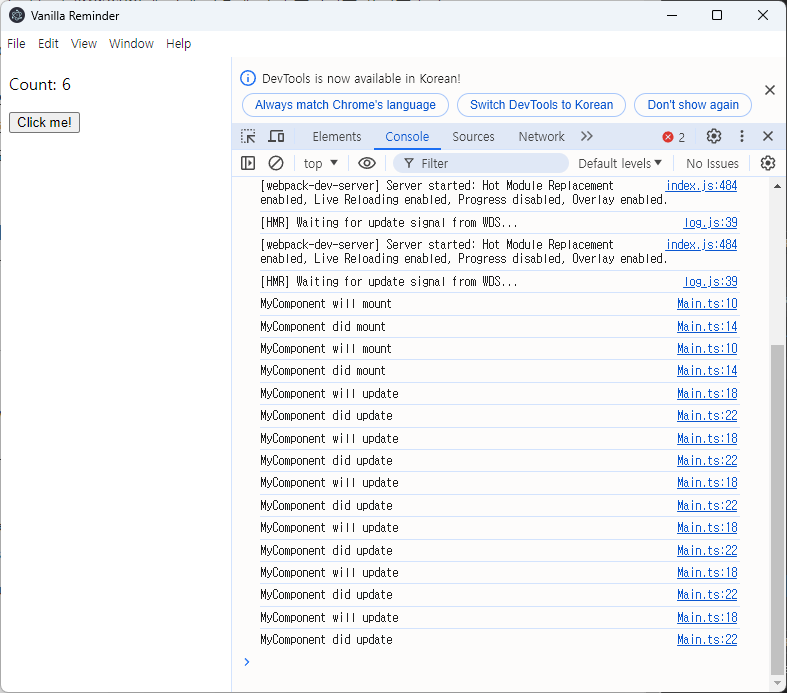
}실행 화면
배운 점
- 생명주기 메서드들은 애플리케이션의 복잡한 로직을 관리하는 데 매우 유용하다. 컴포넌트가 마운트되기 전, 마운트된 후, 업데이트되기 전, 업데이트된 후에 호출되는 메서드를 통해 컴포넌트의 상태를 관리하고 필요한 로직을 실행할 수 있다.
- 리액트의 컴포넌트 기반 구조와 상태 관리, 생명주기 메서드가 바닐라 자바스크립트에 비해 어떻게 더 구조적이고 유지보수가 용이한지 알 수 있었다. 바닐라 자바스크립트로 유사한 기능을 구현하려면 많은 수작업이 필요하며, 코드가 복잡해질수록 유지보수가 어려워질 것 같았다.
- 리액트와 바닐라 자바스크립트의 가장 큰 차이점 중 하나는 상태 관리와 UI 갱신의 자동화이다. 리액트는 선언적 UI 접근 방식을 사용하여 개발자가 상태 변경에 따른 UI 업데이트를 직접 관리하지 않도록 해 준다. 반면, 바닐라 자바스크립트에서는 모든 DOM 조작과 상태 변경을 수동으로 처리해야 한다. 이는 작은 프로젝트나 단일 페이지에서는 관리가 가능하지만, 규모가 커지고 상태가 복잡해질수록 유지보수와 확장이 어려워진다. 따라서, 대규모 애플리케이션 또는 상태가 많이 변경되는 동적인 인터페이스를 개발할 때는 리액트와 같은 프레임워크를 사용하는 것이 효과적이다.