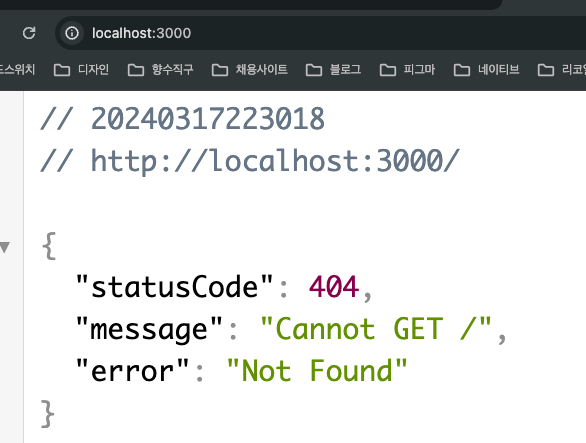
1. main.ts
1번 포스팅에서 main.ts에서는 controller와 module이 같이 정의되어 있었다. 보통 nest에서는 파일 하나에 클래스를 하나만 만든다고 한다. 그렇기 때문에 main.ts에 정의되어 있는 controller와 module을 별도로 나눌 것이다.
2. 파일 명명 규칙

app.controller.ts라고 명명한다.
해당 파일에는 classAppController{}가 정의되어 있는데
app.controller.ts에서
appd은 classAppController에서 app을
controller는 classAppController에서 Controller를 따른다.
즉 어떤 파일에 classAppContoller라는 클래스가 정의되어 있으면 해당 파일은 app.controller.ts가 되는 것이다.
module.ts도 동일하다.
다음은 위의 규칙대로 클래스를 나눴을 경우이다.
main.ts
import { NestFactory } from "@nestjs/core";
import { AppModule } from "./app.module";

async function bootstrap() {
  const app = await NestFactory.create(AppModule);
  await app.listen(3000);
}

bootstrap();
app.controller.ts
import { Controller, Get } from "@nestjs/common";

@Controller()
export class AppController {
  @Get()
  getRootRoute() {
    return "hi there";
  }
}
app.module.ts
import { Module } from "@nestjs/common";
import { AppController } from "./app.controller";

@Module({
  controllers: [AppController],
})
export class AppModule {}
3. 라우팅 데코레이터
node, express로 서버를 구성할 때 라우팅이라는 개념이 있었다.
이를 nest에서는 어떻게 제어를 할까?
app.controller.ts
import { Controller, Get } from "@nestjs/common";

@Controller()
export class AppController {
  @Get("/asdf")
  getRootRoute() {
    return "hi there";
  }
}
@Get 데코레이터에 인수로 "/asdf"를 입력했더니 기존 localhost:3000경로에 응닶값이 나오지 않았다.
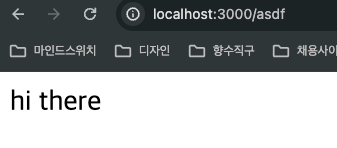
하지만 경로 뒤에 /asdf를 입력하였을 때 라우팅이 적용된 모습을 볼 수 있다.
이제 @Controller 데코레이터에 인수를 넣어보자.
app.controller.ts
import { Controller, Get } from "@nestjs/common";

@Controller("/app")
export class AppController {
  @Get("/asdf")
  getRootRoute() {
    return "hi there";
  }
}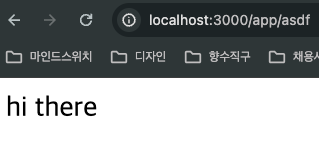
위와 같이 기존 localhost:3000/asdf에서 localhost:3000/app/asdf로 변경된 것을 볼 수 있다.
즉 @Controller데코레이터에 인수는 상위 라우팅에 경로를 제어하고 @Get 데코레이터에서는 해당하는 라우팅의 경로를 입력해서 변경될 수 있는 것이다.
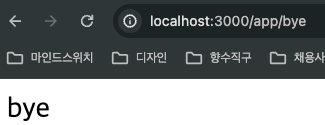
아래는 다른 라우팅을 지정해주는 방법이다.
app.controller.ts
import { Controller, Get } from "@nestjs/common";

@Controller("/app")
export class AppController {
  @Get("/asdf")
  getRootRoute() {
    return "hi there";
  }
  @Get("/bye")
  getBye() {
    return "bye";
  }
}
지금까지 기본적인 nest.js 설치 및 타입스크립트 설정, 컨트롤러, 파일명명 규칙, 라우팅에 대해서 알아봤다.