throughput
시간당 처리량
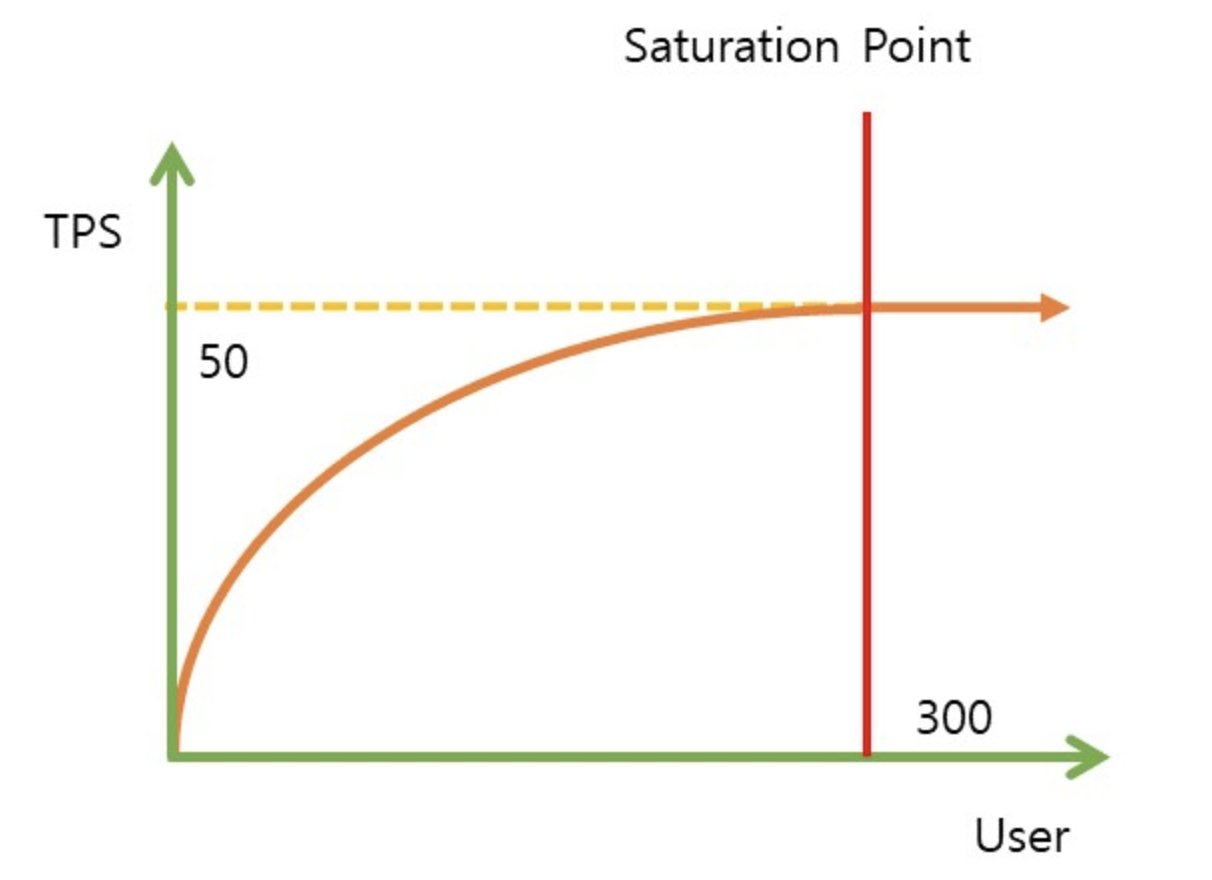
TPS(Transaction per seconds): 초 당 처리할 수 있는 트랜잭션의 수
RPS(Request per seconds) :
latency
지연시간. 시스템이 클라이언트로부터 request를 받아 response를 보내기까지의 시간.
ngrinder
# docker-compose.yml

version: '3'
services:
  ngrinder-controller:
    image: ngrinder/controller:3.4
    container_name: ngrinder-controller
    ports:
      - "80:80"
      - "16001:16001"
      - "12000-12009:12000-12009"
    volumes:
      - ./ngrinder-controller:/opt/ngrinder-controller
  agent-1:
    container_name: ngrinder-agent-1
    image: ngrinder/agent:latest
    command: ["192.168.20.104:8880"]
    environment:
      - TZ=Asia/Seoul
    volumes:
      - ./ngrinder-agent-1:/opt/ngrinder-agent
  agent-2:
    container_name: ngrinder-agent-2
    image: ngrinder/agent:latest
    command: ["192.168.20.104:8880"]
    environment:
      - TZ=Asia/Seoul
    volumes:
      - ./ngrinder-agent-2:/opt/ngrinder-agent
  agent-3:
    container_name: ngrinder-agent-3
    image: ngrinder/agent:latest
    command: ["192.168.20.104:8880"]
    environment:
      - TZ=Asia/Seoul
    volumes:
      - ./ngrinder-agent-3:/opt/ngrinder-agent
  agent-4:
    container_name: ngrinder-agent-4
    image: ngrinder/agent:latest
    command: ["192.168.20.104:8880"]
    environment:
      - TZ=Asia/Seoul
    volumes:
      - ./ngrinder-agent-4:/opt/ngrinder-agent
  agent-5:
    container_name: ngrinder-agent-5
    image: ngrinder/agent:latest
    command: ["192.168.20.104:8880"]
    environment:
      - TZ=Asia/Seoul
    volumes:
      - ./ngrinder-agent-5:/opt/ngrinder-agent
docker로 ngringer controller와 agent(테스트 요청 보내줄 서버)를 설치해준다.
localhost:80에 접속하면 controller가 띄워져 ngrinder 페이지가 나온다.
초기 아이디 비번은 admin/admin
Menu > Agent Management에 가면 아까 같이 도커로 띄운 agent가 보일 것이다.
만약 로컬에서 agent를 만들고 싶다면, 사이트에 로그인 한 후 메뉴에서 admin > Download Agent를 클릭하면 Agent 압축 파일이 다운로드 되고, 완료 후에 압축을 풀어준다.
tar -xvf ngrinder-agent-3.5.5-p1-localhost.tar 현재는 Controller를 로컬에 두어 수정할 필요 없었지만, 나중에 클라우드에 nGrinder 환경을 설정한다면 agent.controller_host=localhost 부분을 수정해줘야한다.
$ cd ngrinder-agent

$ vi __agent.conf

common.start_mode=agent
agent.controller_host=localhost
agent.controller_port=16001
agent.region=NONE
그다음 agent를 실행해준다.
./run_agent.sh설정 속성
✔️ Agent
  ├── 성능 측정에 사용할 Agent 개수
  └── Agent를 여러개로 구성하고 싶은 경우 클라우드 서비스 이용하기
      └── 여러개의 인스턴스를 생성해서 Agent 설치하기

✔️ Vuser per agent
  ├── Agent 당 설정할 가상 사용자 수
  └── 동시에 요청을 날리는 사용자 수를 의미

✔️ Process / Thread
  └── 하나의 Agent에서 생성할 프로세스와 스레드 개수

✔️ Script
  ├── 성능 측정 시 각 Agent에서 실행할 스크립트
  └── 앞서 API 호출 과정에서 생성한 Script를 연결(.groovy)하거나 Github에서 가져올 수 있다.

✔️ Duration (HH:MM:SS)
   └── 성능 측정 수행 시간

✔️ Run Count
   └── 스레드 당 테스트 코드를 수행하는 횟수


✔️ Enable Ramp-Up
  └── 성능 측정 과정에서 가상 사용자를 점진적으로 늘리도록 활성화

✔️ Initial Count
  └── 처음 시작 시 가상 사용자 수

✔️ Initial Sleep Time
  └── 테스트 시작 시간

✔️ Incremental Step
  └── Process 또는 Thread를 증가시키는 개수

✔️  Interval
  └── Process 또는 Thread를 증가시키는 시간 간격