
CRA로 프로젝트를 생성했다면 테스팅 관련 라이브러리가 내장되어있다.
→ @testing-library/jest-dom, @testing-library/react, @testing-library/user-event
jest는 기본적으로 test 폴더에 존재하는 파일이나, .test.js, .spec.js 로 끝나는 모든 파일을 테스트 파일로 인식하며 src 폴더 아래의 모든 깊이에서 찾을 수 있다.
import { useState } from "react";

export default function Counter() {
  const [count, setCount] = useState(0);

  return (
    <>
      <p>{count}</p>
      <button type="button" onClick={() => setCount(count + 1)}>
        +
      </button>
      <button type="button" onClick={() => setCount(count - 1)}>
        -
      </button>
    </>
  );
}
위와 같이 작성된 컴포넌트가 있다고 할 때 생각해 볼 수 있는 테스트 케이스는 아래와 같다.
- CASE 1 초기 값 (0)이 설정되어 있는가?
- CASE 2 더하기 버튼을 눌렀을 때 숫자가 증가하는가?
- CASE 3 빼기 버튼을 눌렀을 때 숫자가 감소하는가?
import { render, screen } from "@testing-library/react";
import userEvent from "@testing-library/user-event";
import Counter from "Counter";

describe("<Counter />", () => {
  it("should set init number in screen", () => { // CASE1 초기 값(0)이 설정되어 있는가?
    render(<Counter />);

    expect(screen.getByText(/0/)).toBeInTheDocument();
  });

  it("should add number when click plus button", () => { // CASE2 더하기 버튼을 눌렀을 때 숫자가 증가하는가?
    render(<Counter />);

    const plusButton = screen.getByRole("button", { name: /\+/ });

    userEvent.click(plusButton);
    userEvent.click(plusButton);

    expect(screen.getByText(/2/)).toBeInTheDocument();
  });

  it("should minus number when click minus button", () => { // CASE3 빼기 버튼을 눌렀을 때 숫자가 감소하는가?
    render(<Counter />);

    const minusButton = screen.getByRole("button", { name: /-/ });

    userEvent.click(minusButton);

    expect(screen.getByText(/-1/)).toBeInTheDocument();
  });
});
리액트 내부에서 테스트 코드는 테스트를 위한 전제 조건을 준비하고(arrange) → 테스트의 실제 작업을 수행한 뒤(act) → 테스트 결과를 확인하는(assert) 구조이다.
CASE 1
line 7: render() 로 Counter 컴포넌트를 렌더링해서 (arrange)
line 9: screen.getByText(/0/) 로 "0" 이라는 텍스트를 가지고 있는 HTMLElement를 찾고 (act), expect(screen.getByText(0)).toBeInTheDocument() 로 위에서 찾은 HTMLElement가 Counter 컴포넌트 안에 있는지 테스트한다. (assert)
CASE 2
line 15: name이 "+"인 button Element를 가져와서 (act)
line 17~18: userEvent.click 으로 실행을 시켰을 때, (act)
line 20: "2" 라는 텍스트를 가지고 있는 HTMLElement가 Counter 안에 있는지 테스트한다. (assert)
CASE 3
25: name이 "-"인 button Element를 가져와서 (act)
27: userEvent.click 으로 실행을 시켰을 때, (act)
29: "-1"라는 텍스트를 가지고 있는 HTMLElement가 Counter 안에 있는지 테스트한다. (assert)
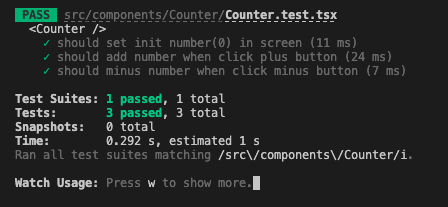
테스트에 성공한다면 위와 같은 결과를 얻을 수 있다.
행위에 대해서 여러가지 쿼리를 날릴 수 있다. (getBy, findBy, queryBy*)
쿼리에 대해서도 동기, 비동기 동작 구분이 있어 테스트 코드를 작성해야하는 상황에 맞춰 쿼리를 작성해야한다.
https://testing-library.com/docs/queries/about
쿼리를 어떻게 써야할지 헷갈린다면 테스트를 위한 플레이그라운드가 있어서 여기서 먼저 작성해보는 것도 나쁘지 않아 보인다.
https://testing-playground.com/