[+73][기업협업]hooks api reference
기본 hook
- useState
- useEffect
- useContext
추가 hooks
- useReducer
- useCallback
- useMemo
- useRef
- useImperativeHandle
- useLayoutEffect
- useDebugValue
useState
사용법
const [state, setState] = useState(initialState);

ex.
const [songId, setSongId] = useState();
또는
const [songId, setSongId] = useState(1);
설명
- 최초 렌더링 하는 동안 반환되는 state는 처음에 전달된 인자 = initialState의 값과 같다.
- setState, setSongId 함수는 state를 갱신할 때 사용된다. 새 state값을 받아 component의 re-rendering을 큐에 등록한다.(큐 = queue는 +45일차 자료구조 라는 글에 있다.)
- re-rendering 시에 useState를 통해 갱신된 값이 state에 저장된다.
- class형에서 callback함수가 필요했다면 hooks에서는 한 함수에 setState 두개가 있고 callback함수를 쓰지 않아도 괜찮다.(좀 더 알아보기)
함수적 갱신
- 함수를 setState로 전달할 수 있다. 그 함수는 이전 값을 받아 갱신괸 값을 반환한다.
ex.
function Add( {initialNum} ) {
  const [songId, setSongId] = useState(initialNum);
  return (
    <>
    SongId: {songId}
     <button onClick={ ()=>setsongId(initialNum) }> Reset</button>
     <button onClick={ ()=>setsongId(prevSongId => prevSongId -1) }> - </button>
     <button onClick={ ()=>setsongId(prevSongId => prevSongId +1) }> + </button>
    </>
   )
}
업데이트 함수가 현재 상태와 정확히 똑같은 값을 반환한다면 바도 뒤에 일어날 re-rendering은 완전히 건너뛰게 된다.
주의
- class component 의 setState 메서드와는 다르게, useState는 갱신 객체를 자동으로 합치지는 않는다.
setState(prevState => {
  //Object.assign would also work
  return {...prevState, ...updateValues }
})
이렇게 함수 업데이터 폼을 객체 전개 연산자와 결합함으로서 이 동작을 복제할 수 있다.
다른 방법으로 useReducer가 있다. useReducer는 state 객체를 관리하는 데에 더 적합하다.
초기 state가 고비용 계산의 결과라면, 초기 렌더 때에만 실행될 함수 쓸 수 있다.
const [state, setState] = useState( ()=> {
  const initialState =
  someExpensiveComputation(props);
  returninitialState;
} );
렌더링 시 고비용의 계산을 하고 있다면 useMemo를 사용해서 최적화 할 수 있다.
useEffect
사용법
useEffect(didUpdate);설명
- 어떤 effect를 발생하는 함수를 인자로 받는다.
- useEffect에 전달된 함수는 화면에 rendering이 완료된 후 수행하게 될 것이다.
기본 동작은 모든 렌더링이 끝나고 effect를 발생시키는 것이지만 의존성 중 하나만 바뀌어도 항상 재 생성되므로 만약 props가 변경될 때만 필요하다면 두 번째 인자로 조건을 준다. 이 두 번째 인자는 effect가 종속되어 있는 값의 배열이다.
ex.
useEffect (
  () => {
    const subscription = props.source.subscribe();
    return ()=> {
      subscription.unsubscribe();
    }
  },
  [props.source]
)
->이제 props.source가 변경될 때에만 구독이 재생성될 것입니다.
- useEffect로 componentDidMount만들기
useEffect (
 () => {
    ...
 },
 []->이렇게 빈 배열 넣기
)
-----
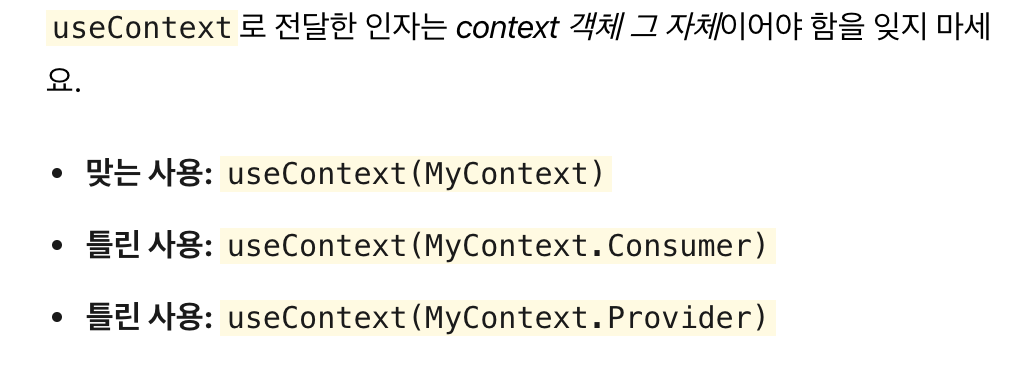
useContext
--
**사용법**const value = useContext(MyContext);
**설명**
context객체(React.createContext에서 반환된 값)을 받아 그 context의 현재 값을 반환한다. context의 현재 값은 트리 안에서 이 Hook을 호출하는 컴포넌트에 가장 가까이에 있는 <MyContext.Provider>의 value prop에 의해 결정된다.
상위 컴포넌트에서 React.memo 또는 shouldComponentUpdate를 사용하더라도 useContext를 사용하고 있는 컴포너트 자체에서부터 다시 렌더링 된다.
useContext를 호출한 컴포넌트는 context값이 변경되면 항상 re-rendering된다.
class형 => static contextType = MyContext 또는 <MyContext.Consumer>
hooks형 => useContext(MyContext)
-----
useContext를 Context.Provider과 같이 사용해라.const themes = {
light: {
foreground: "#ffffff",
background: "#eeeeee"
},
dark: {
foreground: "#ffffff",
background: "#222222"
}
};
const ThemeContext = React.createContext(themes.light);
function App() {
return (
<ThemeContext.Provider value={themes.dark}>
</ThemeContext.Provider>
);
}
function Toolbar(props) {
return (
 <div>
   <ThemeButton />
 </div>
);
}
function ThemedButton() {
const theme = useContext(ThemeContext);
return (
<button style={{background: theme.background, color: theme.foreground}}>
I am styled by theme context!
)
}
----

추가 hook
--


useReducer
--
사용법
const [state, dispatch] = useReducer(reducer, initialArg, init);
useReducer는 useState대체함수이다. (state, action) => newState의 형태로 reducer를 받고 dispatch메서드와 짝의 형태로 현재 state를 반환한다.

state가 이전 state에 의존적인 경우 보통 useState보다 useReducer를 선호한다. useReducer는 자세한 업데이트를 트리거 하는 component의 성능을 최적화할 수 있는데 이것은 콜백 대신 dispatch를 전달 할 수 있기 때문이다.

useState내용이 있던 예제에서 reducer를 사용해서 작성한 예제.
const InitialState = {count:0};
function reducer(state, action) {
switch (action.type) {
case 'increment' :
return {count: state.count +1 };
case 'decrement' :
return { count: state.count -1 };
default:
throw new Error();
}
}
function Counter(){
const [state, dispatch] = useReducer(reducer, initialState);
return(
<>
Count: {state.count}
<button onClick={ ()=> dispatch({type: 'decrement'})}> -
<button onClick={()=> displatch ({type: 'increment'})}> +
</>
)
}
--

때때로 초기값은 props에 의존할 필요도 있지만, 기본적으로
useReducer state초기화 하는데에는 두 가지 방법이 있다.

1. 초기 state의 구체화
가장 간단한 방법으로 초기 state를 두 번째 인자로 전달하는 것이다.
const [state, dispatch] = useReducer (
reducer,
{count: initialCount}
);
(Redux에서는 아니다.)

2. 초기화 지연
초기 state를 조금 지연해서 생성할 수 있다. 이를 위해 `init`함수를 세 번쨰 인자로 전달한다. 그 `init(initialArg)`에 초기 state를 설정하는 것이다.

이것은 reducer 외부에서 초기 state를 계산하는 로직을 추출할 수 있도록 한다. 또, state재설정하는 데에도 유용하다.
function init(initialCount) {
return {count: initialCount};
}
function reducer(state, action) {
switch (action.type) {
case'increment':
return {count: state.count + 1};
case 'decrement':
return {count: state.count -1};
case 'reset':
return init(action.payload);
default:
throw new Error();
}
}
function Counter({initialCount}) {
const [state, dispatch] = useReducer(reducer, initialCount, init);
return(
<>
<button onClick={ ()=> dispatch({type: 'reset', payload: initialCount})}> Reset
<button onClick={ ()=> dispatch({type: 'increment'})}> +
<button onClick={ ()=> dispatch({type: 'decrement'})}> -
</>
)
}
dispatch의 회피
--
Reducer Hook에서 현재 state와 같은 값을 반환하는 경우 React는 자식을 re-rendering하거나 effect를 발생하지 않고 이것들을 회피할 것이다.

만약 렌더링 시에 고비용으로 계산을 하고 있다면 `useMemo`를 사용하여 그것들을 최적화 할 수 있다.

useCallback
--
**사용법**
const memoizedCallback = useCallback(
()=> {
doSomething(a,b)
},
[a,b]
)
memoization된 callback을 반환한다.

`*memoization 이란?`
-> 컴퓨터 프로그램이 동일한 계산을 반복해야 할 때, 이전에 계산한 값을 메모리에 저장함으로써 동일한 계산의 반복 수행을 제거하여 프로그램 속도를 빠르게 하는 기술이다.

이 콜백의 의존성이 변경되었을 때에만 memoization이 변경된다. 이것은 불 필요한 렌더링을 방지하기 위해 참조의 동일성에 의존적인 자식 컴포넌트에 콜백을 전달할 때 유용하다.

`useCallback(fn, deps)` 는 `useMemo( ()=> fn, deps)` 와 같다.


useMemo
--

**사용법**
const memoizedValue = useMemo(() => computeExpensiveValue (a,b), [a,b])
이것도 memoization된 값을 반환한다.
"생성"함수와 그것의 의존성 값틔 배열을 전달한다. useMemo는 의존성이 변경되었을 때에만 memoization된 값만 다시 계산한다. 이 최적화는 모든 렌더링 시의 고비용 계산을 방지하게 해준다.

`useMemo`로 전달된 함수는 렌더링 중에 실행된다는 것을 기억하자. 통상적으로 렌더링 중에 하지 않는 것을 함수 내에서 하면 안된다. 예를 들어, `side effects`는 `useEffect에서 하는 일이지` useMemo에서 하는 일이 아니다.

만약 배열이 없다면 매 렌더링 때마다 새 값을 계산하게 될 것이다.

---


useRef
--

**사용법**
const refContainer = useRef(initialValue);
`useRef`는 .current 프로퍼티로 전달된 인자(initialValue)로 초기화된 변경 가능한 ref객체를 반환한다. 반환된 객체는 컴포넌트의 전 생애주기를 통해 유지된다.

일반적으로 사용되는 case는 자식에게 명령적으로 접근하는 경우이다.
function TextInputWithFocusButton() {
const inputEl = useRef(null);
const onButtonClick = () => {
inputEl.current.focus();
// current로 가리킬 수 있다.
}
return(
<>
Focus ths input
</>
)
}
` useRef`는 `.current`프로퍼티에 변경 가능한 값을 담고 있는 상자와 같아.

ref속성보다 useRef()가 더 유용하다. 이 기능은 어떤 가변값을 유지하는데에 편리하다. useRef가 순수 자바스크립트 객체를 생성하기 때문이다. useRef()와 {current: ...} 객체 자체를 생성하는 것의 유일한 차이점이라면 useRef는 매번 렌더링을 할 때 동일한 ref객체를 제공한다는 것이다.

useRef는 내용이 변경될 때 그것을 알려주지 ㅇ낳는다. .current프로퍼티를 변형하는 것이 리렌더링을 발생시키지는 않는다. 만약 React가 DOM node에 ref를 접근할 떄 어떤 코드를 실행하고 싶다면 대신 콜백 ref를 사용해라.


useImperativeHandle
--
**사용법**
useImperativeHandle(ref, createHandle, [deps])
useImperativeHandle은 ref를 사용할 떄 부모 컴포넌트에 노출되는 인스턴스 값을 사용자화(customizes)한다. 항상 그렇듯, 대부분 경우 ref를 사용한 명령형 코드는 피해야 한다.
useImperativeHandle은 forwardRef와 더불어 사용해야 한다.
fuction FancyInput(props, ref) {
const inputRef = useRef();
useImperativeHandle(ref, ()=> ({
focus: ()=> {
inputRef.current.focus();
}
}));
return <input ref={inputRef} ... />;
}
FancyInput = forwardRef(FancyInput)
위 예제에서 <FancyInput ref={inputRef} />를 렌더린한 부모 컴포넌트는 inputRef.current.focus()를 호출할 수 있다.