Spring Security와 JWT 인증 방식을 사용하면서 가장 흥미로웠던 부분은 Filter Chain에서 일어나는 여러 행위들을 처리하는 다양한 필터들의 역할이었습니다. 물론 필터의 역할들을 제대로 파악하지 못했을 때는 많이 헤맷지만 조금씩 배워나가보니 생각보다 쉽고 사용하기 편하다는 것을 알게되었습니다. 여전히 알아야할 것들은 많지만요. 이 글에서는 제가 구현하고 있는 웹 애플리케이션에서 사용하고있는 필터들 중 일부를 간단히 설명하고, JWT 인증 후 처리 로직에 관해 다루려고 합니다.
JWTAuthenticationFilter
JWT 인증 방식을 사용하는 애플리케이션에서 인증된 사용자는 요청을 할 때마다 서버측으로 token을 보내옵니다. 그럼 서버에서는 이 토큰을 가지고 요청하는 리소스에 대한 권한이 있는지 확인합니다. 서버는 확인 결과에 따라 요청을 계속 진행할 것인지, 재인증을 요구할 것인지 등의 선택을 내립니다.
Spring Security에서는 JWT로 사용자 인증 여부를 확인하는 필터가 따로 없기 때문에 커스텀 필터를 생성하고 또 적절한 위치에 끼워넣어야합니다. 필터 순서에 관해서는 글의 후반부에서 다루겠습니다.
커스텀 필터 구현
요청 시 사용자 인증 여부를 확인하는 필터이기 때문에 한 개의 요청에서 한 번만 실행되도록 보장하는 OncePerRequestFilter를 상속받아 JWTAuthenticationFilter를 구현하려고 합니다. 한 번보시면 의도를 알 수 있을법한 코드라고 생각해서 자세한 설명은 생략하되 중요하다고 생각하는 부분만 다루겠습니다.
import org.springframework.web.filter.OncePerRequestFilter;
import site.roombook.dao.EmplDao;
import site.roombook.dao.JwtDao;
import site.roombook.domain.JwtDto;
import site.roombook.service.JwtService;

public class JWTAuthenticationFilter extends OncePerRequestFilter {

    @Autowired
    JwtService jwtService;

    @Autowired
    JwtDao jwtDao;

    @Autowired
    EmplDao emplDao;

    @Autowired
    UserDetailsService userDetailsService;


    @Override
    protected void doFilterInternal(HttpServletRequest request, HttpServletResponse response, FilterChain filterChain) throws ServletException, IOException {
        String accessToken = jwtService.extractAccessToken(request);
        String refreshToken = jwtService.extractRefreshToken(request);

        if (accessToken == null && refreshToken == null) { // 인증안된 사용자일 경우
            filterChain.doFilter(request, response);
            return;
        }

        try {
            if (accessToken != null) {
                if (jwtService.isValidAccessToken(accessToken)) {
                    saveAuthentication(accessToken);
                } else {
                    throw new PreAuthenticatedCredentialsNotFoundException("Invalid Access Token");
                }
            } else {
                JwtDto refreshTokenData = jwtDao.selectUnexpiredTokenByToken(refreshToken);

                if (refreshTokenData != null) {
                    accessToken = jwtService.createAccessToken(refreshTokenData.getCreEmplId());
                    jwtService.sendToken(response, accessToken, refreshToken);

                    saveAuthentication(accessToken);
                } else {
                    expireInvalidTokenCookie(jwtService.getRefreshCookieName(), refreshToken, response);

                    throw new PreAuthenticatedCredentialsNotFoundException("Invalid Refresh Token");
                }
            }
        } catch (AuthenticationException e) {
            SecurityContextHolder.clearContext();
            throw e;
        }

        filterChain.doFilter(request, response);
    }
}
인증이 성공했을 때
이 필터에서 사용자가 반환한 JWT access token이 유효하다는 것을 확인한 후에는 어떻게 Spring Security에게 인증된 사용자임을 알려 이후의 인증 과정을 생략할 수 있을까요?
바로 SecurityContextHolder에 사용자의 정보를 담고있는 Authentication 객체를 저장하고 다음 필터로 요청과 응답을 보내는 것입니다. 그러기 위해서 위의 구현에 다음 코드를 추가해주겠습니다.
private void saveAuthentication(String accessToken) {
    Authentication authentication = jwtService.getAuthentication(accessToken);
    SecurityContextHolder.getContext().setAuthentication(authentication);
}
구현 코드중 아래의 코드가 다음에 오는 필터를 호출하여 요청과 응답을 보냅니다.
filterChain.doFilter(request, response);이후 로직에서 (해당 요청이 실행되는 동안에만)SecurityContextHolder는 인증된 사용자의 정보를 저장하고 있습니다. 사용자의 권한등의 정보가 다른 필터나 서블릿에서 필요할 때 그 정보를 제공하는 역할을 하죠.
인증이 실패했을 때
JWTAuthenticationFilter에서 JWT가 유효하지 않은, 위변조된 토큰임을 확인한 경우에는 어떻게 처리해야할까요? 인증 실패 로직을 어디서 어떻게 구현해야 할까요?
여러가지 방법이 있을 수 있겠지만 제가 찾은 방법은 두 가지 입니다. 첫째, JWTAuthenticationFilter에 직접 구현한다. 둘째, ExceptionTranslationFilter에서 처리하게 한다.
첫 번째 방법은 JWTAuthenticationFilter에서 직접 response 객체에 필요한 정보를 저장한 후 리턴하는 방법입니다.
두 번째 방법은 Spring Security FilterChain에서 AuthenticationException과 AccessDeniedException 발생 시 받아 예외를 처리하는 Exceptiontranslationfilter를 사용하는 방법입니다.
Exceptiontranslationfilter
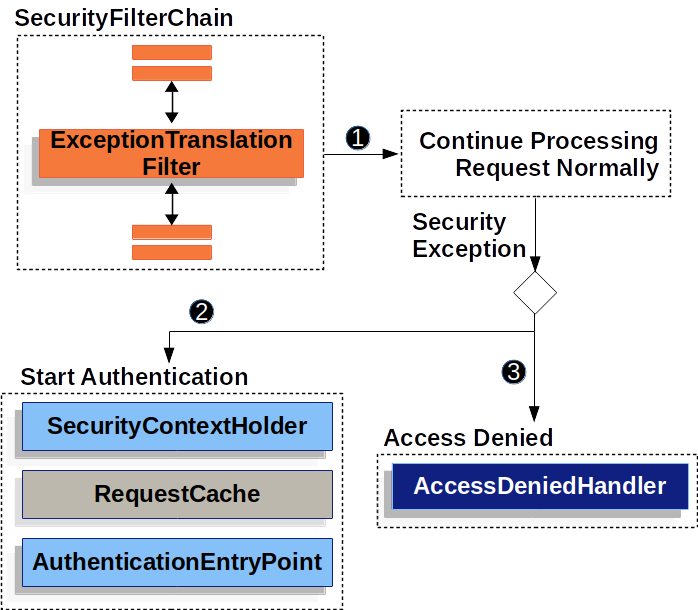
이 필터의 동작에 관한 자세한 설명은 공식 문서에서 확인하실 수 있습니다.
먼저 결과부터 말하면, 저는 JWT 유효성을 확인하는 JWTAuthenticationFilter가 하나의 관심사만을 가지게 하기 위해서, 유효하지 않은 JWT를 가지고 있는 사용자에게 재인증(로그인)을 요구하기 위해서 두 번째 방법을 선택했습니다.
이 필터(Exceptiontranslationfilter)는 Spring Security의 FilterChain 전체에서 발생한 두 예외를 모두 처리하지 못합니다. 당연하게도 이 필터 이후에 있는 필터(downstream filter)에서 발생한 예외만 처리할 수 있기 때문에 이 필터의 위치는 중요합니다. 위치에 대해서는 글의 후반부에 다룹니다.
AuthenticationException이 발생할 경우 그림의 2번에 해당하는 로직이 실행됩니다. 그 중 가장 마지막, AuthenticationEntryPoint는 인증되지 않은 사용자에게 인증을 요구하기 위해서 로그인 페이지로 리디렉션할 수 있도록 Redirect URL을 담을 response를 제공하는 역할을 합니다. AuthenticationEntryPoint를 활용하기 위해서는 AuthenticationException을 발생시켜 던져야겠죠?
throw new PreAuthenticatedCredentialsNotFoundException("Invalid Access Token");AuthenticationException을 상속받은 예외 클래스 중 PreAuthenticatedCredentialsNotFoundException 이 제 목적에 적합해보였습니다. 클래스의 이름 그대로 '이전에 인증 받은 자격 증명을 찾을 수 없'기 때문에 발생시킨 예외니까요.
이 예외가 발생하면 이제 Exceptiontranslationfilter가 받아서 AuthenticationEntryPoint를 호출할 줄 알았으나 문제가 하나 더 남아있습니다. 바로 필터의 순서입니다.
FilterChain
다음은 인증되지 않은 사용자가 인증이 필요한 리소스를 요청할 때, 그 요청이 DispatcherServlet에서 처리되기 전 Spring Security에 납치되어 거치는 14가지의 Filter들의 목록입니다. 이 목록들에는 제가 임의로 추가한 custom filter들이 있습니다.
Spring Security에서 기본적으로 적용하는 Security Filter에 대한 정보와 순서는 공식문서에서 확인할 수 있습니다.
2024-08-21 22:13:23 D.EBUG FilterChainProxy:222 - Securing GET /dept/list
2024-08-21 22:13:23 TRACE FilterChainProxy:358 - Invoking DisableEncodeUrlFilter (1/14)
2024-08-21 22:13:23 TRACE FilterChainProxy:358 - Invoking WebAsyncManagerIntegrationFilter (2/14)
2024-08-21 22:13:23 TRACE FilterChainProxy:358 - Invoking SecurityContextPersistenceFilter (3/14)
2024-08-21 22:13:23 D.EBUG SecurityContextPersistenceFilter:109 - Set SecurityContextHolder to empty SecurityContext
2024-08-21 22:13:23 TRACE FilterChainProxy:358 - Invoking HeaderWriterFilter (4/14)
2024-08-21 22:13:23 TRACE FilterChainProxy:358 - Invoking LogoutFilter (5/14)
2024-08-21 22:13:23 TRACE LogoutFilter:121 - Did not match request to Or [Ant [pattern='/logout', GET], Ant [pattern='/logout', POST], Ant [pattern='/logout', PUT], Ant [pattern='/logout', DELETE]]
2024-08-21 22:13:23 TRACE FilterChainProxy:358 - Invoking ResourceExistenceFilter (6/14)
2024-08-21 22:13:23 TRACE RequestMappingHandlerMapping:519 - Mapped to site.roombook.controller.dept.DeptController#getDeptListPage()
2024-08-21 22:13:23 TRACE FilterChainProxy:358 - Invoking JWTAuthenticationFilter (7/14)
2024-08-21 22:13:23 TRACE FilterChainProxy:358 - Invoking JsonUsernamePasswordAuthenticationFilter (8/14)
2024-08-21 22:13:23 TRACE FilterChainProxy:358 - Invoking RequestCacheAwareFilter (9/14)
2024-08-21 22:13:23 TRACE FilterChainProxy:358 - Invoking SecurityContextHolderAwareRequestFilter (10/14)
2024-08-21 22:13:23 TRACE FilterChainProxy:358 - Invoking AnonymousAuthenticationFilter (11/14)
2024-08-21 22:13:23 TRACE FilterChainProxy:358 - Invoking SessionManagementFilter (12/14)
2024-08-21 22:13:23 TRACE AnonymousAuthenticationFilter:116 - Set SecurityContextHolder to AnonymousAuthenticationToken [Principal=anonymousUser, Credentials=[PROTECTED], Authenticated=true, Details=WebAuthenticationDetails [RemoteIpAddress=127.0.0.1, SessionId=null], Granted Authorities=[ROLE_ANONYMOUS]]
2024-08-21 22:13:23 TRACE FilterChainProxy:358 - Invoking ExceptionTranslationFilter (13/14)
2024-08-21 22:13:23 TRACE FilterChainProxy:358 - Invoking AuthorizationFilter (14/14)
ExceptionTranslationFilter 의 순서
이 목록들을 보시면 ExceptionTranslationFilter는 14개의 필터 중 13번째로 적용됩니다. JWTAuthenticationFilter에서 발생시킨 AuthenticationException은 그에 비하면 너무 앞쪽에 있네요. 이 문제를 어떻게 해야할까요?
아무래도 'JWTAuthenticationFilter이나 'AuthenticationException의 순서를 바꿔야할 것 같습니다. 첫 번째 필터의 순서를 옮기자니 몇가지 마음에 걸리는게 있습니다. 이 마음을 이해하시려면 이후의 필터들의 목적을 알아야합니다.
FilterChain의 필터들의 목적 훑어보기
8번째 필터부터 볼까요?
-
JsonUsernamePasswordAuthenticationFilter: 로그인 요청의 아이디와 패스워드등의 사용자 인증 정보를 추출해서Authentication객체에 저장합니다. -
RequestCacheAwareFilter: 인증 필요해서 리디렉션 될 때 인증 성공 후 전에 한 요청을 반복하기 위해 사용하는 필터입니다.(사용x) -
SecurityContextHolderAwareRequestFilter:HttpServletRequest객체를 래핑해서 표준 HttpServletRequest API를 사용해서SecurityContext의 정보에 접근할 수 있게 하는 필터. -
AnonymousAuthenticationFilter: 인증되지 않은 사용자가 요청을 할 때 ‘익명’의 사용자로 사용자에 대한 정보를 저장하는Authentication객체를SecurityContextHolder에 저장합니다. 익명의 사용자가 제한된 권한을 가지고 애플리케이션의 제한된 리소스에 접근할 수 있도록 관리합니다.(사용x) -
SessionManagementFilter: 세션을 관리하고 공격으로부터 보호하는 등의 보안 관련 작업을 수행하는 필터입니다.(사용x) -
ExceptionTranslationFilter: 자신 이후의 filter chain내에서 발생한AccessDeniedException,AuthenticationException을 처리한다. -
AuthorizationFilter: 사용자의 권한 부여와 관련된 작업들을 한다. 특정 URL로의 접근을 제한한다.
JWTAuthenticationFilter를 뒤쪽으로 옮기기 위해서는 바로 뒤의 JsonUsernamePasswordAuthenticationFilter도 옮겨야합니다. 이미 인증 된 사용자가 아님(=JWT 토큰 없음)을 확인한 이후에 인증 정보를 추출하는 작업이 진행되어야하니까요.
또 SecurityContextHolderAwareRequestFilter는 SecurityContext에 인증된 사용자의 정보가 저장된 이후에 그 기능을 정상적으로 사용할 수 있습니다. 따라서 사용자의 인증을 처리하는 필터 뒤에 와야겠죠.
JWTAuthenticationFilter를 옮기기 위해서는 여러개의 필터를 뒤로 옮겨야합니다. 하지만 ExceptionTranslationFilter의 순서를 옮기는 일은 그에 비해 간단합니다. 하나만 옮기면 되죠! 그렇기 때문에 SecurityConfig 파일에서 ExceptionTranslationFilter의 위치를 JWTAuthenticationFilter 앞으로 옮겼습니다.
    @Bean
    public SecurityFilterChain securityFilterChain(HttpSecurity http) throws Exception {
        http
            .addFilterAfter(resourceExistenceFilter(), LogoutFilter.class)
            .exceptionHandling()
            .authenticationEntryPoint(customAuthenticationEntryPoint())
            .accessDeniedHandler(customAccessDeniedHandler())
            .and()
            .csrf(AbstractHttpConfigurer::disable)
            .httpBasic(AbstractHttpConfigurer::disable)
            .formLogin(AbstractHttpConfigurer::disable)
            .addFilterAfter(jwtAuthenticationFilter(), UsernamePasswordAuthenticationFilter.class)
            .addFilterBefore(exceptionTranslationFilter(), JWTAuthenticationFilter.class) // 여기!!!
            .addFilterAfter(jsonUsernamePasswordSignInFilter(), JWTAuthenticationFilter.class)
            .authorizeHttpRequests(authorize ->
                    authorize
                            .requestMatchers("/", "/signin", "/signin/**").permitAll()
                            .requestMatchers("/signup", "/signup/**", "/empl/**", "/signup-success/", "/signup-success/**").permitAll()
                            .anyRequest().authenticated())
            .logout(logout ->
                    logout.logoutSuccessUrl("/").invalidateHttpSession(true).permitAll())
            .sessionManagement(session -> session.sessionCreationPolicy(SessionCreationPolicy.STATELESS));

        return http.build();
    }
참고로 addFilterBefore, addFilterAfter 메서드를 사용할 때 기준이 되는 필터(두 번째 파라미터)는 반드시 Security framework에서 제공하는 필터이거나 filterChain에 등록된 필터여야합니다. 참고
.addFilterBefore(exceptionTranslationFilter(), JWTAuthenticationFilter.class) 여기에서는 JWTAuthenticationFilter가 바로 앞의 addFilterAfter 메서드로 FilterChain내에서의 순서가 결정되었기 때문에 기준으로서 사용할 수 있습니다.
AuthenticationEntryPoint
다음은 인증 실패 시 리디렉션 관련 작업을 처리하는 AuthenticationEntryPoint 객체의 구현입니다.
import org.slf4j.Logger;
import org.slf4j.LoggerFactory;
import org.springframework.security.core.AuthenticationException;
import org.springframework.security.web.AuthenticationEntryPoint;

import javax.servlet.ServletException;
import javax.servlet.http.HttpServletRequest;
import javax.servlet.http.HttpServletResponse;
import java.io.IOException;
import java.net.URLEncoder;
import java.nio.charset.StandardCharsets;

public class CustemAuthenticationEntryPoint implements AuthenticationEntryPoint {
    private Logger logger = LoggerFactory.getLogger(CustemAuthenticationEntryPoint.class);
    @Override
    public void commence(HttpServletRequest request, HttpServletResponse response, AuthenticationException authException) throws IOException, ServletException {
        String redirectUrl = request.getRequestURI();
        String queryString = request.getQueryString();
        logger.info(redirectUrl);
        logger.info(queryString);

        response.sendRedirect("/signin?redirect=" + URLEncoder.encode(redirectUrl + "?" + queryString, StandardCharsets.UTF_8));
    }
}
JWT 인증 방식을 사용하기 때문에 Session 기반으로 사용자의 이전 요청을 저장하는 RequestCacheAwareFilter를 사용할 수 없습니다. 그렇기 때문에 사용자의 이전 요청에 대한 정보를 인증 성공 이후에 활용할 수 있도록 query string으로 담아 보내도록 했습니다.
마무리
Spring Security의 인증 아키텍쳐에 대해 알면 알수록 더 많은 기능을 더 편리하게 구현할 수 있었습니다. 이 글을 보시는 분들에게 도움이 되기를 바랍니다.
참조
- https://docs.spring.io/spring-security/site/docs/current/api/org/springframework/security/config/annotation/web/HttpSecurityBuilder.html#addFilter(jakarta.servlet.Filter)
- https://docs.spring.io/spring-security/reference/5.7-SNAPSHOT/servlet/architecture.html
- https://docs.spring.io/spring-security/reference/5.7-SNAPSHOT/servlet/authentication/architecture.html