SENTENCE U | Day 12 (LIKE버튼/유저페이지)
LIKE 버튼 구현
UI는 아래와 같이 스타일을 적용했다.
Like 버튼의 데이터는 글, 날짜, 작성자와 동일하게 가져왔다.
Like 버튼은 데이터만 가져오면 끝나는게 아니다. 누를 때 마다 데이터가 업데이트 되어야 하고, 이미 눌렀다면 다시 뺀 값이 업데이트 되어야한다.
api는 게시물 번호와, 유저명을 받아 해당 게시물을 찾아서 like배열에 유저명을 넣는 식으로 작성했다.
like배열에 이미 유저명이 있으면 배열에서 유저명을 제거해서 다시 돌려준다.
/**
 * @path {PATCH} http://localhost:8000/api/posts/like
 * @description 좋아요 수 변경
 * @returns {post}
 */
router.patch('/posts/like', async (req, res) => {
  const { postId, userName } = req.body;
  await Post.findOne({ postId })
    .then((post) => {
      if (!post) {
        return res.status(404).send({ message: 'Post not found' });
      }

      const likeIndex = post.postLike.indexOf(userName);
      if (likeIndex === -1) {
        post.postLike.push(userName);
        post
          .save()
          .then(() => res.send({ message: 'Like added successfully', post }))
          .catch((error) => res.status(500).send({ message: error.message }));
      } else {
        post.postLike.splice(likeIndex, 1);
        post
          .save()
          .then(() => res.send({ message: 'Like removed successfully', post }))
          .catch((error) => res.status(500).send({ message: error.message }));
      }
    })
    .catch((error) => res.status(500).send({ message: error.message }));
});
Post 컴포넌트는 처음 불러올 때 해당 포스트에 현재 사용자가 좋아요를 눌렀는지 확인해서 isLiked의 flag값을 반영해줬다.
그리고 Like버튼을 누르면 DB에서 Like배열에 저장된 유저명의 length를 가져와서 좋아요 수로 나타내줬다.
isLiked state는 누를때마다 이전값의 반대 값이 적용되도록 setIsLiked((prev) => !prev); 이렇게 작성했다.
아직 댓글을 작성할 수 있는 페이지는 만들지 않았지만 댓글버튼을 누르면 해당 포스트의 디테일 페이지로 이동하게 navigate를 사용했다.
const Post = ({ postId, postTitle, postUser, postDate, postLike }) => {
  const navigate = useNavigate();
  const { data: userName } = useUserName();
  const [isLiked, setIsLiked] = useState(false);
  const [like, setLike] = useState(postLike.length);

  useEffect(() => {
    if (postLike.indexOf(userName) !== -1) {
      setIsLiked(true);
    } else {
      setIsLiked(false);
    }
  }, [postLike, userName]);

  const onCommentHandler = useCallback(() => {
    axios
      .get(`api/posts/${postId}`, { withCredentials: true })
      .then((res) => {
        navigate(`/posts/${res.data}`);
      })
      .catch((err) => console.log(err));
  }, [navigate, postId]);

  const onLikeHandler = useCallback(() => {
    axios
      .patch('api/posts/like', { postId: postId, userName: userName }, { withCredentials: true })
      .then((res) => {
        setIsLiked((prev) => !prev);
        setLike(res.data.post.postLike.length);
      })
      .catch((err) => console.log(err));
  }, [postId, userName]);

  return (
    <PostWrap>
      <Actions>
        <Like onClick={onLikeHandler}>
          {isLiked ? <FaHeart /> : <FaRegHeart />}
          {like}
        </Like>
        <Comment>
          <FaRegCommentDots onClick={onCommentHandler} />
        </Comment>
      </Actions>
      <Title>{postTitle}</Title>
      <Date>{postDate}</Date>
      <Name>{postUser}</Name>
    </PostWrap>
  );
};
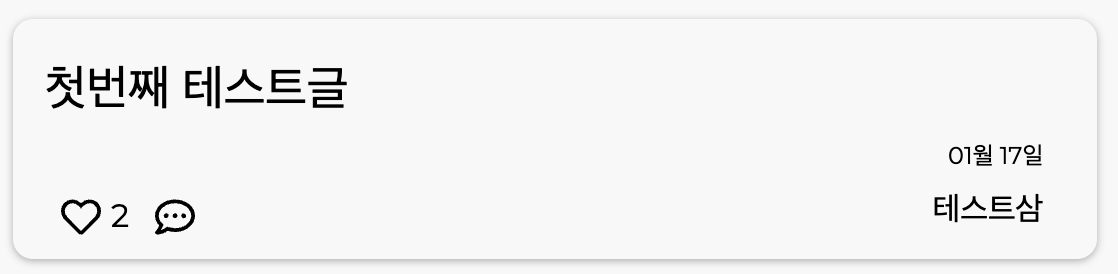
누를 때마다 반영되는 모습 !
유저별 개별 페이지 구현
<Route path='/:user' element={<MyPage />} />
<Route path='/:user/collection' element={<MyPage />} />
기존의 라우트 경로와 다르게 user명을 파라미터로 받아서 해당 유저의 페이지로 이동할 수 있도록 구현했다.
첫번째 문제, 나는 유저명을 한글로도 작성 가능하도록 해서 파라미터로 한글이 들어갈 수 있다.
그렇게 되면 서버로 보낼때 한글이 깨져서 데이터가 보내진다.

그래서 애초에 유저의 파라미터를 보낼때 인코딩해서 보냈다. 그럼 서버에서도 인코딩 된 유저명을 잘 받아올 수 있다.
axios
    .get(`/api/users/${encodeURI(params.user)}`)
    .then((res) => {
      setParamsUserName(res.data.userName);
      setParamsUserImage(res.data.userImage);
    })
    .catch((error) => {
      console.log(error.response);
    });
서버에서 DB로 파라미터로 받은 유저명(인코딩된)으로 특정 유저의 정보를 찾는다.
/**
 * @path {GET} http://localhost:8000/api/users/:id
 * @description 특정 유저 정보 가져오기
 * @returns {user || false}
 */
router.get('/users/:id', async (req, res) => {
  await User.findOne({ userName: req.params.id })
    .then((user) => {
      if (!user) return res.status(403).json({ loadUser: false });
      return res.status(200).json({ userName: user.userName, userImage: user.userImage });
    })
    .catch((error) => {
      console.log('에러: ', error);
      return res.status(403).json(error.errors);
    });
});
그리고 해당 유저의 이미지와 유저명을 돌려줘 페이지에 나타날 수 있게 했다. 유저들이 쓴 글, 좋아요 누른 글 등 다양한 정보를 더 추가할 생각이다.

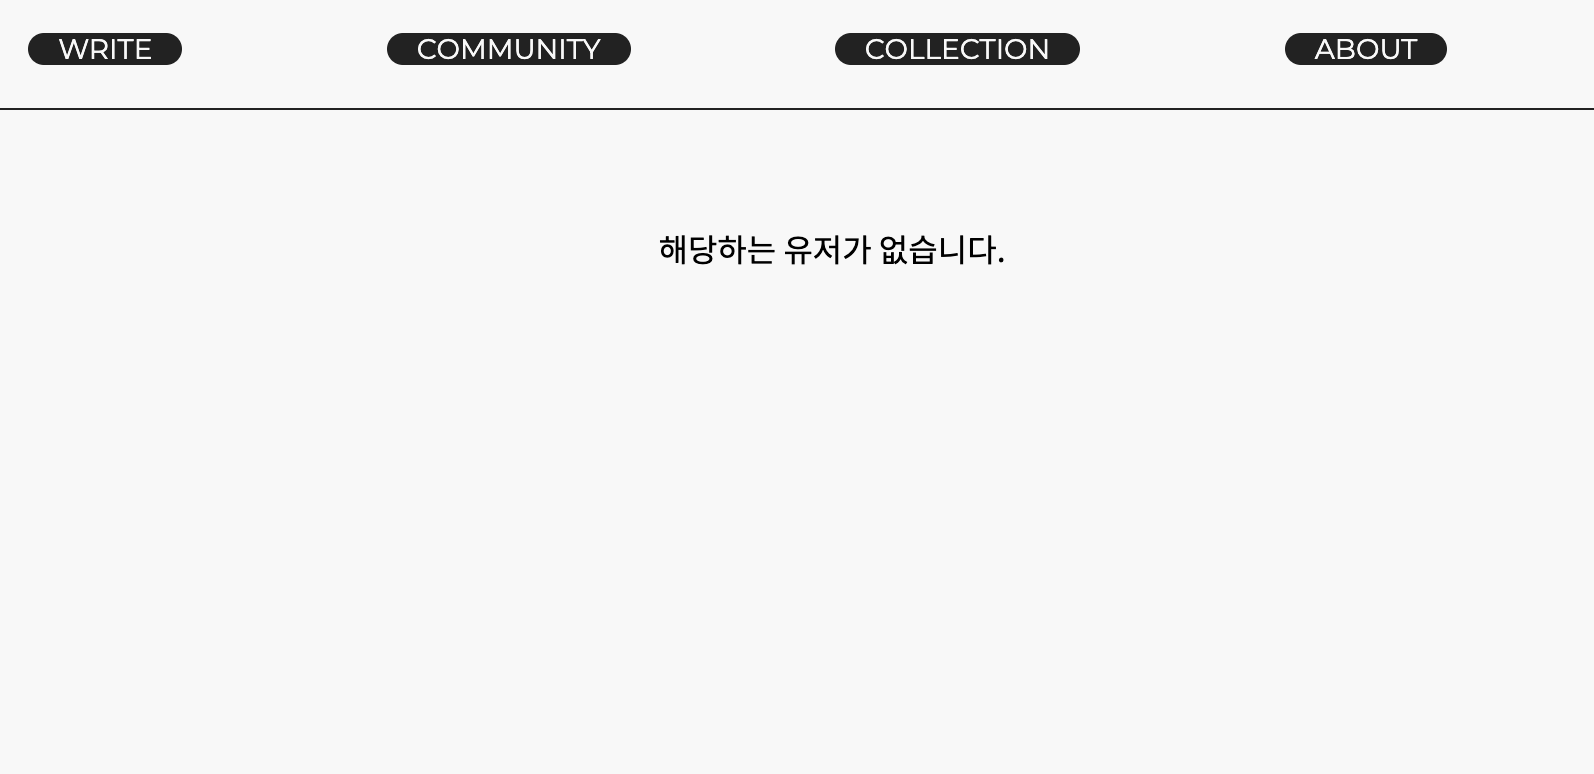
존재하지 않는 아이디의 주소로 접속하면 존재하지 않는 유저라고 나타내준다.