오늘은 자바스크립트를 사용해서 자료구조 스택을 구현해보려 한다.
자료구조는 개발자에게 중요한 기본기이며 기술면접에서도 직접
구현해보라고 자주 등장하기에 직접 구현하는 연습을 해두면 좋다.
Stack이란
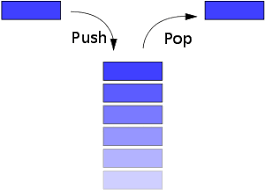
스택은 선형 자료구조의 일종으로 Last In First Out(LIFO, 후입선출) 또는 First In Last Out(FILO, 선입후출)이라는 특징을 가지고 있다.
차곡차곡 쌓이는 구조로 먼저 Stack에 들어가게 된 원소는 맨 밑 바닥에 깔리게 된다.
그렇게 때문에 늦게 들어간 원소가 그 위에 쌓이게 되고 호출 시 가장 위에 있는 원소가 먼저 호출되는 구조이다.
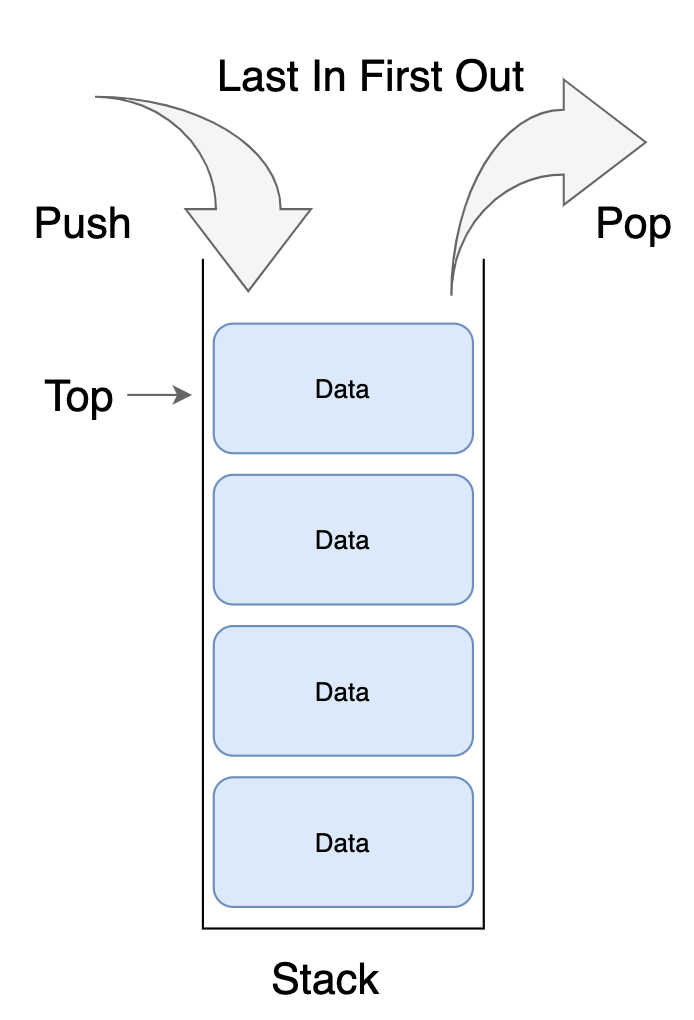
이미지로 봐도 매우 간단한 자료구조이다.
자바스크립트 스택 구현
구글링을 해서 자바스크립트로 스택을 구현하는 코드들을 조금 살펴봤는데
대부분이 배열을 사용해서 간단하게 push, pop을 통해서 구현했는데
나는 메서드를 사용하지 않고 class를 사용하여 직접 노드부터 구현했다.
노드 만들기
class Node {
  constructor(item) {
    this.item = item;
    this.next = null;
  }
}class를 사용해서 노드를 만들었다.
데이터를 담기 위해 item이라는 인스턴스를 생성하고,
다음 노드를 가리키기 위해 next라는 인스턴스를 생성했다.
constructor안에 생성해서 인스턴스를 초기화한다.
스택 만들기
class stack {
  constructor() {
    this.top = null;
    this.length = 0;
  }
}
스택도 마찬가지로 class를 사용해서 만들어주고 constructor에 스택의 맨 위 원소를 가리키는 top과 스택 자체의 길이를 나타내는 length를 초기화시켜줬다.
push(item) 기능 구현하기
class stack {
  constructor() {
    this.top = null;
    this.length = 0;
  }

  push(item) {
    const node = new Node(item);
    if (!this.length) this.top = node;
    else {
      node.next = this.top;
      this.top = node;
    }
    this.length++;
  }
}class내에 함수를 만들어서 push기능을 구현했다.
매개변수로 스택에 추가할 원소 item을 받아서 위에서 구현한 Node로 원소를 담을 노드를 생성해준다.
그리고 조건문을 통해 스택이 비어있다면 top이 노드를 지정하게 만들어주고 스택에 이미 원소가 담겨져 있다면 스택의 맨 위의 노드가 현재 생성된 노드를 가리키게 만들고 스택의 top이 생성된 노드를 가리키게 만들어준다.
마지막으로 스택에 노드가 추가됐으므로 길이를 늘려준다.
pop() 기능 구현하기
class stack {
  constructor() {
    this.top = null;
    this.length = 0;
  }

  // push(item) {}

  pop() {
    if (!this.length) return null;
    const pop = this.top;
    this.top = this.top.next;
    this.length--;
    return pop.item;
  }
}pop기능도 마찬가지로 class내에 함수를 만들었다.
조건문을 사용해서 스택이 비어있다면 추출할 노드가 없기 때문에 null을 반환하고 스택에 노드가 존재한다면 스택의 top이 가리키는 노드를 pop이라는 변수를 생성해서 담고 현재 스택의 top을 top이 가리키는 노드가 가리키는 다음 노드로 변경한다.
즉, top다음 노드를 top으로 만드는 것이다.
노드가 스택에서 하나 추출됐으므로 길이도 하나 줄여준다.
마지막으로 pop변수에 담은 노드의 원소값을 반환해준다.
size() 기능 구현하기
size는 현재 스택의 길이를 알려주는 함수다.
class stack {
  constructor() {
    this.top = null;
    this.length = 0;
  }

  // push(item) {}

  // pop() {}

  size() {
    return this.length;
  }
}
간단하게 스택이 가지고 있는 인스턴스인 length를 반환한다.
peek() 기능 구현하기
peek는 현재 스택의 맨 위 노드의 원소값을 알려주는 함수다.
class stack {
  constructor() {
    this.top = null;
    this.length = 0;
  }

  // push(item) {}

  // pop() {}

  // size() {}

  peek() {
    if (!this.length) return null;
    else {
      return this.top.item;
    }
  }
}
조건문을 사용해 스택에 노드가 존재하지 않는다면 null을 반환하고 존재한다면 top이 가리키는 노드의 item을 반환한다.
최종 코드
class Node {
  constructor(item) {
    this.item = item;
    this.next = null;
  }
}

class Stack {
  constructor() {
    this.top = null;
    this.length = 0;
  }

  push(item) {
    const node = new Node(item);
    if (!this.length) this.top = node;
    else {
      node.next = this.top;
      this.top = node;
    }
    this.length++;
  }

  pop() {
    if (!this.length) return null;
    const pop = this.top;
    this.top = this.top.next;
    this.length--;
    return pop.item;
  }

  size() {
    return this.length;
  }

  peek() {
    if (!this.length) return null;
    else {
      return this.top.item;
    }
  }
}
이렇게 자바스크립트를 사용해서 스택을 구현해보았다.
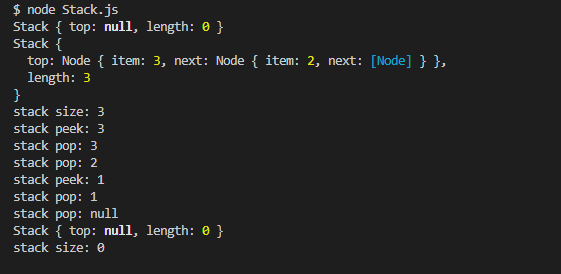
테스트를 위해 간단한 테스트 코드를 작성해서 실행해보았다.
// 테스트 코드
let stack = new Stack(); // 스택 생성
console.log(stack);
stack.push(1); // 스택에 원소 1 추가
stack.push(2);
stack.push(3);
console.log(stack);
console.log(`stack size: ${stack.size()}`); // 현재 스택 길이 확인
console.log(`stack peek: ${stack.peek()}`); // 현재 스택의 맨 위 원소값 확인
console.log(`stack pop: ${stack.pop()}`); // 스택의 맨 위 노드 추출
console.log(`stack pop: ${stack.pop()}`);
console.log(`stack peek: ${stack.peek()}`);
console.log(`stack pop: ${stack.pop()}`);
console.log(`stack pop: ${stack.pop()}`);
console.log(stack);
console.log(`stack size: ${stack.size()}`);
테스트 실행 결과