[AWES 3기] 7주차 스터디 내용 정리
K8S Scheduler
- 쿠버네티스에서 스케줄링은 파드를 노드에 매칭시켜 Kubelet이 실행할 수 있도록 하는 과정이다.
- 스케줄러는 노드가 할당되지 않은 새로 생성된 파드를 감시
- 각 파드에 가장 적합한 노드를 찾는다.
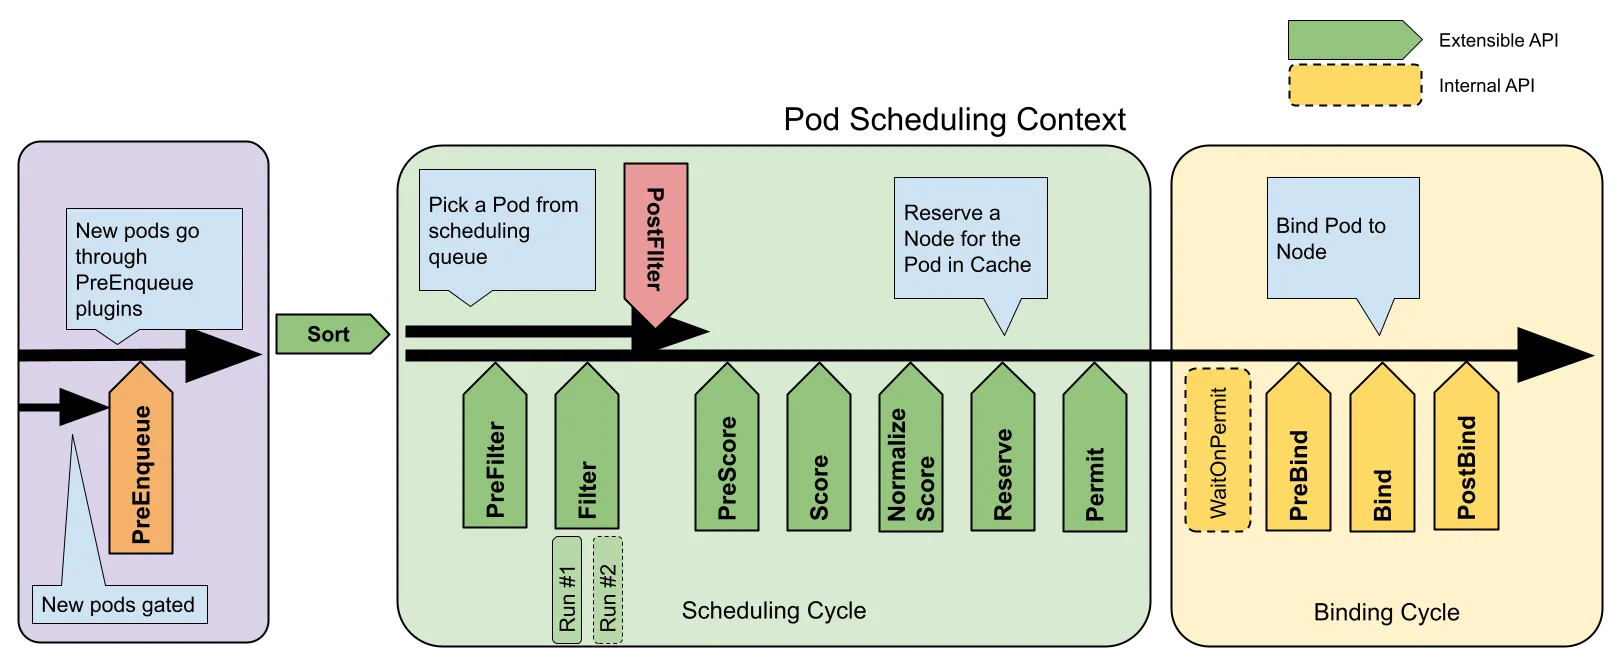
[kube-scheduler]
컨트롤 플레인의 일부로 동작하며, 두 단계로 파드의 노드를 선택한다.
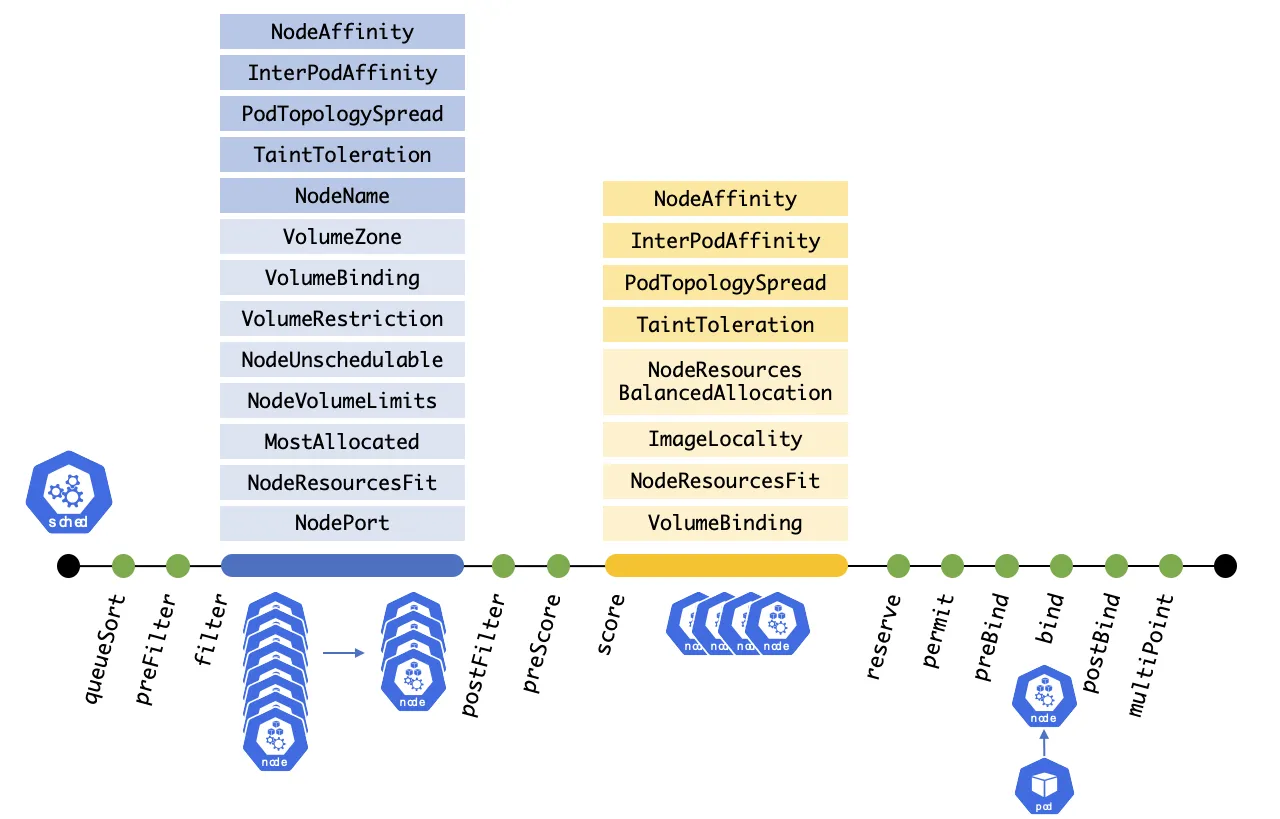
- 필터링(Filtering): 파드를 스케줄할 수 있는 적합한 노드 집합을 찾는다
- 스코어링(Scoring): 필터링을 통과한 노드들에 점수를 매겨 가장 적합한 노드를 선택한다. 만약 여러 노드가 동일한 점수를 가지면 무작위로 하나를 선택한다.
[파드 스케줄링 대기]
spec.schedulingGates 필드를 사용하여 파드 스케줄링 시점을 제어할 수 있다. 이 필드는 파드 생성 시에만 초기화가 가능하며, 생성 후에는 값을 제거만 할 수 있고 추가는 불가능하다.
파드가 schedulingGates 필드를 포함하면 schedulingGated 상태에 진입한다. 해당 필드를 삭제하면 스케줄러가 작업을 시작하며, 이 상태에서는 스케줄링 조건을 강화하는 것만 가능
- 기존 .spec.nodeSelector에 조건을 추가할 수 있음
- .spec.affinity.nodeAffinity가 비어있으면 설정 가능
- 이미 존재하는 required 조건에는 추가만 가능
- preferred 조건에는 제한 없음
[노드 배치 전략][직접 노드 지정]
- 파드 생성 시 spec.nodeName 필드에 원하는 노드를 직접 지정
- 지정된 노드가 존재하지 않거나 리소스가 부족할 경우 배포에 실패
[NodeSelector를 통한 레이블 기반 배포]
- spec.nodeSelector 필드를 통해 특정 레이블을 가진 노드를 선택 가능.
- 지정된 모든 노드 레이블과 일치하는 노드만 선택되므로, 간단한 제약 조건을 설정하기에 적합
[Affinity & Anti-Affinity]
- 레이블 기반 배포의 확장된 형태로, 더 복잡한 조건 설정이 가능
[NodeAffinity]
- In, NotIn, Exists, DoesNotExist, Gt, Lt 등의 연산자로 상세한 레이블 비교 가능
- requireDuringSchedulingIgnoreDuringExecution: 스케줄링 시 필수 조건
- preferredDuringSchedulingIgnoreDuringExection: 가중치 기반 선호 노드 선택
[PodAffinity & PodAntiAffinity]
- 실행 중인 파드의 레이블을 기준으로 노드 배치 결정
[토폴로지 분산 제약조건]
- Topology Spread Constraints를 통해 클러스터 내 파드 분산 방식을 제어 가능
- topologyKey 레이블로 노드 그룹 정의
- maxSkew 설정으로 그룹 간 균등 배포 조절
- PodAffinity보다 더 간편하게 분산 배포 구현 가능
[Taints & Tolerations]
- 특정 노드에서 파드를 제외하는 방식의 제어
- Taint가 설정된 노드에는 해당 Toleration이 있는 파드만 배포 가능
Terraform
‘하시코프의 철학’ 중 3가지를 담아서 테라폼을 설계 : 1. 워크플로우에 집중, 2. 코드형 인프라, 3. 실용주의
테라폼 제공 유형 : 3가지 유형
- On-premise : Terraform이라 불리는 형태로, 사용자의 컴퓨팅 환경에 오픈소스 바이너리툴인 테라폼을 통해 사용
- Hosted SaaS : Terraform Cloud로 불리는 SaaS로 제공되는 구성 환경으로 하시코프가 관리하는 서버 환경이 제공
- Private Install : Terraform Enterprise로 불리는 서버 설치형 구성 환경으로, 기업의 사내 정책에 따라 프로비저닝 관리가 외부 네트워크와 격리
# tfenv 설치
brew install tfenv

# 설치 가능 버전 리스트 확인
tfenv list-remote

# 테라폼 1.5.6 버전 설치
tfenv install 1.5.6

# tfenv로 설치한 버전 확인(변경 전)
tfenv list
  1.5.6
* 1.5.1 (set by /usr/local/Cellar/tfenv/3.0.0/version)

# 테라폼 1.5.6 버전 사용 설정
tfenv use 1.5.6

# tfenv로 설치한 버전 확인(변경 후)
tfenv list
* 1.5.6 (set by /usr/local/Cellar/tfenv/3.0.0/version)
  1.5.1

# 테라폼 버전 정보 확인
terraform version

# 자동완성
terraform -install-autocomplete
## 참고 .zshrc 에 아래 추가됨
cat ~/.zshrc
autoload -U +X bashcompinit && bashcompinit
complete -o nospace -C /usr/local/bin/terraform terraform
실습 전 default VPC 확인!
brew install awscli

aws configure
... >> 입력

aws configure list
      Name                    Value             Type    Location
      ----                    -----             ----    --------
   profile                <not set>             None    None
access_key     ****************DYFF shared-credentials-file
secret_key     ****************m7Za shared-credentials-file
    region           ap-northeast-2      config-file    ~/.aws/config


aws s3 ls
mkdir t101-1week-ec2
cd t101-1week-ec2

cat <<EOT > main.tf
provider "aws" {
  region = "ap-northeast-2"
}

resource "aws_instance" "example" {
  ami           = "ami-084e92d3e117f7692"
  instance_type = "t2.micro"
}
EOT
# 초기화
terraform init
ls -al
tree .terraform

# plan 확인
terraform plan

# apply 실행
terraform apply
 Enter a value: yes 입력

# ec2 생성 확인 : aws 웹 관리 콘솔에서도 확인 - 서울 리전 선택
export AWS_PAGER=""
aws ec2 describe-instances --output table
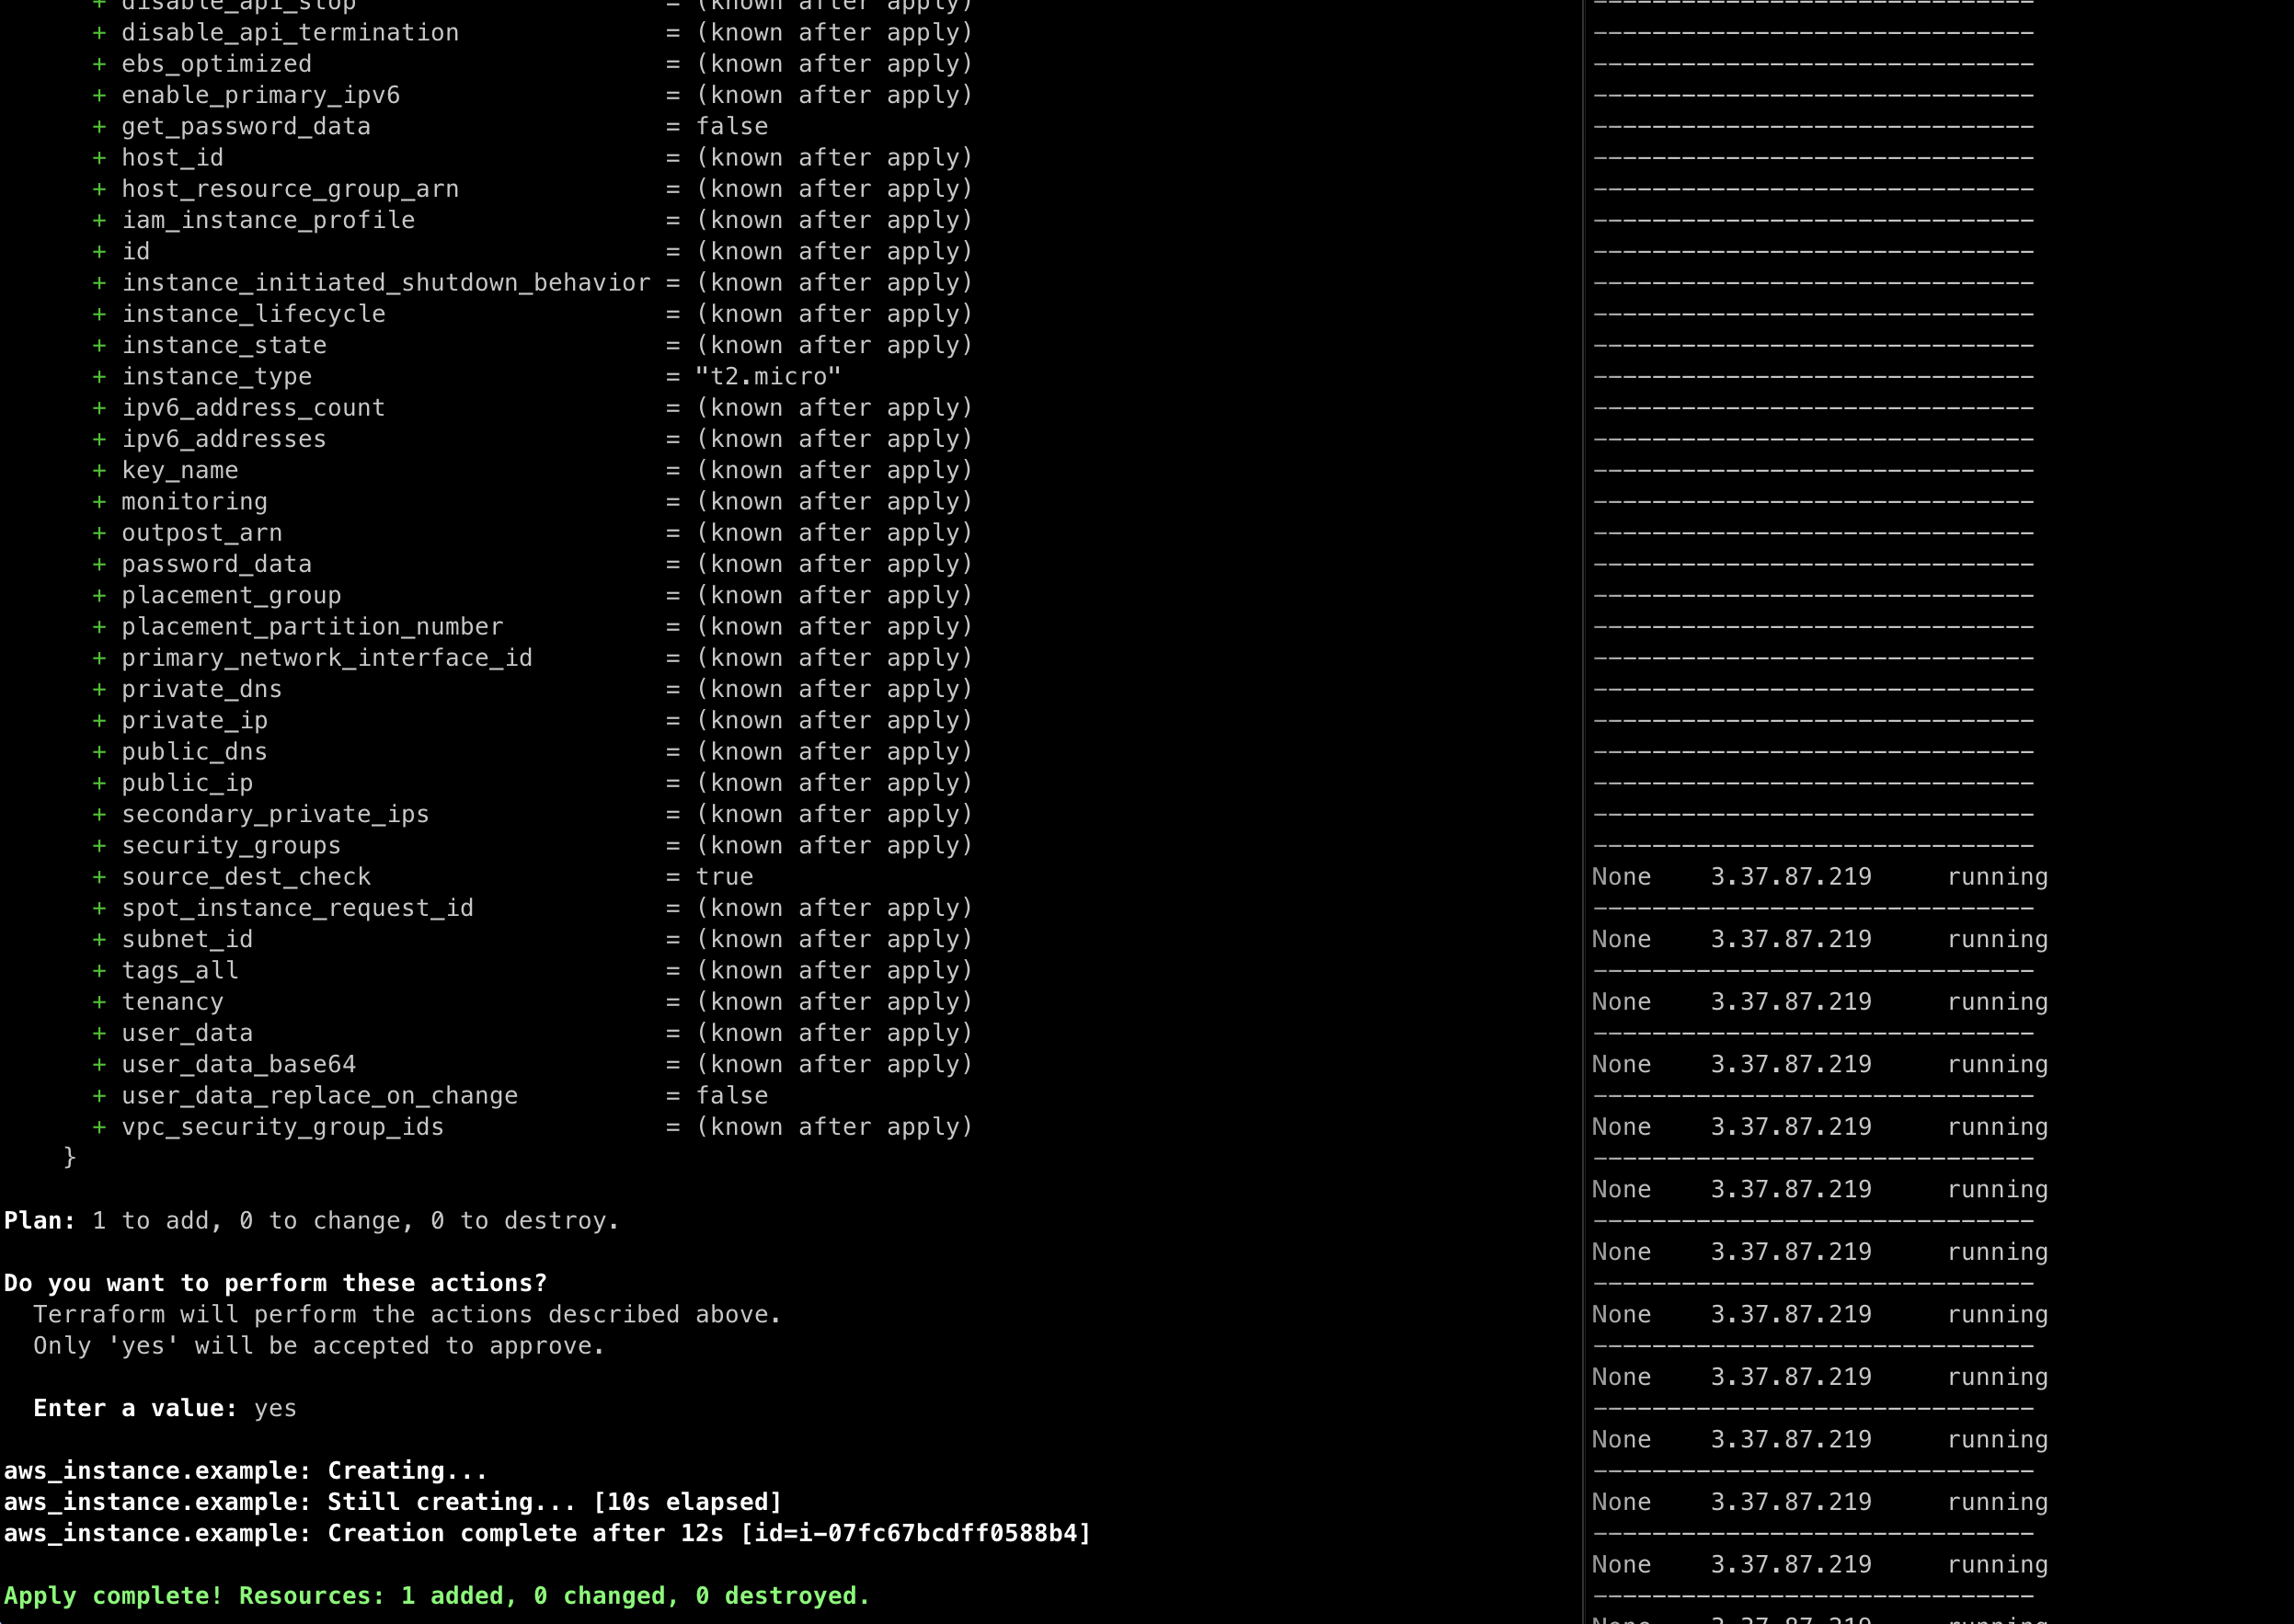
apply 이후에 ec2가 생성된 것을 확인할 수 있다!
[태그 정보 수정]
cat <<EOT > main.tf
provider "aws" {
  region = "ap-northeast-2"
}

resource "aws_instance" "example" {
  ami           = "ami-084e92d3e117f7692"
  instance_type = "t2.micro"

  tags = {
    Name = "t101-study"
  }

}
EOT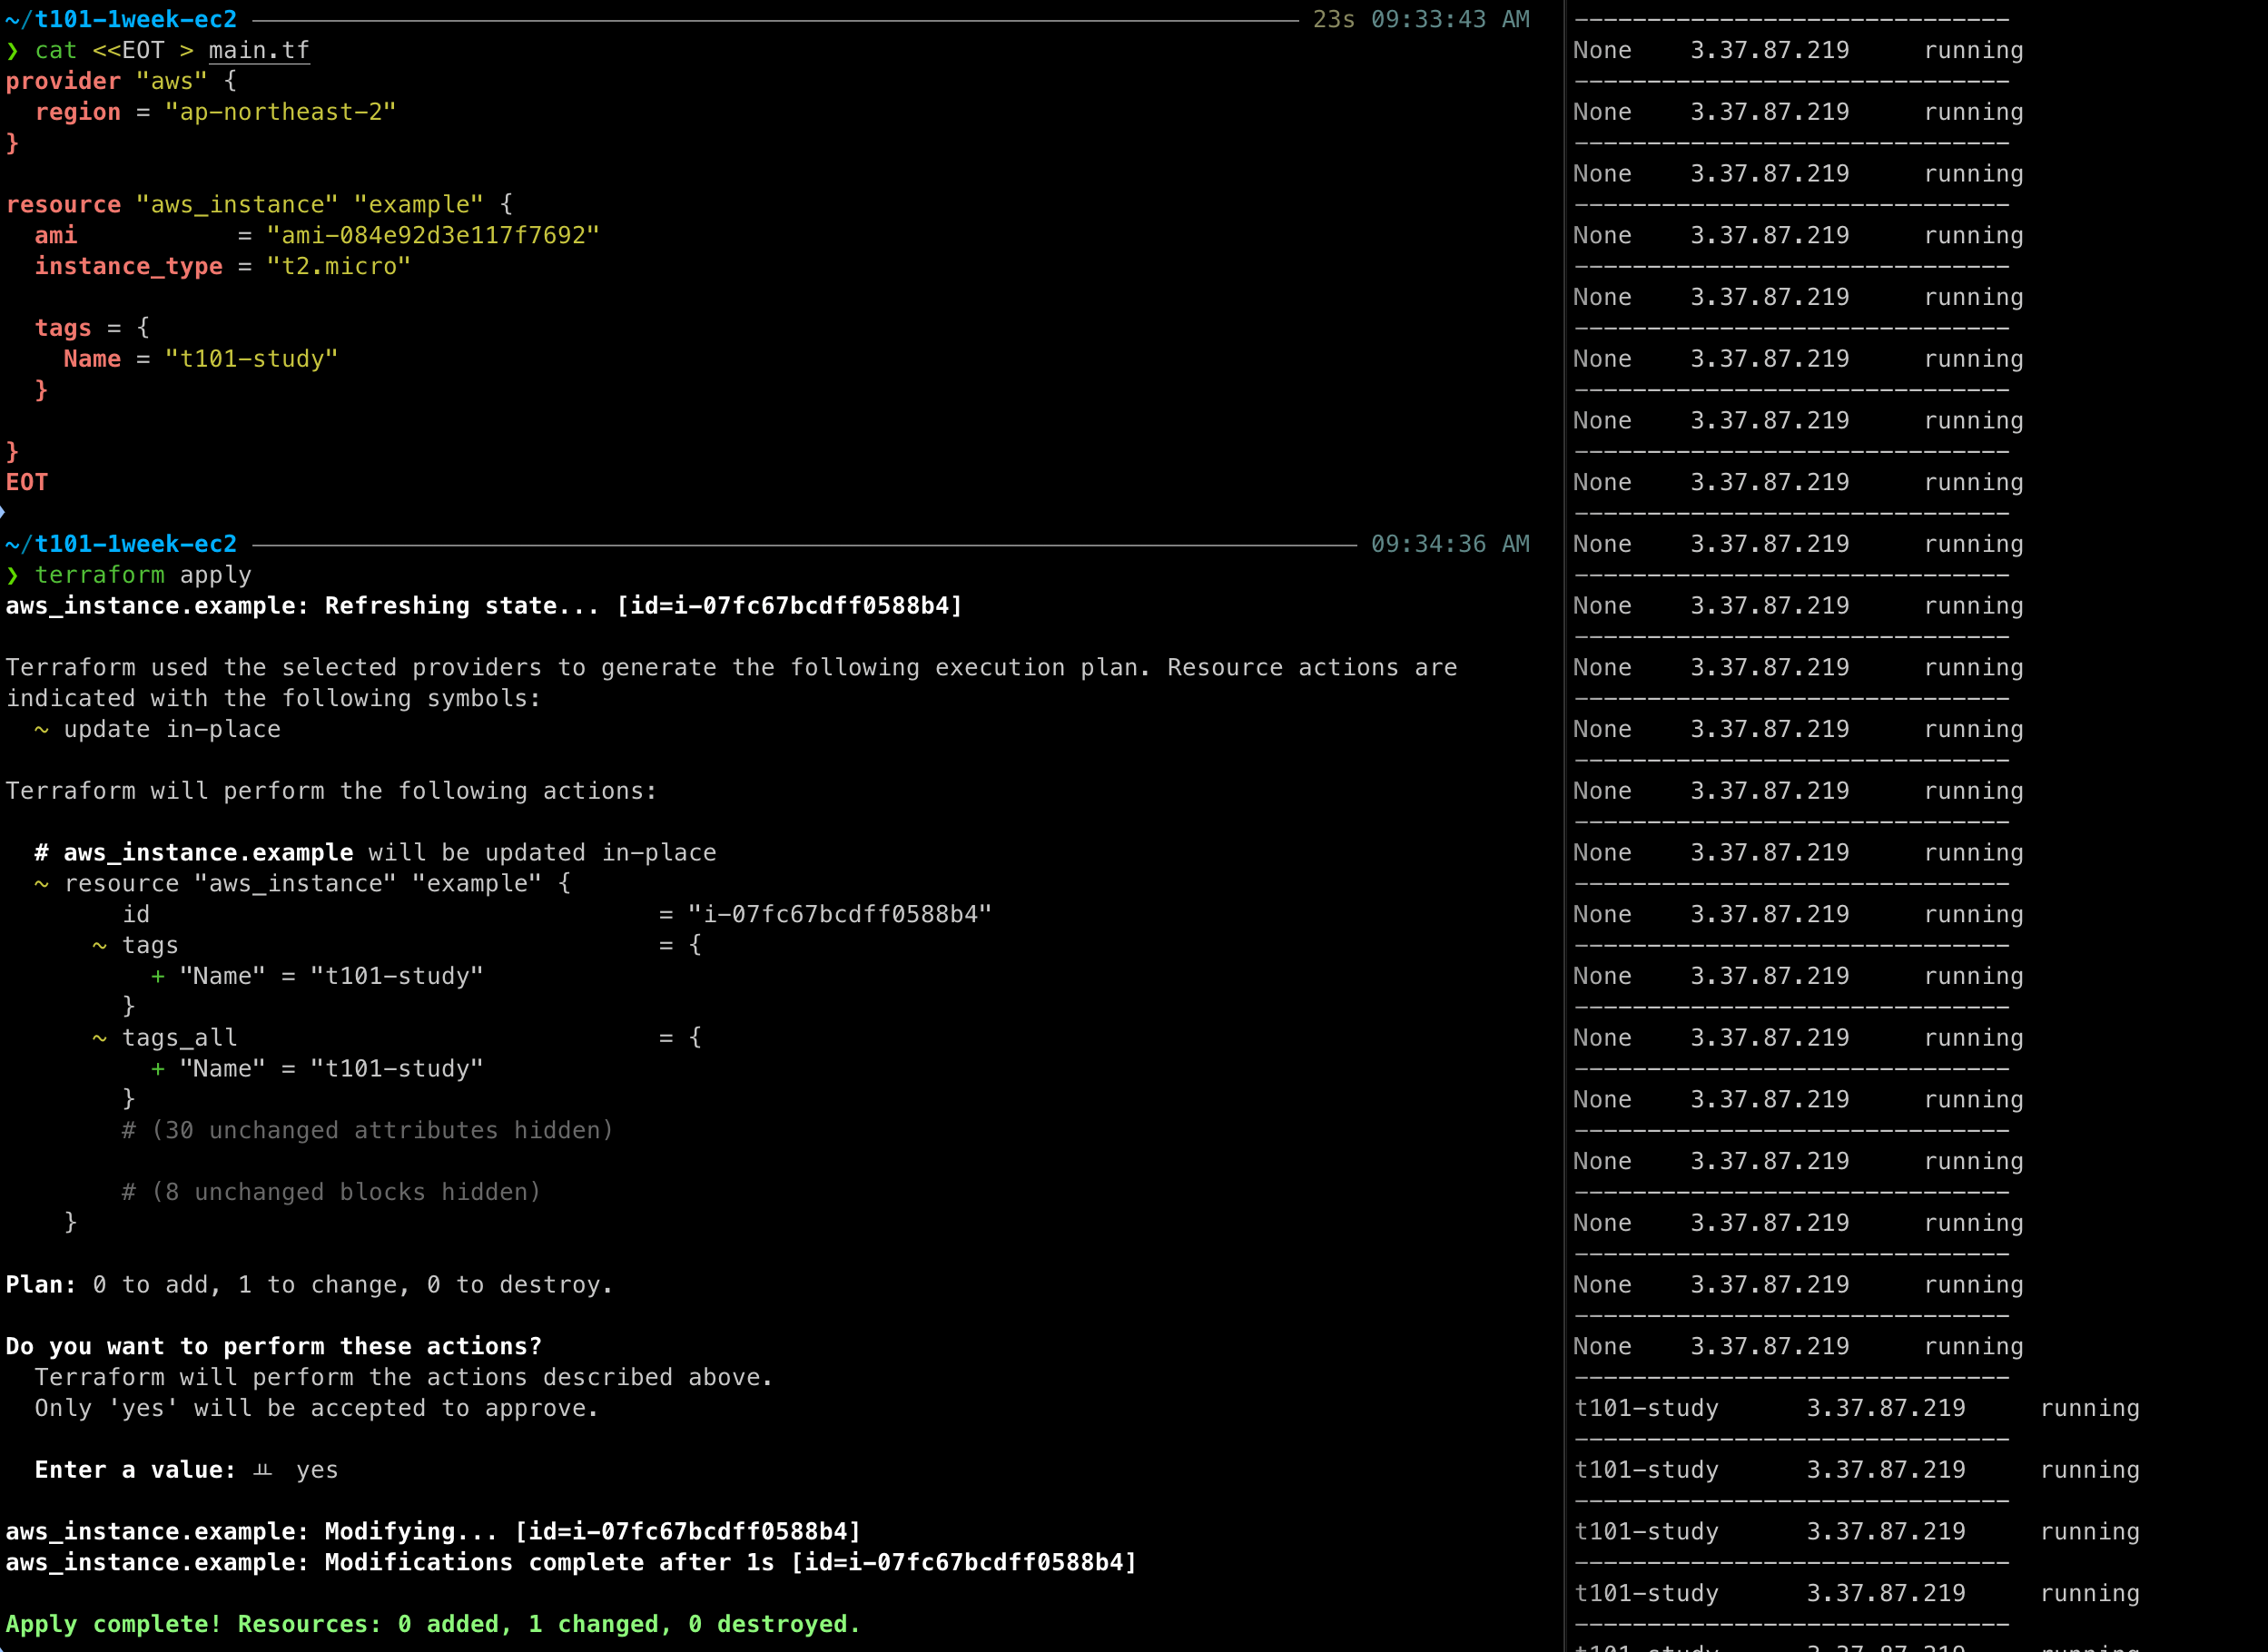
수정 이후에 ec2의 이름이 바뀐 것을 확인할 수 있다.
[EC2 삭제 - 터미널2]
# 리소스 삭제
terraform destroy
 Enter a value: yes 입력
[주요 커맨드]
- init: 코드 사용 구문 기반으로 필요한 프로바이더 플러그인을 찾고 설치
$ terraform init- plan: 구성 내용을 바탕으로 어떤 리소스가 생성되는지 상세 내역 출력, 기본값 자동 입력 적용
- -detailed-exitcode : plan 추가 옵션으로, 파이프라인 설계에서 활용 가능, exitcode가 환경 변수로 구성됨
- -auto-approve: 자동 승인 기능 부여 옵션
- -replace : 프로비저닝이 완료 후 사용자에 필요에 의해 특정 리소스를 삭제 후 다시 생성
$ terraform plan- apply: plan 계획을 기반으로 작업을 실행
- -out: 지정된 형태로 출력
- -replace : 프로비저닝이 완료 후 사용자에 필요에 의해 특정 리소스를 삭제 후 다시 생성
- 테라폼은 선언적으로 동작하기 때문에 현재의 코드 상태와 적용할 상태를 비교해 일치시키는 동작을 수행
$ terraform apply- destroy: 테라폼 구성에서 관리하는 모든 개체를 제거하는 명령어
$ terraform destroy- fmt : format 또는 reformat 줄임 표시로 terraform tmt 명령어로 수행, 테라폼 구성 파일을 표준 형식과 표준 스타일로 적용
$ terraform fmt[HCL]
HCL(HashiCorp Configuration Language)은 하시코프사에서 IaC와 구성 정보를 명시하기 위해 개발된 오픈 소스 도구이다
HCL 특징
- IaC는 코드를 통해 인프라를 관리하고 프로비저닝 하는 것을 말한다.
- 테라폼에서 HCL이 코드의 영역을 담당한다. HCL은 쉽게 읽을 수 있고 빠르게 배울 수 있는 언어의 특징을 가진다.
- 인프라가 코드로 표현되고, 이 코드는 곧 인프라이기 때문에 선언적(declarative) 특성을 갖게 되고 튜링 완전한 Turing-complete 언어적 특성을 갖는다.
- 즉, 일반적인 프로그래밍 언어의 조건문 처리 같은 동작이 가능하다. 자동화와 더불어, 쉽게 버저닝해 히스토리를 관리하고 함께 작업 할 수 있는 기반을 제공.
HCL을 사용하는 이유
- JSON과 YAML 은 기계 친화적인 언어로 제작.
- HCL은 JSON으로 표현하는 것보다 더 간결하고 읽기 쉽게 작성할 수 있다. (JSON 대비 50~70% 간결하게 작성가능)
- JSON은 구문이 길어지고 주석이 지원되지 않는다는 단점이 있다.
// 한줄 주석 방법1
# 한줄 주석 방법2

/*
라인
주석
*/

locals {
  key1     = "value1"     # = 를 기준으로 키와 값이 구분되며
  myStr    = "TF ♡ UTF-8" # UTF-8 문자를 지원한다.
  multiStr = <<EOF
  Multi
  Line
  String
  with anytext
EOF

  boolean1    = true   # boolean true
  boolean2    = false  # boolean false를 지원한다.
  deciaml     = 123    # 기본적으로 숫자는 10진수,
  octal       = 0123   # 0으로 시작하는 숫자는 8진수,
  hexadecimal = "0xD5" # 0x 값을 포함하는 스트링은 16진수,
  scientific  = 1e10   # 과학표기 법도 지원한다.

  # funtion 호출 예
  myprojectname = format("%s is myproject name", var.project)

  # 3항 연산자 조건문을 지원한다.
  credentials = var.credentials == "" ? file(var.credentials_file) : var.credentials
}
Fargate
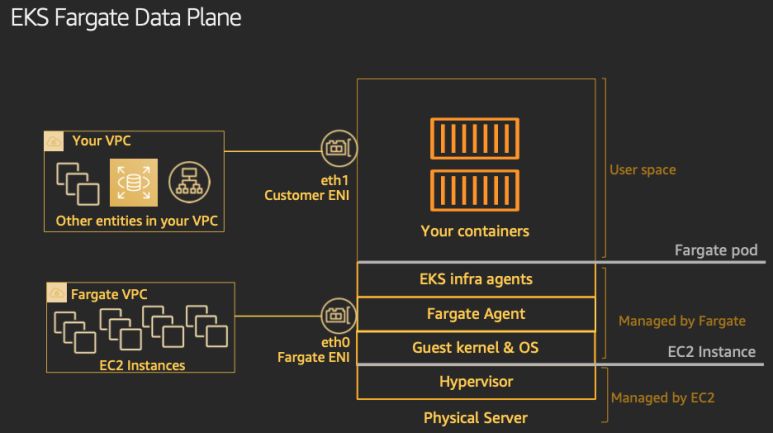
EKS(컨트롤 플레인) + Fargate(데이터 플레인)의 완전한 서버리스화(=AWS 관리형)
- Cluster Autoscaler 불필요, VM 수준의 격리 가능(VM isolation at Pod Level)
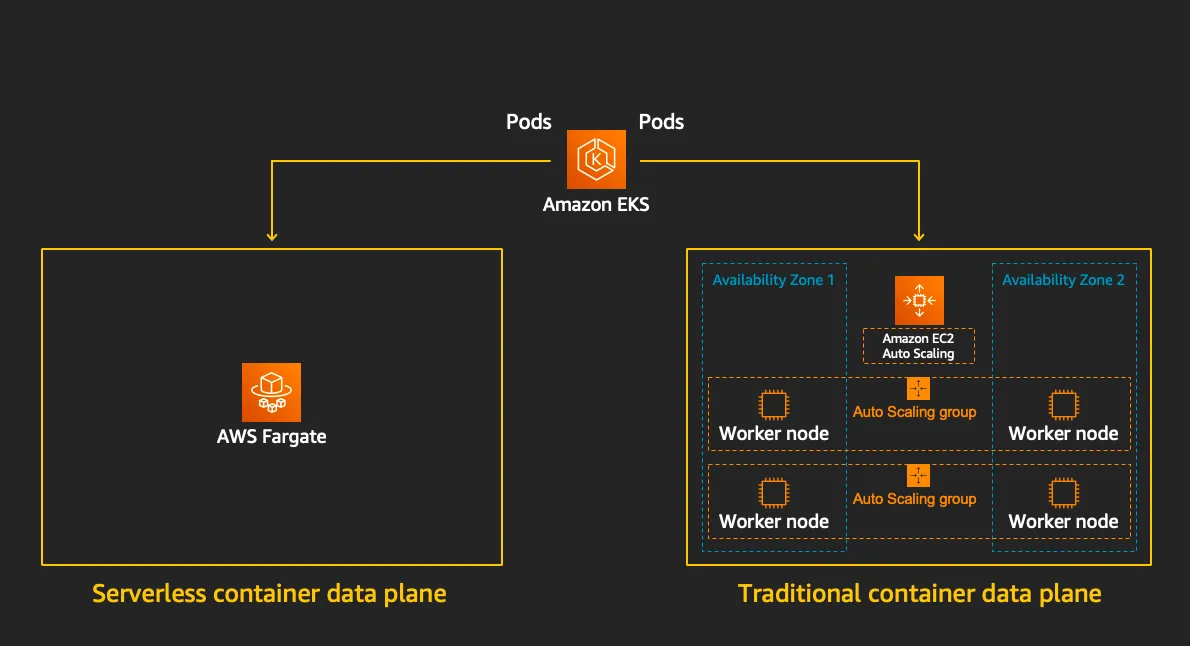
Fargate를 사용하면 VM 컨테이너에서의 스케일링, 프로비저닝, 설정을 신경 쓰지 않아도 된다.
컨트롤러들은 EKS Managed Kubernetes control plan에 들어가게 되고 Fargate 위의 Pod에 스케줄링 된다.
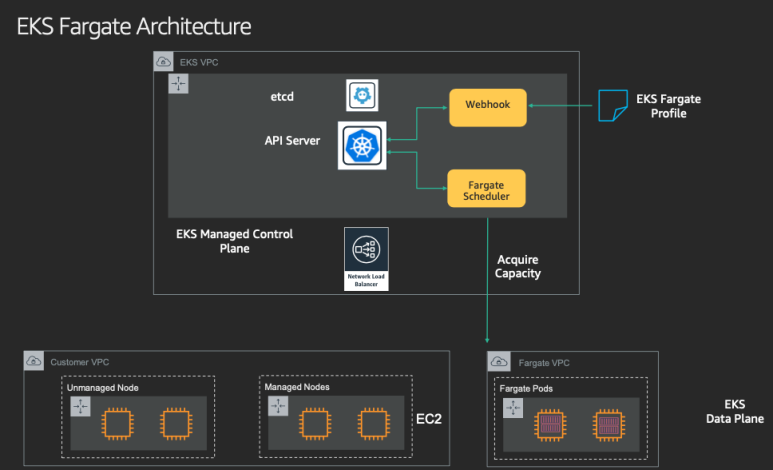
[Fargate 프로필]
Fargate 프로필은 어떤 파드들이 Fargate에서 실행될지를 정의한다.
- 특정 네임스페이스와 레이블 셀렉터를 기반으로 구성
- 프로필에 일치하는 파드는 자동으로 Fargate에서 스케줄링됨
- 각 프로필은 특정 IAM 역할과 연결되어 해당 파드의 권한 정의
[Fargate의 주요 이점]
- 인프라 관리 오버헤드 제거
- 보안 강화 (파드 수준 격리)
- 사용한 리소스에 대해서만 비용 지불
- 클러스터 관리 없이 Kubernetes의 이점 활용
[테라폼으로 실습 환경 배포]
git clone https://github.com/aws-ia/terraform-aws-eks-blueprints
tree terraform-aws-eks-blueprints/patterns
cd terraform-aws-eks-blueprints/patterns/fargate-serverless
provider "aws" {
region = local.region
}
provider "kubernetes" {
host = module.eks.cluster_endpoint
cluster_ca_certificate = base64decode(module.eks.cluster_certificate_authority_data)
exec {
api_version = "client.authentication.k8s.io/v1beta1"
command = "aws"
# This requires the awscli to be installed locally where Terraform is executed
args = ["eks", "get-token", "--cluster-name", module.eks.cluster_name]
}
}
provider "helm" {
kubernetes {
host = module.eks.cluster_endpoint
cluster_ca_certificate = base64decode(module.eks.cluster_certificate_authority_data)
exec {
api_version = "client.authentication.k8s.io/v1beta1"
command = "aws"
# This requires the awscli to be installed locally where Terraform is executed
args = ["eks", "get-token", "--cluster-name", module.eks.cluster_name]
}
}
}
data "aws_availability_zones" "available" {
# Do not include local zones
filter {
name = "opt-in-status"
values = ["opt-in-not-required"]
}
}
locals {
name = basename(path.cwd)
region = "ap-northeast-2"
vpc_cidr = "10.10.0.0/16"
azs = slice(data.aws_availability_zones.available.names, 0, 3)
tags = {
Blueprint = local.name
GithubRepo = "github.com/aws-ia/terraform-aws-eks-blueprints"
}
}
################################################################################
# Cluster
################################################################################
module "eks" {
source = "terraform-aws-modules/eks/aws"
version = "~> 20.11"
cluster_name = local.name
cluster_version = "1.30"
cluster_endpoint_public_access = true
# Give the Terraform identity admin access to the cluster
# which will allow resources to be deployed into the cluster
enable_cluster_creator_admin_permissions = true
vpc_id = module.vpc.vpc_id
subnet_ids = module.vpc.private_subnets
# Fargate profiles use the cluster primary security group so these are not utilized
create_cluster_security_group = false
create_node_security_group = false
fargate_profiles = {
study_wildcard = {
selectors = [
{ namespace = "study-*" }
]
}
kube_system = {
name = "kube-system"
selectors = [
{ namespace = "kube-system" }
]
}
}
fargate_profile_defaults = {
iam_role_additional_policies = {
additional = module.eks_blueprints_addons.fargate_fluentbit.iam_policy[0].arn
}
}
tags = local.tags
}
################################################################################
# EKS Blueprints Addons
################################################################################
module "eks_blueprints_addons" {
source = "aws-ia/eks-blueprints-addons/aws"
version = "~> 1.16"
cluster_name = module.eks.cluster_name
cluster_endpoint = module.eks.cluster_endpoint
cluster_version = module.eks.cluster_version
oidc_provider_arn = module.eks.oidc_provider_arn
# We want to wait for the Fargate profiles to be deployed first
create_delay_dependencies = [for prof in module.eks.fargate_profiles : prof.fargate_profile_arn]
# EKS Add-ons
eks_addons = {
coredns = {
configuration_values = jsonencode({
computeType = "Fargate"
# Ensure that the we fully utilize the minimum amount of resources that are supplied by
# Fargate https://docs.aws.amazon.com/eks/latest/userguide/fargate-pod-configuration.html
# Fargate adds 256 MB to each pod's memory reservation for the required Kubernetes
# components (kubelet, kube-proxy, and containerd). Fargate rounds up to the following
# compute configuration that most closely matches the sum of vCPU and memory requests in
# order to ensure pods always have the resources that they need to run.
resources = {
limits = {
cpu = "0.25"
# We are targeting the smallest Task size of 512Mb, so we subtract 256Mb from the
# request/limit to ensure we can fit within that task
memory = "256M"
}
requests = {
cpu = "0.25"
# We are targeting the smallest Task size of 512Mb, so we subtract 256Mb from the
# request/limit to ensure we can fit within that task
memory = "256M"
}
}
})
}
vpc-cni = {}
kube-proxy = {}
}
# Enable Fargate logging this may generate a large ammount of logs, disable it if not explicitly required
enable_fargate_fluentbit = true
fargate_fluentbit = {
flb_log_cw = true
}
enable_aws_load_balancer_controller = true
aws_load_balancer_controller = {
set = [
{
name = "vpcId"
value = module.vpc.vpc_id
},
{
name = "podDisruptionBudget.maxUnavailable"
value = 1
},
]
}
tags = local.tags
}
################################################################################
# Supporting Resources
################################################################################
module "vpc" {
source = "terraform-aws-modules/vpc/aws"
version = "~> 5.0"
name = local.name
cidr = local.vpc_cidr
azs = local.azs
private_subnets = [for k, v in local.azs : cidrsubnet(local.vpc_cidr, 4, k)]
public_subnets = [for k, v in local.azs : cidrsubnet(local.vpc_cidr, 8, k + 48)]
enable_nat_gateway = true
single_nat_gateway = true
public_subnet_tags = {
"kubernetes.io/role/elb" = 1
}
private_subnet_tags = {
"kubernetes.io/role/internal-elb" = 1
}
tags = local.tags
}일부 수정된 내용이 있어 해당 파일을 덮어쓰기 한 후 진행한다.
# init 초기화
terraform init
tree .terraform
cat .terraform/modules/modules.json | jq
tree .terraform/providers/registry.terraform.io/hashicorp -L 2

# plan
terraform plan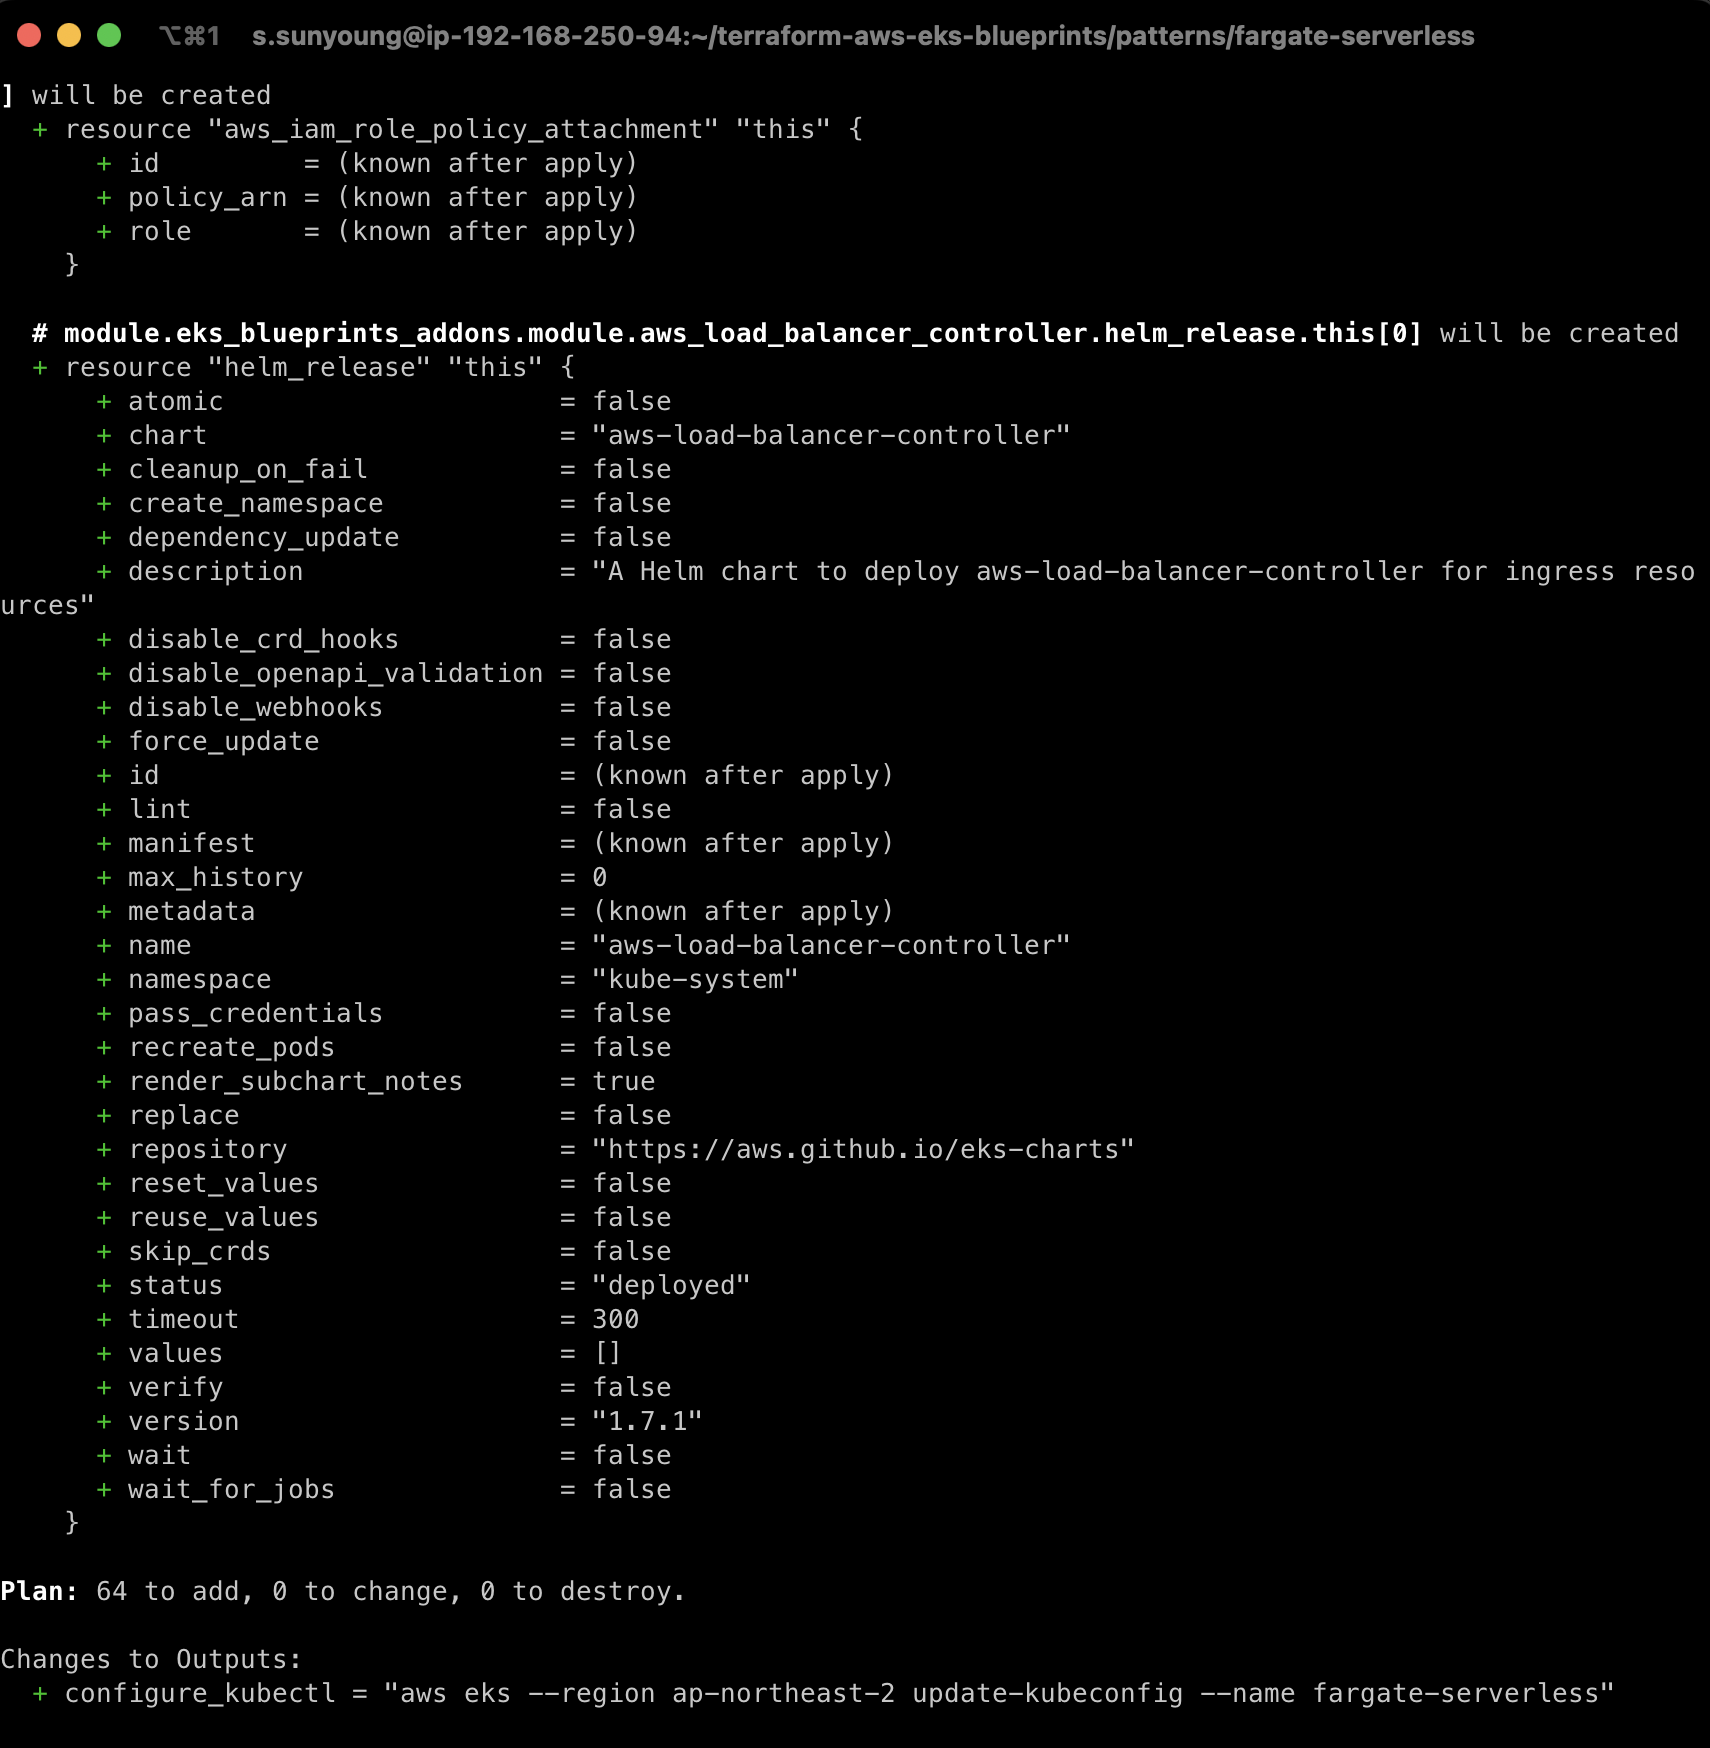
terraform apply -auto-approve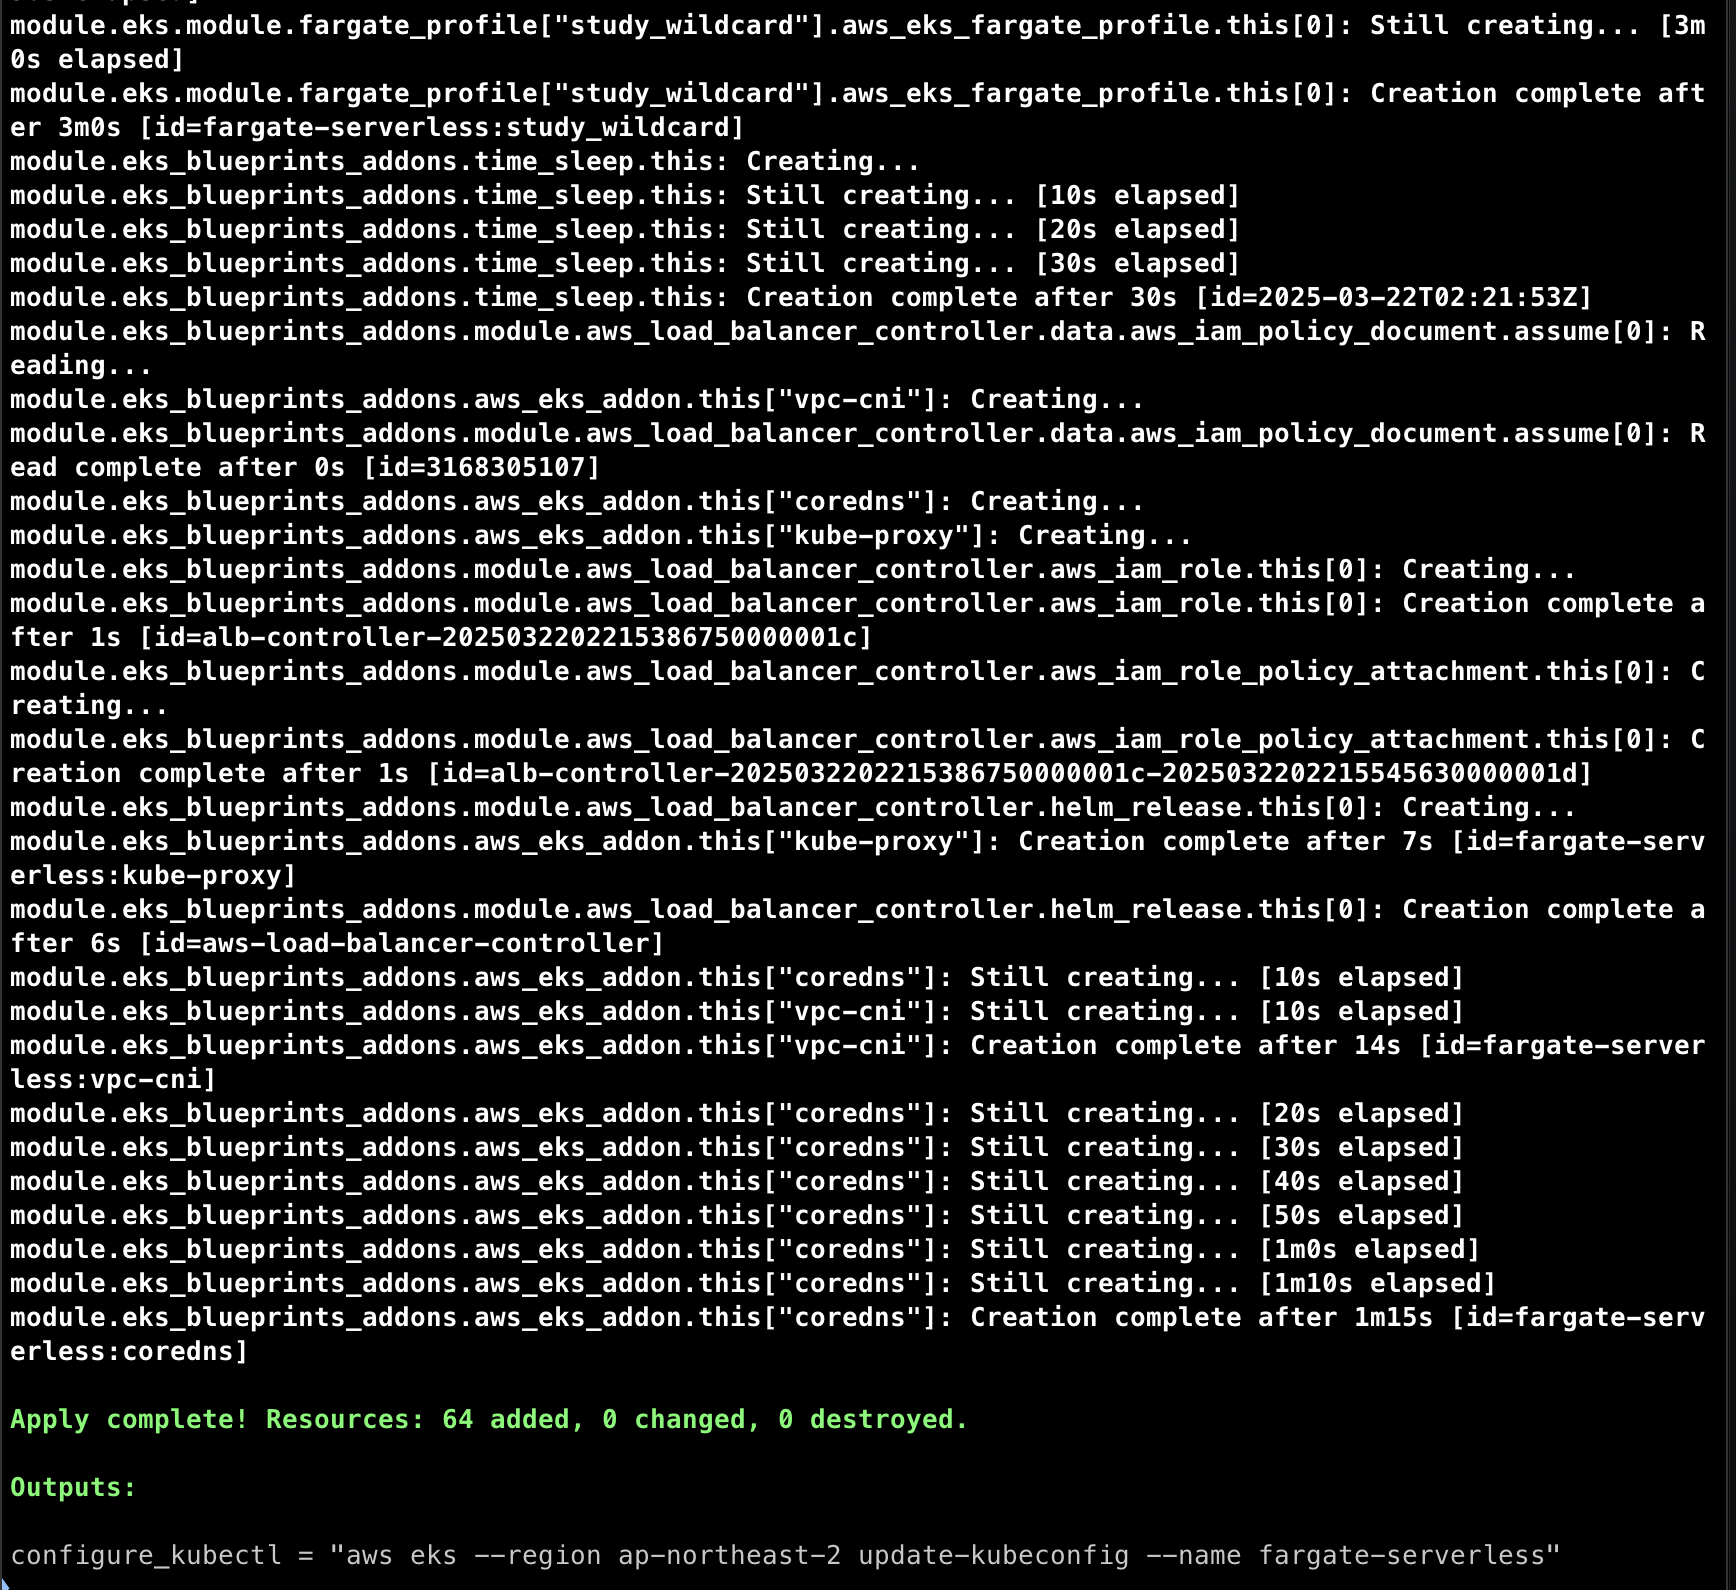
# 배포 완료 후 확인
terraform state list
# EKS 자격증명
$(terraform output -raw configure_kubectl)
cat ~/.kube/config
# kubectl context 변경
kubectl ctx
kubectl config rename-context "arn:aws:eks:ap-northeast-2:$(aws sts get-caller-identity --query 'Account' --output text):cluster/fargate-serverless" "fargate-lab"
# k8s 노드, 파드 정보 확인
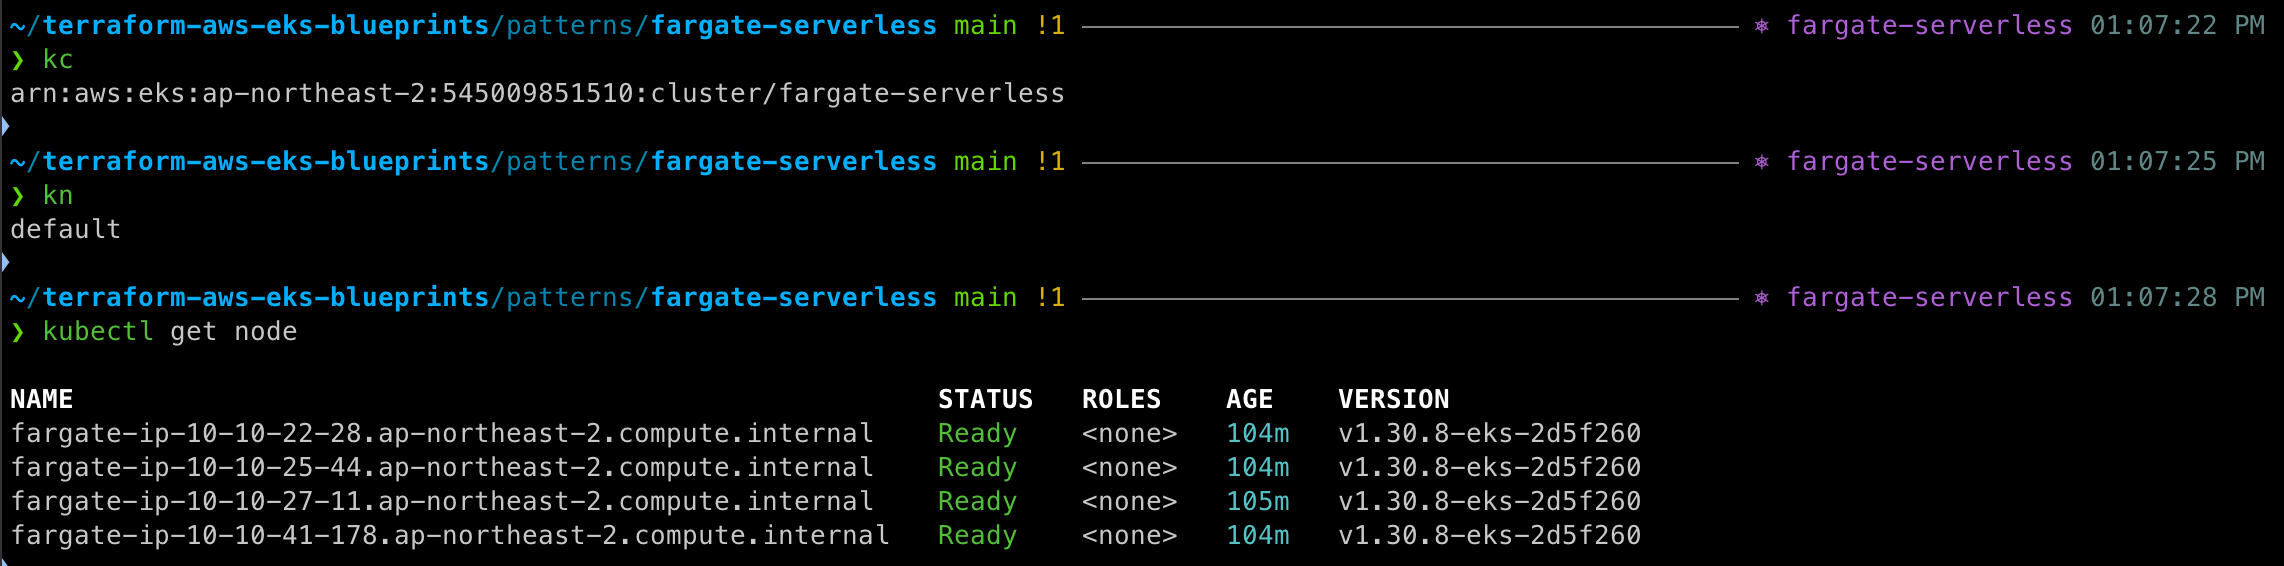
kubectl ns default
kubectl cluster-info
kubectl get node
kubectl get pod -A
# 상세 정보 확인
terraform show
terraform state list
terraform state show 'module.eks.**aws_eks_cluster**.this[0]'
terraform state show 'module.eks.data.tls_certificate.this[0]'
terraform state show 'module.eks.aws_cloudwatch_log_group.this[0]'
terraform state show 'module.eks.aws_eks_access_entry.this["cluster_creator"]'
terraform state show 'module.eks.aws_iam_openid_connect_provider.oidc_provider[0]'
terraform state show 'module.eks.data.aws_partition.current'
terraform state show 'module.eks.aws_iam_policy.cluster_encryption[0]'
terraform state show 'module.eks.aws_iam_role.this[0]'
terraform state show 'module.eks.time_sleep.this[0]'
terraform state show 'module.eks.module.kms.**aws_kms_key**.this[0]'
terraform state show 'module.eks.module.**fargate_profile**["kube_system"].aws_eks_fargate_profile.this[0]'
...
[coredns 파드 정보 확인]
kubectl get pod -n kube-system -l k8s-app=kube-dns -o yaml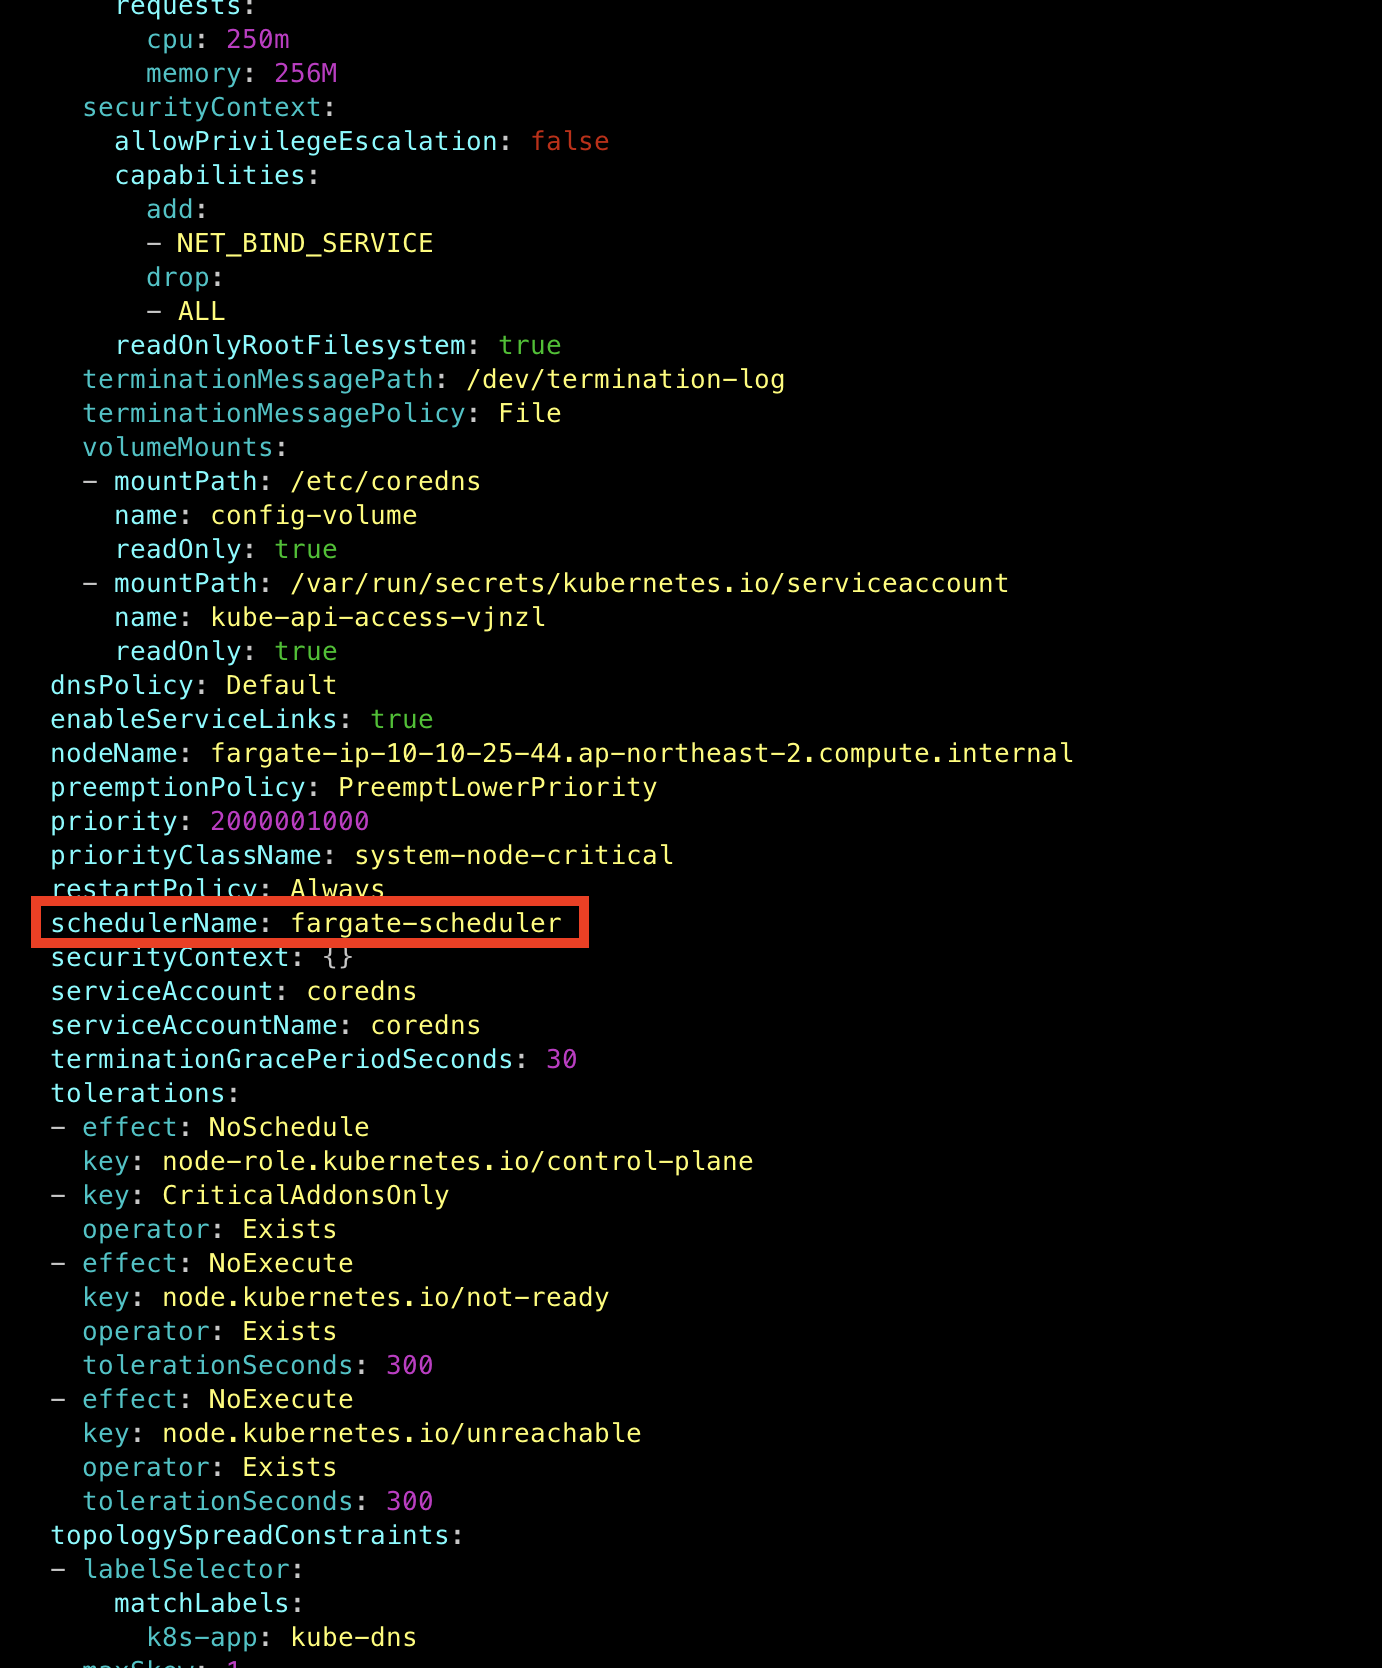
schedulerName이 fargate-scheduler인 것을 확인할 수 있다.
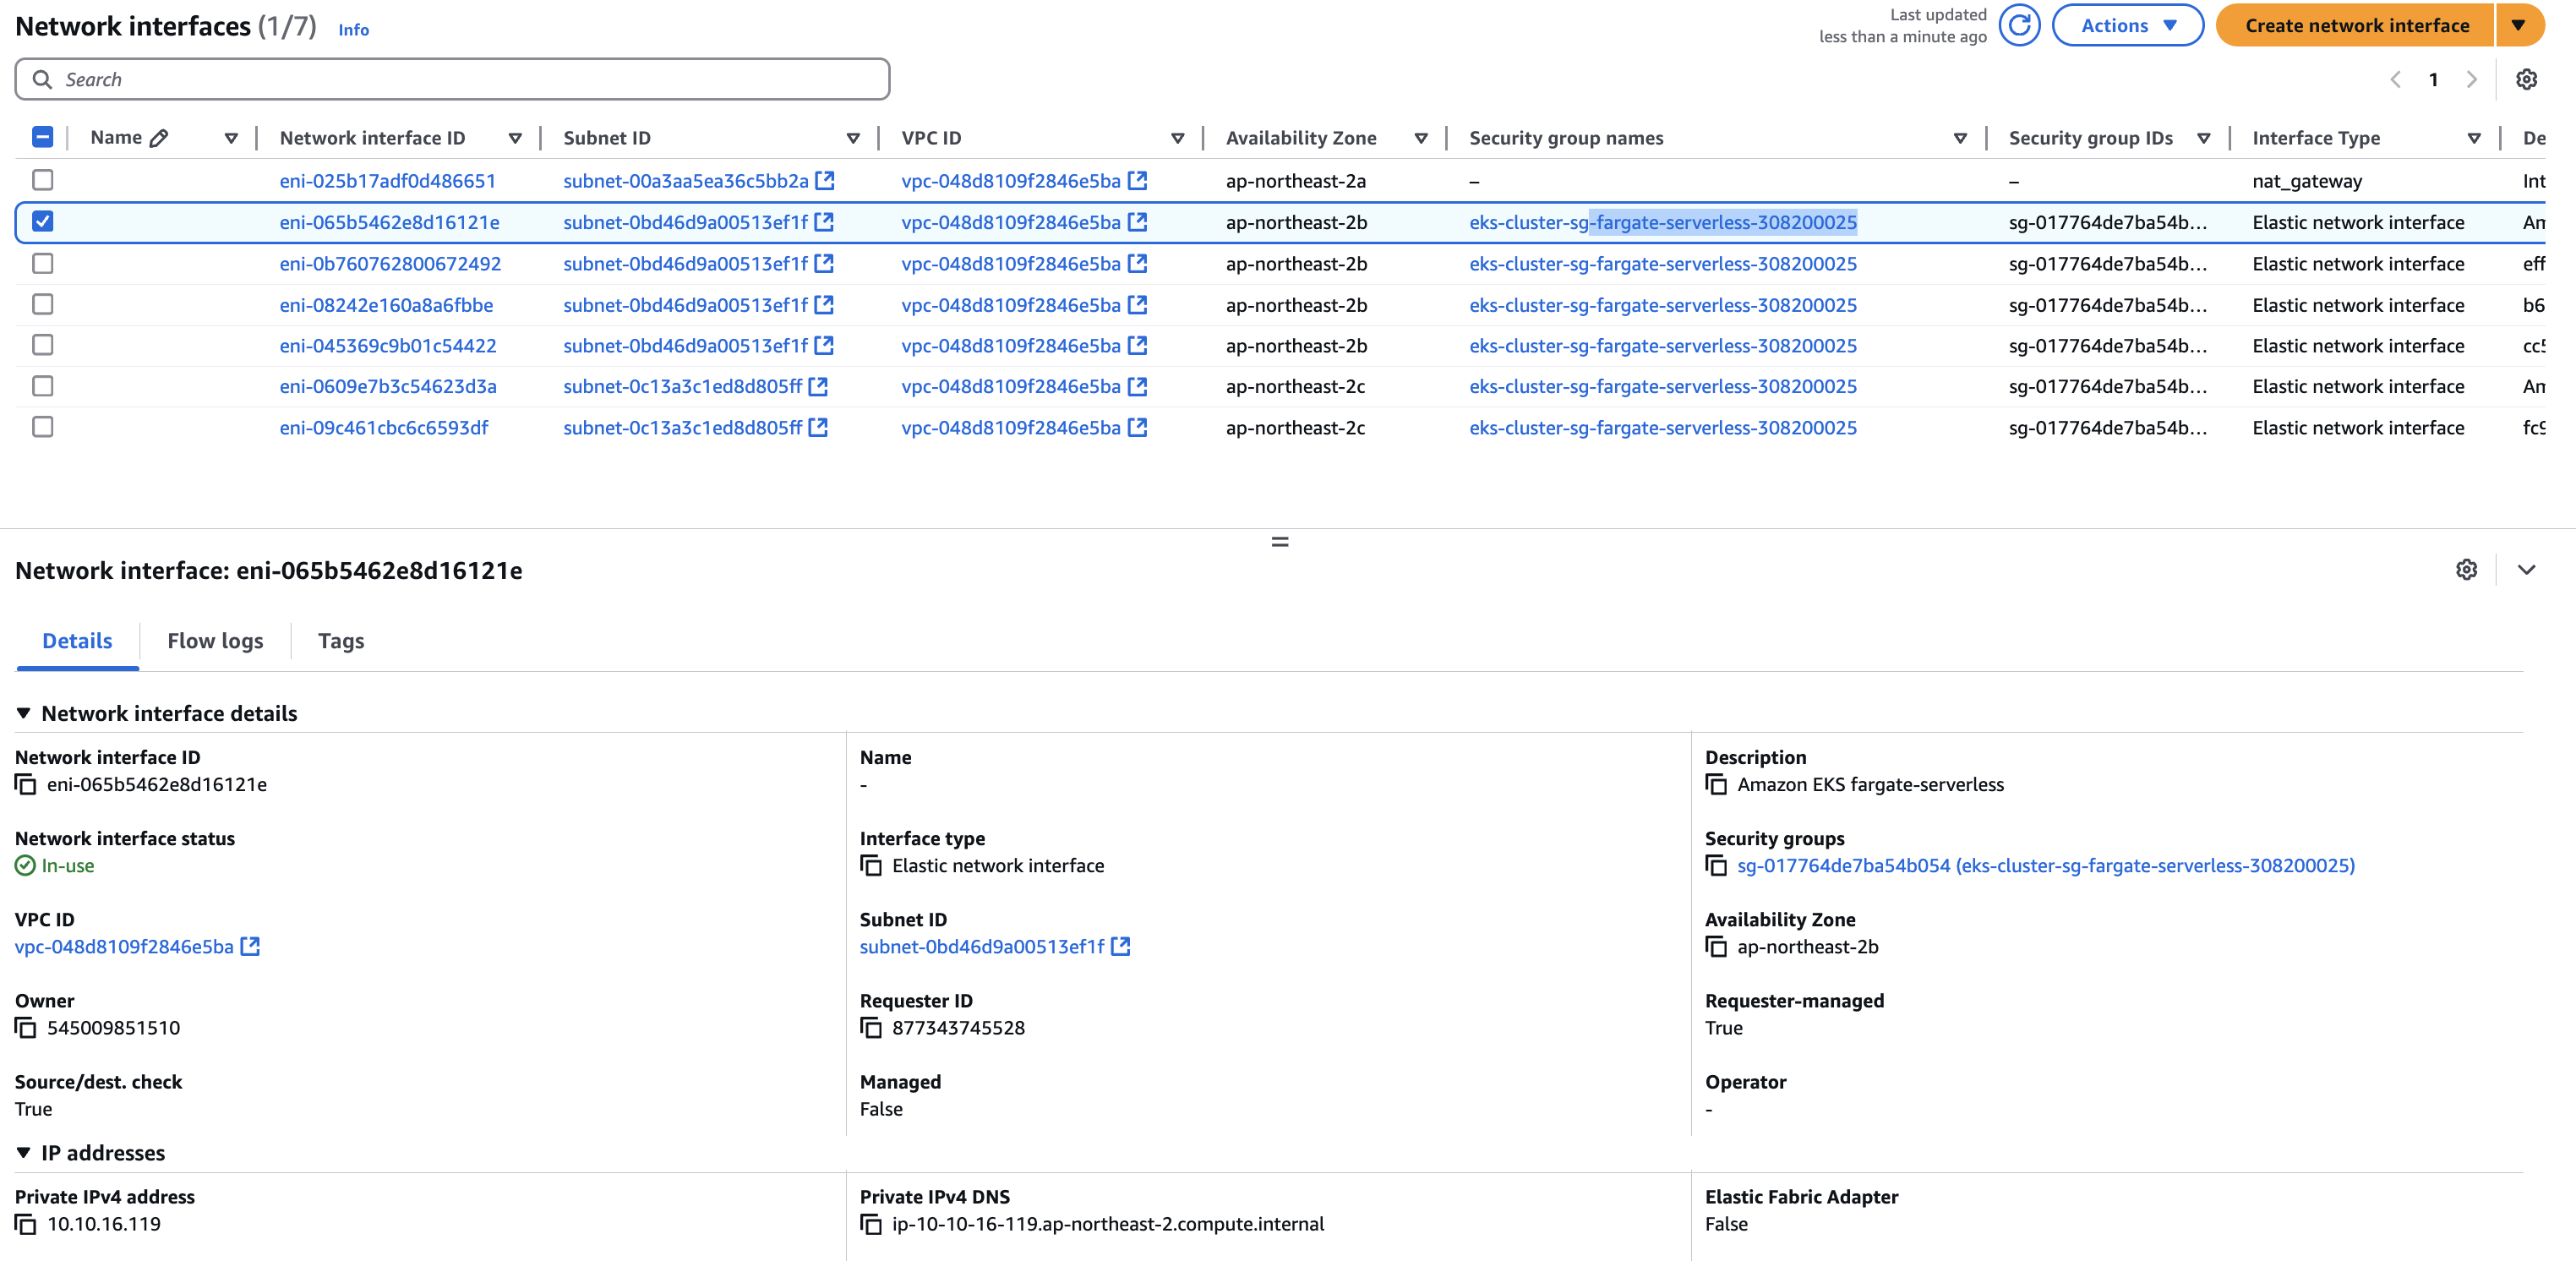
AWS 콘솔에서 봐도 EC2는 없는 것을 확인 가능하다 (serverless)
[fargate 에 netshoot 디플로이먼트(파드)]
# 네임스페이스 생성
kubectl create ns study-aews
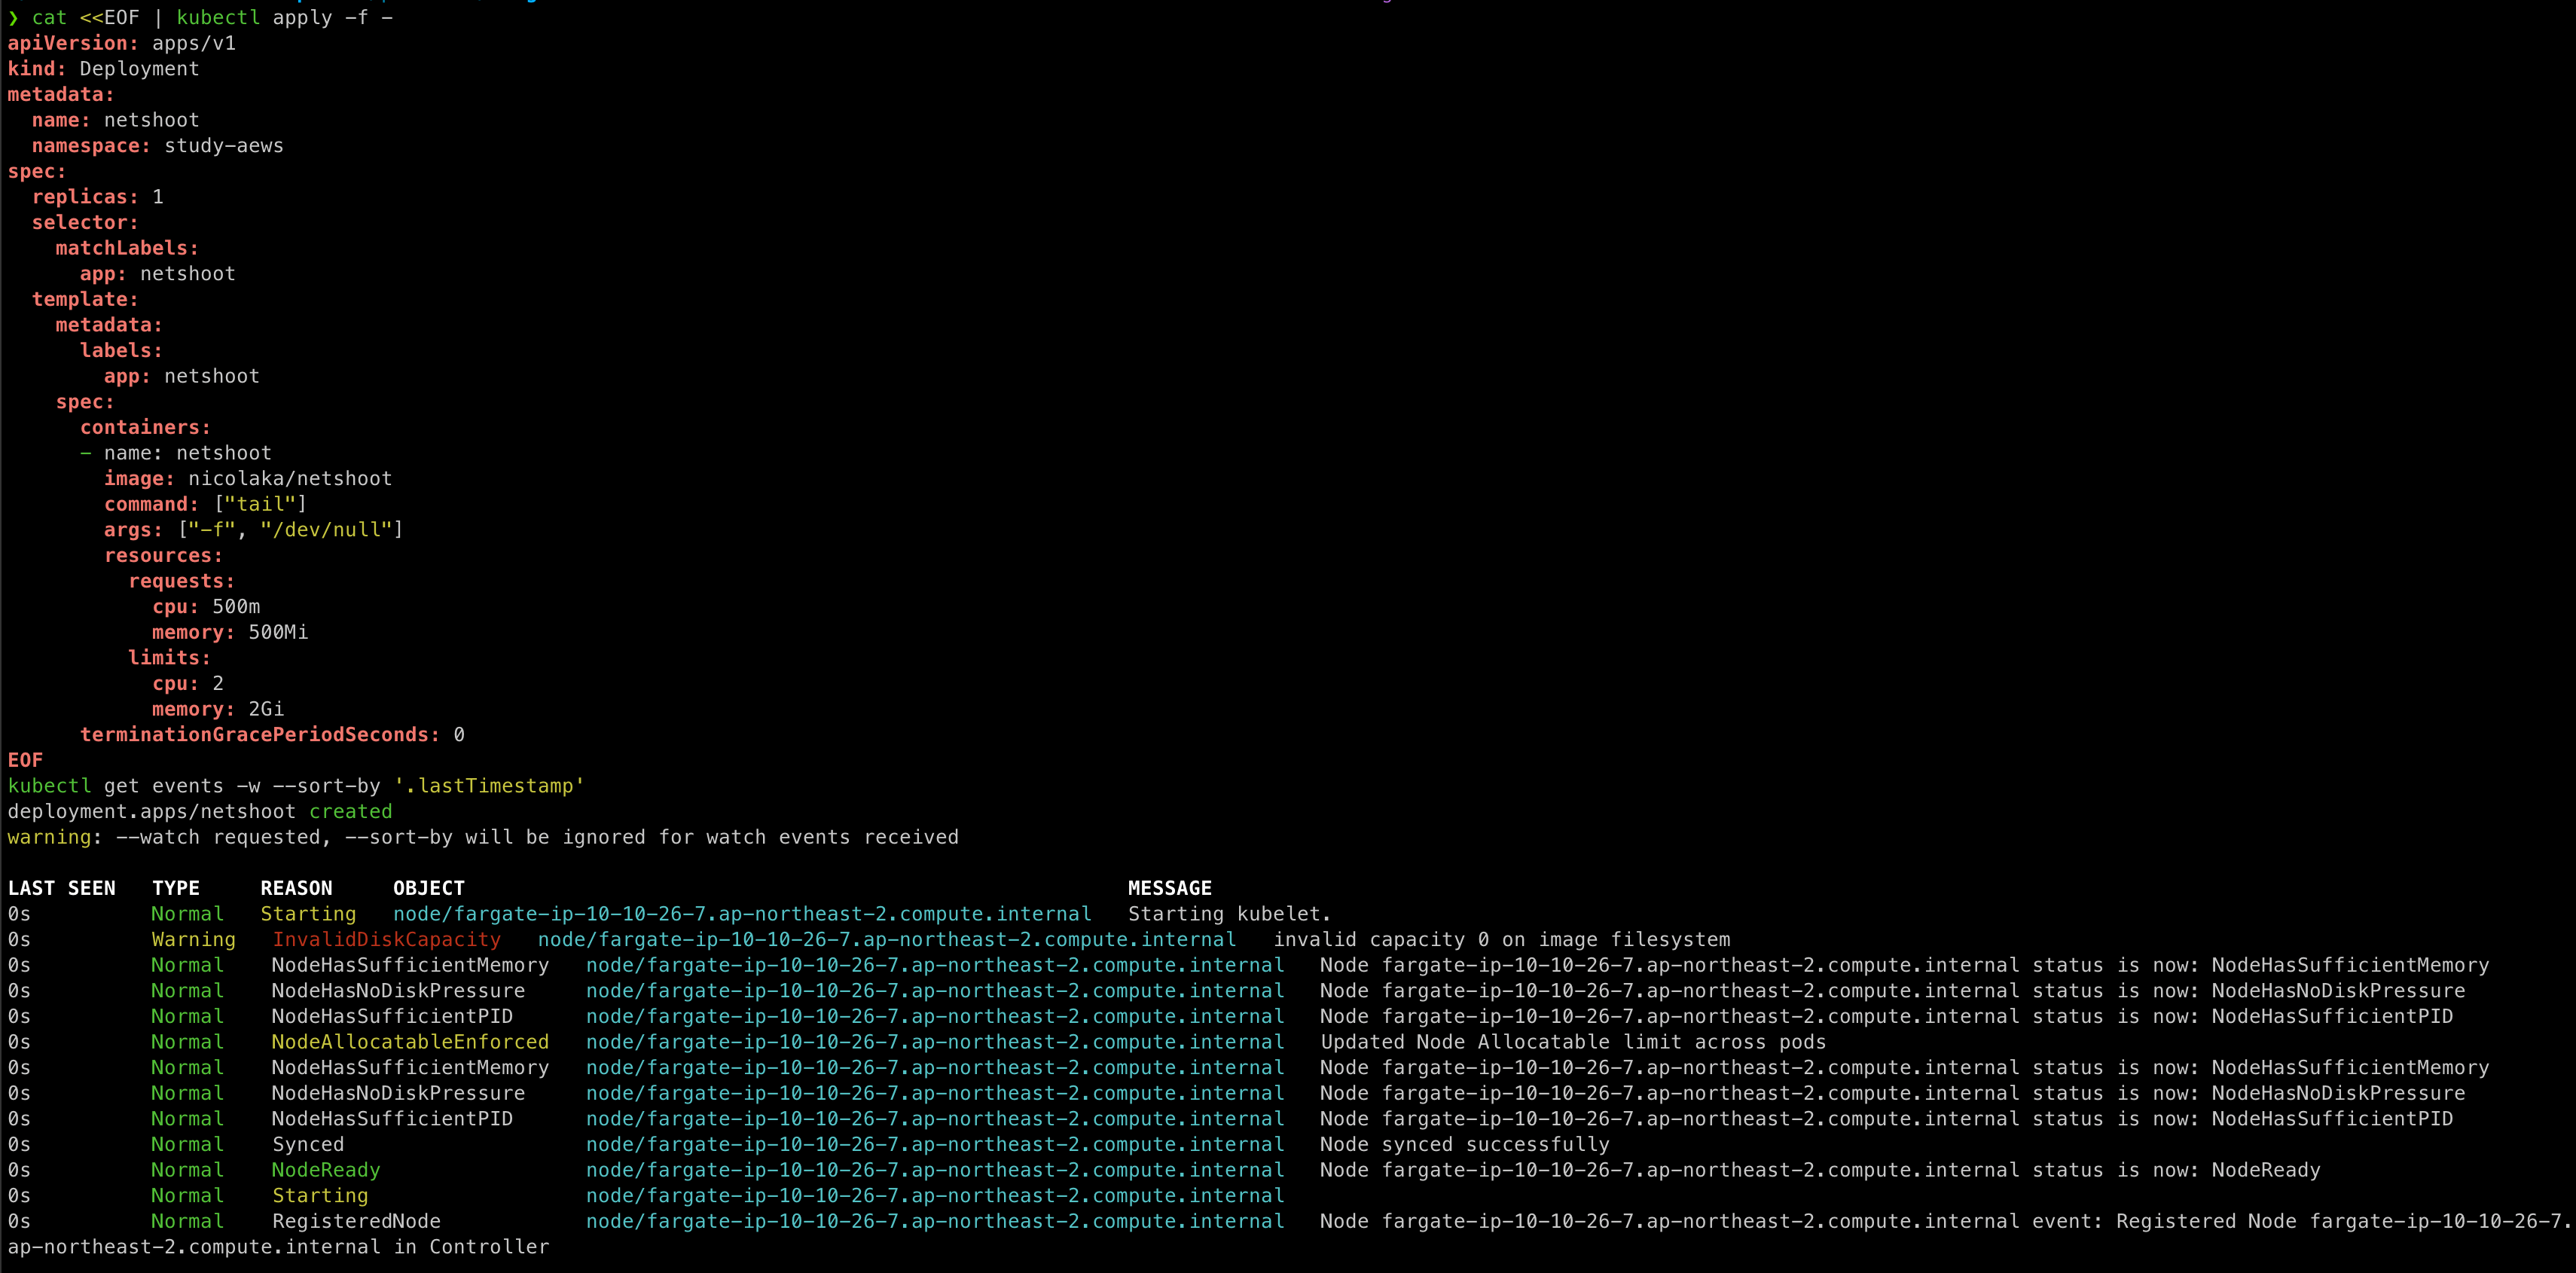
# 테스트용 파드 netshoot 디플로이먼트 생성 : 0.5vCPU 1GB 할당되어, 아래 Limit 값은 의미가 없음. 배포 시 대략 시간 측정해보자!
cat <<EOF | kubectl apply -f -
apiVersion: apps/v1
kind: Deployment
metadata:
name: netshoot
namespace: study-aews
spec:
replicas: 1
selector:
matchLabels:
app: netshoot
template:
metadata:
labels:
app: netshoot
spec:
containers:
- name: netshoot
image: nicolaka/netshoot
command: ["tail"]
args: ["-f", "/dev/null"]
resources:
requests:
cpu: 500m
memory: 500Mi
limits:
cpu: 2
memory: 2Gi
terminationGracePeriodSeconds: 0
EOF
kubectl get events -w --sort-by '.lastTimestamp'
kubectl get pod -n study-aews -o wide
kubectl get pod -n study-aews -o jsonpath='{.items[0].metadata.annotations.CapacityProvisioned}'
0.5vCPU 1GB
# 디플로이먼트 상세 정보
kubectl get deploy -n study-aews netshoot -o yaml
...
template:
...
spec:
...
schedulerName: default-scheduler
securityContext: {}
terminationGracePeriodSeconds: 0
...
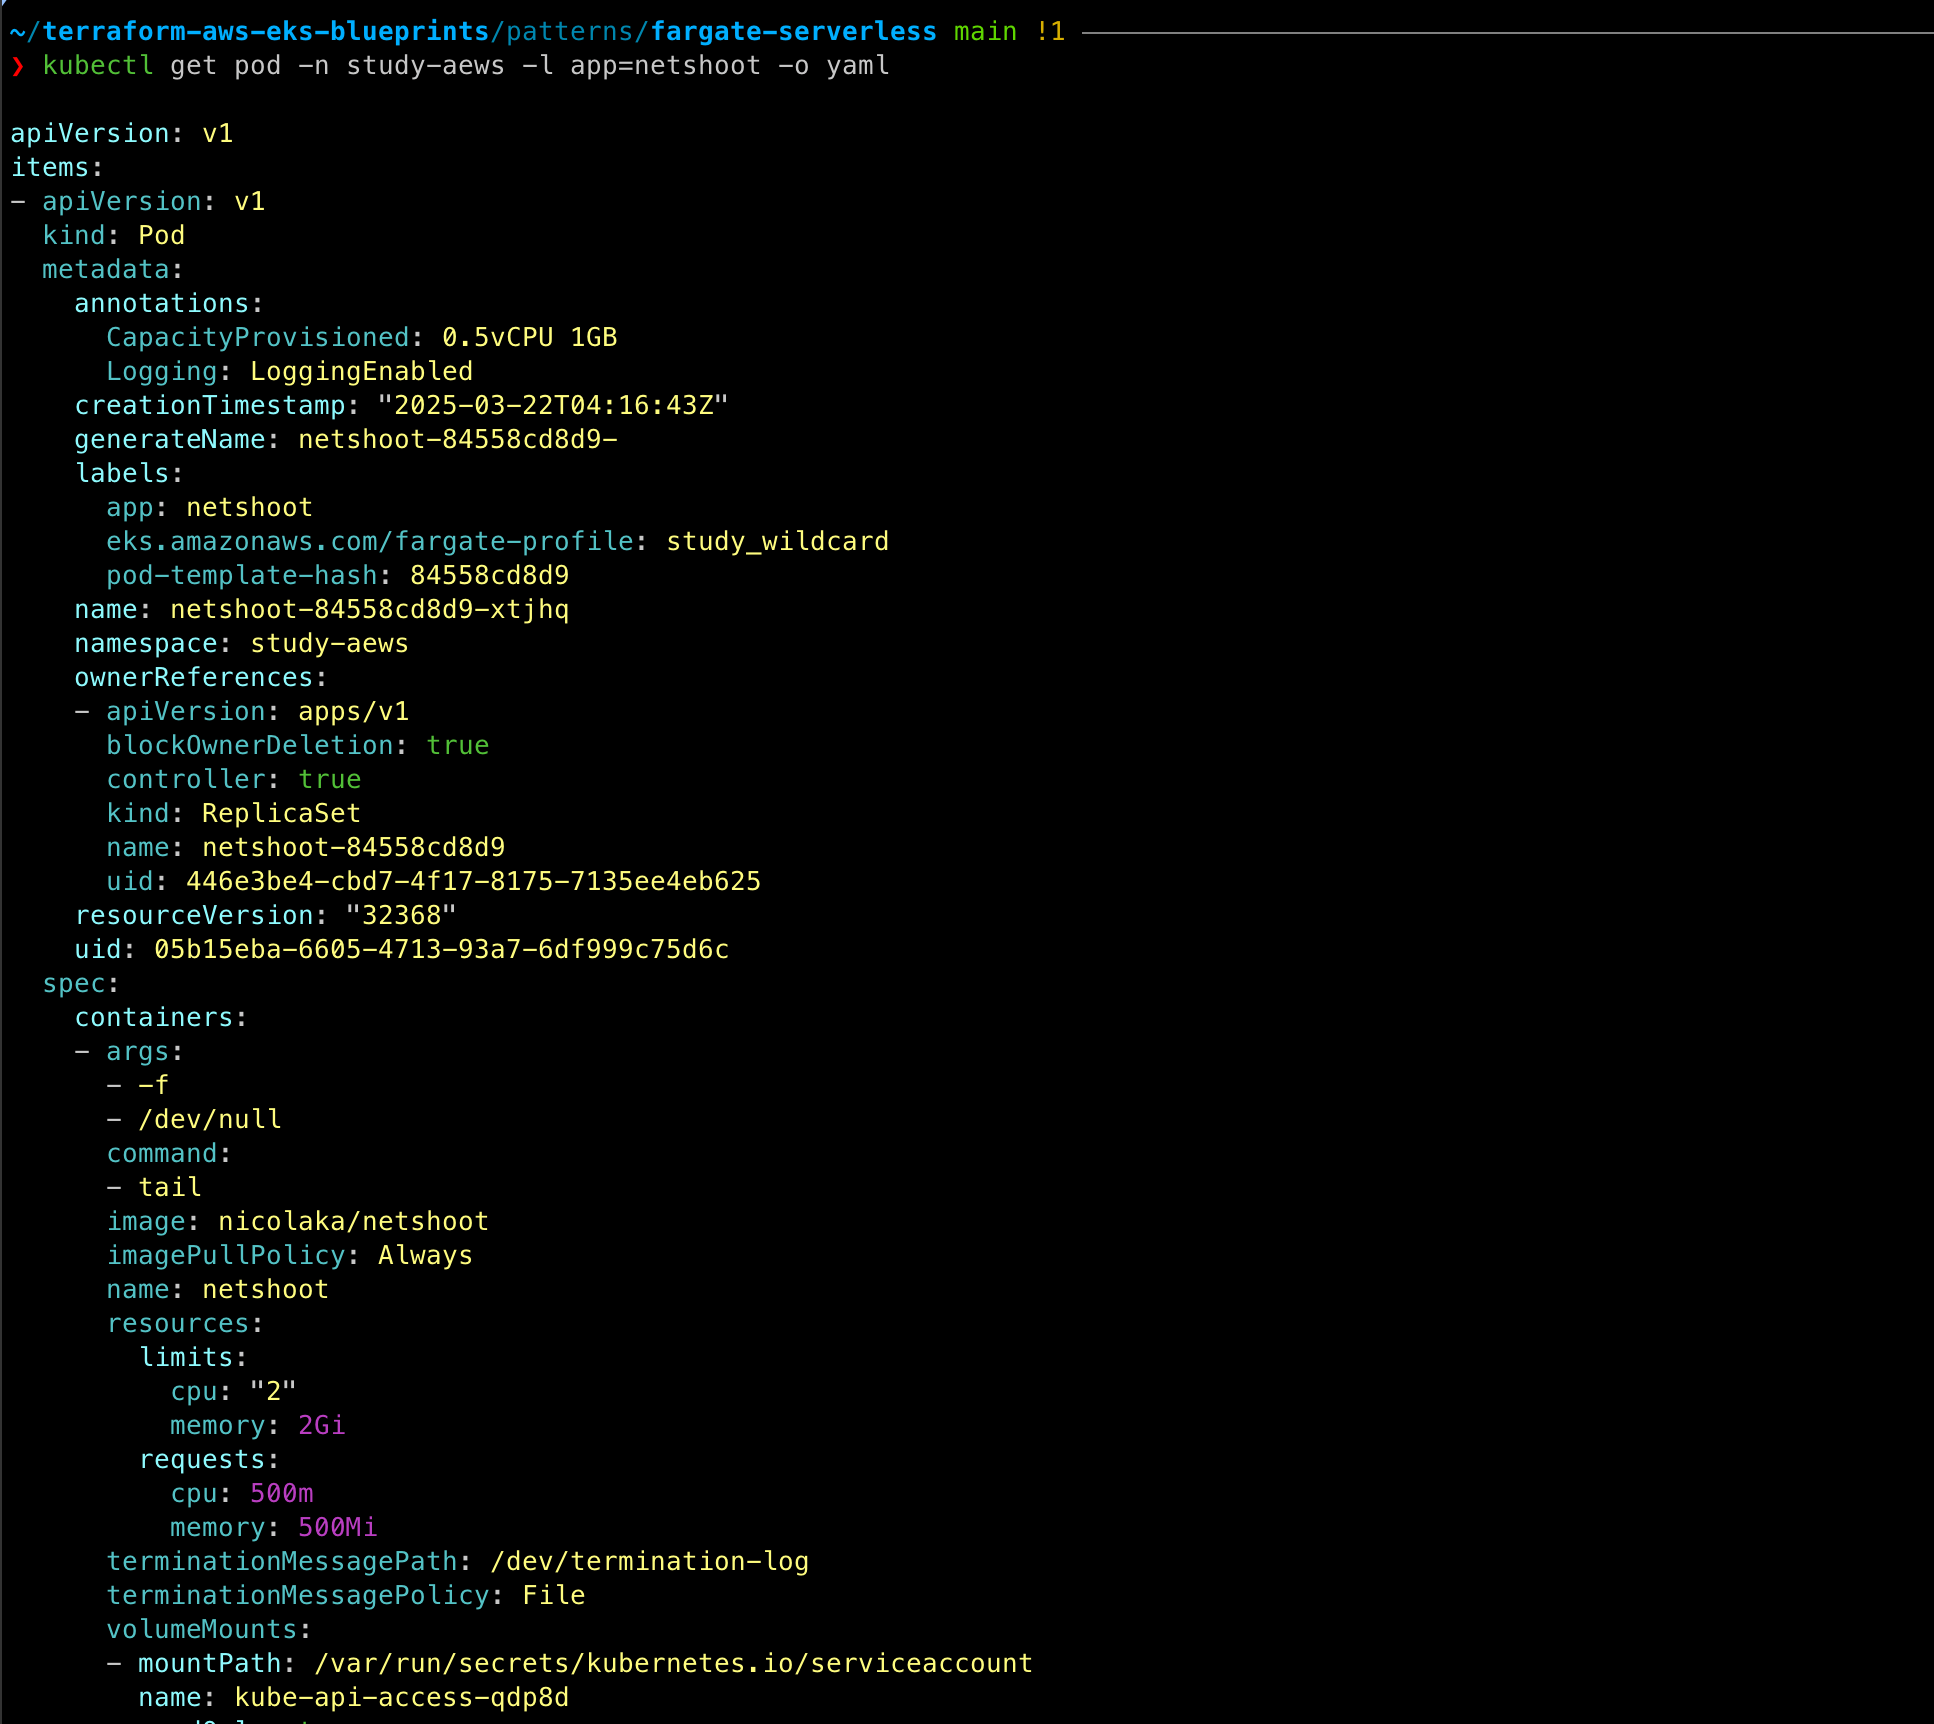
# 파드 상세 정보 : admission control 이 동작했음을 알 수 있음
kubectl get pod -n study-aews -l app=netshoot -o yaml
...
metadata:
annotations:
CapacityProvisioned: 0.5vCPU 1GB
Logging: LoggingEnabled
...
preemptionPolicy: PreemptLowerPriority
priority: 2000001000
priorityClassName: system-node-critical
restartPolicy: Always
schedulerName: fargate-scheduler
...
qosClass: Burstable
[파드 권한과 호스트 네임스페이스 공유로 호스트 탈취 시도]
kubectl apply -f - <<EOF
apiVersion: v1
kind: Pod
metadata:
  name: root-shell
  namespace: study-aews
spec:
  containers:
  - command:
    - /bin/cat
    image: alpine:3
    name: root-shell
    securityContext:
      privileged: true
    tty: true
    stdin: true
    volumeMounts:
    - mountPath: /host
      name: hostroot
  hostNetwork: true
  hostPID: true
  hostIPC: true
  tolerations:
  - effect: NoSchedule
    operator: Exists
  - effect: NoExecute
    operator: Exists
  volumes:
  - hostPath:
      path: /
    name: hostroot
EOF

#
kubectl get pod -n study-aews root-shell
kubectl describe pod -n study-aews root-shell | grep Events: -A 10
파드 권한과 호스트 네임스페이스 공유로 호스트 탈취 시도할 때 실패하는 것을 확인할 수 있다. => fargate의 경우는 탈취 시도가 어렵다.
# 삭제
kubectl delete pod -n study-aews root-shell

[AWS ALB]
# 게임 디플로이먼트와 Service, Ingress 배포
cat <<EOF | kubectl apply -f -
apiVersion: apps/v1
kind: Deployment
metadata:
  namespace: study-aews
  name: deployment-2048
spec:
  selector:
    matchLabels:
      app.kubernetes.io/name: app-2048
  replicas: 2
  template:
    metadata:
      labels:
        app.kubernetes.io/name: app-2048
    spec:
      containers:
      - image: public.ecr.aws/l6m2t8p7/docker-2048:latest
        imagePullPolicy: Always
        name: app-2048
        ports:
        - containerPort: 80
---
apiVersion: v1
kind: Service
metadata:
  namespace: study-aews
  name: service-2048
spec:
  ports:
    - port: 80
      targetPort: 80
      protocol: TCP
  type: ClusterIP
  selector:
    app.kubernetes.io/name: app-2048
---
apiVersion: networking.k8s.io/v1
kind: Ingress
metadata:
  namespace: study-aews
  name: ingress-2048
  annotations:
    alb.ingress.kubernetes.io/scheme: internet-facing
    alb.ingress.kubernetes.io/target-type: ip
spec:
  ingressClassName: alb
  rules:
    - http:
        paths:
        - path: /
          pathType: Prefix
          backend:
            service:
              name: service-2048
              port:
                number: 80
EOF


# 모니터링
watch -d kubectl get pod,ingress,svc,ep,endpointslices -n study-aews

# 생성 확인
kubectl get-all -n study-aews
kubectl get ingress,svc,ep,pod -n study-aews
kubectl get targetgroupbindings -n study-aews

# Ingress 확인
kubectl describe ingress -n study-aews ingress-2048
kubectl get ingress -n study-aews ingress-2048 -o jsonpath="{.status.loadBalancer.ingress[*].hostname}{'\n'}"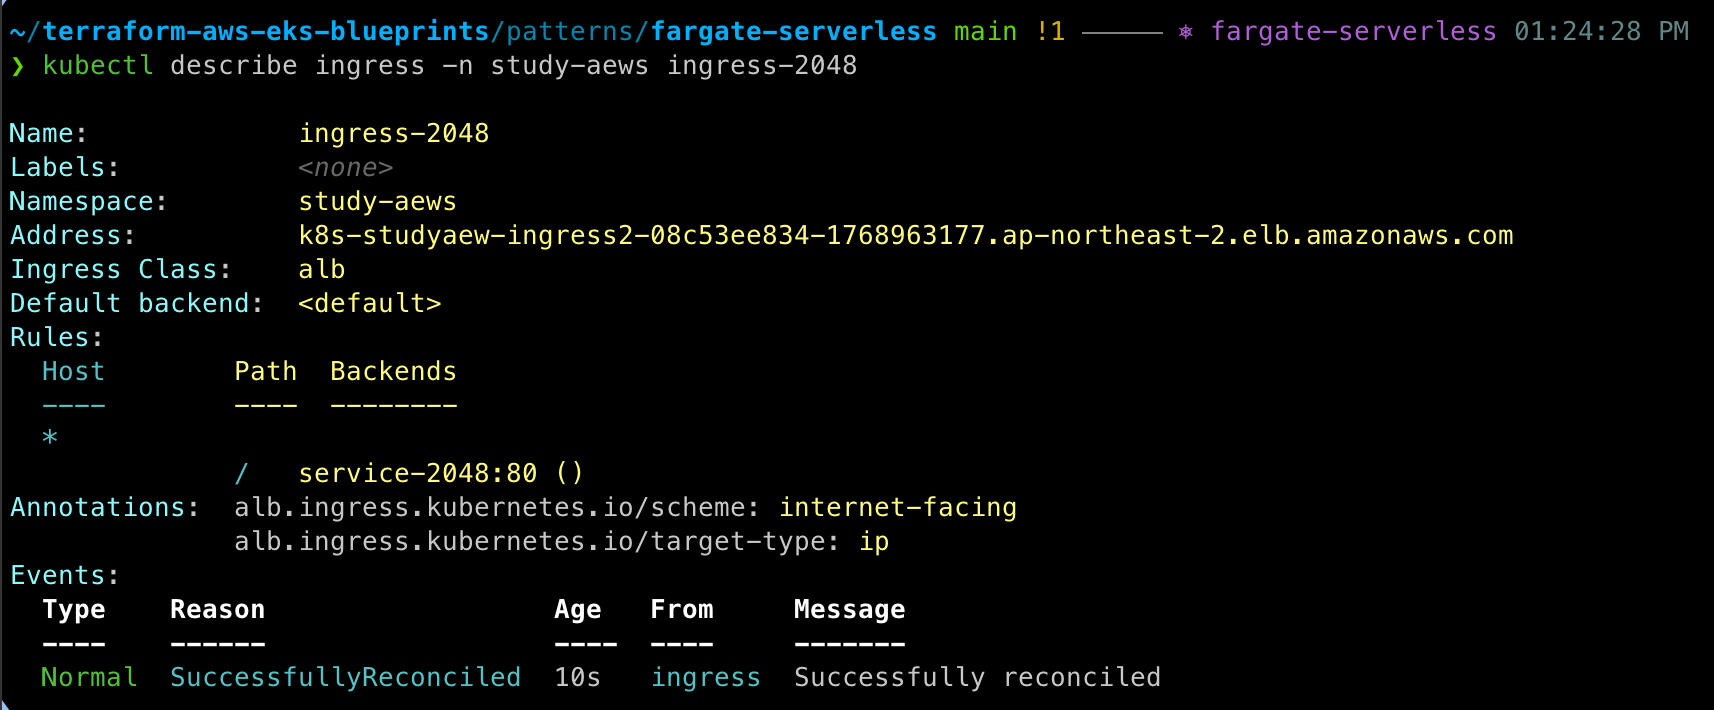
# 파드 IP 확인
kubectl get pod -n study-aews -owide

# 파드 증가
kubectl scale deployment -n study-aews  deployment-2048 --replicas 4

# 게임 실습 리소스  삭제
kubectl delete ingress ingress-2048 -n study-aews
kubectl delete svc service-2048 -n study-aews && kubectl delete deploy deployment-2048 -n study-aews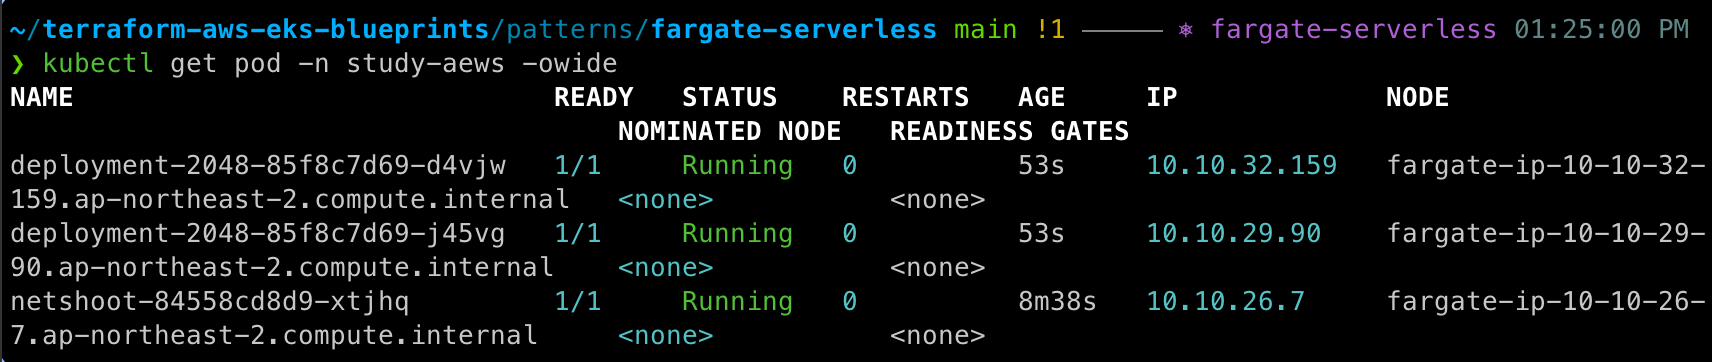
[fargate job]
#
cat <<EOF | kubectl apply -f -
apiVersion: batch/v1
kind: Job
metadata:
  name: busybox1
  namespace: study-aews
spec:
  template:
    spec:
      containers:
      - name: busybox
        image: busybox
        command: ["/bin/sh", "-c", "sleep 10"]
      restartPolicy: Never
  ttlSecondsAfterFinished: 60 # <-- TTL controller
---
apiVersion: batch/v1
kind: Job
metadata:
  name: busybox2
  namespace: study-aews
spec:
  template:
    spec:
      containers:
      - name: busybox
        image: busybox
        command: ["/bin/sh", "-c", "sleep 10"]
      restartPolicy: Never
EOF

#
kubectl get job,pod -n study-aews
kubectl get job -n study-aews -w
kubectl get pod -n study-aews -w
kubectl get job,pod -n study-aews

# 삭제
kubectl delete job -n study-aews --all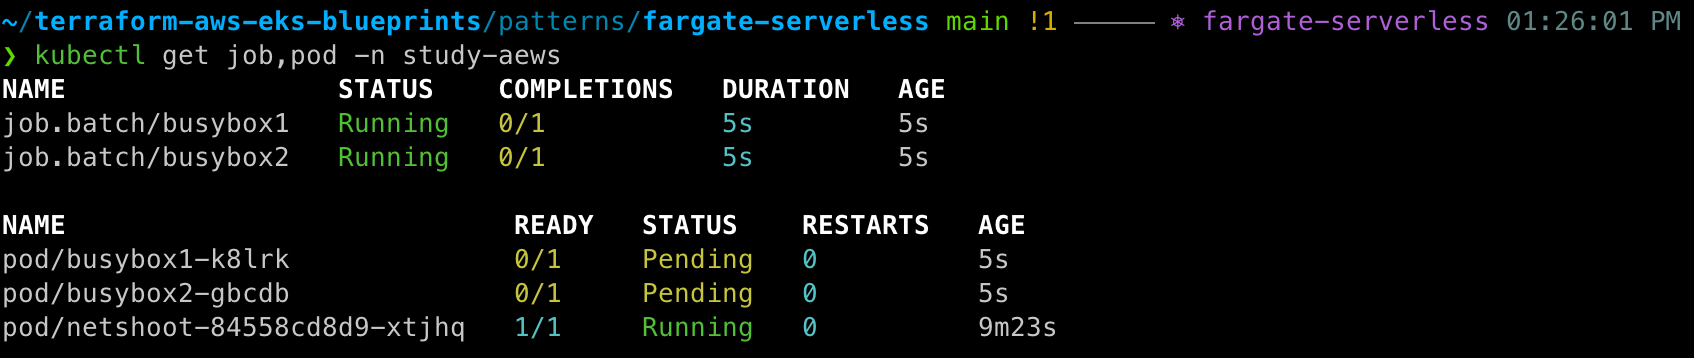
[fargate logging]
- Fargate의 Amazon EKS는 Fluent Bit 기반의 내장 로그 라우터를 제공한다. => Fluent Bit 컨테이너를 Amazon에서 실행
- 구성은 다음 기준을 충족해야 하는 전용 ConfigMap을 통해 이루어집니다.
- 이름 : aws-logging
- aws-observability라는 전용 네임스페이스에서 생성됨
- ConfigMap을 생성하면 Fargate의 Amazon EKS가 자동으로 이를 감지하고 로그 라우터를 구성한다.
cat <<EOF | kubectl apply -f -
apiVersion: apps/v1
kind: Deployment
metadata:
  name: sample-app
  namespace: study-aews
spec:
  replicas: 2
  selector:
    matchLabels:
      app: nginx
  template:
    metadata:
      labels:
        app: nginx
    spec:
      containers:
      - image: nginx:latest
        name: nginx
        ports:
        - containerPort: 80
          name: http
        resources:
          requests:
            cpu: 500m
            memory: 500Mi
          limits:
            cpu: 2
            memory: 2Gi
---
apiVersion: v1
kind: Service
metadata:
  name: sample-app
  namespace: study-aews
spec:
  selector:
    app: nginx
  ports:
  - port: 80
    targetPort: 80
    protocol: TCP
  type: ClusterIP
EOF

# 확인
kubectl get pod -n study-aews -l app=nginx
kubectl describe pod -n study-aews -l app=nginx

# 반복 접속
kubectl exec -it deploy/netshoot -n study-aews -- curl sample-app | grep title
while true; do kubectl exec -it deploy/netshoot -n study-aews -- curl sample-app | grep title; sleep 1; echo ; date; done;

# 로그 확인
kubectl stern -n study-aews -l app=nginx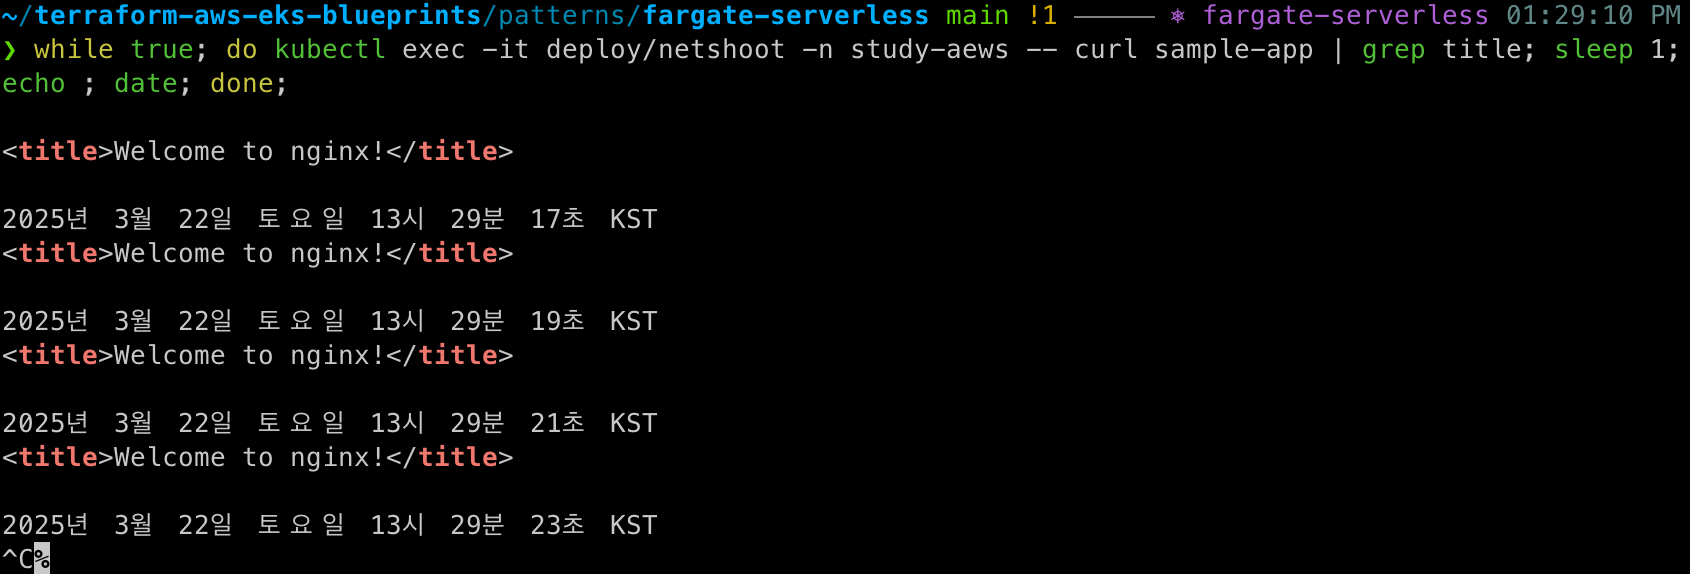
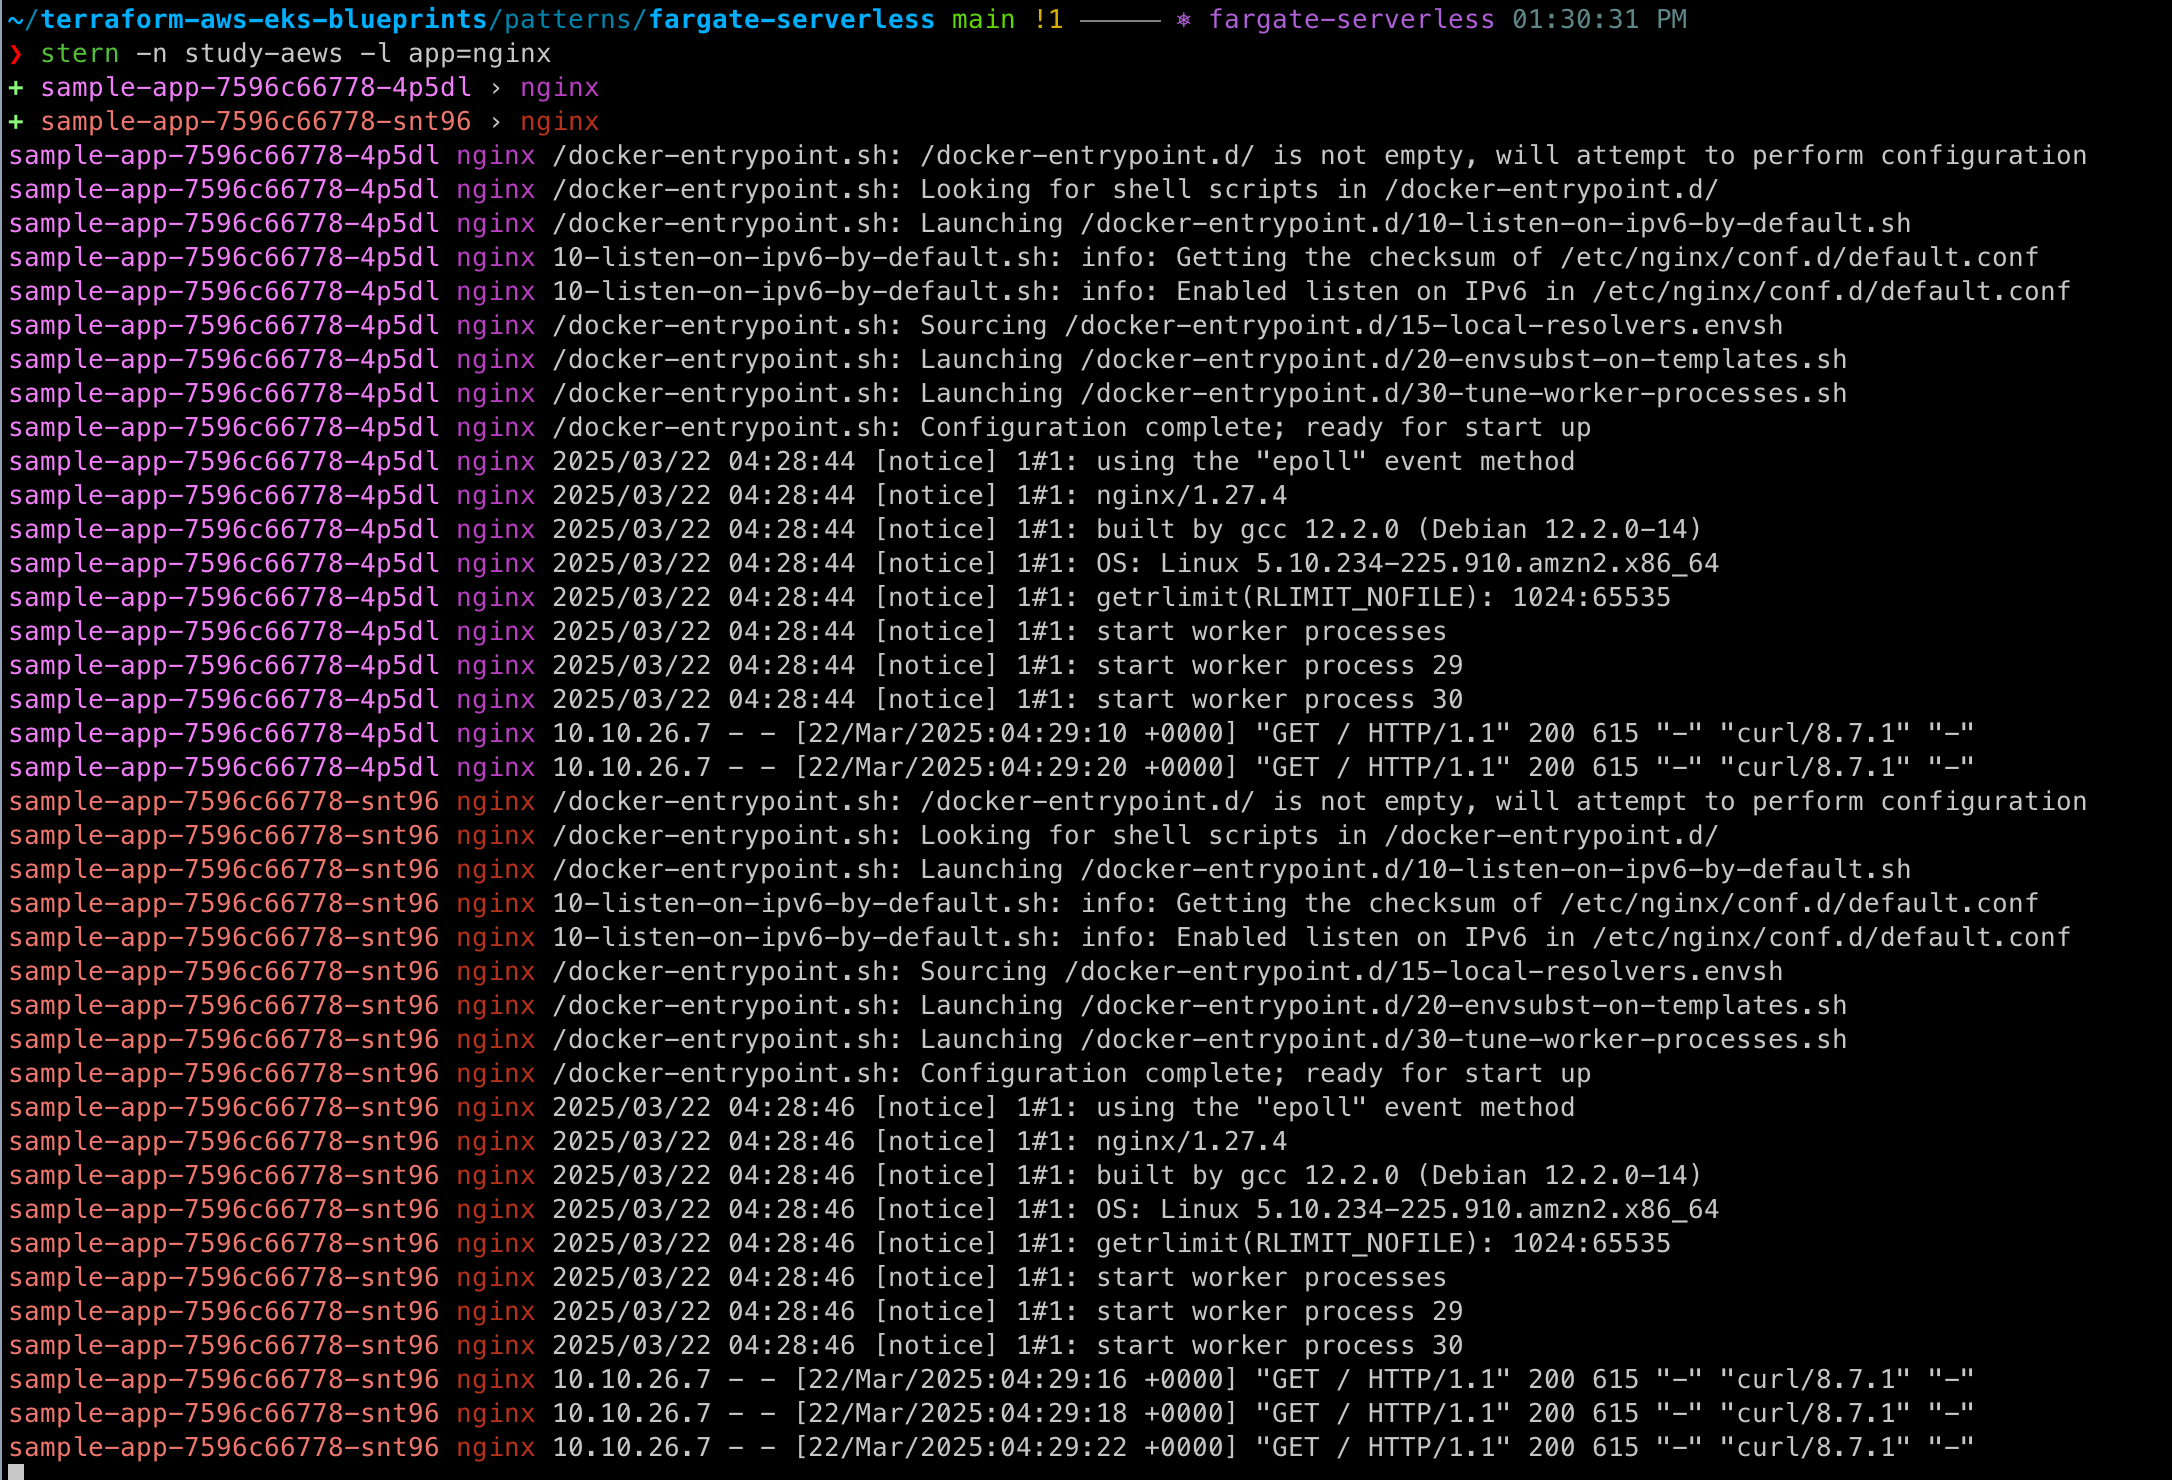
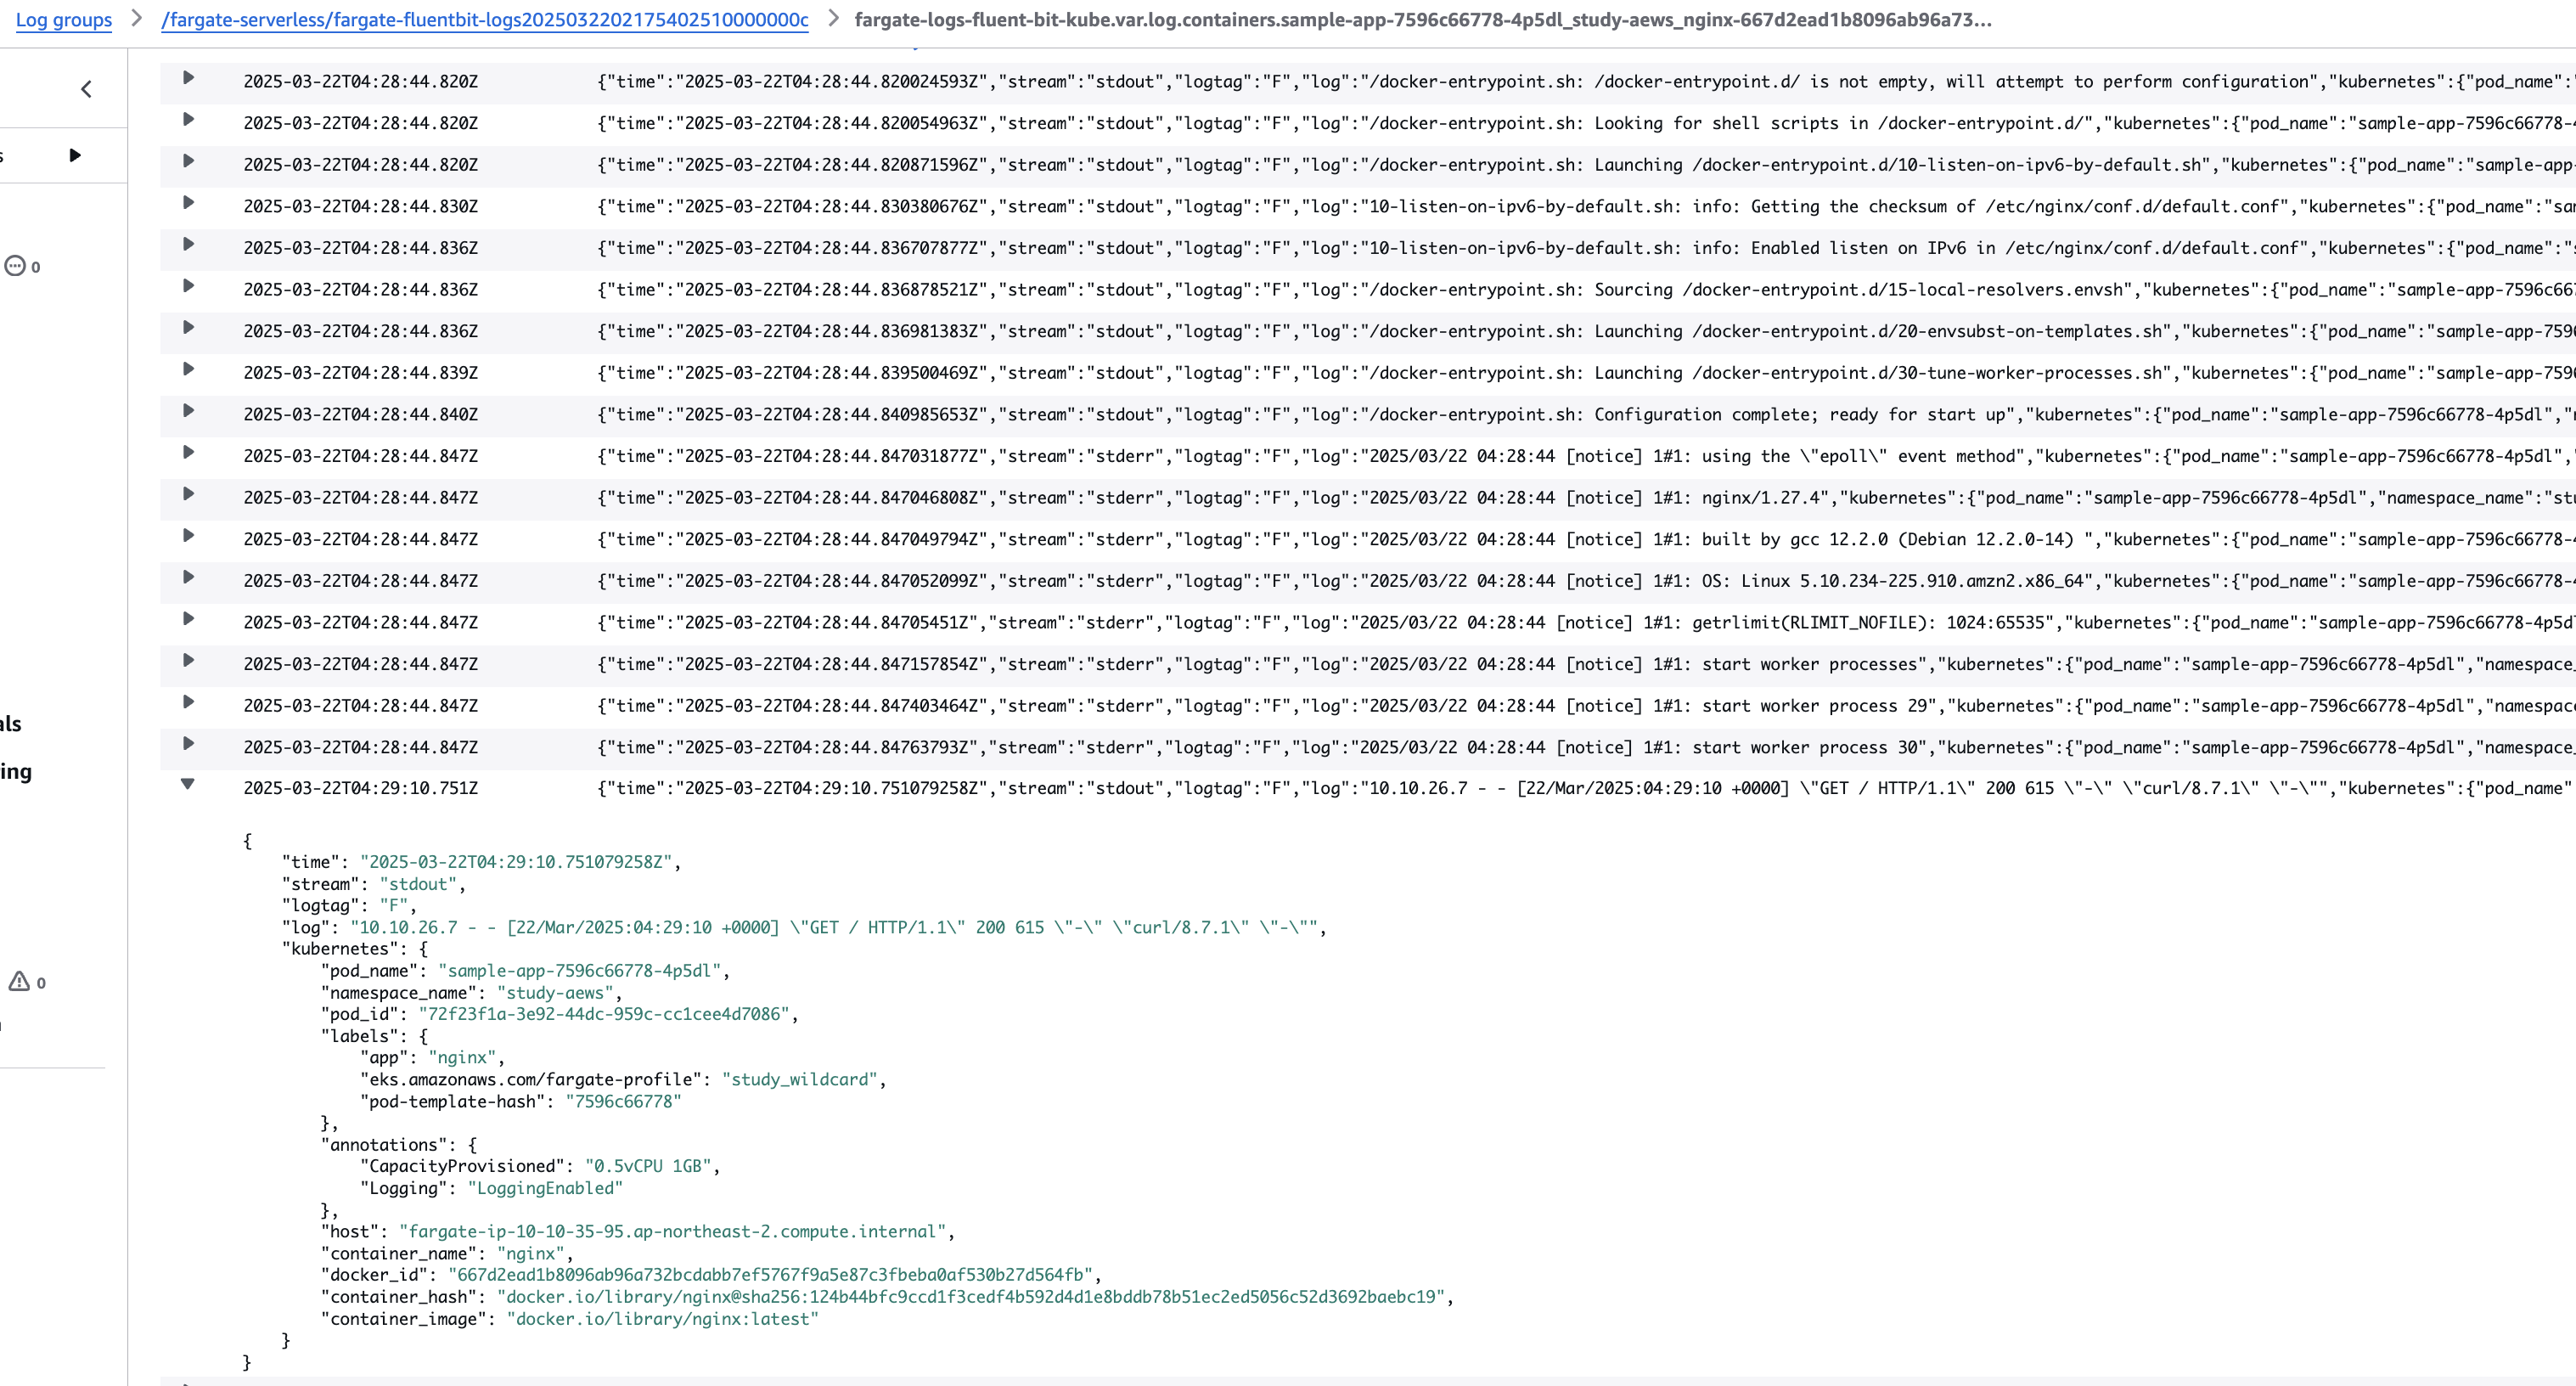
콘솔에서도 로그 확인이 가능하다!
[삭제]
# 게임 실습 리소스  삭제
kubectl delete ingress ingress-2048 -n study-aews
kubectl delete svc service-2048 -n study-aews && kubectl delete deploy deployment-2048 -n study-aews

# netshoot 삭제
kubectl delete deploy netshoot -n study-aews

# kube-ops-view 삭제
helm uninstall kube-ops-view -n kube-system

# 테라폼 삭제 : vpc 삭제가 잘 안될 경우 aws 콘솔에서 vpc 수동 삭제 -> vnic 등 남아 있을 경우 해당 vnic 강제 삭제
terraform destroy -auto-approve

# VPC 삭제 확인
aws ec2 describe-vpcs --filter 'Name=isDefault,Values=false' --output yaml

# kubeconfig 삭제
rm -rf ~/.kube/config
Firecracker
가상화되지 않은 환경에서 1초도 되지 않는 시간 안에 경량 microVM(마이크로 가상 머신)을 시작할 수 있고, 컨테이너를 통해 제공하는 리소스 효율성과 기존 VM에서 제공하는 워크로드 격리 및 보안의 혜택을 그대로 활용할 수 있다.
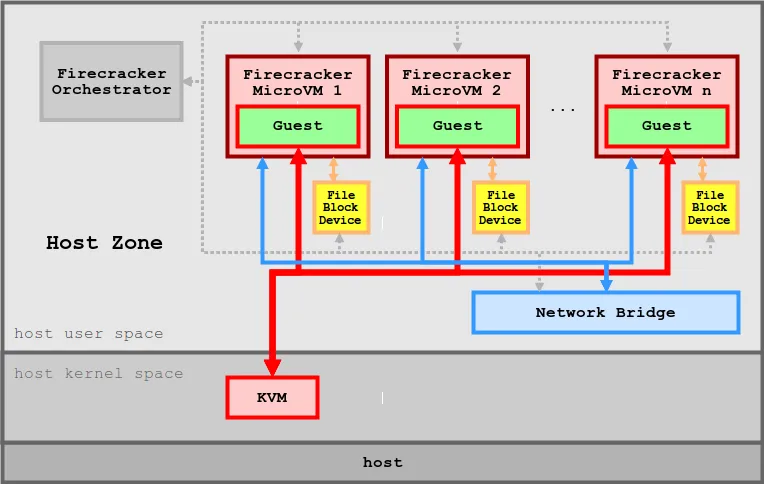
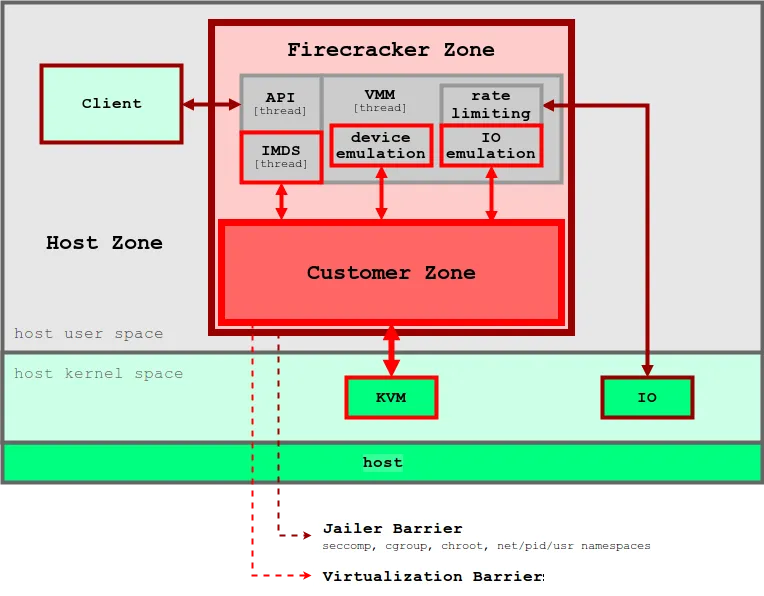
firecracker 프로세스는 정적으로 연결되며, 잠금자(Jailer)에서 시작하여 가능한 안전하고 클린한 상태의 호스트 환경을 보장한다.
Automode
EKS Auto Mode는 간단하게 AWS가 EKS 리소스의 일부를 직접 책임지고 관리해 주는 기능이다. 이로인해 사용자는 클러스터 관리에 필요한 오버헤드를 줄이고, 비즈니스에 더욱 집중할 수 있게 된다.
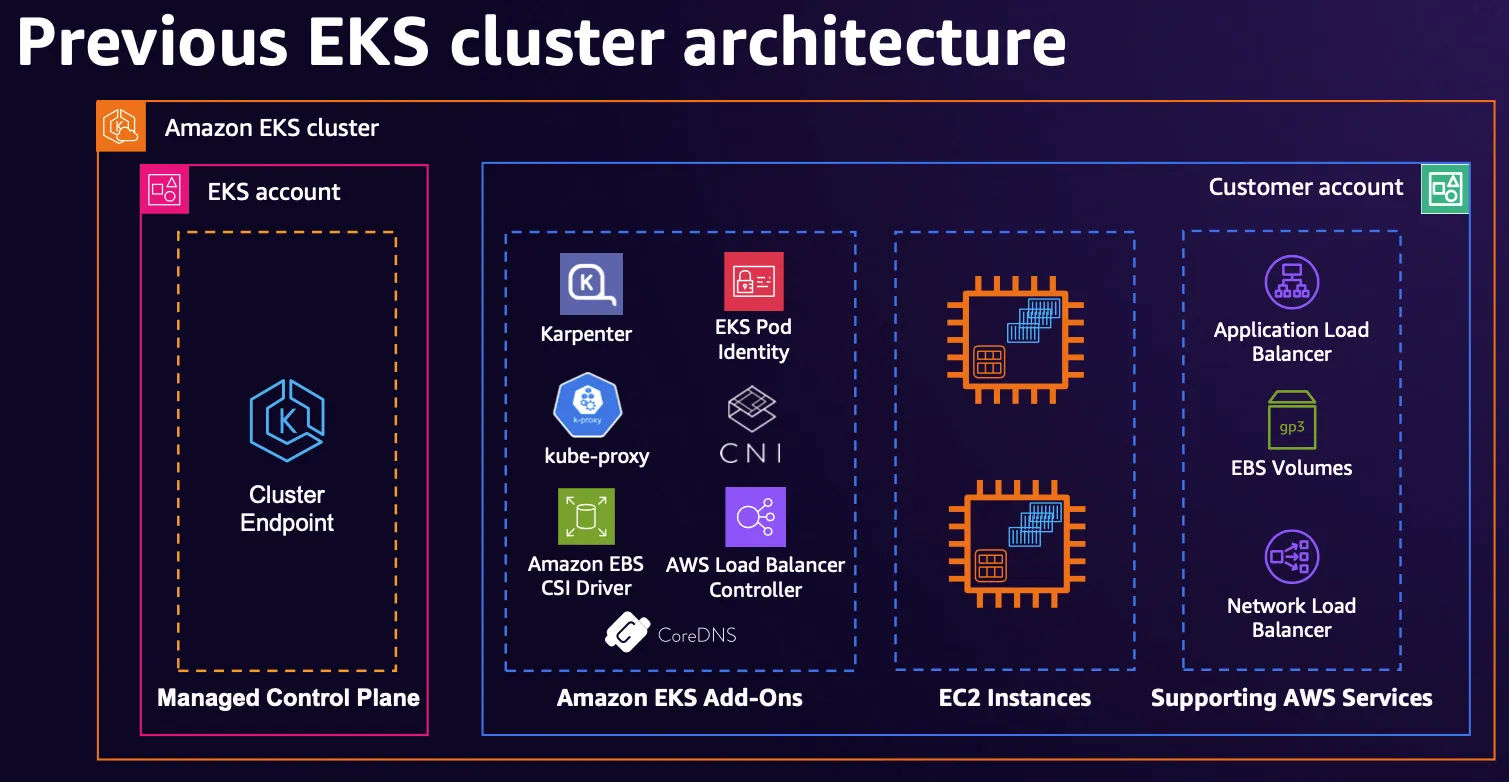
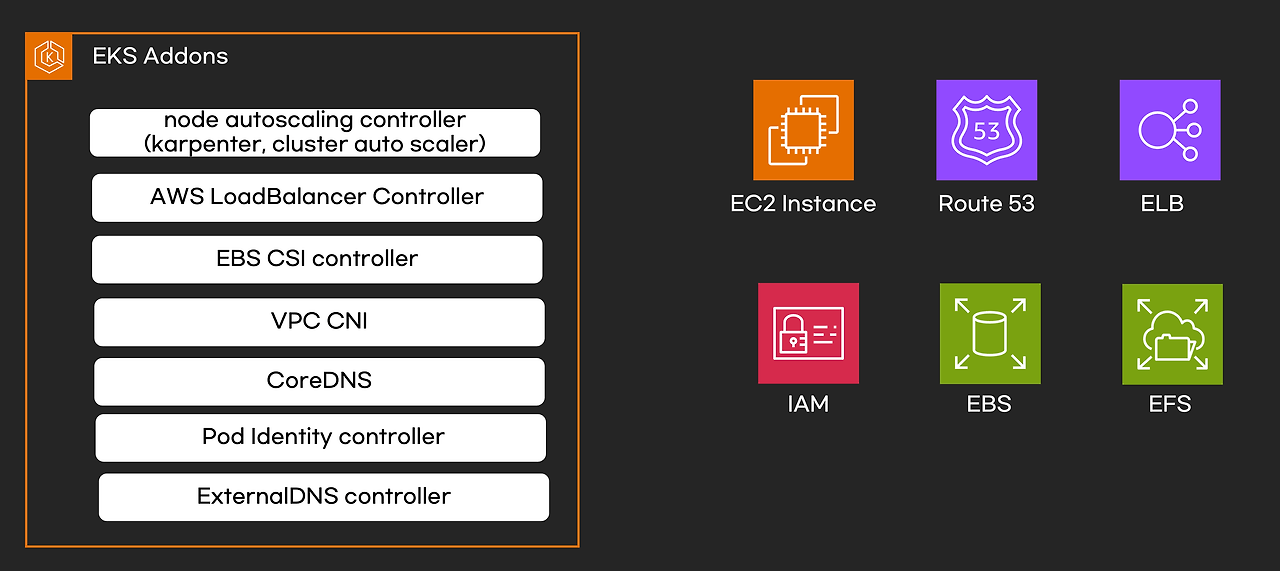
- 6가지 구성요소가 파드로 구성되는게 아니고, 해당 노드에 systemd 데몬(agent)로 실행됨
- kube-proxy, kubelet, eks-pod-identity-agent, eks-node-monitor-agent, eks-healthcheck, eks-ebs-csi-driver,
- csi-node-driver-registrar, coredns, containerd, aws-network-policy-agent, apiserver, ipam
[실습]
# Get the code : 배포 코드에 addon 내용이 없다
git clone https://github.com/aws-samples/sample-aws-eks-auto-mode.git
cd sample-aws-eks-auto-mode/terraform

# eks.tf : "system" 은 '전용인스턴스'로 추가하지 않는다
...
  cluster_compute_config = {
    enabled    = true
    node_pools = ["general-purpose"]
  }
...
여기에서 cluster_compute_config 설정이 auto mode 설정이다.
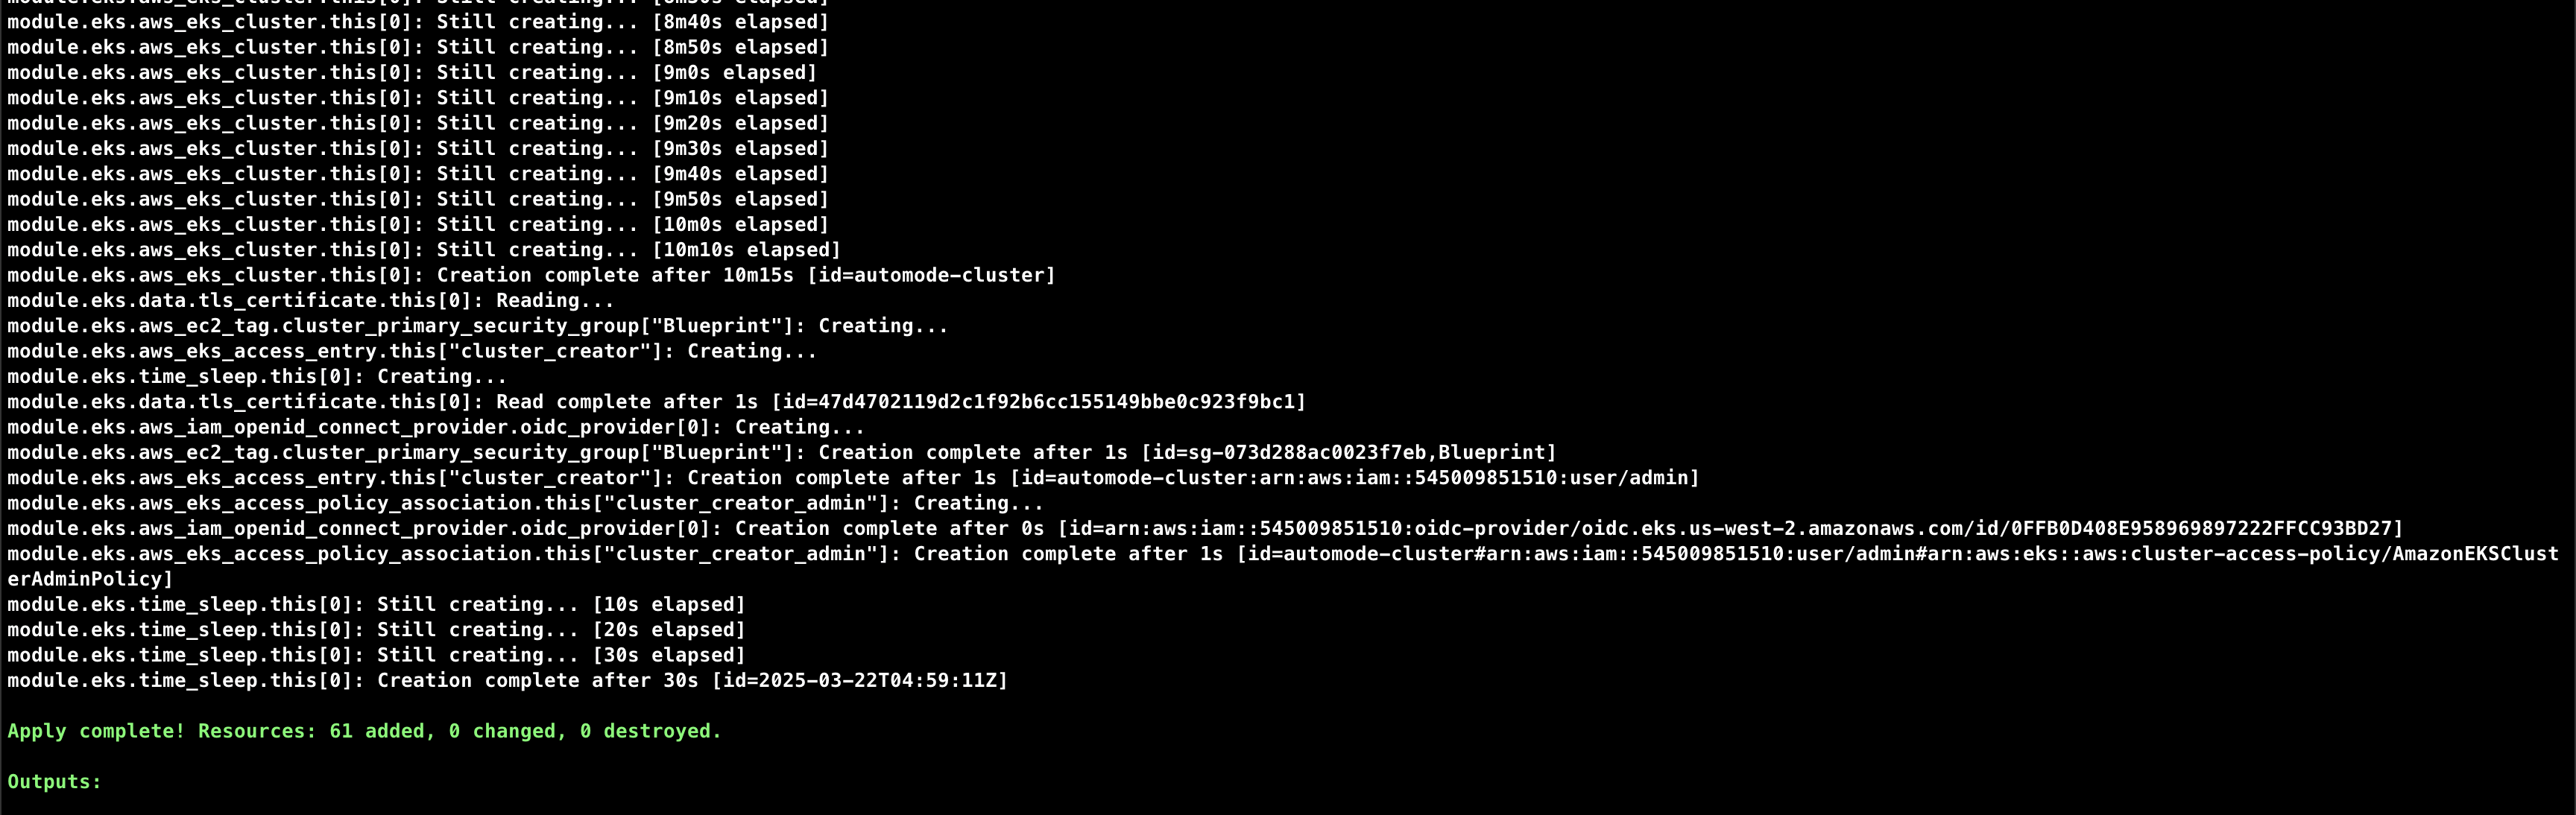
# Initialize and apply Terraform
terraform init
terraform plan
terraform apply -auto-approve
...
null_resource.create_nodepools_dir: Creating...
null_resource.create_nodepools_dir: Provisioning with 'local-exec'...
null_resource.create_nodepools_dir (local-exec): Executing: ["/bin/sh" "-c" "mkdir -p ./../nodepools"]
...
# Configure kubectl
cat setup.tf
ls -l ../nodepools
$(terraform output -raw configure_kubectl)

# kubectl context 변경
kubectl ctx
kubectl config rename-context "arn:aws:eks:ap-northeast-2:$(aws sts get-caller-identity --query 'Account' --output text):cluster/automode-cluster" "automode-lab"
kubectl ns default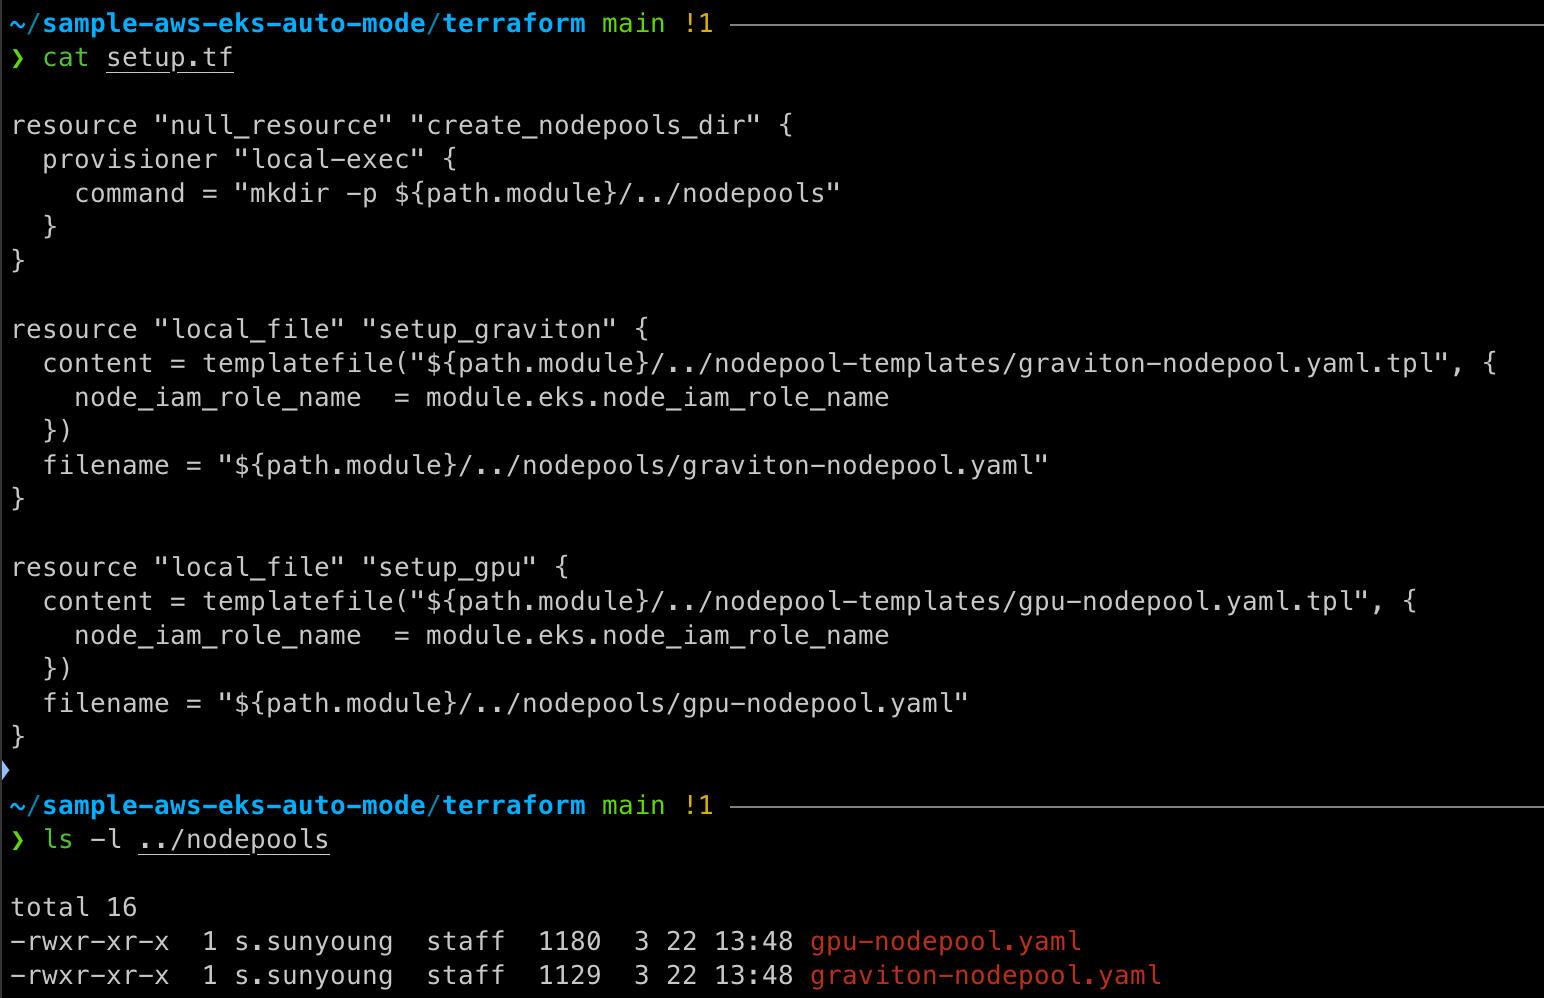
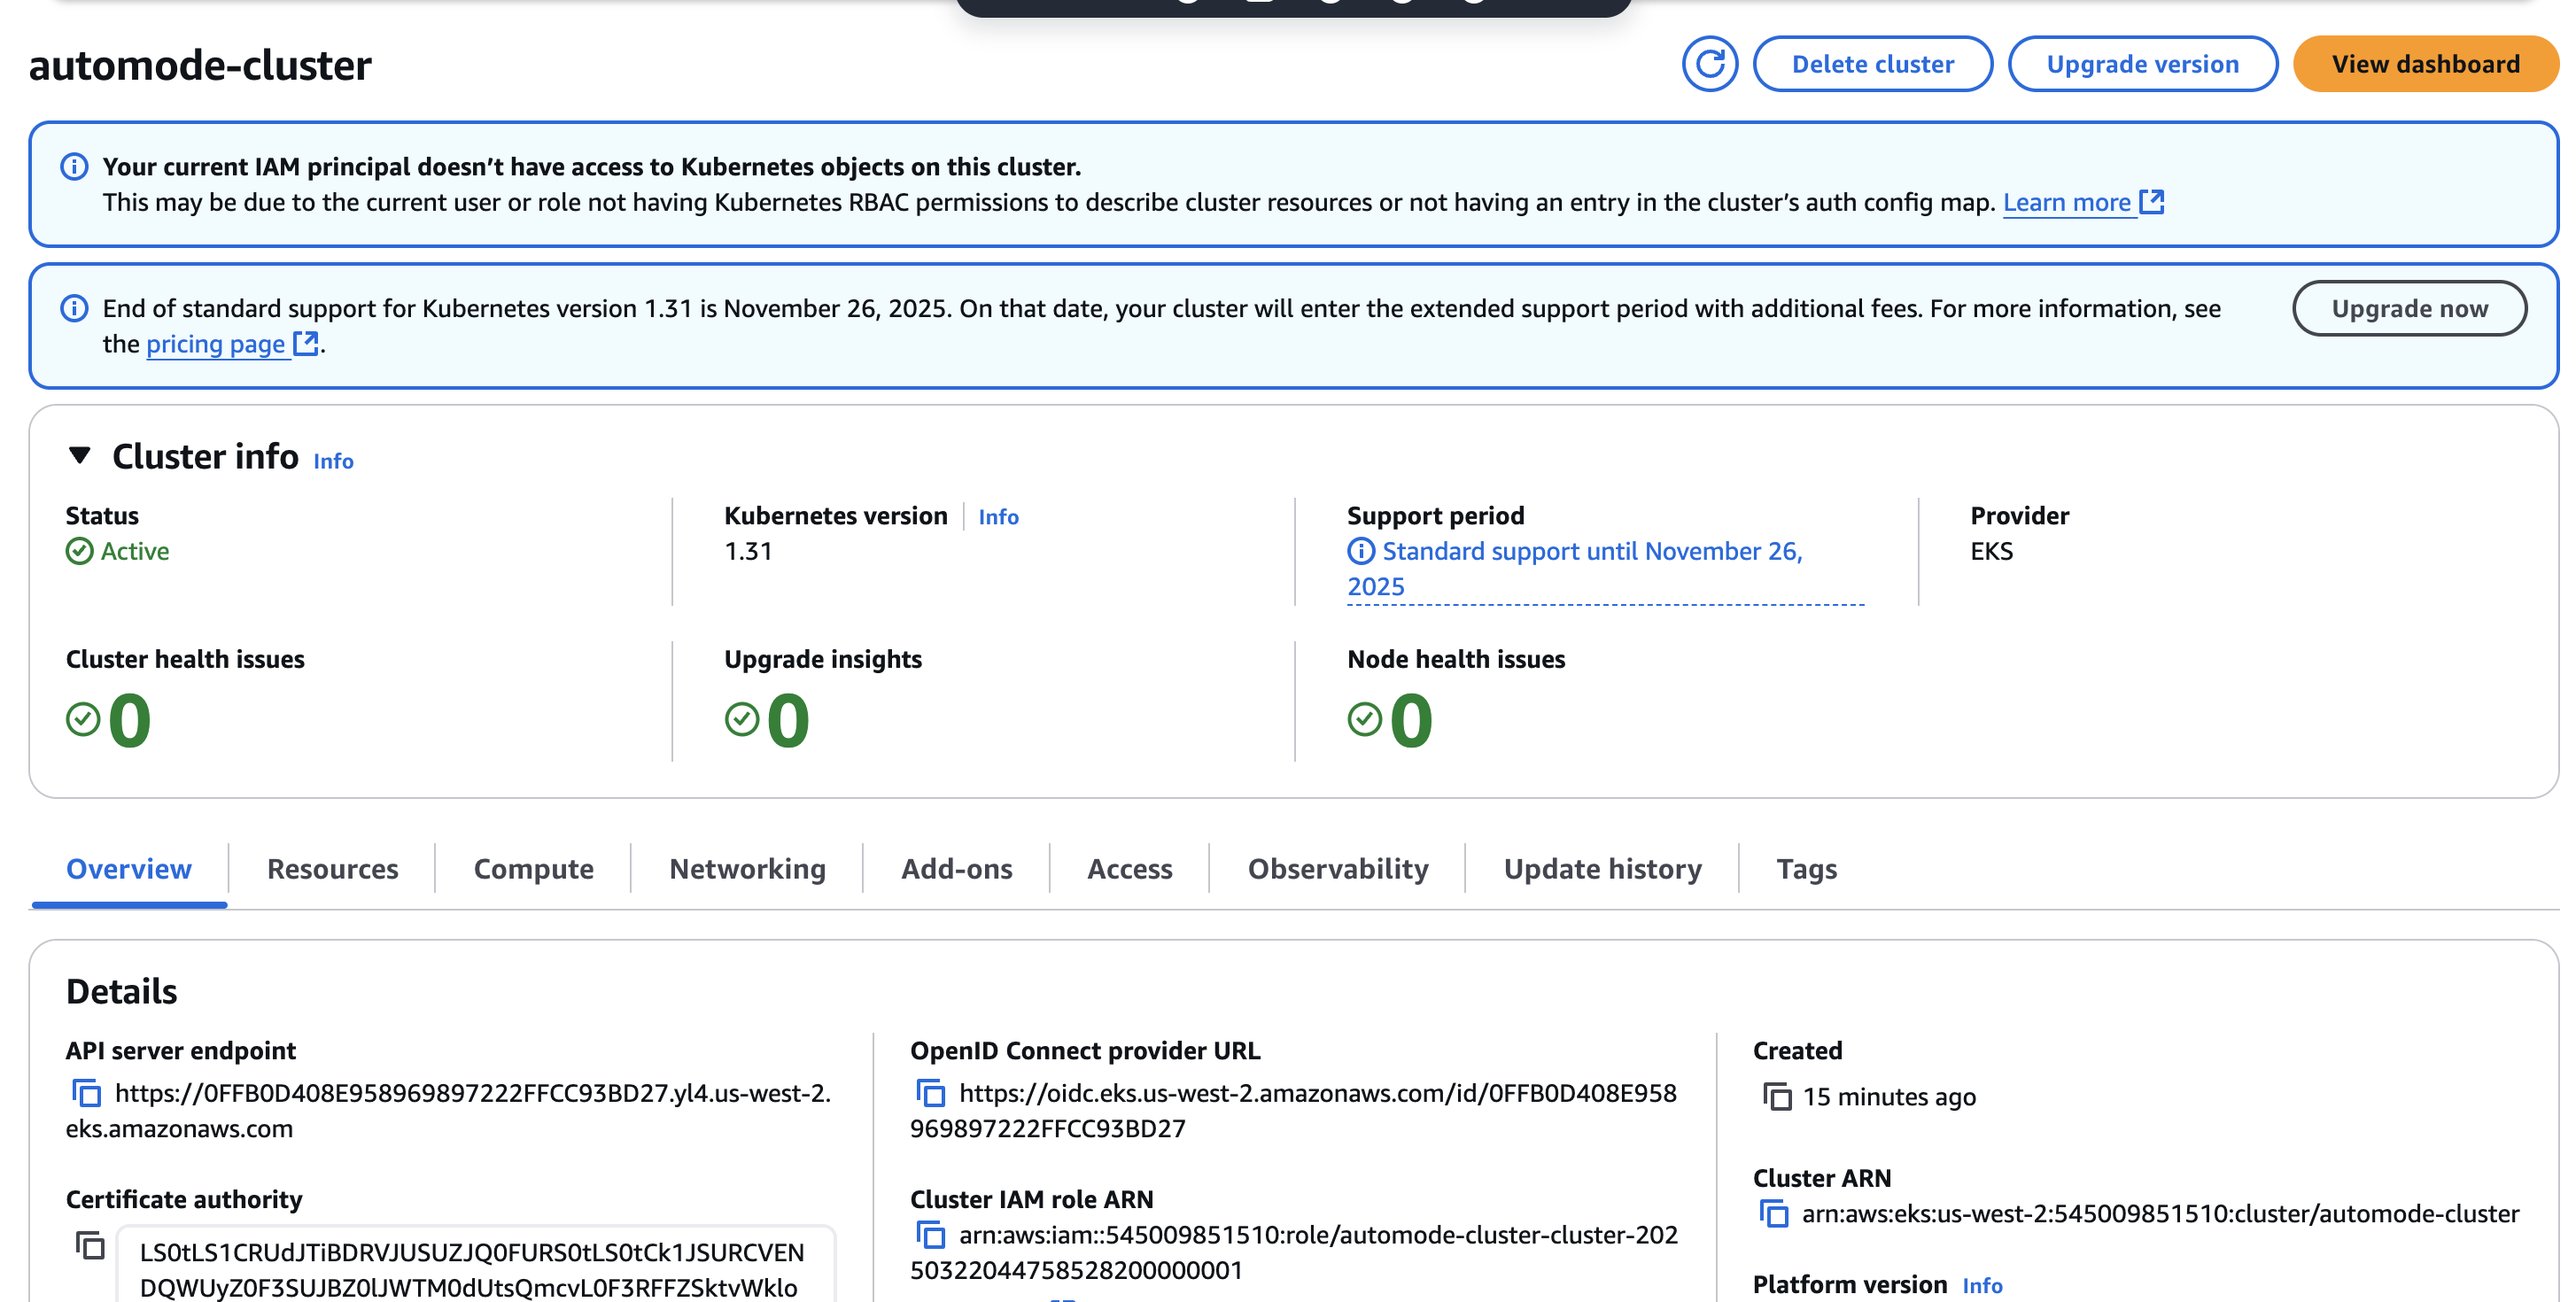
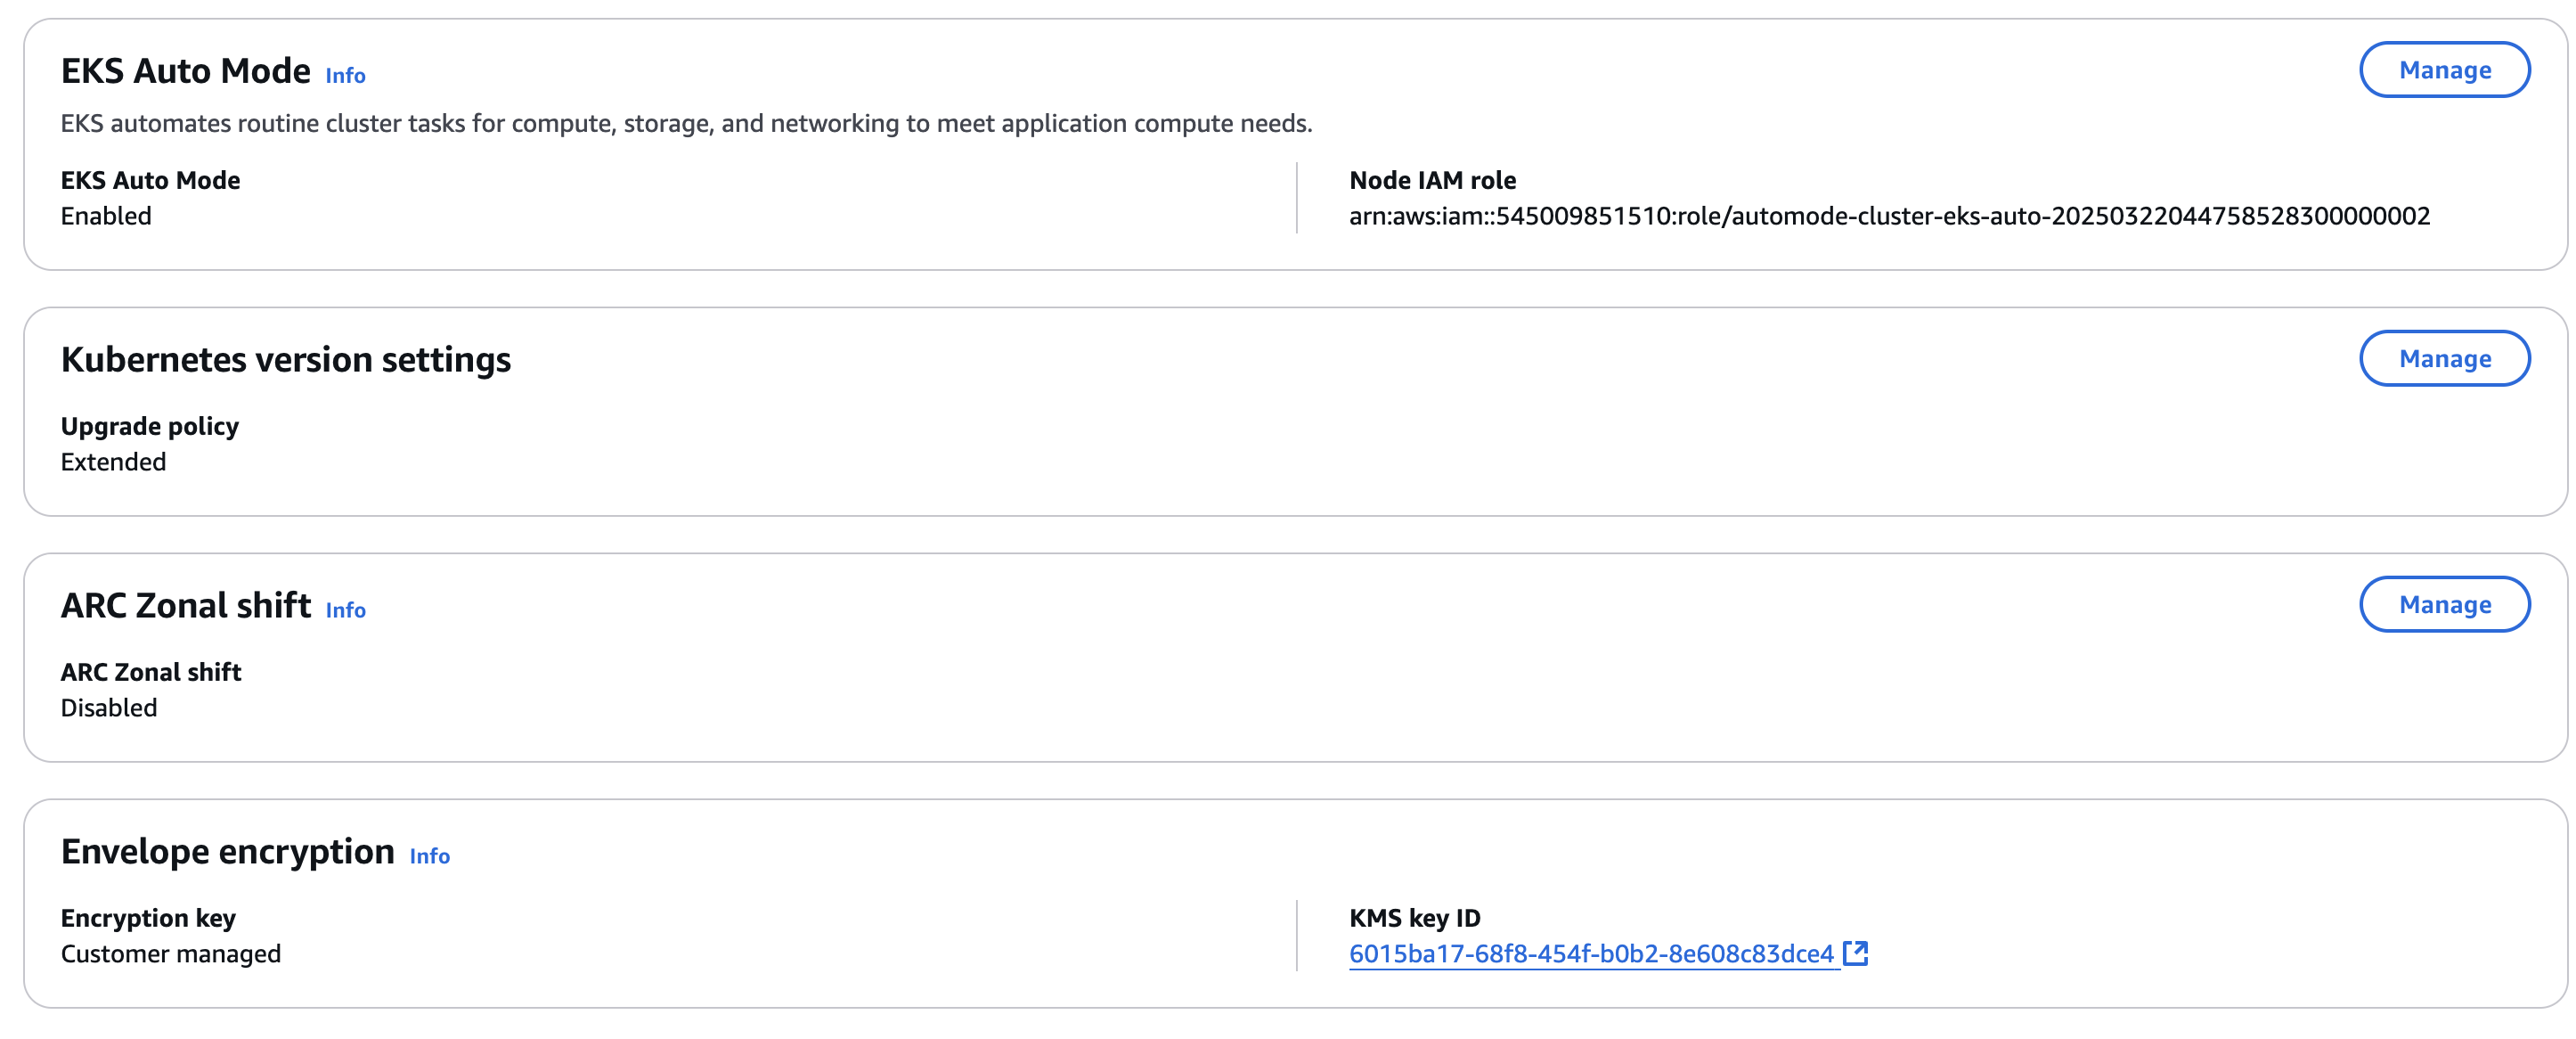
Auto mode가 enabled로 되어 있는 것을 확인할 수 있다.
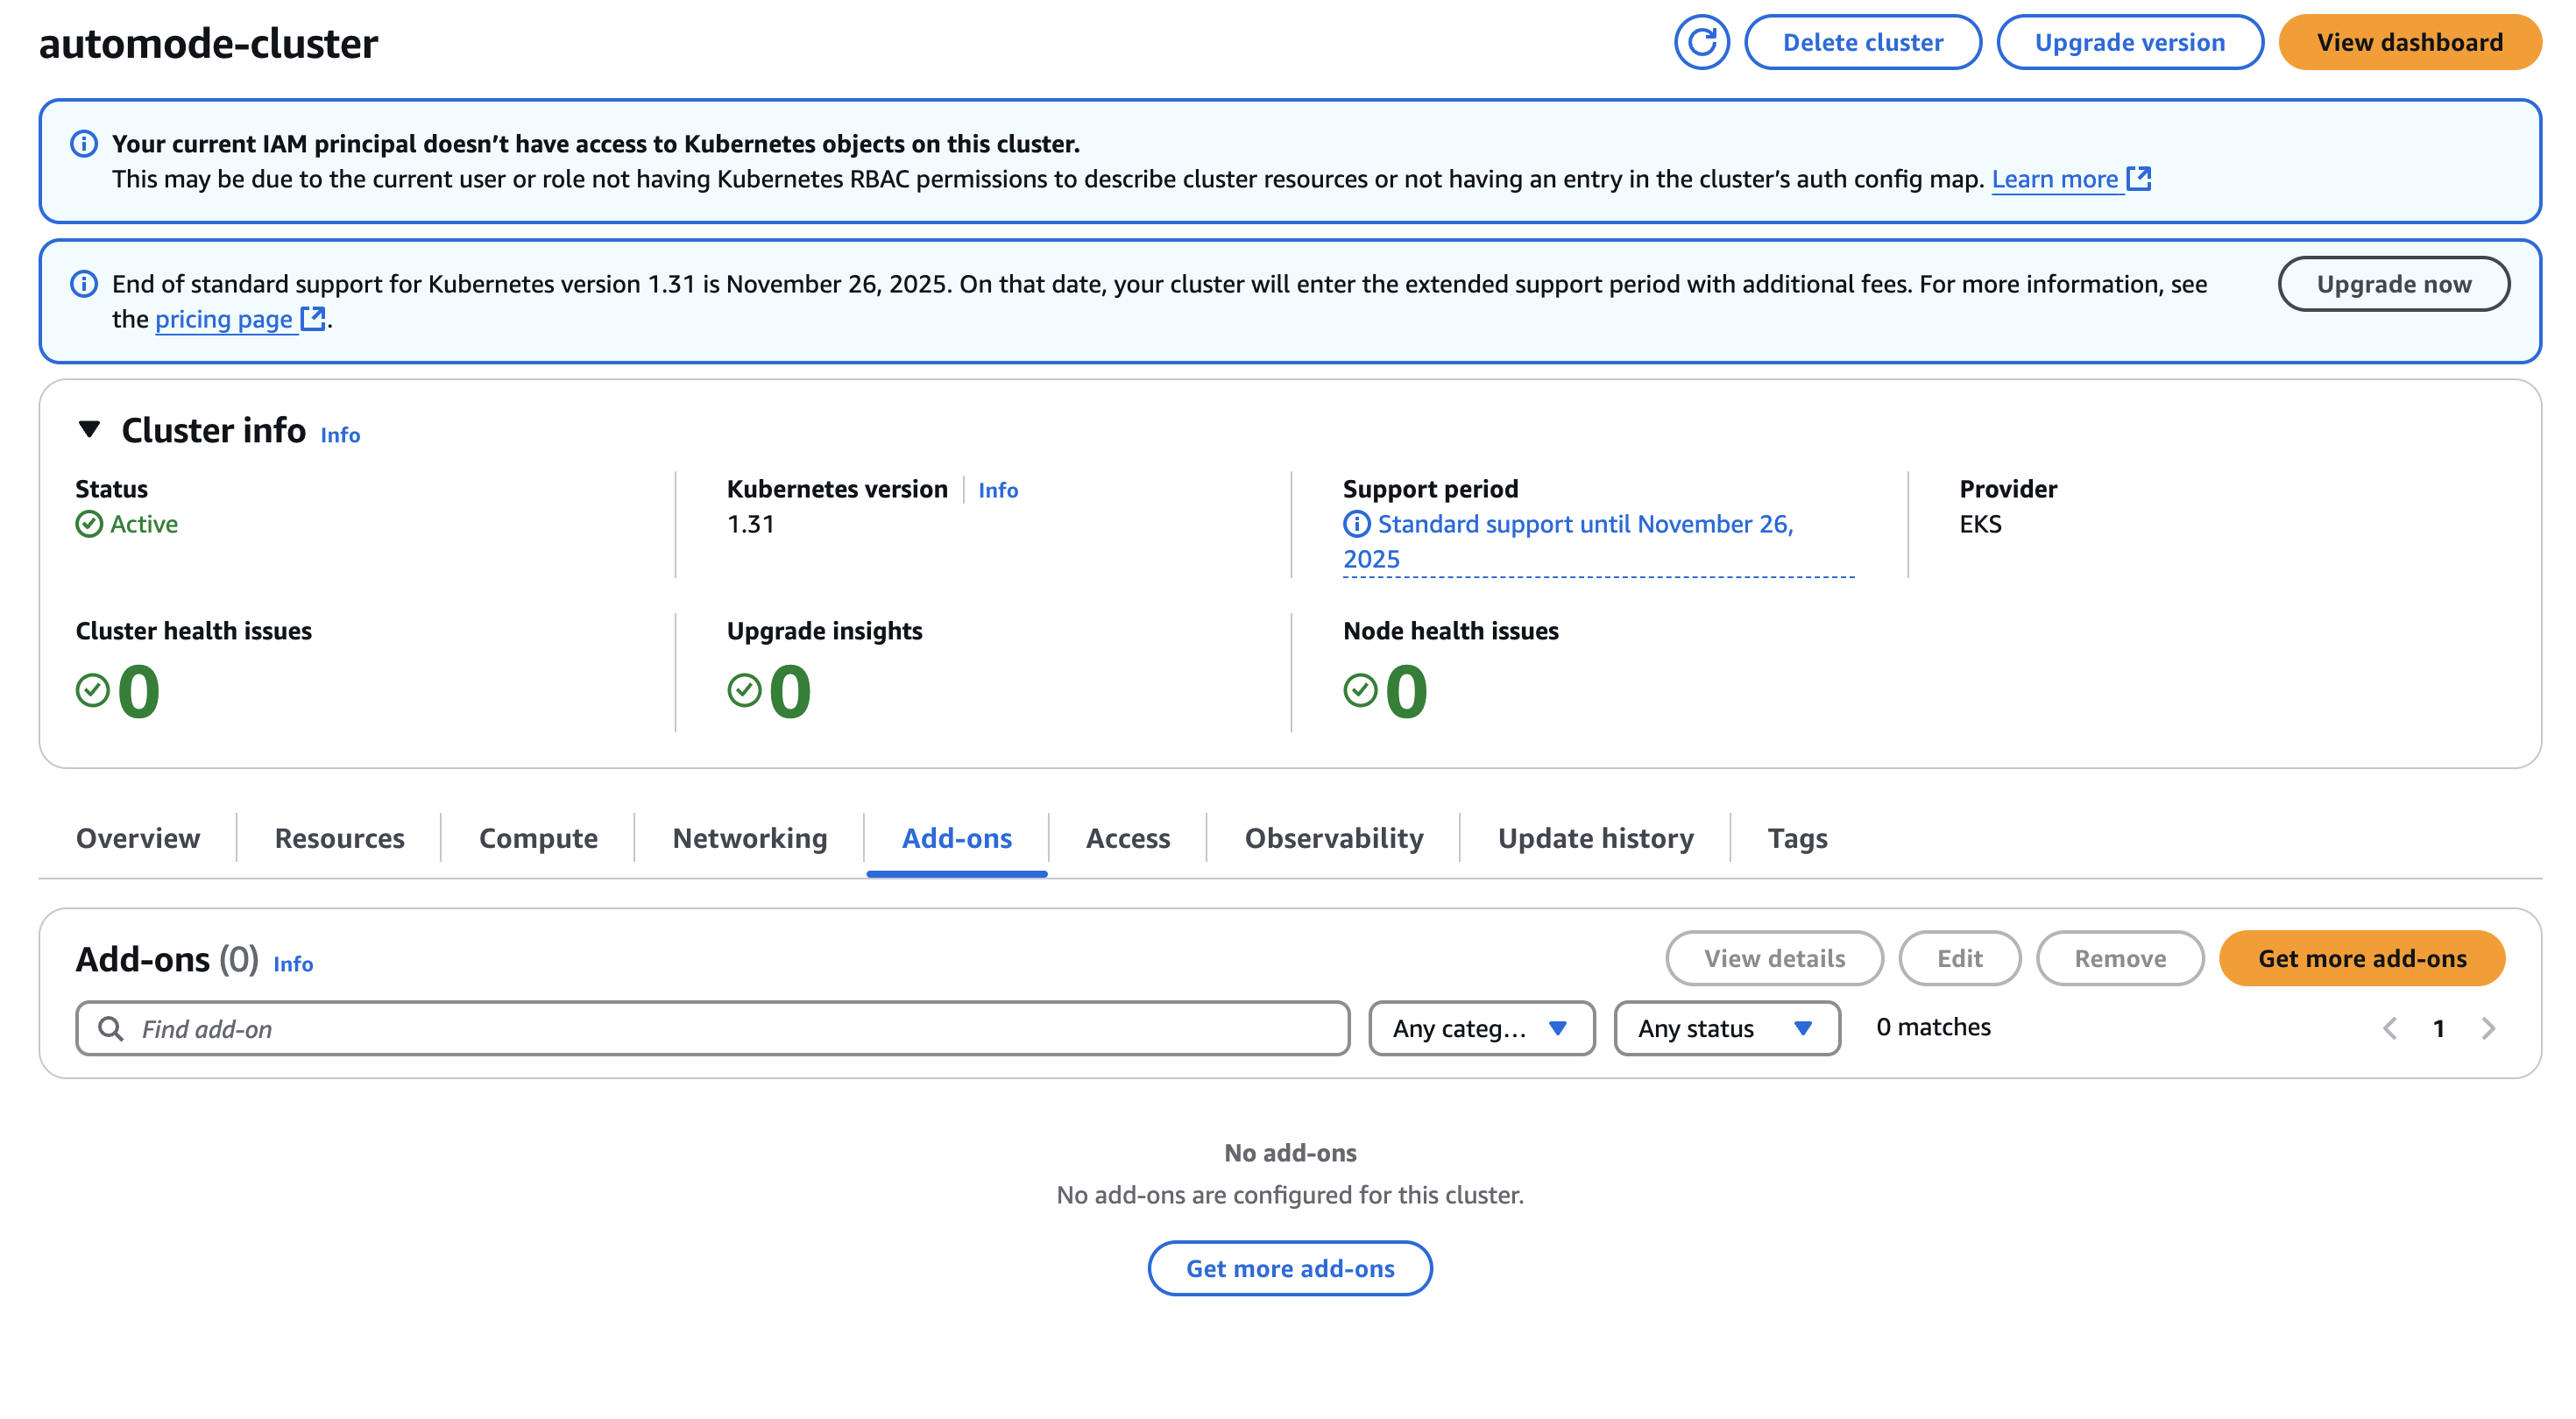
Add-on이 존재하지 않는다.
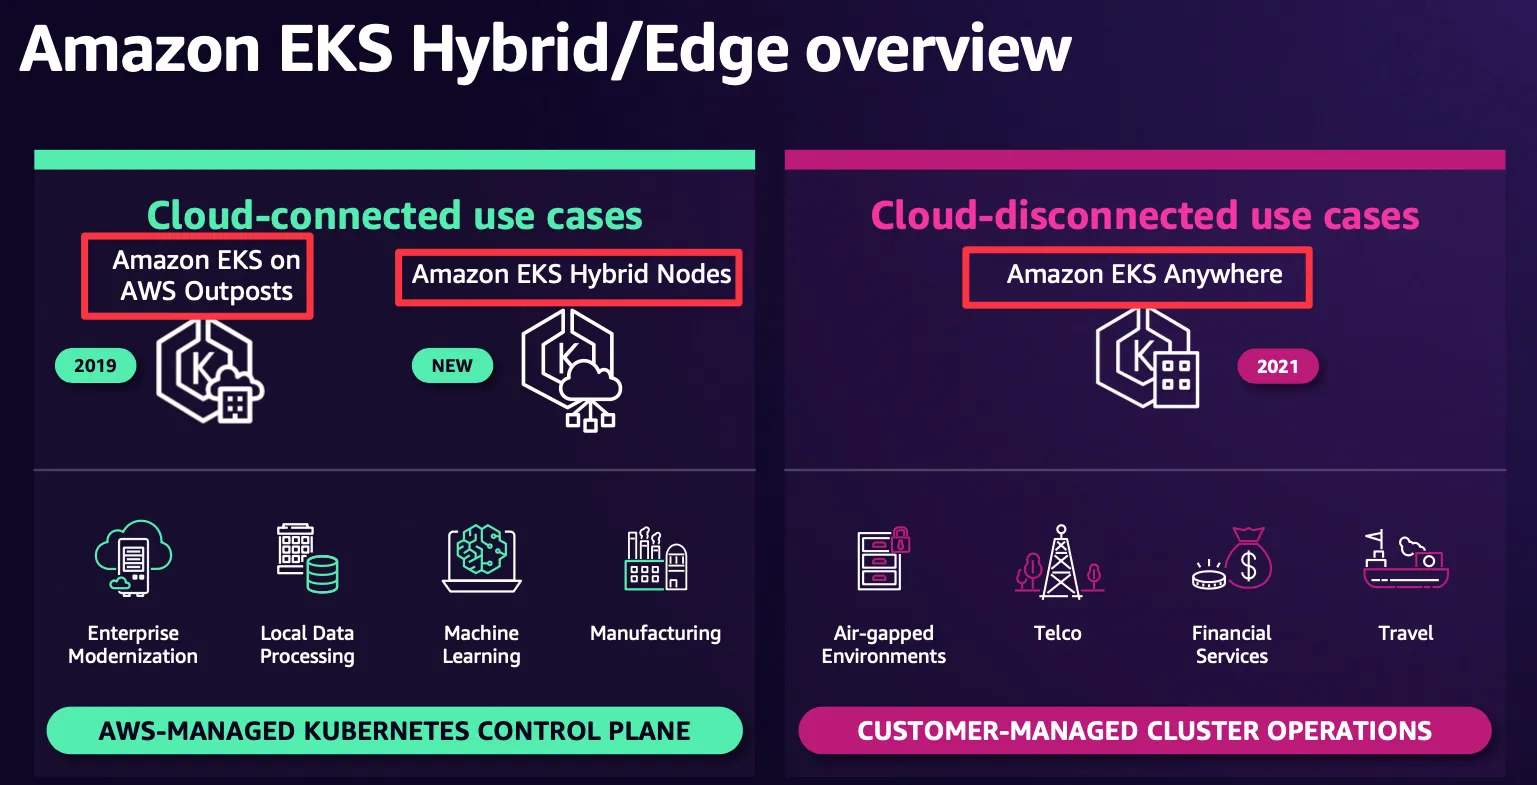
HyBrid Nodes