EXAMPLE) Project 3. [버킷리스트]
1. Flask로 만들 프로젝트 폴더 구조 만들기
1) 프로젝트 폴더(BUCKET) 생성
2) 프로젝트 폴더 안에 app.py 파일 생성
3) 가상환경(venv) 만들고 활성화
4) 패키지 설치 (flask, pymongo, dnspython, requests, bs4,)
pip install flask pymongo dnspython requests bs4(여러 개를 설치할 때는 띄어쓰기로 구분)
5) templates 폴더 생성 하고 index.html 파일 생성
bucket 폴더 구조
- - -
bucket
|— venv
|— app.py (서버)
|— templates
         |— index.html (클라이언트 파일)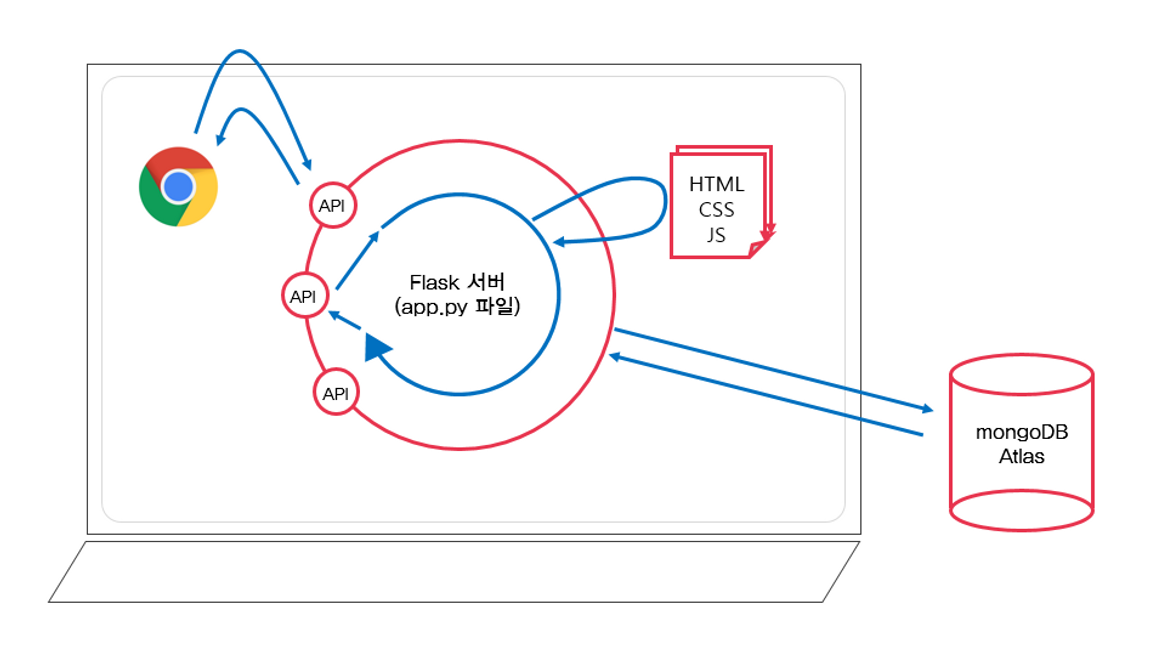
- 우리가 chrome이나 microsoft Edge같은 확장 프로그램에서 웹 페이지를 이용하려고 할 때 나의 운영체제(windows)와 응용프로그램 사이의 통신을 연결해주는 은행 창구나 식당의 메뉴판 같은 역할을 하는 것이 API이다.
- Flask는 파이썬의 프레임워크이다. 프레임워크는 특정 언어를 특화된 구조로 체계화한 것으로 API(창구)를 가지고 웹 서버를 구동하는데 필요한 복잡한 코드들을 모아둔 것이다. 나름의 규칙들이 있고 폴더 구조 또한 지켜줘야한다.
2. 프로젝트의 서버(app.py) 부분 준비
from flask import Flask, render_template, request, jsonify
app = Flask(__name__) # flask application을 생성하는 코드

@app.route('/')
def home():
    return render_template('index.html')

# @app : .route('/')에 표시된 해당 앱 도메인을 방문할 때마다 home()함수를 실행하라.
# @app.route('/') : 해당 앱의 URL을 함수/기능에 쉽게 할당하기 위해 Flask가 제공하는 Python 데코레이터

@app.route("/bucket", methods=["POST"]) # URL= /bucket, 요청 방식 = POST
def bucket_post():
    sample_receive = request.form['sample_give'] # 클라(fetch) → 서버(flask) : URL bucket에 데이터를 담아 보냄.
    print(sample_receive)
    return jsonify({'msg': 'POST 연결 완료!'}) # 서버(flask) → 클라(fetch) : 메시지 데이터를 보냄

@app.route("/bucket", methods=["GET"])
def bucket_get():
return jsonify({'msg': 'GET 연결 완료!'})- Flask(class) import 코드 : 파이썬으로 GET POST 코드 구조 사용
- render_template : localhost에 index.html 불러오기
- request 라이브러리 : 웹 페이지를 그대로 가져와서 데이터 추출하는 웹크롤링을 위한 라이브러리. 파이썬으로 http 호출이 쉬움. 편하게 가져온다는 뜻.
- pymongo import코드 : pymongo로 db에서 데이터 가져오기
- jsonify : 서버로부터 딕셔너리 형태로 저장되어있는 데이터를 Json 형식으로 받아오기
3. index.html script 함수부분 준비
<script>
$(document).ready(function () {
show_bucket();
});
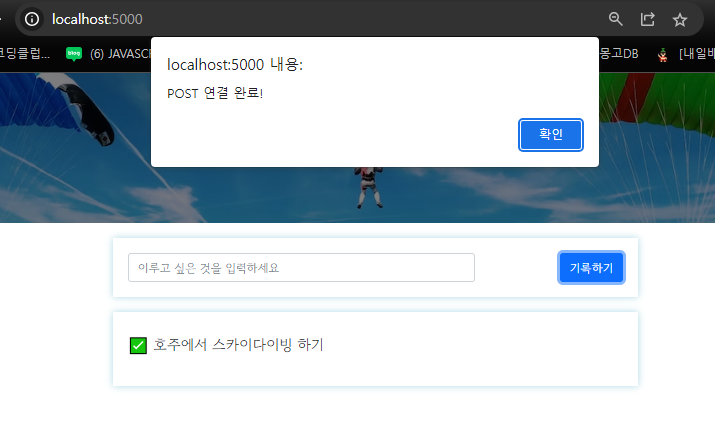
function show_bucket() {
fetch('/bucket').then(res => res.json()).then(data => {
console.log(data)
alert(data["msg"]); # 서버(flask) → 클라(fetch) : 메시지를 보냄
})
}
function save_bucket() {
let formData = new FormData();
formData.append("sample_give", "샘플데이터");
fetch('/bucket', {method: "POST",body: formData,}).then((response) => response.json()).then((data) => { # 클라(fetch) → 서버(flask) : bucket
alert(data["msg"]);
window.location.reload();
});
}
</script>
</head>
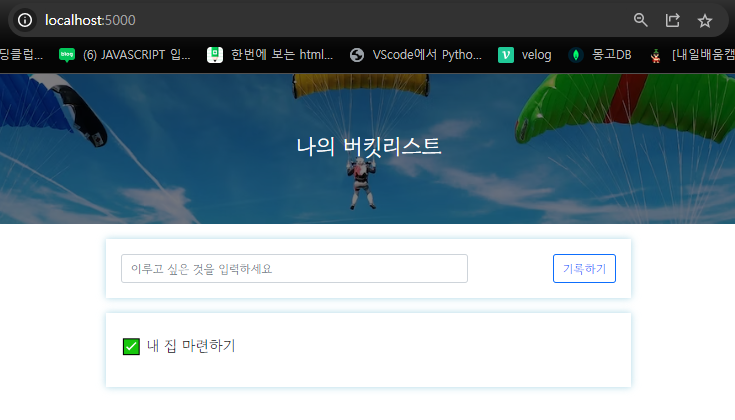
<body>
<div class="mypic">
<h1>나의 버킷리스트</h1>
</div>
<div class="mybox">
<div class="mybucket">
<input
id="bucket"
class="form-control"
type="text"
placeholder="이루고 싶은 것을 입력하세요"
/>
<button onclick="save_bucket()" type="button" class="btn btn-outline-primary">기록하기</button>
</div>
</div>
<div class="mybox" id="bucket-list">
<li>
<h2>✅ 호주에서 스카이다이빙 하기</h2>
</li>
</div>
</body>
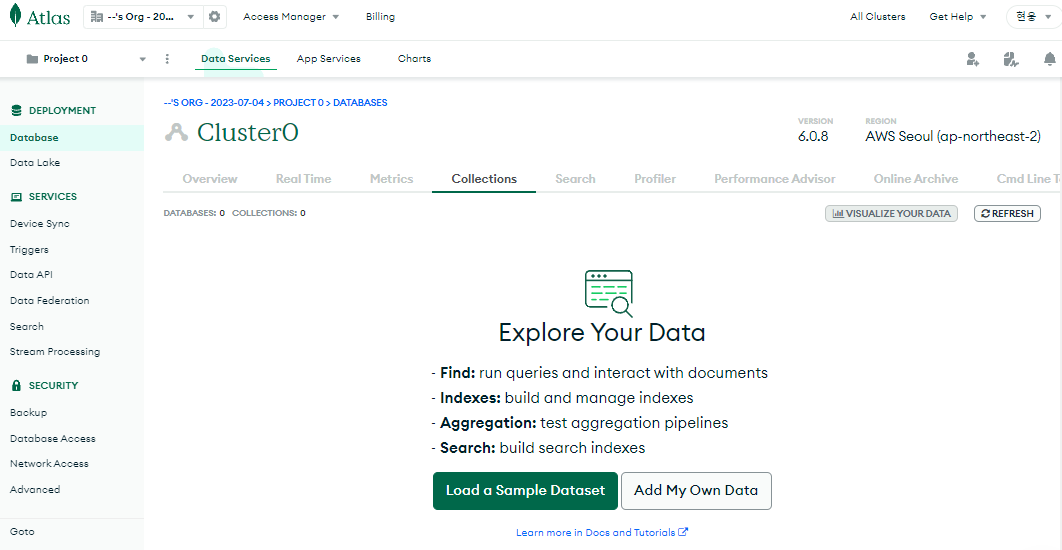
</html>4. 프로젝트 준비 - mongoDB Atlas 창 띄워두기
5. app.py 터미널에서 실행해보고 브라우저 localhost:5000 들어가보기
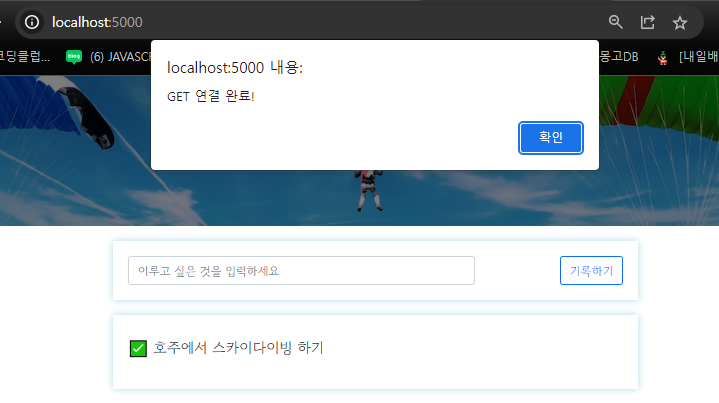
$(document).ready(function () {
  show_bucket();
});
→ 문서가 준비되면 show_bucket()함수가 불려온다.
function show_bucket() {
  fetch('/bucket').then(res => res.json()).then(data => {
    console.log(data)
	alert(data["msg"]);
      })
@app.route("/bucket", methods=["GET"])
def bucket_get():
return jsonify({'msg': 'GET 연결 완료!'})→ API /bucket에서 데이터를 가져와서 데이터를 json형식으로 내려준다.
→ fetch를 통해서 서버가 API /bucket에서 받아온 데이터를 가져와서 alert로 띄운다.
}
function save_bucket() {
  let formData = new FormData();
  formData.append("sample_give", "샘플데이터");

  fetch('/bucket', {method: "POST",body: formData,}).then((response) => response.json()).then((data) => {
      alert(data["msg"]);
      window.location.reload();
    });
}
@app.route("/bucket", methods=["POST"])
def bucket_post():
sample_receive = request.form['sample_give']
print(sample_receive)
return jsonify({'msg': 'POST 연결 완료!'})→ '기록하기' 버튼을 누르면 formData에 'sample_give'라는 이름으로 "샘플데이터"의 형태로 데이터를 담아준 후 서버로 보내줌.
→ 서버는 클라이언트로부터 'sample_give'라는 데이터를 받아와서 프린트하고 클라이언트로 데이터를 msg('POST 연결 완료!) 형태로 내려준다.
→ 클라이언트는 fetch로 서버로부터 내려온 데이터의 메시지부분을 alert로 띄우고 새로고침(API /bucket에 갱신된 모든 데이터를 받아와서 출력) 한다.
6. [버킷리스트] - POST 연습하기(API 만들고 사용하기 - 버킷리스트 기록 API(Create→POST))
- 1) 데이터 명세 (데이터 생성은 POST)
- 요청 정보 : URL=
/bucket, 요청 방식 =POST
- 요청 정보 : URL=
- 클라(fetch) → 서버(flask) :
bucket
- 클라(fetch) → 서버(flask) :
- 서버(flask) → 클라(fetch) : 메시지를 보 (버킷리스트 저장 완료!)
- 2) 서버(app.py)
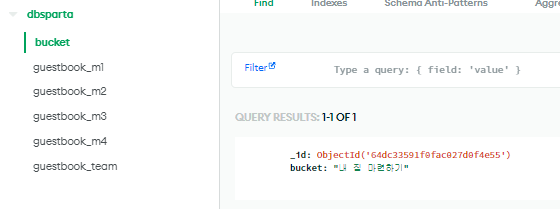
2-1) 데이터베이스에 연결
from pymongo import MongoClient

client = MongoClient('mongodb+srv://sparta:test@cluster0.wop0dox.mongodb.net/?retryWrites=true&w=majority')
db = client.dbsparta
2-2) 클라이언트로부터 bucket 정보(bucket_give)를 받아서, 저장(bucket_receive)
@app.route("/bucket", methods=["POST"])
def bucket_post():
    bucket_receive = request.form['bucket_give'] # bucket 정보를 받아서,
    doc = {
        'bucket' : bucket_receive # 이런 형태로
    }
    db.bucket.insert_one(doc) # db에 저장
return jsonify({'msg': '저장 완료!'}) # json형식으로 이런 데이터를 내려줌.- 3) 클라이언트(index.html) : 이번엔 bucket 정보를 보내줌.
function save_bucket() {
        let bucket = $("#bucket").val(); # bucket 정보를

        let formData = new FormData();
        formData.append("bucket_give", bucket); # formData에 데이터를 넣고

        fetch('/bucket', {method: "POST", body: formData,}).then((res) => res.json()).then((data) => { # API /bucket으로 보내주고
            alert(data["msg"]); # 서버에서 내려준 메시지 데이터를 alert로 띄움.
            window.location.reload(); # 저장되면, 새로고침을 해서 다시 보여줄 준비
          });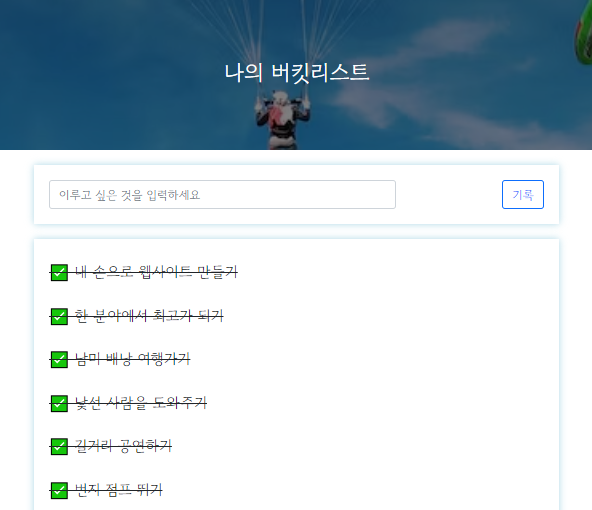
}- 4) 완성 확인

7. [버킷리스트] - GET 연습하기(API 만들고 사용하기 - 버킷리스트 조회 API(Read→GET))
-
1) 데이터 명세 (데이터 조회는 GET)
- 요청 정보 : URL=
/bucket, 요청 방식 =GET
- 요청 정보 : URL=
- 클라(fetch) → 서버(flask) : 없음
- 서버(flask) → 클라(fetch) : 전체 버킷을 보여주기
-
2) 서버(app.py)
@app.route("/bucket", methods=["GET"])
def bucket_get():
    all_buckets = list(db.bucket.find({}, {'_id': False}))
    return jsonify({'result': all_buckets})

# 받을 것 없이 bucket 에 버킷리스트를 담아서 내려주기만 하면 됨.- 3) 클라이언트(index.html)
function show_bucket() {
  fetch('/bucket').then(res => res.json()).then(data => {
					let rows = data['result']
					$('#bucket-list').empty() # 기존 html 코드들을 지워줄 수 있도록 empty()
          rows.forEach((a) => { # 버킷리스트는 말 그대로 리스트 형식 forEach문으로 반복하면서 데이터를 뽑아냄.
              let bucket = a['bucket']
              let temp_html = `<li>
                                  <h2>✅ ${bucket}</h2>
                              </li>`
              $('#bucket-list').append(temp_html) # 가져온 데이터를 temp_html로 뼈대에 데이터를 담아 제이쿼리로 append
          })
      })
}- 4) 완성 확인
서버(app.py)

from flask import Flask, render_template, request, jsonify
app = Flask(__name__)

from pymongo import MongoClient

client = MongoClient('mongodb+srv://sparta:test@cluster0.wop0dox.mongodb.net/?retryWrites=true&w=majority')
db = client.dbsparta

@app.route('/')
def home():
    return render_template('index.html')

@app.route("/bucket", methods=["POST"])
def bucket_post():
    bucket_receive = request.form['bucket_give']
    doc = {
        'bucket' : bucket_receive
    }
    db.bucket.insert_one(doc)
    return jsonify({'msg': '저장 완료!'})

@app.route("/bucket", methods=["GET"])
def bucket_get():
    all_buckets = list(db.bucket.find({}, {'_id': False}))
    return jsonify({'result': all_buckets})

if __name__ == '__main__':
    app.run('0.0.0.0', port=5000, debug=True)
클라이언트(index.html)

<!DOCTYPE html>
<html lang="en">
  <head>
    <meta charset="UTF-8" />
    <meta http-equiv="X-UA-Compatible" content="IE=edge" />
    <meta name="viewport" content="width=device-width, initial-scale=1.0" />

    <link
      href="https://cdn.jsdelivr.net/npm/bootstrap@5.0.2/dist/css/bootstrap.min.css"
      rel="stylesheet"
      integrity="sha384-EVSTQN3/azprG1Anm3QDgpJLIm9Nao0Yz1ztcQTwFspd3yD65VohhpuuCOmLASjC"
      crossorigin="anonymous"
    />
    <script src="https://ajax.googleapis.com/ajax/libs/jquery/3.5.1/jquery.min.js"></script>
    <script
      src="https://cdn.jsdelivr.net/npm/bootstrap@5.0.2/dist/js/bootstrap.bundle.min.js"
      integrity="sha384-MrcW6ZMFYlzcLA8Nl+NtUVF0sA7MsXsP1UyJoMp4YLEuNSfAP+JcXn/tWtIaxVXM"
      crossorigin="anonymous"
    ></script>

    <link
      href="https://fonts.googleapis.com/css2?family=Gowun+Dodum&display=swap"
      rel="stylesheet"
    />

    <title>인생 버킷리스트</title>

    <style>
      * {
        font-family: "Gowun Dodum", sans-serif;
      }
      .mypic {
        width: 100%;
        height: 200px;

        background-image: linear-gradient(
            0deg,
            rgba(0, 0, 0, 0.5),
            rgba(0, 0, 0, 0.5)
          ),
          url("https://images.unsplash.com/photo-1601024445121-e5b82f020549?ixid=MnwxMjA3fDB8MHxwaG90by1wYWdlfHx8fGVufDB8fHx8&ixlib=rb-1.2.1&auto=format&fit=crop&w=1189&q=80");
        background-position: center;
        background-size: cover;

        color: white;

        display: flex;
        flex-direction: column;
        align-items: center;
        justify-content: center;
      }
      .mypic > h1 {
        font-size: 30px;
      }
      .mybox {
        width: 95%;
        max-width: 700px;
        padding: 20px;
        box-shadow: 0px 0px 10px 0px lightblue;
        margin: 20px auto;
      }
      .mybucket {
        display: flex;
        flex-direction: row;
        align-items: center;
        justify-content: space-between;
      }

      .mybucket > input {
        width: 70%;
      }
      .mybox > li {
        display: flex;
        flex-direction: row;
        align-items: center;
        justify-content: center;

        margin-bottom: 10px;
        min-height: 48px;
      }
      .mybox > li > h2 {
        max-width: 75%;
        font-size: 20px;
        font-weight: 500;
        margin-right: auto;
        margin-bottom: 0px;
      }
      .mybox > li > h2.done {
        text-decoration: line-through;
      }
    </style>
    <script>
      $(document).ready(function () {
        show_bucket();
      });
      function show_bucket() {
        fetch('/bucket').then(res => res.json()).then(data => {
					let rows = data['result']
					$('#bucket-list').empty()
          rows.forEach((a) => {
              let bucket = a['bucket']
              let temp_html = `<li>
                                  <h2>✅ ${bucket}</h2>
                              </li>`
              $('#bucket-list').append(temp_html)
          })
      })
}

      function save_bucket() {
        let bucket = $("#bucket").val();

        let formData = new FormData();
        formData.append("bucket_give", bucket);

        fetch('/bucket', {method: "POST", body: formData,}).then((res) => res.json()).then((data) => {
            alert(data["msg"]);
            window.location.reload();
          });
      }

    </script>
  </head>
  <body>
    <div class="mypic">
      <h1>나의 버킷리스트</h1>
    </div>
    <div class="mybox">
      <div class="mybucket">
        <input
          id="bucket"
          class="form-control"
          type="text"
          placeholder="이루고 싶은 것을 입력하세요"
        />
        <button onclick="save_bucket()" type="button" class="btn btn-outline-primary">기록하기</button>
      </div>
    </div>
    <div class="mybox" id="bucket-list">
      <li>
        <h2>✅ 호주에서 스카이다이빙 하기</h2>
      </li>
    </div>
  </body>
</html>