🎯 목표: Clone하며 code의 basic logic을 이해하기!
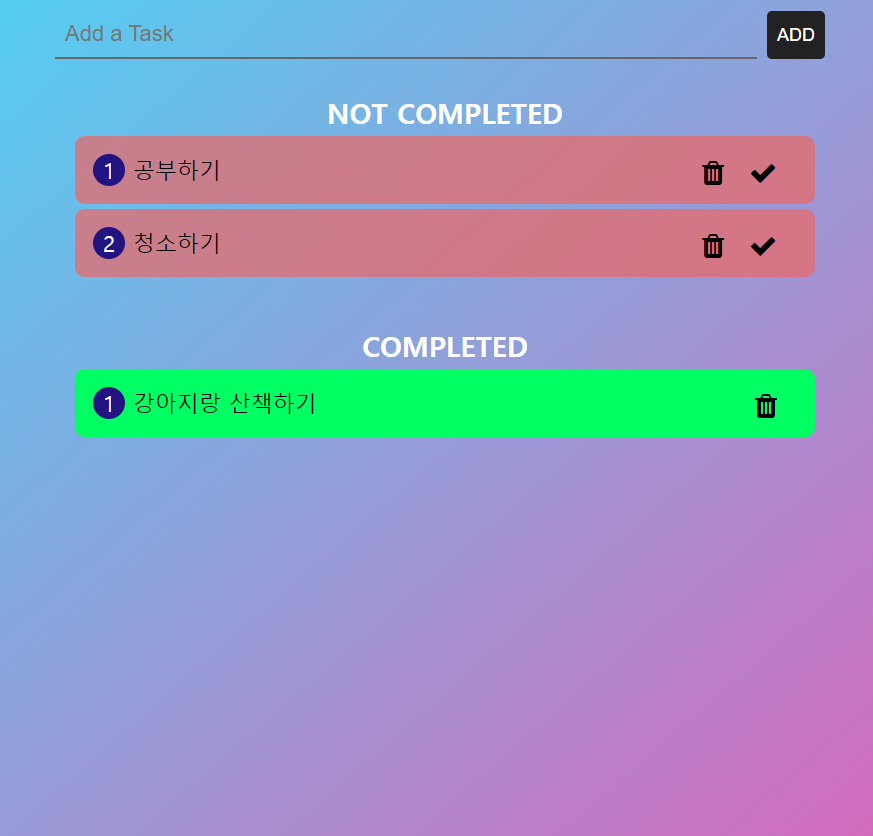
1. HTML 일부 발췌
<body>
	<div class="container">
		<div class="addTask">
			<input type="text" placeholder="Add a Task" />
			<button>add</button>
		</div>
		<ol class="notCompleted">
			<h3>Not Completed</h3>
		</ol>
		<ol class="completed">
			<h3>Completed</h3>
		</ol>
	</div>
	<script src="main.js"></script>
</body>
2. CSS 일부 발췌
body {
 height: 100vh;
 background: #03dfff;
 background: linear-gradient(139deg, #03ddffcb 0%, #ff038ab6 90%);
}

.addTask > input[type="text"] {
  width: 90%;
  color: #333;
  border: none;
  border-bottom: 2px solid #666;
  background: none;
  padding: 10px;
  font-size: 22px;
  outline: none;
}

ol {
  list-style: none;
  counter-reset: my-counter;
}

ol li {
  width: 100%;
  padding: 18px;
  margin: 5px 0;
  background: #e96969bb;
  font-size: 22px;
  border-radius: 10px;
  counter-increment: my-counter;
}

ol.completed li {
  background: #00ff62;
}

ol li::before {
  content: counter(my-counter);
  background: #231381;
  width: 2rem;
  height: 2rem;
  border-radius: 50%;
  display: inline-block;
  line-height: 2rem;
  text-align: center;
  color: #fff;
  margin-right: 0.5rem;
}
🚩 CSS에서 새로 공부할 내용
- background color에 linear하게 gradient주기
- selector 세부 지정 방법
ex).addTask > input[type="text"]- counter로 넘버링하기
- px말고 반응형단위 사용하기
3. JavaScript
const btn = document.querySelector("button");
const input = document.querySelector("input");

btn.addEventListener("click", onClick);
input.addEventListener("keyup", (e) => {
	e.keyCode === 13 ? onClick(e) : null;
});

function onClick(e) {
  const notCompleted = document.querySelector(".notCompleted");
  const completed = document.querySelector(".completed");

  const newLi = document.createElement("li");
  const checkBtn = document.createElement("button");
  const delBtn = document.createElement("button");

  checkBtn.innerHTML = '<i class="fa fa-check"></i>';
  delBtn.innerHTML = '<i class="fa fa-trash"></i>';

  if (input.value !== "") {
	newLi.textContent = input.value;
    input.value = "";
	notCompleted.appendChild(newLi);
    newLi.appendChild(checkBtn);
	newLi.appendChild(delBtn);
  }

  checkBtn.addEventListener("click", function () {
	const parent = this.parentNode;
	parent.remove();
	completed.appendChild(parent);
	checkBtn.style.display = "none";
  });

  delBtn.addEventListener("click", function () {
	const parent = this.parentNode;
	parent.remove();
  });
}
🔎 JavaScript의 code를 한줄씩 해석해보기
-
button element를 JS로 불러오고
-
input element도 JS로 불러오고
-
button을 click할 경우, onClick 함수 실행
-
input에 keyup이라는 keyboard event가 발생할 경우 ternary operator 실행. event를 발생시킨 keycode가 13번(enter key)이면 onClick 함수 실행하고 그렇지 안으면 무반응
-
onClick 함수 정의
-
함수 내에서 local variable 선언(일부 variable을 global variable로 선언하면 결과값이 달라진다. 이 내용은 아래에서 좀더 다루기)
-
class가 notCompleted이었던 ol element를 JS로 불러오기. 왜냐하면 새로 생성할 li element가 ol element 안에 생성될 것이니까 parent element 소환!
-
class가 completed이었던 ol element를 JS로 불러오기
-
li tag를 가진 element 만들기
-
check button 만들기
-
del button 만들기
-
버튼에 check icon 이미지(font-awesome은 text)를 innerHTML property로 넣어주기
-
버튼에 del icon 이미지(font-awesome은 text)를 innerHTML property로 넣어주기
-
input창 입력값이 빈 문자열이 아니라면, 조건문 실행
-
새로 만들어진 li tag 안에 input.value를 textContext property를 이용하여 text로 만들어 content 채워 li element 완성하기
-
input창은 빈 공간으로 만들기
-
새로 생성된 li element를 NotCompleted ol안에 붙여주기
-
li tag가 만들어지면 check button, del button 붙여주기
-
check button을 click하는 event가 발생할 경우, 익명함수 실행
-
이 check button의 parentNode를 새로운 varible에 할당하여
-
button을 click하면 이 object의 parentNode를 remove method를 사용하여 제거
-
제거된 parentNode를 Completed ol안에 붙여주기
-
Completed안의 list들은 check button 필요 없으므로 지워주기
-
del button을 click하는 event가 발생할 경우, 익명함수 실행
-
이 del button의 parentNode를 새로운 varible에 할당하여
-
button을 click하면 이 object의 parentNode를 remove method를 사용하여 제거
❗ JavaScript 새로 알게된 내용
- keycode값으로 함수 만들기
keycode 확인하기
❓ JavaScript code에서 궁금한 점
- Event에 할당되는 함수는 간단할 수록 좋다고 하는데, 이 함수 안에는 내용이 너무 많은 거 아닐까?
- 함수 안에 함수를 선언한 것을 바꿔주기 위해 분리를 하면 variable scope때문에 실행되지 않는 기능들이 생긴다. 어떻게 refactoring할 수 있을까?
- check button과 del button에 같은 variable을 선언했는데, 중복되지 않게 작성하는 법은 없을까?