BOM(Browser Object Model)
window 객체
<p>
window 객체는 자바스크립트의 최상위 객체이며, 브라우저 내의 모든 요소들과 객체를 포함한다. <br>
BOM : location 객체, navigator 객체, history 객체, screen 객체<br>
DOM : document 객체
</p>
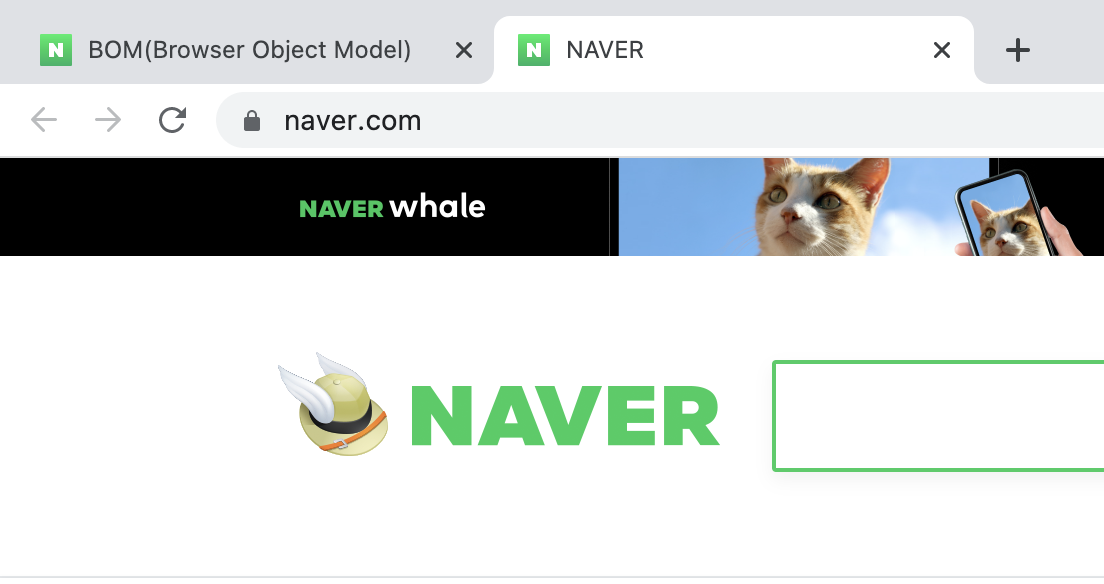
1) window.open()
<button id="btn1">실행 확인</button>
// window 객체
// 1) window.open()
let btn1 = document.getElementById('btn1');
btn1.addEventListener('click', () => {
// window.open(); // 새탭
// window.open('https://www.naver.com'); // 열고자하는 URL
// window.open('https://www.naver.com', 'naver'); // 열고자하는 URL, 창이름
// 특성의 경우 브라우저마다 다르게 동작하기 때문에 정상적으로 동작하는지 꼭 확인해야 한다.
window.open('https://www.naver.com', 'naver', 'width=500', 'height=600', 'resizable=no');
});
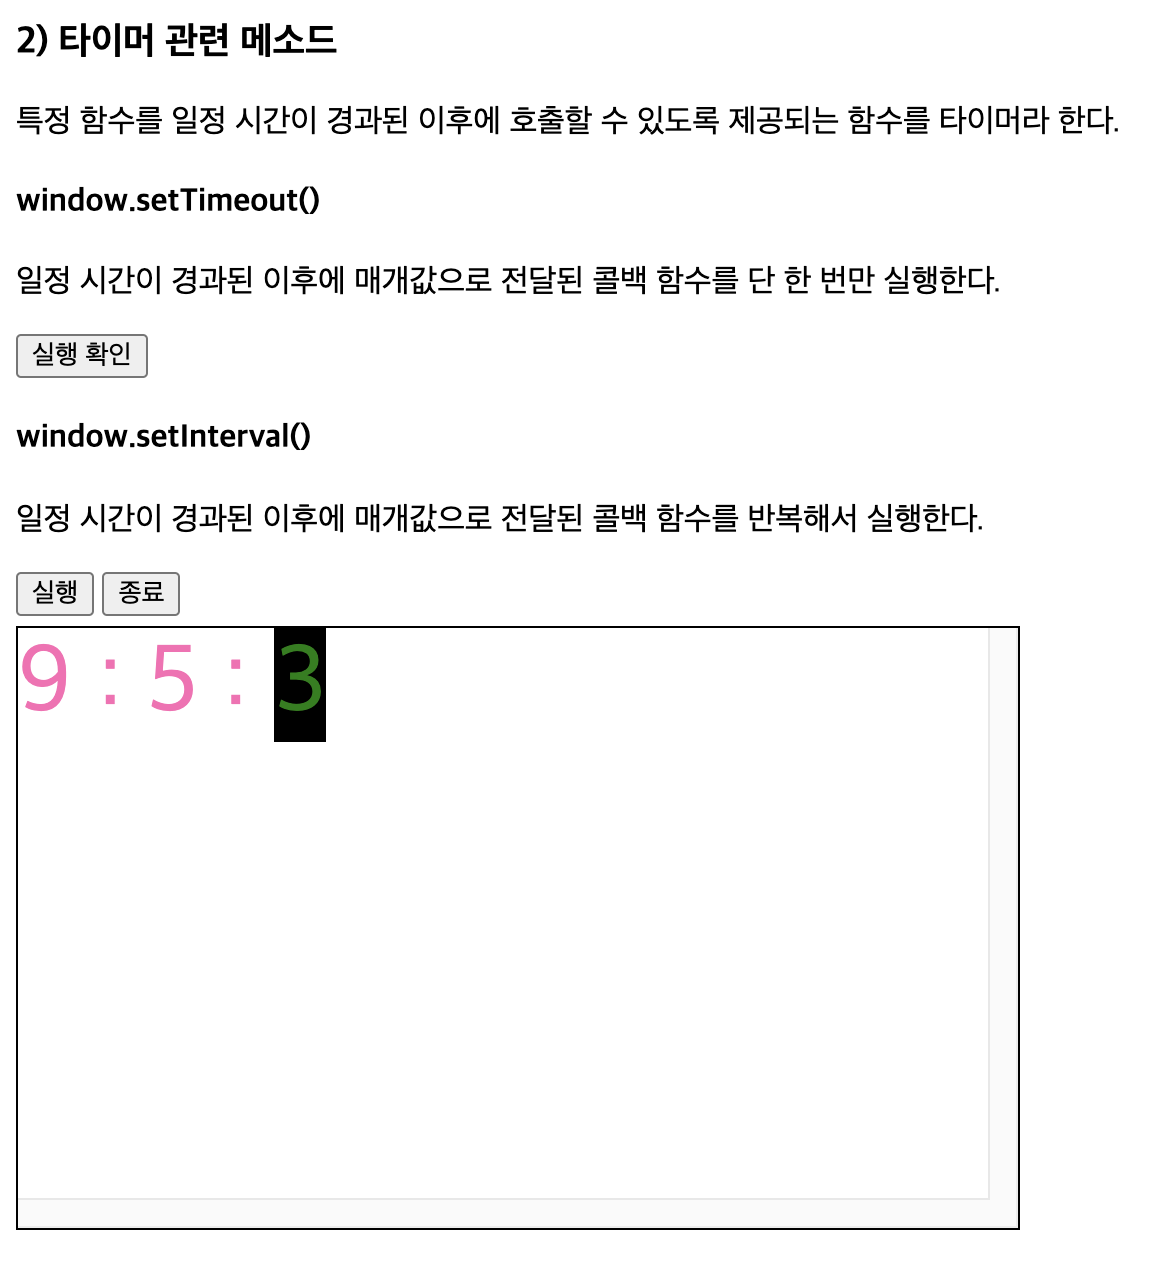
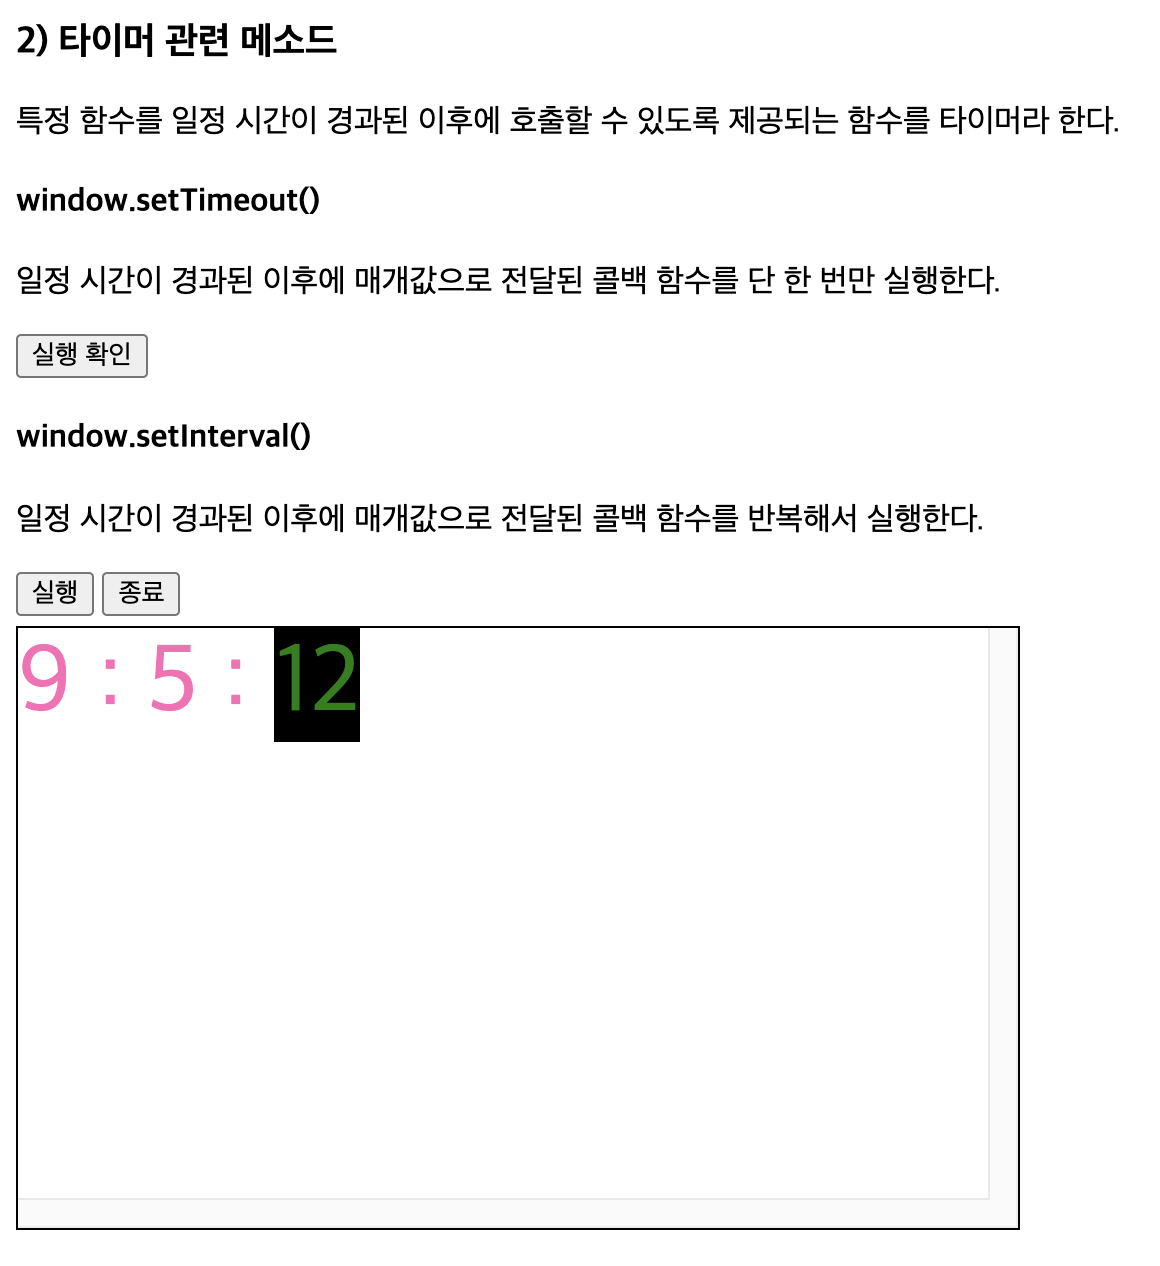
2) 타이머 관련 메소드
    <p>
        특정 함수를 일정 시간이 경과된 이후에 호출할 수 있도록 제공되는 함수를 타이머라 한다.
    </p>

    <h4>window.setTimeout()</h4>
    <p>
        일정 시간이 경과된 이후에 매개값으로 전달된 콜백 함수를 단 한 번만 실행한다.
    </p>

    <button id="btn2">실행 확인</button>

    <h4>window.setInterval()</h4>
    <p>
        일정 시간이 경과된 이후에 매개값으로 전달된 콜백 함수를 반복해서 실행한다.
    </p>

    <button id="btnStart">실행</button>
    <button id="btnStop">종료</button>

    <div id="area1" class="area"></div>

    // 2) 타이머 관련 메소드
    // window.setTimeout()
    let btn2 = document.getElementById('btn2');

    btn2.addEventListener('click', () => {
        let timerId = 0;
        let newWindow = window.open();

        newWindow.alert('3초 후에 이 페이지는 종료됩니다.');

        // 일정 시간 후에 콜백 함수를 한 번 실행
        timerId = window.setTimeout(() => {
            newWindow.close();
        }, 3000);

        console.log(timerId);

        // 타이머 id를 clearTimeout() 함수에 전달하면 해당 id의 타이머를 취소할 수 있다.
        clearTimeout(timerId);
    });

    // window.setInterval()
    let timerId = 0;
    let btnStart = document.getElementById('btnStart');
    let btnStop = document.getElementById('btnStop');

    btnStart.addEventListener('click', () => {
        let area = document.getElementById('area1');

        timerId = window.setInterval(() => {
            let date = new Date();

            area.innerHTML = `<span id='timer'>${date.getHours()} : ${date.getMinutes()} : <span id='second'>${date.getSeconds()}</span></span>`;

        }, 1000);

    });

    btnStop.addEventListener('click', () => {
        clearInterval(timerId);
    });

BOM(Browser Object Model) 객체
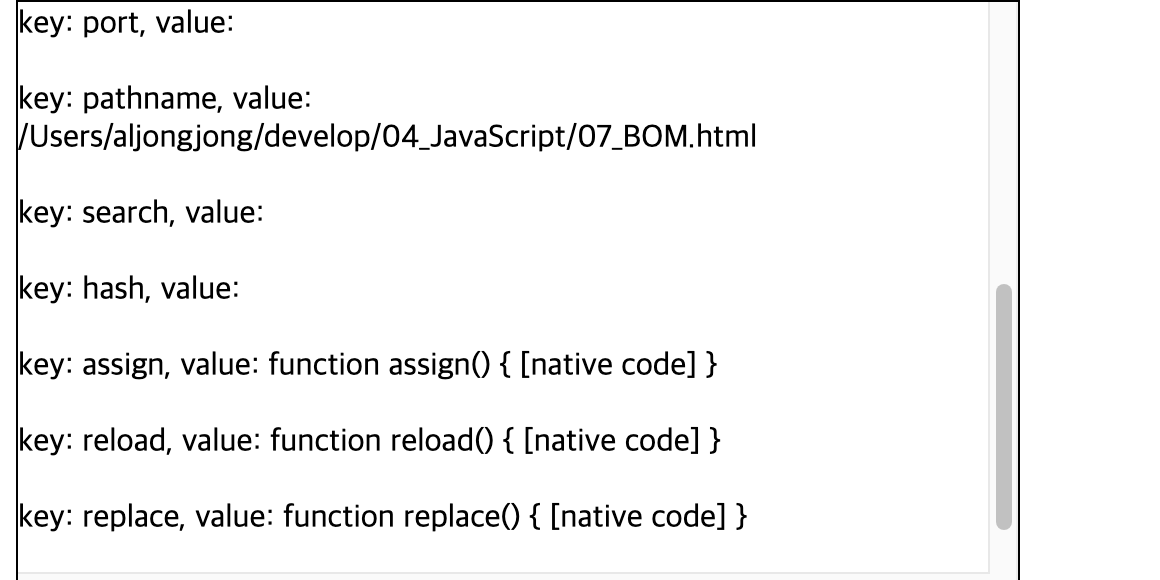
1) location 객체
<p>
브라우저의 주소 표시줄과 관련된 객체이다.
</p>
<button id="btn3">실행 확인</button>
<div id="area3" class="area"></div>
// BOM(Browser Object Model) 객체
// 1) location 객체
let btn3 = document.getElementById('btn3');
btn3.addEventListener('click', () => {
let area = document.getElementById('area3');
area.innerHTML = `<h4>location 객체</h4>`;
for (const key in location) {
area.innerHTML += `key: ${key}, value: ${location[key]}<br><br>`;
}
});
 <h4>location.reload()</h4>
    <p>
        페이지를 새로 고침하는 메소드
    </p>

    <button onclick="location.reload()">새로고침</button>
    <button onclick="location.href = location.href">새로고침</button>
    <button onclick="location = location">새로고침</button>

<h4>location.href</h4>
    <p>
        현재 페이지의 URL 주소를 가지고 있는 속성으로 <br>
        해당 속성의 값을 변경해서 페이지를 이동할 수 있다.
    </p>

    <button onclick="location.href = 'https://www.naver.com'">네이버 이동</button>
    <button onclick="location = 'https://www.naver.com'">네이버 이동</button>

<h4>location.assign(), location.replace()</h4>
    <p>
        두 메소드 모두 페이지를 이동시키지만, replace()는 history에 기록되지 않는다.
    </p>

    <button onclick="location.assign('https://www.naver.com')">네이버 이동</button>
    <button onclick="location.replace('https://www.naver.com')">네이버 이동</button>
2) history 객체
<p>
브라우저의 방문 기록과 관련된 객체이다.
</p>
<button onclick="history.back()">back()</button>
<button onclick="history.forward()">forward()</button>
<button onclick="history.go(-1)">go(-1)</button>
<button onclick="history.go(1)">go(1)</button>
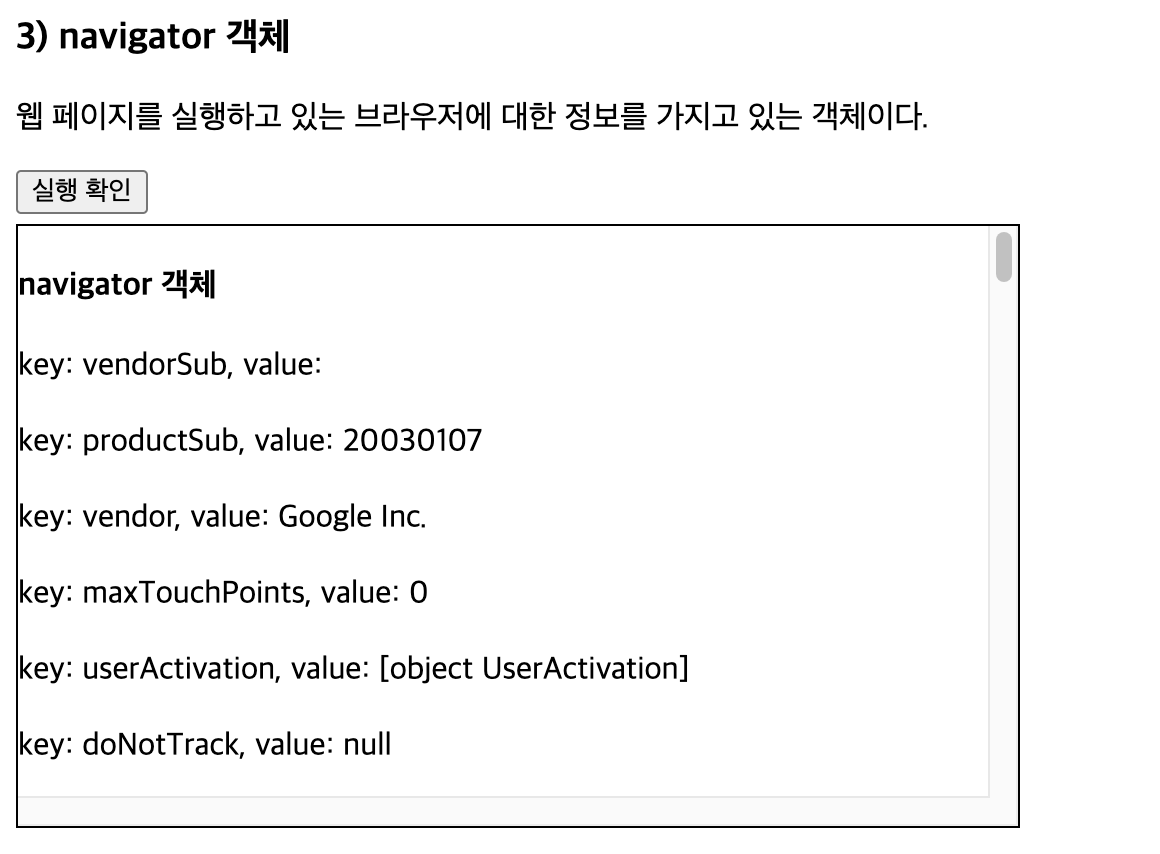
3) navigator 객체
    <p>
        웹 페이지를 실행하고 있는 브라우저에 대한 정보를 가지고 있는 객체이다.
    </p>

    <button id="btn4">실행 확인</button>
    <div id="area4" class="area"></div>

    // 3) navigator 객체
    let btn4 = document.getElementById('btn4');

    btn4.addEventListener('click', () => {
        let area = document.getElementById('area4');

        area.innerHTML = `<h4>navigator 객체</h4>`;

        for (const key in navigator) {
            area.innerHTML += `key: ${key}, value: ${navigator[key]}<br><br>`;
        }
    });
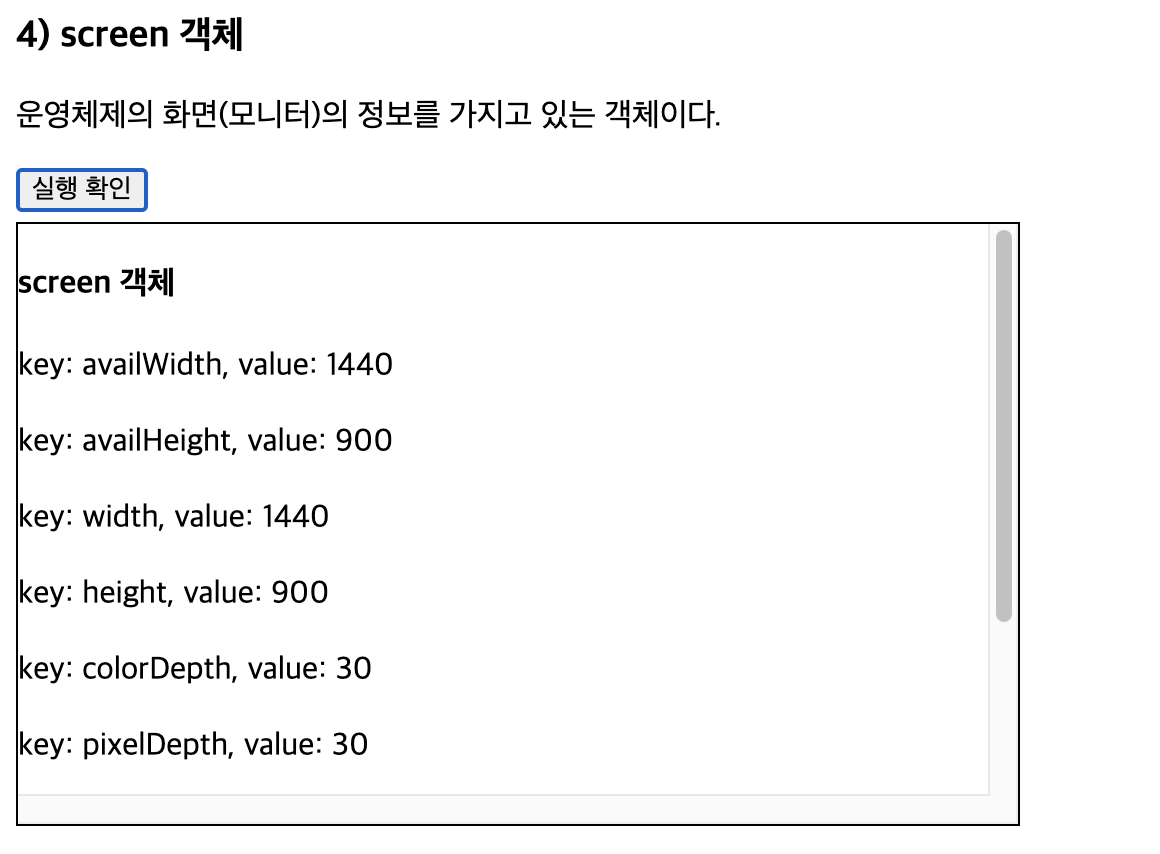
4) screen 객체
    <p>
        운영체제의 화면(모니터)의 정보를 가지고 있는 객체이다.
    </p>

    <button id="btn5">실행 확인</button>
    <div id="area5" class="area"></div>

    // 4) screen 객체
    let btn5 = document.getElementById('btn5');

    btn5.addEventListener('click', () => {
        let area = document.getElementById('area5');

        area.innerHTML = `<h4>screen 객체</h4>`;

        for (const key in screen) {
            area.innerHTML += `key: ${key}, value: ${screen[key]}<br><br>`;
        }
    });