본 글은 freeCodeCamp.Org의 Youtube 영상 'Solidity, Blockchain, and Smart Contract Course – Beginner to Expert Python Tutorial'와 관련 코드인 SmartContract의 Github 코드를 기초로 작성되었다.
Youtube 영상 링크: https://www.youtube.com/watch?v=M576WGiDBdQ&t=10336s
Github 코드 링크: https://github.com/smartcontractkit/full-blockchain-solidity-course-py
오늘의 코드: https://github.com/PatrickAlphaC/aave_brownie_py_freecode
이번 포스팅은 유튜브 영상 08:34:53~09:50:20에 해당하는 내용이다.
디파이(DeFi)란 탈중앙화 금융(Decentralized Finance)의 약자로서, 탈중앙화된 분산금융 또는 분산재정을 의미한다.
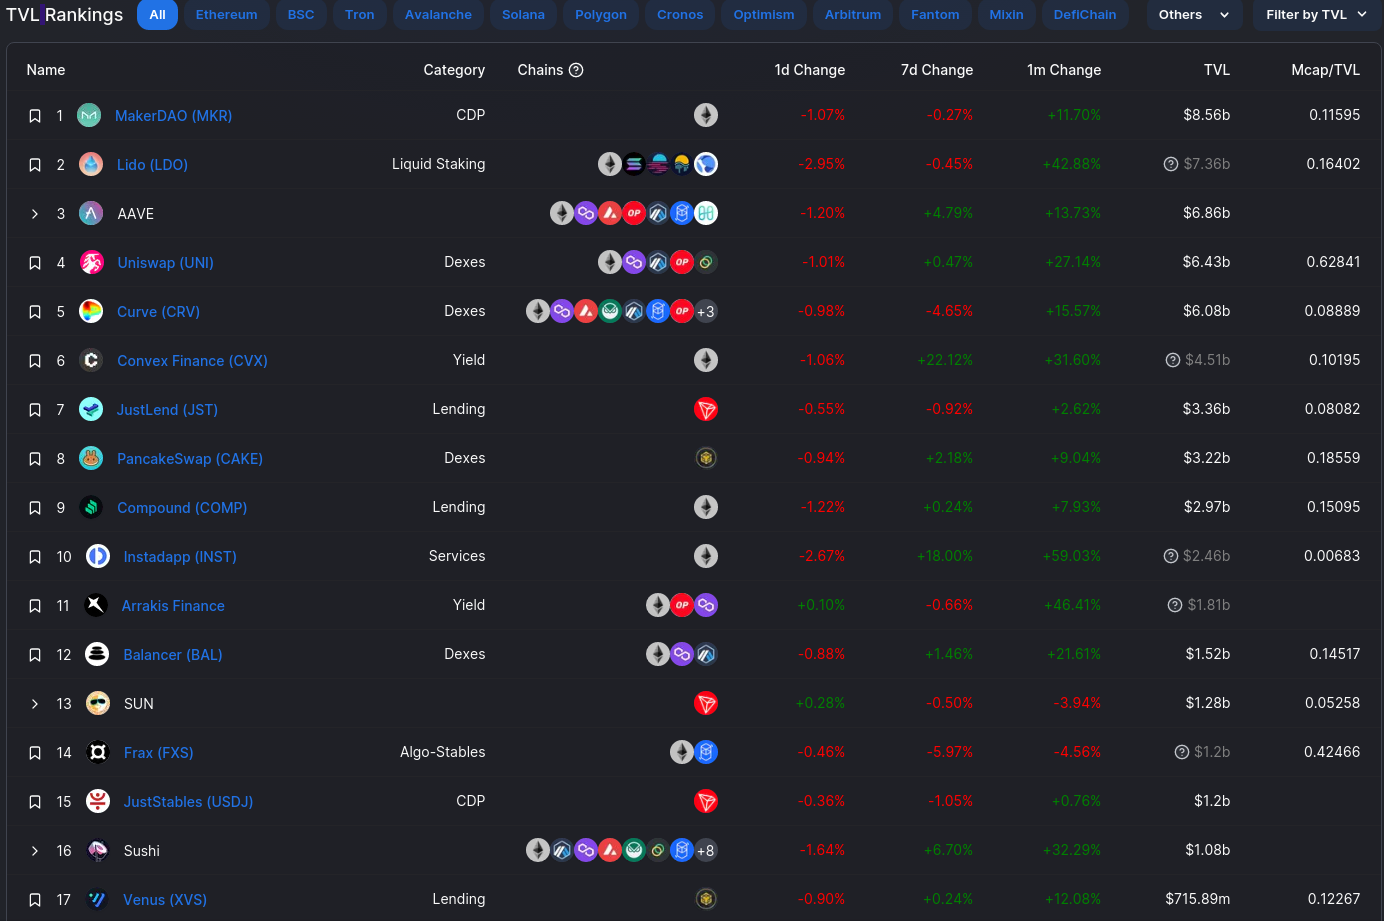
주요 Defi를 확인하기 위해 아래 사이트에 들어가보자.
https://defillama.com/
아래 사진처럼 TVL 순위가 나온다.(TVL이란, Total Value Locked의 약자로서, Defi에 예치된 자산의 총합계를 의미한다.)
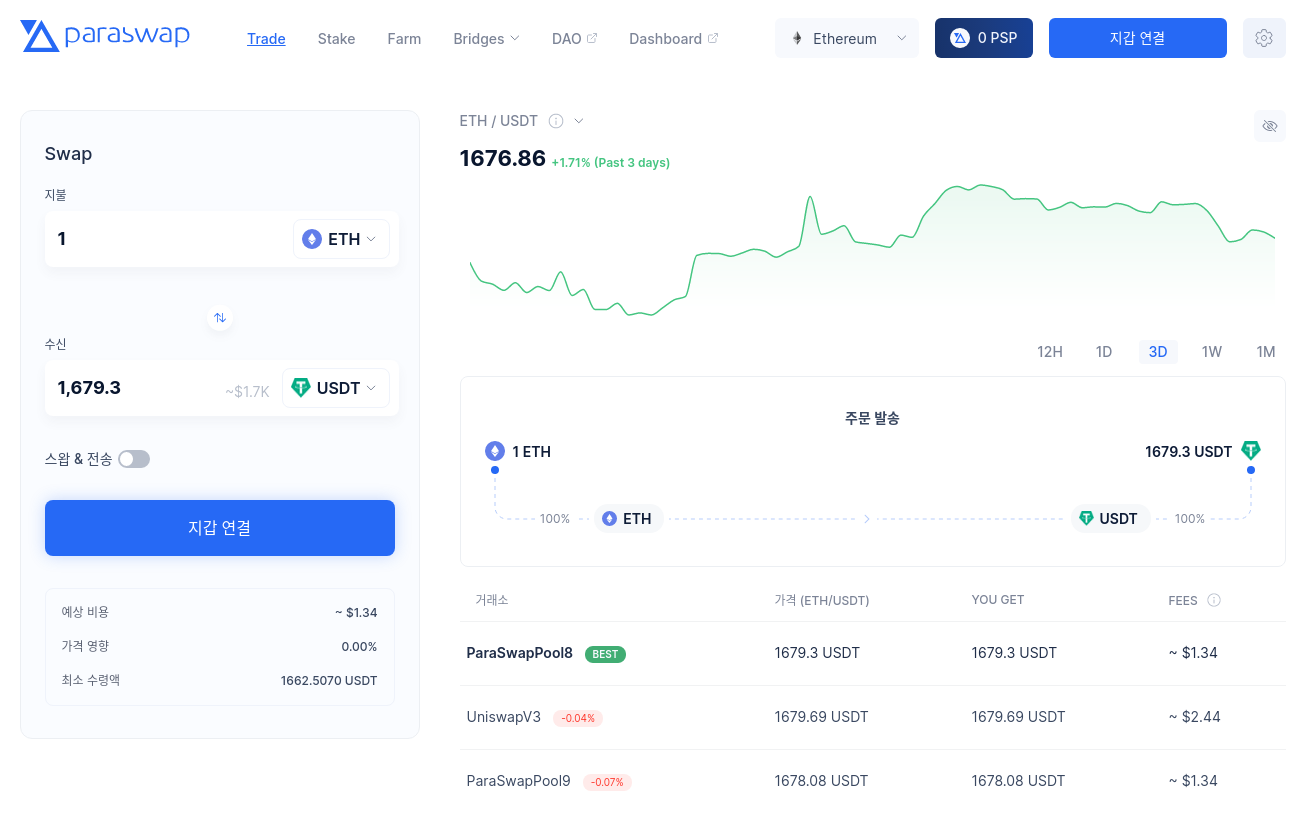
DEX(Decentralized Exchange)는 탈중앙화 교환 시스템으로, 자유롭게 두 토큰 간 교환을 가능하게 한다. 아래 링크에 들어가 지갑을 연결하고 지불하고자 하는 토큰과 수신하고자 하는 토큰을 정해서 교환할 수 있다. DEX의 대표적 예시로는 Uniswap과 Curve가 있다.
https://app.paraswap.io/
우리는 Defi 중 탈중앙 금융 프로토콜인 AAVE를 활용할 것이다. AAVE는 대차거래 protocol을 제공한다.
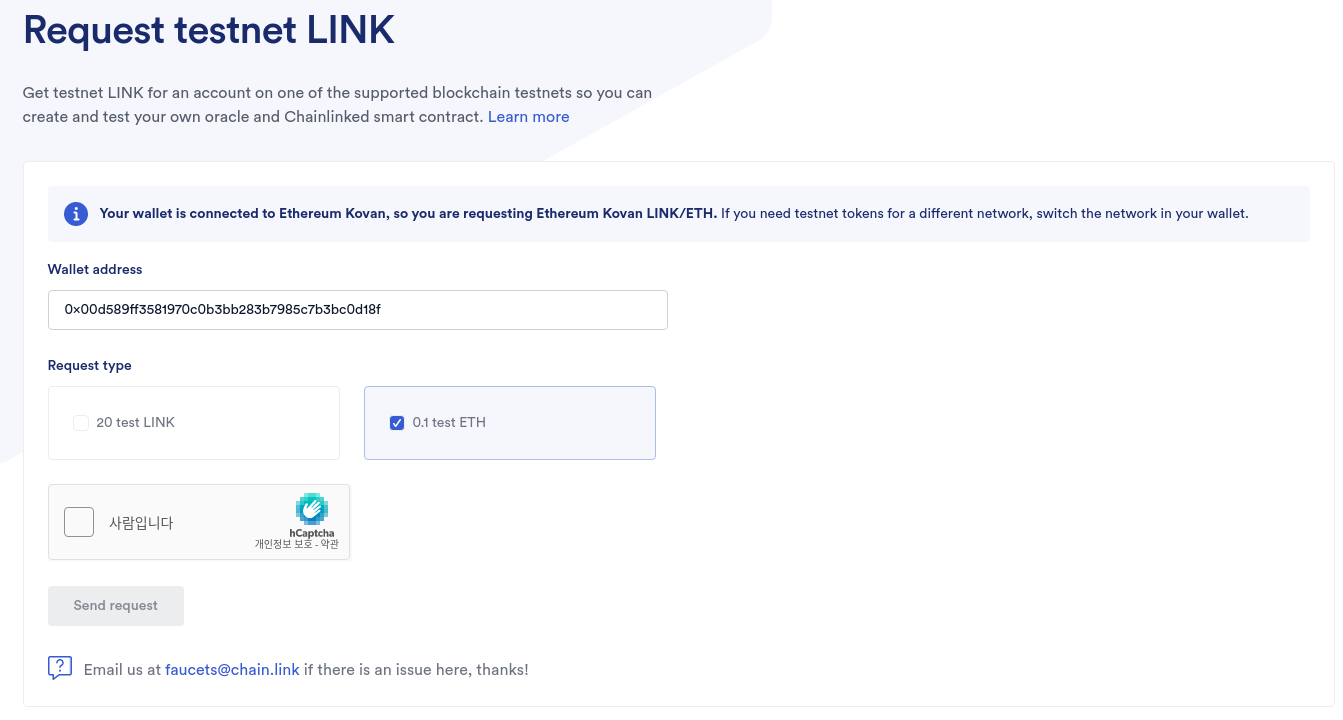
먼저 아래 사이트에 들어가 0.1 Kovan ETH를 Metamask 지갑에 가져오자.
https://faucets.chain.link/
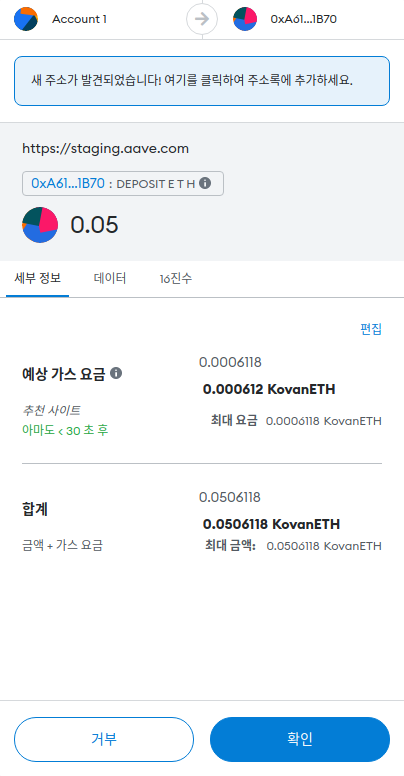
아래 링크로 AAVE 테스트넷에 들어가 지갑을 연결해주자. 다음으로 Supply버튼을 눌러 0.099ETH를 예치하자.
https://staging.aave.com/
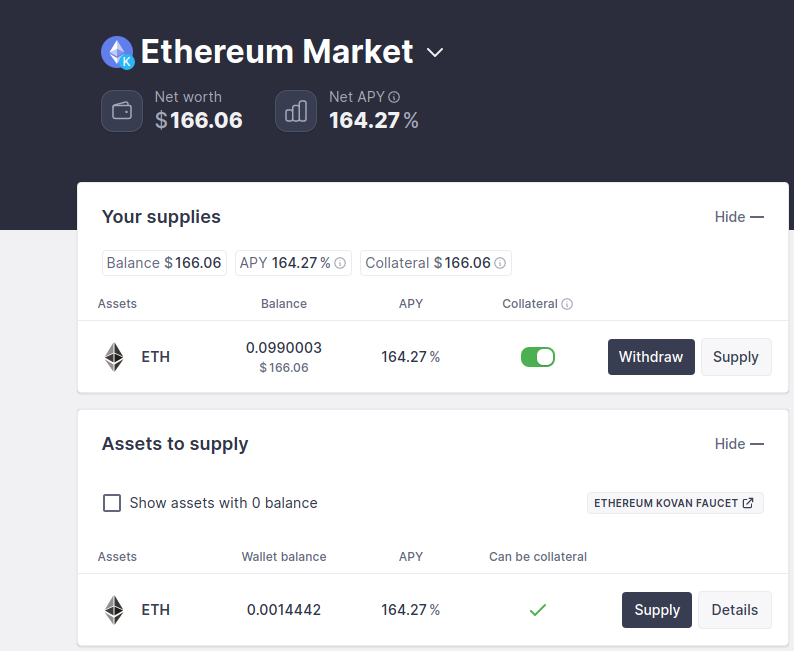
Details를 누르고 뜨는 창에서 Wrapped ETH 옆의 파일 모양 버튼을 클릭하자. aETH를 눌러 추가해주자. aETH는 이자율 포함 토큰이다. 따라서 aETH의 값이 시간이 지남에 따라 증가함을 확인할 수 있다. 따라서 Withdraw를 누르면 처음 예치한 금액보다 큰 값이 회수된다.
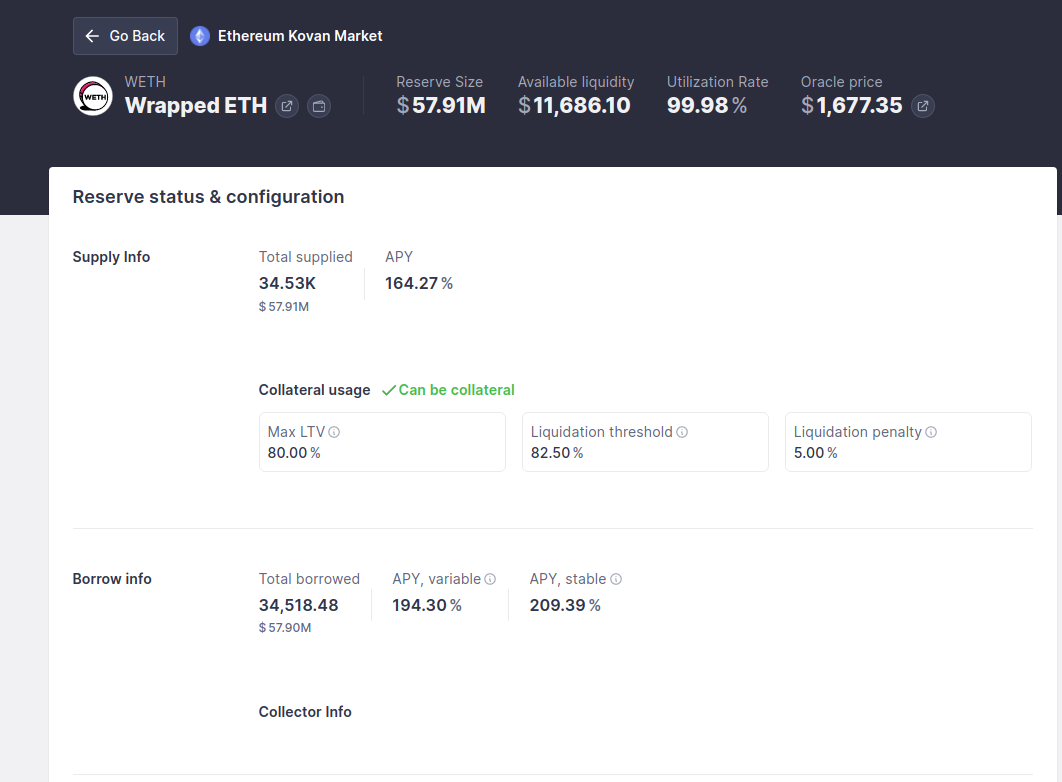
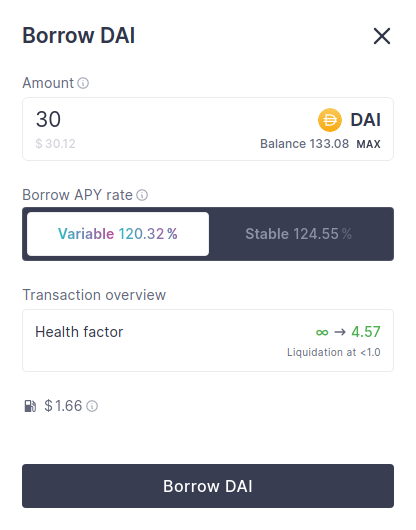
예치된 ETH는 담보(Collateral)로도 쓸 수 있다. Dashboard-Assets to borrow에서 DAI의 Borrow 버튼을 눌러주자. 창이 하나 뜨는데 빌릴 토큰의 양과 고정금리와 변동 금리 중 선택할 수 있는 창이 뜬다. Health factor는 담보 청산(Liquidation) Risk를 드러내는 지표로, 높을수록 Risk가 줄어든다. 담보 가치가 빌린 토큰의 가치에 비해 낮아질수록 Health factor가 떨어진다. 이때 담보 가치가 빌린 토큰의 정해진 일정 비율(Health factor가 1이 될 때)까지 떨어지면 빌린 토큰이 청산된다.
30 DAI를 빌려주자.
Crypto 시장에서의 Liqudation(청산)은 해당 암호화폐의 강제 매각을 의미한다.
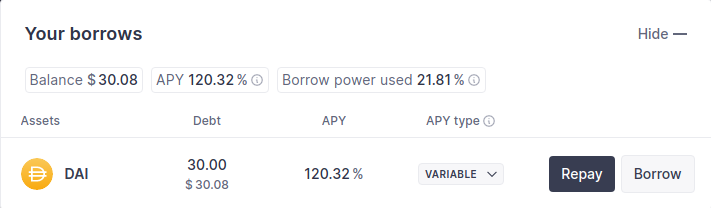
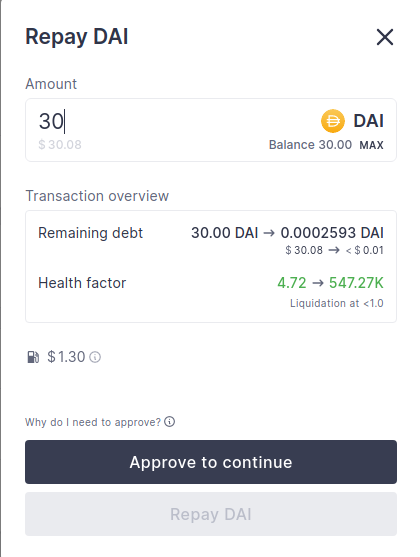
이번에는 빌린 DAI를 Repay 버튼을 눌러 갚아보자.
Approve와 Repay까지 하면 Repay가 완료된다. 이때 빌린 돈의 이자가 붙어 30 DAI를 갚더라도 갚아야 할 금액이 조금 남는다. 이를 갚으려고 해봤는데 UI의 문제인지 내가 못 하는 건지 결국 갚지 못했다.
지금까지 Aave UI 상에서 진행했던 활동을 코드를 활용하여 진행해보자.
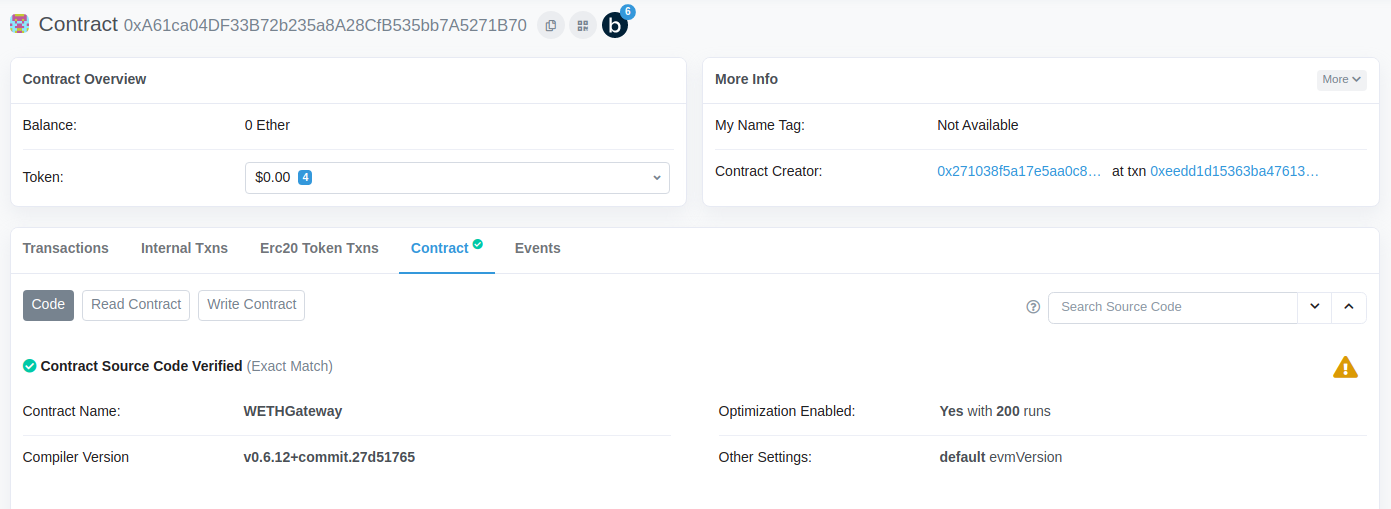
Kovan ETH를 Deposit할 때의 송금 대상 계좌를 복사하여 Kovan Etherscan에 입력해보면 WETH Gateway라는 Contract를 확인할 수 있다. 우리가 ETH를 deposit하면 우리는 그만큼의 WETH 토큰을 받게 되는 방식으로 Deposit이 일어난다.
코드 상의 Deposit을 위해 먼저 ETH를 WETH로 변경해주어야 한다. 이를 본격적으로 진행하기 전에 평소 하던 사전 작업을 진행하자. .env파일을 만들고 늘 채우던 내용으로 채워주자.
export PRIVATE_KEY = 0xb5e857091a491a306f8a13ac49ed53655f51c2d780db0e9faf0305878b3f8fe5
export WEB3_INFURA_PROJECT_ID=a9c5bc0ec75c4a83a3e48086df81acfe
export ETHERSCAN_TOKEN=BEF1HMKFS34JWYP6RQACG8S3MX6G4FN4N4
.gitignore에 '.env'를 추가해주자. 다음으로 brownie-config.yaml을 채워주자.
dependencies:
  - aave/protocol-v2@1.0.1
compiler:
  solc:
    remappings:
      - '@aave=aave/protocol-v2@1.0.1'
dotenv: .env
networks:
  default: mainnet-fork
  kovan:
    weth_token: '0xd0a1e359811322d97991e03f863a0c30c2cf029c'
    lending_pool_addresses_provider: '0x88757f2f99175387ab4c6a4b3067c77a695b0349'
    dai_eth_price_feed: '0x22B58f1EbEDfCA50feF632bD73368b2FdA96D541'
    dai_token: '0xFf795577d9AC8bD7D90Ee22b6C1703490b6512FD'
  mainnet-fork:
    weth_token: '0xC02aaA39b223FE8D0A0e5C4F27eAD9083C756Cc2'
    lending_pool_addresses_provider: '0xB53C1a33016B2DC2fF3653530bfF1848a515c8c5'
    dai_eth_price_feed: '0x773616E4d11A78F511299002da57A0a94577F1f4'
    dai_token: '0x6b175474e89094c44da98b954eedeac495271d0f'
wallets:
  from_key: ${PRIVATE_KEY}
이후 사용할 aave protocol을 위해 dependencies를 입력해주고 있다.
해당 github link: https://github.com/aave/protocol-v2
network에서는 kovan과 mainnet-fork를 사용하고 있음을 알 수 있다. 이때 local chain인 mainnet-fork를 default로 사용하고 있음을 알 수 있다.
oracle을 이용할 때는 mocking을 활용하여 oracle을 배제하고 테스트하는 과정이 필요하다. 그러나 이번 테스트에서는 oracle이 활용되지 않기에 mainnet-fork 네트워크를 활용한 테스트로 local test를 충분히 진행할 수 있다.
kovan과 mainnet-fork 각각 아래 네 가지 주소를 입력하고 있다.
-
weth token을 가져오기 위한 주소
kovan network에 해당하는 weth token 주소를 가져오기 위해선 구글에 'weth token kovan etherscan'을 검색하여 나오는 첫 링크에서 주소를 따오면 된다.
weth token kovan 주소를 따오기 위한 etherscan 주소: https://kovan.etherscan.io/token/0xd0a1e359811322d97991e03f863a0c30c2cf029c
마찬가지로 mainnet weth 주소를 가져오기 위해 'weth token etherscan'을 검색하여 주소를 따오면 된다.
weth token 주소를 따오기 위한 etherscan 링크: https://etherscan.io/token/0xc02aaa39b223fe8d0a0e5c4f27ead9083c756cc2 -
lending pool 주소
AAVE 상의 예금, 인출, 대출, 반환 등의 과정 등은 AAVE의 lending pool contract에서 이루어진다. 각 네트워크에 해당하는 lending pool 주소를 입력하고 있다.
주소를 가져오기 위한 링크: https://docs.aave.com/developers/v/2.0/deployed-contracts/deployed-contracts -
DAI/ETH 가격 피드
WETH를 AAVE에 예치한 이후 이를 담보로 DAI를 빌려올 계획이다. DAI를 예치된 금액의 부채담보부비율(LTV)만큼 가져올 수 있다. AAVE에서 대출가능한 토큰의 LTV와 청산 임계값(liquidation threshold)을 확인하고 싶다면 아래 사이트에 들어가면 된다.
https://docs.aave.com/risk/v/aave-v2/asset-risk/risk-parameters
DAI/ETH 가격 피드 주소는 이전 포스팅에서 ETH/USD 피드 주소를 가져왔던 chainlink 주소에서 가져올 수 있다.
https://docs.chain.link/docs/ethereum-addresses/ -
DAI Token을 가져오기 위한 주소
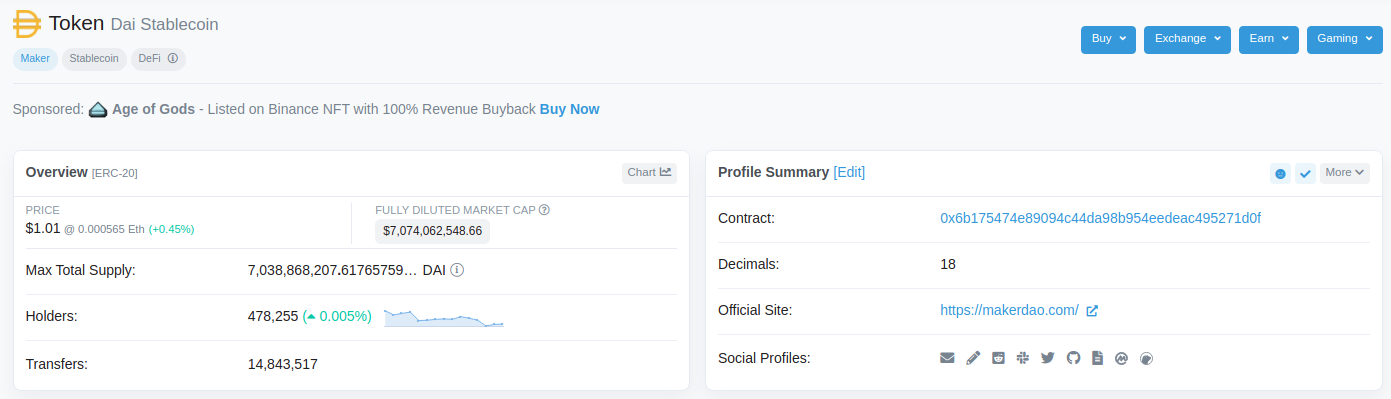
Mainnet에서 DAI Token Contract에 해당하는 주소는 etherscan에서 쉽게 찾을 수 있다.
https://etherscan.io/token/0x6b175474e89094c44da98b954eedeac495271d0f
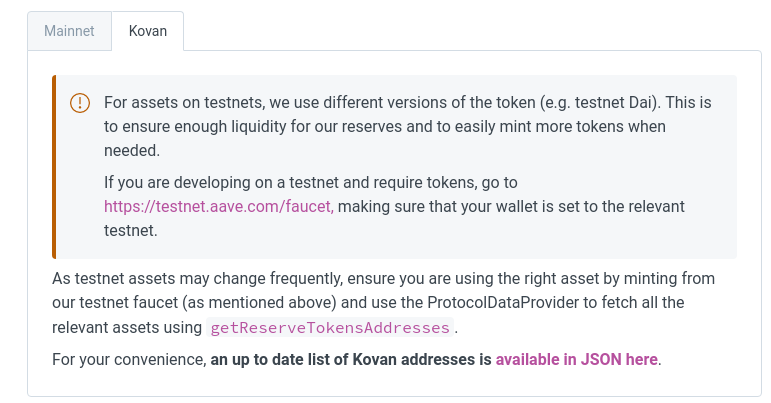
Kovan Network 상의 Token Contract는 자주 변경될 수 있다고 한다. 따라서 아래 사이트에서 주소 확인을 해보자.
https://aave.github.io/aave-addresses/kovan.json
위 링크에서 DAI를 검색하여 해당 주소를 찾으면 된다. 위 링크로 들어가는 방법은 아래 링크로 들어가
https://docs.aave.com/developers/v/2.0/deployed-contracts/deployed-contracts
available in JSON here를 눌러주면 된다.
이제 ETH를 주고 WETH를 받아오는 script를 작성해보자.
먼저 이를 위한 interface를 interfaces 폴더에 추가해주자. 'aave_brownie_py/interfaces/WethInterface.sol'의 경로로 interface를 가져올 수도 있지만 WethInterface를 IWeth로 변경해주는 번거로움을 피하기 위해 아래 링크에서 가져오자.
https://github.com/PatrickAlphaC/aave_brownie_py_freecode/blob/main/interfaces/IWeth.sol
interfaces 폴더의 'IWeth.sol'이라는 파일을 만들어 파일 안에 위 링크의 코드를 넣어주자.
다음으로 scripts 폴더에 __init__.py와 helpful_scripts.py를 추가해주자. helpful_scripts의 내용은 다음 코드로 추가해주자.
from brownie import accounts, network, config

LOCAL_BLOCKCHAIN_ENVIRONMENTS = [
    "development",
    "ganache",
    "hardhat",
    "local-ganache",
    "mainnet-fork",
]


def get_account(index=None, id=None):
    if index:
        return accounts[index]
    if network.show_active() in LOCAL_BLOCKCHAIN_ENVIRONMENTS:
        return accounts[0]
    if id:
        return accounts.load(id)
    if network.show_active() in config["networks"]:
        return accounts.add(config["wallets"]["from_key"])
    return None
helpful_scripts의 내용은 이전 포스팅에서 이미 다뤘으므로 설명은 생략하겠다.
WETH 토큰을 가져오기 위한 script인 get_weth.py를 추가하고 아래 코드를 입력해주자.
from scripts.helpful_scripts import get_account
from brownie import interface, config, network, accounts


def main():
    get_weth()


def get_weth():
    account = get_account()
    weth = interface.IWeth(config["networks"][network.show_active()]["weth_token"])
    tx = weth.deposit({"from": account, "value": 0.1 * 10 ** 18})
    tx.wait(1)
    print("Received 0.1 WETH")
get_weth 함수를 보자.
계좌를 하나 가져와서,
Weth 수령을 위한 interface에 현재 활성화된 네트워크를 연결하여 weth에 저장하고 있다.
가져온 계좌로부터 0.1 ETH를 예치하는 transaction을 발생시키면(IWETH.sol에서 deposit 함수를 찾을 수 있다. 이때의 deposit은 WETH를 받아오기 위해 ETH를 예치하는 것으로, AAVE 상의 예치와는 다르다. 받아온 WETH를 AAVE에 예치하는 과정은 추후 다른 script에서 다룬다.) 이에 대응하는 0.1 WETH를 받아오게 된다.
AAVE 상에서 우리가 앞서 AAVE 홈페이지에서 진행했던 WETH예금부터 DAI상환까지의 과정을 코드를 통해 진행해보자.
먼저 getLendingPool함수, 즉 lending pool을 가져오기 위한 함수가 포함된 interface를 저장해주자.
interfaces 폴더에 ILendingPoolAddressesProvider.sol을 만들고 아래 링크의 코드를 붙여넣어주자.
https://github.com/PatrickAlphaC/aave_brownie_py_freecode/blob/main/interfaces/ILendingPoolAddressesProvider.sol
getLendingPool함수는 ILendingPoolAddressesProvider.sol에 다음과 같이 정의되어 있다.
function getLendingPool() external view returns (address);
다음으로 AAVE 상 예치, 인출, 대출, 상환 등의 함수를 포함하는 LendingPool Interface를 interface에 넣어주자. 파일명은 ILendingPool.sol로 정하고 아래 링크의 코드를 붙여넣어주자.
https://github.com/aave/protocol-v2/blob/master/contracts/interfaces/ILendingPool.sol
import문장 두 줄을 다음과 같이 바꿔주자.
import {ILendingPoolAddressesProvider} from '@aave/contracts/interfaces/ILendingPoolAddressesProvider.sol';
import {DataTypes} from '@aave/contracts/protocol/libraries/types/DataTypes.sol';
github에서는 같은 폴더 내의 import이기 때문에 './'을 사용했지만 우리는 github에서 직접 import하므로 앞서 config의 dependencies를 고려하여 위와 같이 입력해주면 된다.
우리는 AAVE 상의 기능을 구현하기 위해 WETH와 같은 ERC20 토큰을 전송하는 과정이 필요하다. ERC20 토큰은 전송을 실행하기 전 전송을 승인(approve)하는 과정을 거친다. 따라서 이 승인 기능을 담은 interface를 interfaces 폴더에 추가해주자. IERC20.sol 파일을 만들고 아래 링크의 코드를 담아주자.
https://github.com/PatrickAlphaC/aave_brownie_py_freecode/blob/main/interfaces/IERC20.sol
interface의 approve 함수만 따로 보면 다음과 같다.
function approve(address spender, uint256 value) external returns (bool success);interfaces 폴더에 마지막으로 하나의 파일을 추가해주자. DAI/ETH 가격 비율을 가져오기 위한 AggregatorV3Interface이다. 이 인터페이스는 이전 포스팅에서 여러 차례 다루었으므로 설명은 생략하겠다. AggregatorV3Interface.sol을 interfaces 폴더에 추가하고 아래 링크의 코드를 붙여넣어주자.
https://github.com/smartcontractkit/chainlink/blob/develop/contracts/src/v0.6/interfaces/AggregatorV3Interface.sol
이제 오늘의 메인 스크립트인 aave_borrow.py를 scripts에 추가하고 내용을 하나하나 채워보자.
def get_lending_pool():
    lending_pool_addresses_provider = interface.ILendingPoolAddressesProvider(
        config["networks"][network.show_active()]["lending_pool_addresses_provider"]
    )
    lending_pool_address = lending_pool_addresses_provider.getLendingPool()
    lending_pool = interface.ILendingPool(lending_pool_address)
    return lending_pool
활성화되어있는 network의 lending pool을 가져오기 위한 함수인 get_lending_pool 함수를 정의하자.
먼저 현재 활성화되어있는 네트워크를 lending pool address provider interface에 연결하여 이 interface를 lending_pool_addresses_provider에 저장해주고 있다.
lending_pool_addresses_provider로부터 getLendingPool함수를 호출하여 활성화되어있는 네트워크의 lending pool 추소를 받아 lending_pool_address에 저장해주고 있다.
lending_pool_address를 입력값으로 ILendingPool을 호출하여 활성화되어있는 네트워크의 lending pool을 받아 이를 lending_pool에 저장해주고 있다.
lending pool을 반환함으로써 함수가 종료된다.
def approve_erc20(amount, spender, erc20_address, account):
    print("Approving ERC20 token...")
    erc20 = interface.IERC20(erc20_address)
    tx = erc20.approve(spender, amount, {"from": account})
    tx.wait(1)
    print("Approved!")
    return tx
앞서 erc20 토큰 전송을 위해서는 거래 승인이 선행되어야 한다고 이야기했다. 이를 위한 approve_erc20 함수 정의이다.
IERC20 interface의 approve함수는 spender와 amount를 입력값으로 받는다. 따라서 IERC20 interface를 활용하는 approve_erc20의 입력값에도 amount와 spender를 포함시켰다. 또한 승인 대상 토큰의 주소와 transaction 발생을 위한 계좌를 입력값에 포함시키고 있다.
승인 대상 토큰 주소를 IERC20에 넣은 interface를 erc20에 저장하고 있다.
erc20의 approve함수를 호출하여 transaction을 발생시키면 승인이 완료된다.
발생한 transaction을 반환하며 함수가 종료된다.
def get_borrowable_data(lending_pool, account):
    (
        total_collateral_eth,
        total_debt_eth,
        available_borrow_eth,
        current_liquidation_threshold,
        ltv,
        health_factor,
    ) = lending_pool.getUserAccountData(account.address)
    available_borrow_eth = Web3.fromWei(available_borrow_eth, "ether")
    total_collateral_eth = Web3.fromWei(total_collateral_eth, "ether")
    total_debt_eth = Web3.fromWei(total_debt_eth, "ether")
    print(f"You have {total_collateral_eth} worth of ETH deposited.")
    print(f"You have {total_debt_eth} worth of ETH borrowed.")
    print(f"You can borrow {available_borrow_eth} worth of ETH.")
    return (float(available_borrow_eth), float(total_debt_eth))
이번에는 토큰을 빌리는 데 사용할 수 있는 ETH의 양과 현재 대출에 사용한 ETH의 양을 반환하는 get_borrowable_data 함수를 정의해보자.
lending_pool과 account를 입력값으로 받고 있다.
lending_pool의 getUserAccountData 함수에 계좌 주소를 입력하면 total_collateral_eth, total_debt_eth, available_borrow_eth, current_liquidation_threshold, ltv, health_factor를 반환한다.(각각이 무엇인지는 앞서 다루었다.)
반환값에 대한 변수를 정의하여 이를 저장해주고 있다.
대출에 사용가능한 ETH(available_borrow_eth)와 담보로 사용한 총 ETH(total_collateral_eth), 대출에 사용한 총 ETH(total_debt_eth)를 Wei 단위에서 ETH 단위로 바꾸어주고 있다.
각 값을 출력해주고, available_borrow_eth와 total_debt_eth를 반환해주고 있다. 이때 각 변수를 감싸준 float는 실수형 data type이다. 즉, 두 값을 실수 단위로 출력해주기 위해 float로 각 변수를 감싸주었다.
def get_asset_price(price_feed_address):
    dai_eth_price_feed = interface.AggregatorV3Interface(price_feed_address)
    latest_price = dai_eth_price_feed.latestRoundData()[1]
    converted_latest_price = Web3.fromWei(latest_price, "ether")
    print(f"The DAI/ETH price is {converted_latest_price}")
    return float(converted_latest_price)
get_asset_price는 DAI/ETH 가격을 반환하는 함수이다.
가격 피드 주소를 입력값으로 받는다.
가격 피드 주소로 AggregatorV3Interface를 호출하여 이를 dai_eth_price_feed, 즉 DAI/ETH 가격 피드를 나타내는 변수에 저장하고 있다.
dai_eth_price_feed의 LatestRoundData는 5개의 변수를 반환하는데, 이 중 2번째 변수가 answer, 즉 DAI/ETH의 가격 비율이다. [1]은 배열의 2번째 요소를 가리키기에 latest_price에는 DAI/ETH의 가격 비율이 저장된다.
이 가격 비율을 Wei 단위에서 ETH 단위로 바꾸어주고, 이 값을 출력 및 반환해준다.
def repay_all(amount, lending_pool, account):
    approve_erc20(
        Web3.toWei(amount, "ether"),
        lending_pool,
        config["networks"][network.show_active()]["dai_token"],
        account,
    )
    repay_tx = lending_pool.repay(
        config["networks"][network.show_active()]["dai_token"],
        amount,
        1,
        account.address,
        {"from": account},
    )
    repay_tx.wait(1)

    print("Repaid!")
빌린 토큰을 모두 갚는 repay_all함수를 정의해보자. 갚을 양, lending_pool, 계좌를 입력값으로 하고 있다.
토큰 전송을 위해서는 approve가 선행되어야 하므로 approve_erc20함수를 먼저 실행하고 있다.
다음으로 lending_pool의 repay함수를 호출하여 repay를 진행하는 transaction을 발생시키고 있는데, ILendingPool.sol에서 repay는 다음과 같이 정의되어 있다.
 function repay(
    address asset,
    uint256 amount,
    uint256 rateMode,
    address onBehalfOf
  ) external returns (uint256);
asset으로 dai token, amount로 amount(반납할 token의 양), rateMode로 1(1은 Stable, 즉 고정금리, 2는 Variable, 즉 변동금리를 의미한다.), onBehalfOf(빚을 갚는 대상)로 account.address(우리 계좌 주소)을 설정하고 repay를 진행하고 있다.
from brownie import network, config, interface
from scripts.helpful_scripts import get_account
from scripts.get_weth import get_weth
from web3 import Web3

# 0.1
AMOUNT = Web3.toWei(0.1, "ether")
import 대상을 코드의 맨 위에 적어주자.
AMOUNT로 Wei 단위의 0.1 ETH를 정의하고 있다.
def main():
    account = get_account()
    erc20_address = config["networks"][network.show_active()]["weth_token"]
    if network.show_active() in ["mainnet-fork"]:
        get_weth()
    lending_pool = get_lending_pool()
    approve_tx = approve_erc20(AMOUNT, lending_pool.address, erc20_address, account)
    print("Depositing...")
    tx = lending_pool.deposit(
        erc20_address, AMOUNT, account.address, 0, {"from": account}
    )
    tx.wait(1)
    print("Deposited!")
    # ...how much?
    borrowable_eth, total_debt = get_borrowable_data(lending_pool, account)
    print("Let's borrow!")
    # DAI in terms of ETH
    dai_eth_price = get_asset_price(
        config["networks"][network.show_active()]["dai_eth_price_feed"]
    )
    amount_dai_to_borrow = (1 / dai_eth_price) * (borrowable_eth * 0.95)
    # borrowable_eth -> borrowable_dai * 95%\
    print(f"We are going to borrow {amount_dai_to_borrow} DAI")
    # Now we will borrow!
    dai_address = config["networks"][network.show_active()]["dai_token"]
    borrow_tx = lending_pool.borrow(
        dai_address,
        Web3.toWei(amount_dai_to_borrow, "ether"),
        1,
        0,
        account.address,
        {"from": account},
    )
    borrow_tx.wait(1)
    print("We borrowed some DAI!")
    get_borrowable_data(lending_pool, account)
    # I made an oopsie in the video with this!!
    repay_all(Web3.toWei(amount_dai_to_borrow, "ether"), lending_pool, account)
    get_borrowable_data(lending_pool, account)
    print(
        "You just deposited, borrowed, and repayed with Aave, Brownie, and Chainlink!"
    )
대망의 main 함수를 살펴보자.
get_account 함수를 이용해 계좌를 받아오고 있다.
erc20으로 weth token을 설정해준다.
mainnet-fork로 네트워크가 활성화되어있는 경우 get_weth로 weth를 받아온다.
lending_pool은 앞서 정의한 get_lending_pool함수를 이용해 가져온다.
deposit을 실행하기 위해 먼저 approve를 진행하고 있다.
다음으로 lending_pool에서 deposit 함수를 불러와 transaction을 발생시키고 있다. lending pool의 deposit 함수를 살펴보자.
 function deposit(
    address asset,
    uint256 amount,
    address onBehalfOf,
    uint16 referralCode
  ) external;
asset은 예금 대상 자산, amount는 예치할 양, onBehalfOf는 예치에 따라 발생하는 a토큰(e. g. aWETH)을 받을 주소, referralCode는 더이상 사용되지 않는다. 다만 값에 0을 고정으로 입력해주면 된다.
따라서 asset에 erc20의 주소, amount에 0.1 ETH, onBehalfOf에 우리 계좌 주소를 입력해주고 있다.
다음으로 get_borrowable_data 함수 lending_pool과 account를 입력값으로 실행하여 return 값을 borrowable_eth와 total_debt에 저장해주고 있다.
get_asset_price함수에 dai_eth_price_feed에 해당하는 주소를 입력값으로 넣어 DAI/ETH 가격을 dai_eth_price에 저장하고 있다.
amount_dai_to_borrow에 대출 가능한 ETH의 95%를 ETH 단위에서 DAI 단위로 반경하여 저장하고 있다.
dai_address에 활성화된 네트워크의 dai_token에 해당하는 주소를 입력하고 있다.
lending_pool의 borrow 함수를 실행하는데, borrow 함수를 살펴보자.
function borrow(
    address asset,
    uint256 amount,
    uint256 interestRateMode,
    uint16 referralCode,
    address onBehalfOf
  ) external;
asset에 빌릴 자산의 주소, amount에 빌릴 양, interestRateMode에 고정금리(1)나 변동금리(2), referralCode에 0, onBehalfOf에 대출 받는 계좌를 넣어준다.
main함수에서는 asset에 dai_address, amount에 Wei 단위의 amount_dai_to_borrow, interestRateMode에 1(고정금리), referralCode에 0, onBehalfOf에 account의 주소를 입력해주고 있다.
마지막으로 get_borrowable_data 함수를 이용하여 해당 정보를 출력하고,
repay를 진행한 후
다시 get_borrowable_data 함수를 이용하여 해당 정보를 출력하고 있다.
이로써 메인함수가 마무리된다.
마지막으로 tests 폴더에 test_aave_borrow.py를 추가하여 내용을 채우는 것으로 오늘의 포스팅을 마무리하자.
from scripts.aave_borrow import (
    get_asset_price,
    get_lending_pool,
    approve_erc20,
    get_account,
)
from brownie import config, network


def test_get_asset_price():
    # Arrange / Act
    asset_price = get_asset_price(
        config["networks"][network.show_active()]["dai_eth_price_feed"]
    )
    # Assert
    assert asset_price > 0
scripts의 avve_borrow에서 테스트에 필요한 함수들을 호출하고 있다.
test_get_asset_price를 보자.
이는 get_asset_price 함수가 DAI/ETH 가격 피드로부터 DAI/ETH 가격을 제대로 가져올 수 있는지 확인하는 함수이다. get_asset_price 함수를 호출하여 반환값을 asset_price에 저장하고 이 값이 0보다 큰지 확인하고 있다.
def test_get_lending_pool():
    # Arrange / Act
    lending_pool = get_lending_pool()
    # Assert
    assert lending_pool is not None


def test_approve_erc20():
    # Arrange
    account = get_account()
    lending_pool = get_lending_pool()
    amount = 1000000000000000000  # 1
    erc20_address = config["networks"][network.show_active()]["weth_token"]
    # Act
    tx = approve_erc20(amount, lending_pool.address, erc20_address, account)
    # Assert
    assert tx is not True
test_get_lending_pool은 get_lending_pool 함수가 제대로 동작하는지 확인하는 테스트이다. get_lending_pool의 반환값이 none이 아닌지 확인하고 있다.
마지막으로 approve_erc20이 제대로 동작하는지 확인하는 test_approve_erc20을 보자.
account, lending_pool, amount, erc20_address(WETH토큰의 주소)를 입력값으로 approve_erc20함수를 실행하고 있다. 이때 발생한 transaction이 거짓인지를 확인하고 있다.
amount로 1ETH를 설정했는데, 우리가 가져온 local account는 transaction 내역이 없는 새로운 계좌이다. 따라서 이 계좌에는 아무런 ETH가 예치되어 있지 않고, 이 계좌가 1 ETH를 전송하는 transaction에 대해 승인이 나지 않는다. 따라서 approve_erc20가 False를 반환해야(approve_erc20은 승인이 성공하면 True, 실패하면 False를 반환한다.) approve_erc20가 제대로 작동한다고 볼 수 있다.
오늘의 포스팅이 끝났다! 이제 포스팅도 3편이면 끝나고 마지막 포스팅은 사회에서 작성하게 될 듯하다. 아직 나가는 게 실감은 나지 않는다. 사회에 나가서 하나하나 해나가면 그제서야 실감이 날 듯하다. 남은 날들 최선을 다해 잘 마무리하고 나갔으면 한다. 나 자신의 의지와 노력이 제일 중요하지 않을까 싶다. 다음 포스팅에서 보자!!!!!
MIT License

Copyright (c) 2021 SmartContract

Permission is hereby granted, free of charge, to any person obtaining a copy of this software and associated documentation files (the "Software"), to deal in the Software without restriction, including without limitation the rights to use, copy, modify, merge, publish, distribute, sublicense, and/or sell copies of the Software, and to permit persons to whom the Software is furnished to do so, subject to the following conditions:

The above copyright notice and this permission notice shall be included in all copies or substantial portions of the Software.

THE SOFTWARE IS PROVIDED "AS IS", WITHOUT WARRANTY OF ANY KIND, EXPRESS OR IMPLIED, INCLUDING BUT NOT LIMITED TO THE WARRANTIES OF MERCHANTABILITY, FITNESS FOR A PARTICULAR PURPOSE AND NONINFRINGEMENT. IN NO EVENT SHALL THE AUTHORS OR COPYRIGHT HOLDERS BE LIABLE FOR ANY CLAIM, DAMAGES OR OTHER LIABILITY, WHETHER IN AN ACTION OF CONTRACT, TORT OR OTHERWISE, ARISING FROM, OUT OF OR IN CONNECTION WITH THE SOFTWARE OR THE USE OR OTHER DEALINGS IN THE SOFTWARE.