캡스톤 실습에 필요한 푸쉬 알림을 구현하기 위해서 Spring-boot 를 이용해 서버를 만들고 android 클라이언트 에서 test 하기로 하였다.
FCM(firebase cloud messaging)
- 파이어베이스 클라우드 메시징으로, 앱 서버에서 구글에서 제공하는 FCM을 이용하여 사용자 디바이스가 설치된 앱 단위로 메시지를 전송할 수 있는 서비스이다.
FCM 주요 용어
클라이언트 앱
- 안드로이드 단말에서 FCM을 사용하는 앱
Notification Server
- mobile 기기에 push 알림을 전송하는 서버(FCM이 여기에 해당)
Client App
- 사용자 mobile 기기에 설치된 App
- push 알림 받는 역할
Provider
- Client App을 위한 서버
- 필요시 Notification Server에 요청을 전송하여, Client App에 알림을 보냄
Sender ID
- Client App 에서 Registration Token을 발급 받기 위해 FCM에 전달하는 값으로 사용된다.
Registration Token
- FCM 에서 발급 받은 토큰
- 앱 서버(Provider)에 전달하여 클라이언트 앱에서 메시지 알림을 전송할 때 사용한다.
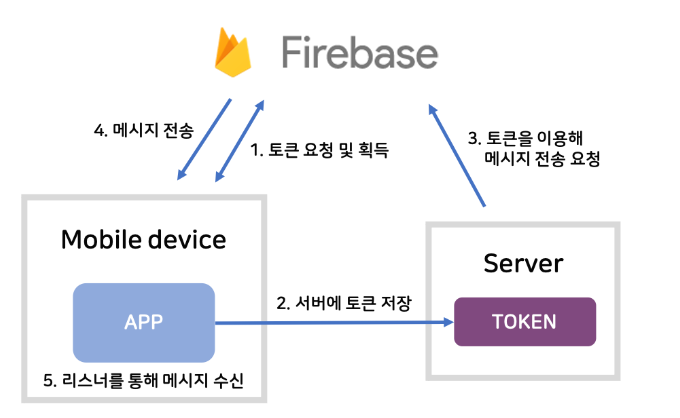
FCM을 이용하여 push알림을 보내는 과정
FCM push 알림 구현하기
FCM 프로젝트 생성
android
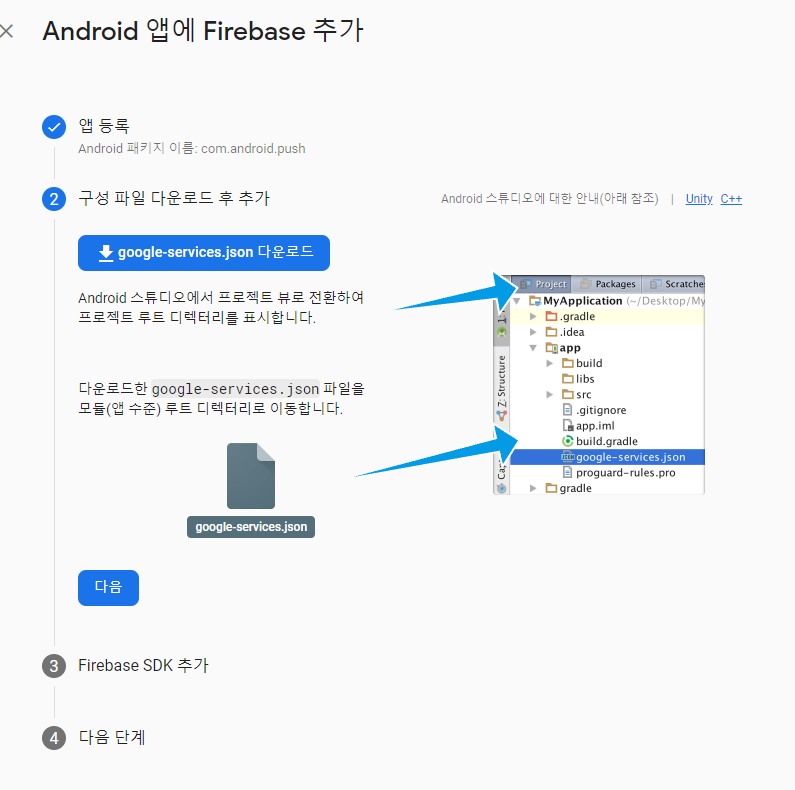
android studio app단에 다음과 같이 google-servieces.json 파일을 넣어준다.

루트 수준의 build.grdle 파일에 classpath 추가
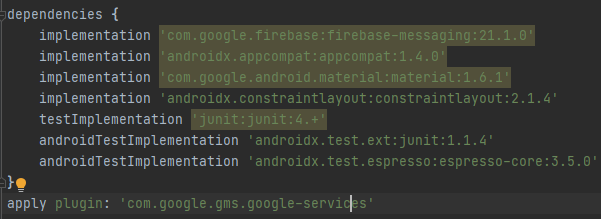
implementation 'com.google.firebase:firebase-messaging:21.1.0'
}
apply plugin: 'com.google.gms.google-services'- app 모듈 수준의 build.gradle 파일에 Firebase관련 클래스를 사용할 수 있도록 라이브러리를 추가
- 플러그인 추가
<application>
	<service android:name=".MyFirebaseMessagingService" android:exported="false">
            <intent-filter>
                <action android:name="com.google.firebase.MESSAGING_EVENT"/>
            </intent-filter>
        </service>
    </application>
AndroidManifest.xml 파일에 service를 추가해주고 인텐트 필터 설정.
public class MyFirebaseMessagingService extends FirebaseMessagingService {
    @Override
    public void onNewToken(String token){
        Log.d("FCM Log", "Registration token: "+token);
    }
}- FirebaseMessagingService를 상속받는 서비스를 하나 만들고, onNewToken()와 를 재정의한다.
- onNewToken()은 클라우드 서버에 등록되었을 때 호출되고, 파라미터로 전달된 token이 앱을 구분하기 위한 고유한 키가 된다.(토큰값은 로그를 찍어서 확인해 주었다 , 또한 앱을 최초 실행시에만 토큰을 주도록 하였다.)
Server(Spring-boot)
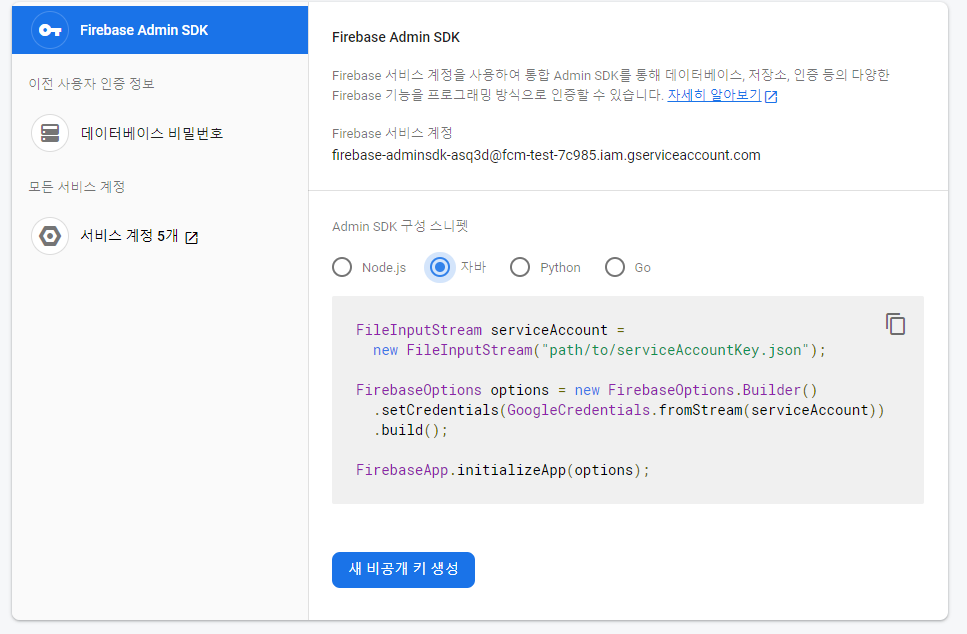
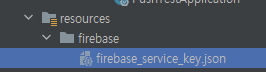
프로젝트 설정에서 새 비공개 키를 생성하여 파일을 resource 밑에 넣어준다.
FirebaseCloudMessageService.class
@Component
@RequiredArgsConstructor
public class FirebaseCloudMessageService {
private final String API_URL = "https://fcm.googleapis.com/v1/projects/{프로젝트 ID}/messages:send"; // 요청을 보낼 엔드포인트
private final ObjectMapper objectMapper;
public void sendMessageTo(String targetToken, String title, String body) throws IOException {
String message = makeMessage(targetToken, title, body);
OkHttpClient client = new OkHttpClient();
RequestBody requestBody = RequestBody.create(message,
MediaType.get("application/json; charset=utf-8"));
Request request = new Request.Builder()
.url(API_URL)
.post(requestBody)
.addHeader(HttpHeaders.AUTHORIZATION, "Bearer " + getAccessToken())
.addHeader(HttpHeaders.CONTENT_TYPE, "application/json; UTF-8")
.build();
Response response = client.newCall(request).execute();
System.out.println(response.body().string());
}
private String makeMessage(String targetToken, String title, String body) throws JsonParseException, JsonProcessingException {
FcmMessage fcmMessage = FcmMessage.builder()
.message(FcmMessage.Message.builder()
.token(targetToken)
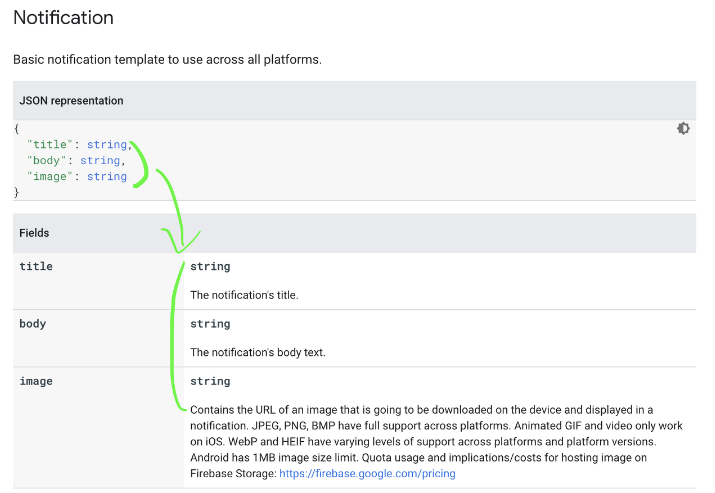
.notification(FcmMessage.Notification.builder()
.title(title)
.body(body)
.image(null)
.build()
).build()).validateOnly(false).build();
return objectMapper.writeValueAsString(fcmMessage);
}
}- FCM에 알림 요청을 위한 HTTP POST Request 만들기(OkHttp3 를 이용해 생성)
- sendMessage() 에서는 targetToken에 해당하는 device로 FCM 푸시알림 전송 요청
- makeMessage() 에서는 FcmMessage를 만들고 ObjectMapper를 이용해 String 으로 변환
@Component
@RequiredArgsConstructor
public class FirebaseCloudMessageService {

  private String getAccessToken() throws IOException {
          String firebaseConfigPath = "firebase/firebase_service_key.json";

          GoogleCredentials googleCredentials = GoogleCredentials
                  .fromStream(new ClassPathResource(firebaseConfigPath).getInputStream())
                  .createScoped(List.of("https://www.googleapis.com/auth/cloud-platform"));           //엑세스 토큰 받아오기

          googleCredentials.refreshIfExpired();
          return googleCredentials.getAccessToken().getTokenValue();
      }
}
- getAccessToken()에서는 header 에 추가할 Access 토큰을 얻어온다.
MainController.class
@RestController
@RequiredArgsConstructor
public class MainController {

    private final FirebaseCloudMessageService firebaseCloudMessageService;

    @PostMapping("/api/fcm")
    public ResponseEntity pushMessage(@RequestBody RequestDTO requestDTO) throws IOException {
        System.out.println(requestDTO.getTargetToken() + " "
                +requestDTO.getTitle() + " " + requestDTO.getBody());

        firebaseCloudMessageService.sendMessageTo(
                requestDTO.getTargetToken(),
                requestDTO.getTitle(),
                requestDTO.getBody());
        return ResponseEntity.ok().build();
    }
}
FcmMessage.class
@Builder
@AllArgsConstructor
@Getter
public class FcmMessage {
    private boolean validateOnly;
    private Message message;

    @Builder
    @AllArgsConstructor
    @Getter
    public static class Message {
        private Notification notification;
        private String token;
    }

    @Builder
    @AllArgsConstructor
    @Getter
    public static class Notification {
        private String title;
        private String body;
        private String image;
    }
}

- 이 클래스를 통해 생성된 객체는, Object Mapper 를 사용하여 String으로 변환하고, Http Post 요청의 Request Body에 포함된다.
RequestDTO
@Getter
@Setter
public class RequestDTO {
    private String targetToken;
    private String title;
    private String body;
}
테스트 해보기

- postman 을 통해 device 에서 얻어온 registration token 값을 포함하여 post 요청을 보낸다.
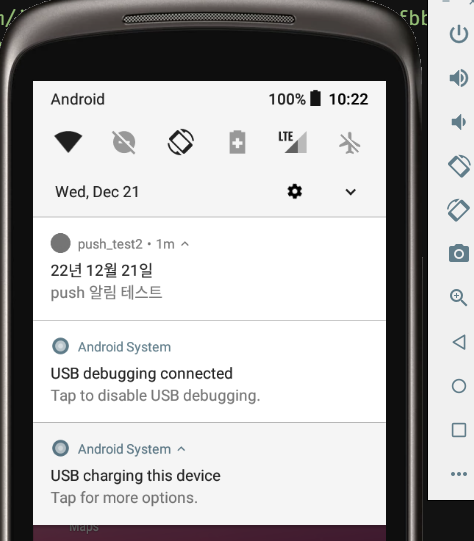
- device에 푸쉬알림 도착 확인!
참고블로그
https://galid1.tistory.com/740
https://sol-devlog.tistory.com/11

백엔드 개발자를 꿈꾸며 공부한 내용을 기록하고 있습니다.