CHAPTER 12 그래픽
12.1 스윙 컴포넌트 그리기
12.2 Graphics
12.3 도형 그리기와 칠하기
12.4 이미지 그리기
12.5 클리핑(Clipping)
12.6 스윙의 페인팅 메커니즘
12.1 ) 스윙 컴포넌트 그리기, paintComponent()
- 스윙의기본철학
- 모든 컴포넌트는 자신의 모양을 스스로(자동으로) 그린다.
- 각 컴포넌트는 자신의 모양을 그리는 코드 또는 메소드를 가지고 있다!
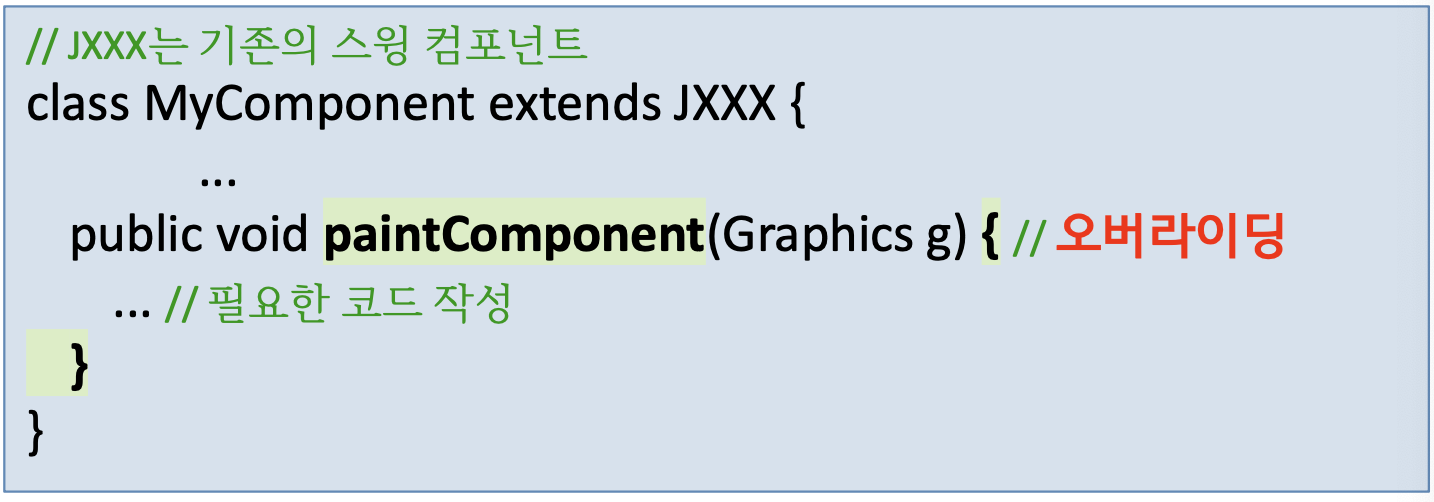
- public void paintComponent(Graphics g)
- 스윙 컴포넌트가 자신의 모양을 그리는 메소드
- Jcomponent의 추상 메소드로 제공된다
- 추상 메소드이기 때문에 모든 스윙 컴포넌트가 오버라이딩하여 사용
- 컴포넌트가 그려져야 하는 시점마다 호출 → 크기가 변경되거나, 위치가 변경되거나 컴포넌트가 가려졌던 것이 사라지는 등
- 즉, 윈도우(회면)에 변화가 있을 때 무조건 paintComponent 가 자동으로 호출된다
- Graphics 객체
- java.awt.Graphics
- 컴포넌트 그리기에 필요한 도구를 제공하는 객체
- 색지정, 도형그리기, 클리핑, 이미지 그리기 등의 메소드 제공
- 사용자가 원하는 모양을 그리고자 할 때 ⭑
- paintComponent(Graphic g) 오버라이딩
- paintComponent(Graphic g) 오버라이딩
예제 12-1 : JPanel 을 상속 받아 도형 그리기
- JPanel의 용도
- 사용자가 그래픽을 통해 다양한 UI를 창출하는 일종의 캔버스
- Jpanel의 paintComponent() 를 이용하여, 프로그래머가 원하는 그림을 재정의 하여 그림
기존 : 윈도우만들기 -> 패널 -> 컴포넌트 부착 : 이렇게 하지 않고
그림을 그리는 새로운 패널을 만들어서 컨탠트팬에 부착하여 일을 시킬 것 -> 내부 클래스로 하여금 MyPanel 로 만든다
화면상의 변화가 있으면 항상 호출됨
실제로는 참조변수 panel 로 관리하고 윈도우의 기본 패널로 등록하여 사용한다.
package paintJPanelEx;
import javax.swing.*;
import java.awt.*;
public class paintJPanelEx extends JFrame {
private MyPanel panel = new MyPanel(); //새로운 패널 생성 Mypanel 정의는 하단에
public paintJPanelEx() {
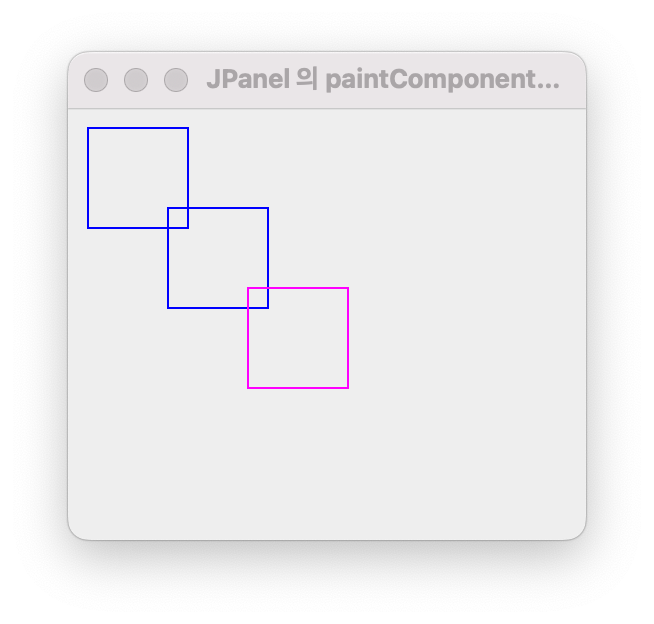
setTitle("JPanel 의 paintComponent() 예제");
setDefaultCloseOperation(JFrame.EXIT_ON_CLOSE);
setContentPane(panel); //내가 만든 패널을 컨탠트맨에 등록하겠다.
setSize(250, 220);
setVisible(true);
// 프로그래머가 paintComponent 재정의 (오버라이딩)
// super.paintCompenet() 로 이전 내용 지움
}
// 기본 JPanel을 상속받는 새 패널을 프로그래머가 새롭게 구현
class MyPanel extends JPanel { //MyPanel 클래스 정의
public void paintComponent(Graphics g) { //자동 호출 되는 것 기억
super.paintComponent(g); //Jpanel의
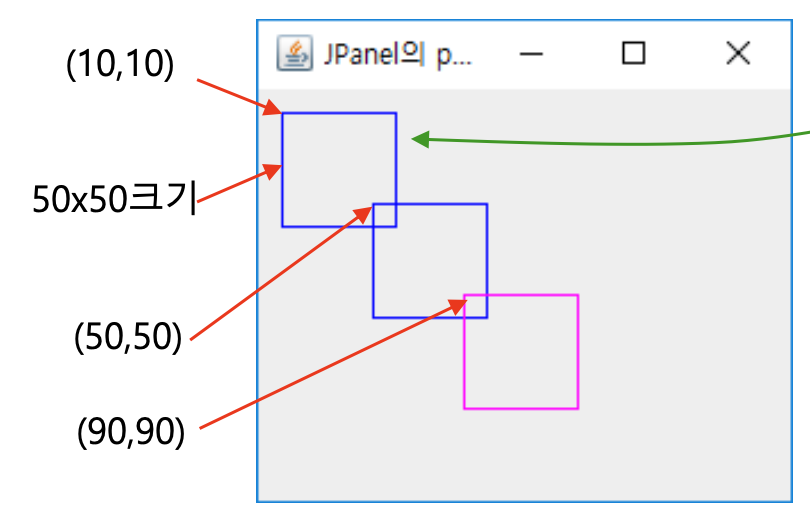
g.setColor(Color.BLUE); //paintComponent() 호출
g.drawRect(10,10,50,50); //패널 내에 이전에 그려진
g.drawRect(50,50,50,50); //호출됨
g.setColor(Color.MAGENTA); // 그리고 하단의 내용을 출력
g.drawRect(90,90,50,50);
}
}
public static void main(String[] args) {
// TODO Auto-generated method stub
new paintJPanelEx();
}
}
12.2 Graphics
그래픽 기반 GUI 프로그래밍
- 그래픽 기반 GUI 프로그래밍
- 스윙 컴포넌트를 사용하지 않고
- 선, 원, 이미지 등을 (패널에) 직접 그려, GUI 화면을 구성하는 방식 (화면에 부착)
- 장점
- 스윙 컴포넌트로 만들 수 없는 자유로운 GUI 가능
- 차트, 게임 등 자유로운 모양을 표현에 효과적
- 그래픽 그리기는 컴포넌트 그리기보다 빠르다
- 자바의 GUI 바탕 기술을 이해하는데 도움
- 개발자 자신만의 컴포넌트를 창작
- 스윙 컴포넌트로 만들 수 없는 자유로운 GUI 가능
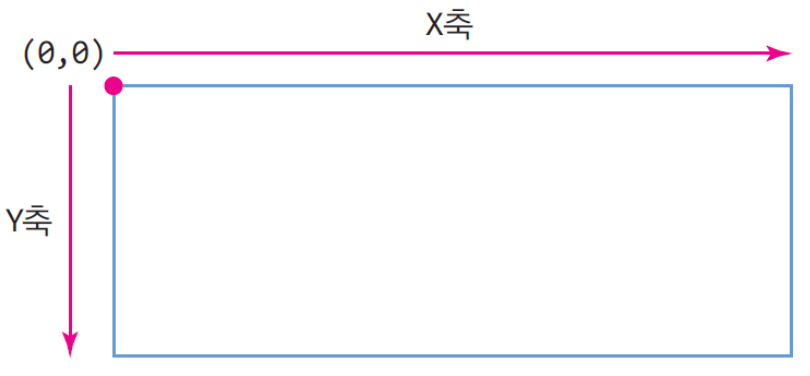
자바의 Graphics 좌표 시스템
- Graphics의 좌표 체계 : 화면상 실제 정보들은 음수값을 입력할순있으나 화면에 보이지 않음.
- Graphics의 기능
- 색상 선택하기
- 문자열 출력
- 도형 그리기
- 도형 칠하기
- 이미지 출력
- 클리핑
- 문자열 그리기
- void drawString(String str, int x, int y)
- (x,y) 영역에 str 문자열 그리기
- 현재 색과 현재 폰트로 출력
- void drawString(String str, int x, int y)
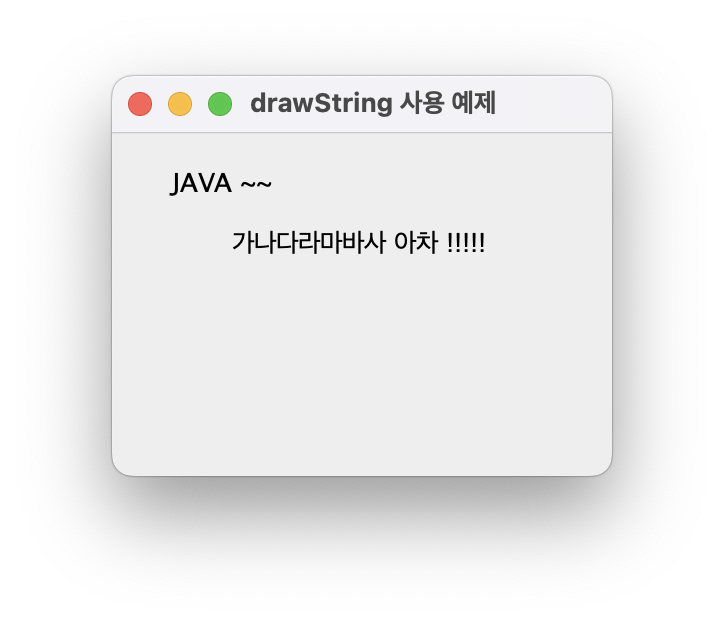
예제 12-2 : drawString() 메소드를 이용하여 문자열 출력하기
-
문자열 그리기를 위한 Graphics 메소드: drawString()
- void drawString(String str, int x, int y)
- str 문자열을 (x,y) 영역에 출력한다. 이때 컨텍스트 내의 현재 색과 폰트로 출력한다.
- void drawString(String str, int x, int y)
-
JPanel을 상속받아 paintComponent() 를 오버라이딩 하고
drawString() 메소드를 사용하여
다음 그림과 같이 패널 내의 (30, 30)과 (60, 60)에
각각 문자열을 출력하는 스윙 프로그램을 작성하시오. -
기존정보를 지워달라는 코드가 꼭 필요하다 정도
import javax.swing.*;
import java.awt.*;

public class GraphicsDrawStringEx extends JFrame {
	private MyPanel panel = new MyPanel(); //MyPanel 클래스를 활용한 새로운 패널을 컨텐트팬에 부착

	public GraphicsDrawStringEx() {
		setTitle("drawString 사용 예제");
		setDefaultCloseOperation(JFrame.EXIT_ON_CLOSE);
		setContentPane(panel);
		setSize(250, 200);
		setVisible(true);

	}

	class MyPanel extends JPanel {
		public void paintComponent(Graphics g) {
			super.paintComponent(g); //Jpanel의 최상위 paintComponent() 호출 : 기존 패널 관련 정보 삭제
			g.drawString("JAVA ~~", 30, 30);
			g.drawString("가나다라마바사 아차 !!!!!", 60, 60); // 문자를 {x,y} 위치에 출력
		}
	}
	public static void main(String[] args) {
		// TODO Auto-generated method stub
		new GraphicsDrawStringEx();
	}
}
Color와 Font 클래스 : java.awt 패키지에 포함된 클래스
Color
- java.awt.Color: 하나의 색을 표현하는 클래스
- Red, Green, Blue 의 3 성분으로 구성
- 각 성분의 크기는 0-255(8비트)
- 생성자
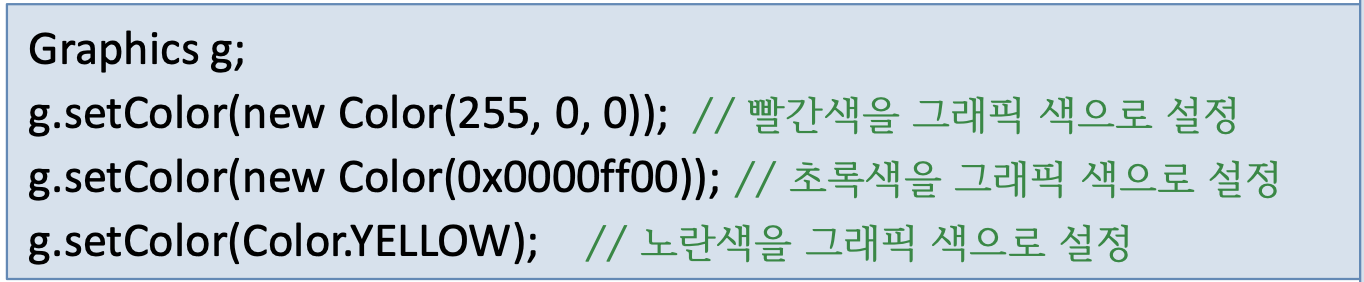
- Color(int r, int g, int b)
- red(r), green(g), blue(b) 값, sRGB 색 생성
- new Color(255, 0, 0); // 완전 빨강색
- Color(int rgb)
- rgb 정수 값은 총 32비트 중 하위 24비트 만이 유효하고 0x00rrggbb로 표현
- 하위 8비트는 blue, 그 다음 상위 8비트는 green, 그 다음 8비트는 blue 성분을 표시
- new Color(0x0000ff00); // 완전 초록
- Color(int r, int g, int b)
- 다른 생성 방법
- Color.BLUE 등의 static 상수 활용
- Color.BLUE 등의 static 상수 활용
Font
- java.awt.Font: 폰트를 표현하는 클래스
- 생성자
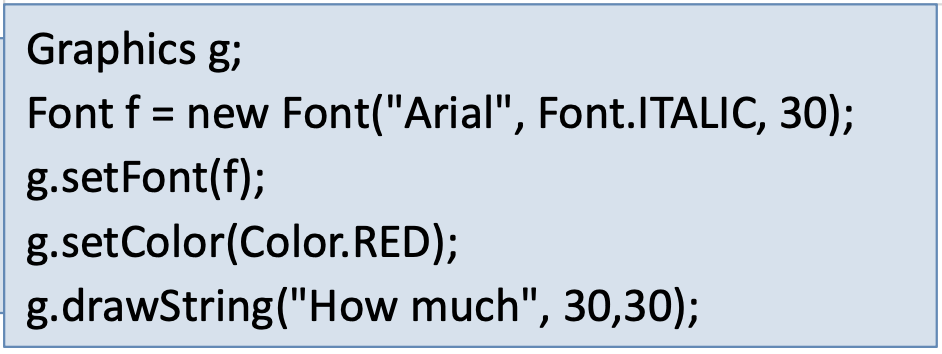
- Font(String fontFace, int style, int size)
- fontFace는 "고딕체", “Arial" 등의 폰트 이름
- style은 Font.BOLD, Font.ITALIC , Font.PLAIN 셋 중 하나
- size는 픽셀 단위의 크기
- Font(String fontFace, int style, int size)
- Graphics 객체에서 색상과 폰트 설정
- void setColor(Color color)
- 칠할 색을 color로 지정
- void setFont(Font font)
- 폰트를 font로 지정
- 폰트를 font로 지정
- void setColor(Color color)
예제 12-3 : Color와 Font를 활용한 문자열 그리기
- Color 와 Font 클래스를 이용항 그림과 같이 출력되는 패널을 작성하라.
import javax.swing.*;
import java.awt.*;

public class GraphicsColorFontEx extends JFrame {
	private MyPanel panel = new MyPanel();

	public GraphicsColorFontEx() {
		setTitle("Color, Font 사용 예제");
		setDefaultCloseOperation(JFrame.EXIT_ON_CLOSE);
		setContentPane(panel);
		setSize(350, 470);
		setVisible(true);
	}
	class MyPanel extends JPanel {
		public void paintComponent(Graphics g) {
			super.paintComponent(g);  //기존에 있던 모든 내용을 지우는 역할. 이후 다시 그린다.
			g.setColor(Color.BLUE);
			g.drawString("I Love Java. ~~~ ", 30, 30);
			g.setColor(new Color(255,0,0));
			g.setFont(new Font("Arial", Font.ITALIC, 30));
			g.drawString("How much?", 30, 30);
			g.setColor(new Color(0x00ff00ff));
			for(int i=0; i<=5; i++) {
				g.setFont(new Font("Jokerman", Font.ITALIC, 30));
				g.drawString("This much!!", 30, 60+i*60);
			}
		}
	}
	public static void main(String[] args) {
		// TODO Auto-generated method stub
		new GraphicsColorFontEx();
	}

}
super.paintComponent(g) 는 화면의 기존 정보를 지우고 다시 그리는 역하를 한다는 설명!
Graphics의 도형 그리기 메소드
- 도형그리기
- 선,타원,사각형,둥근모서리사각형,원호,폐다각형
- Graphics의 메소드
voiddrawLine(intx1,inty1,intx2,inty2)- 인자 : 시작점 x,y width, height
- (x1, y1)에서 (x2, y2) 까지 선을 그린다.
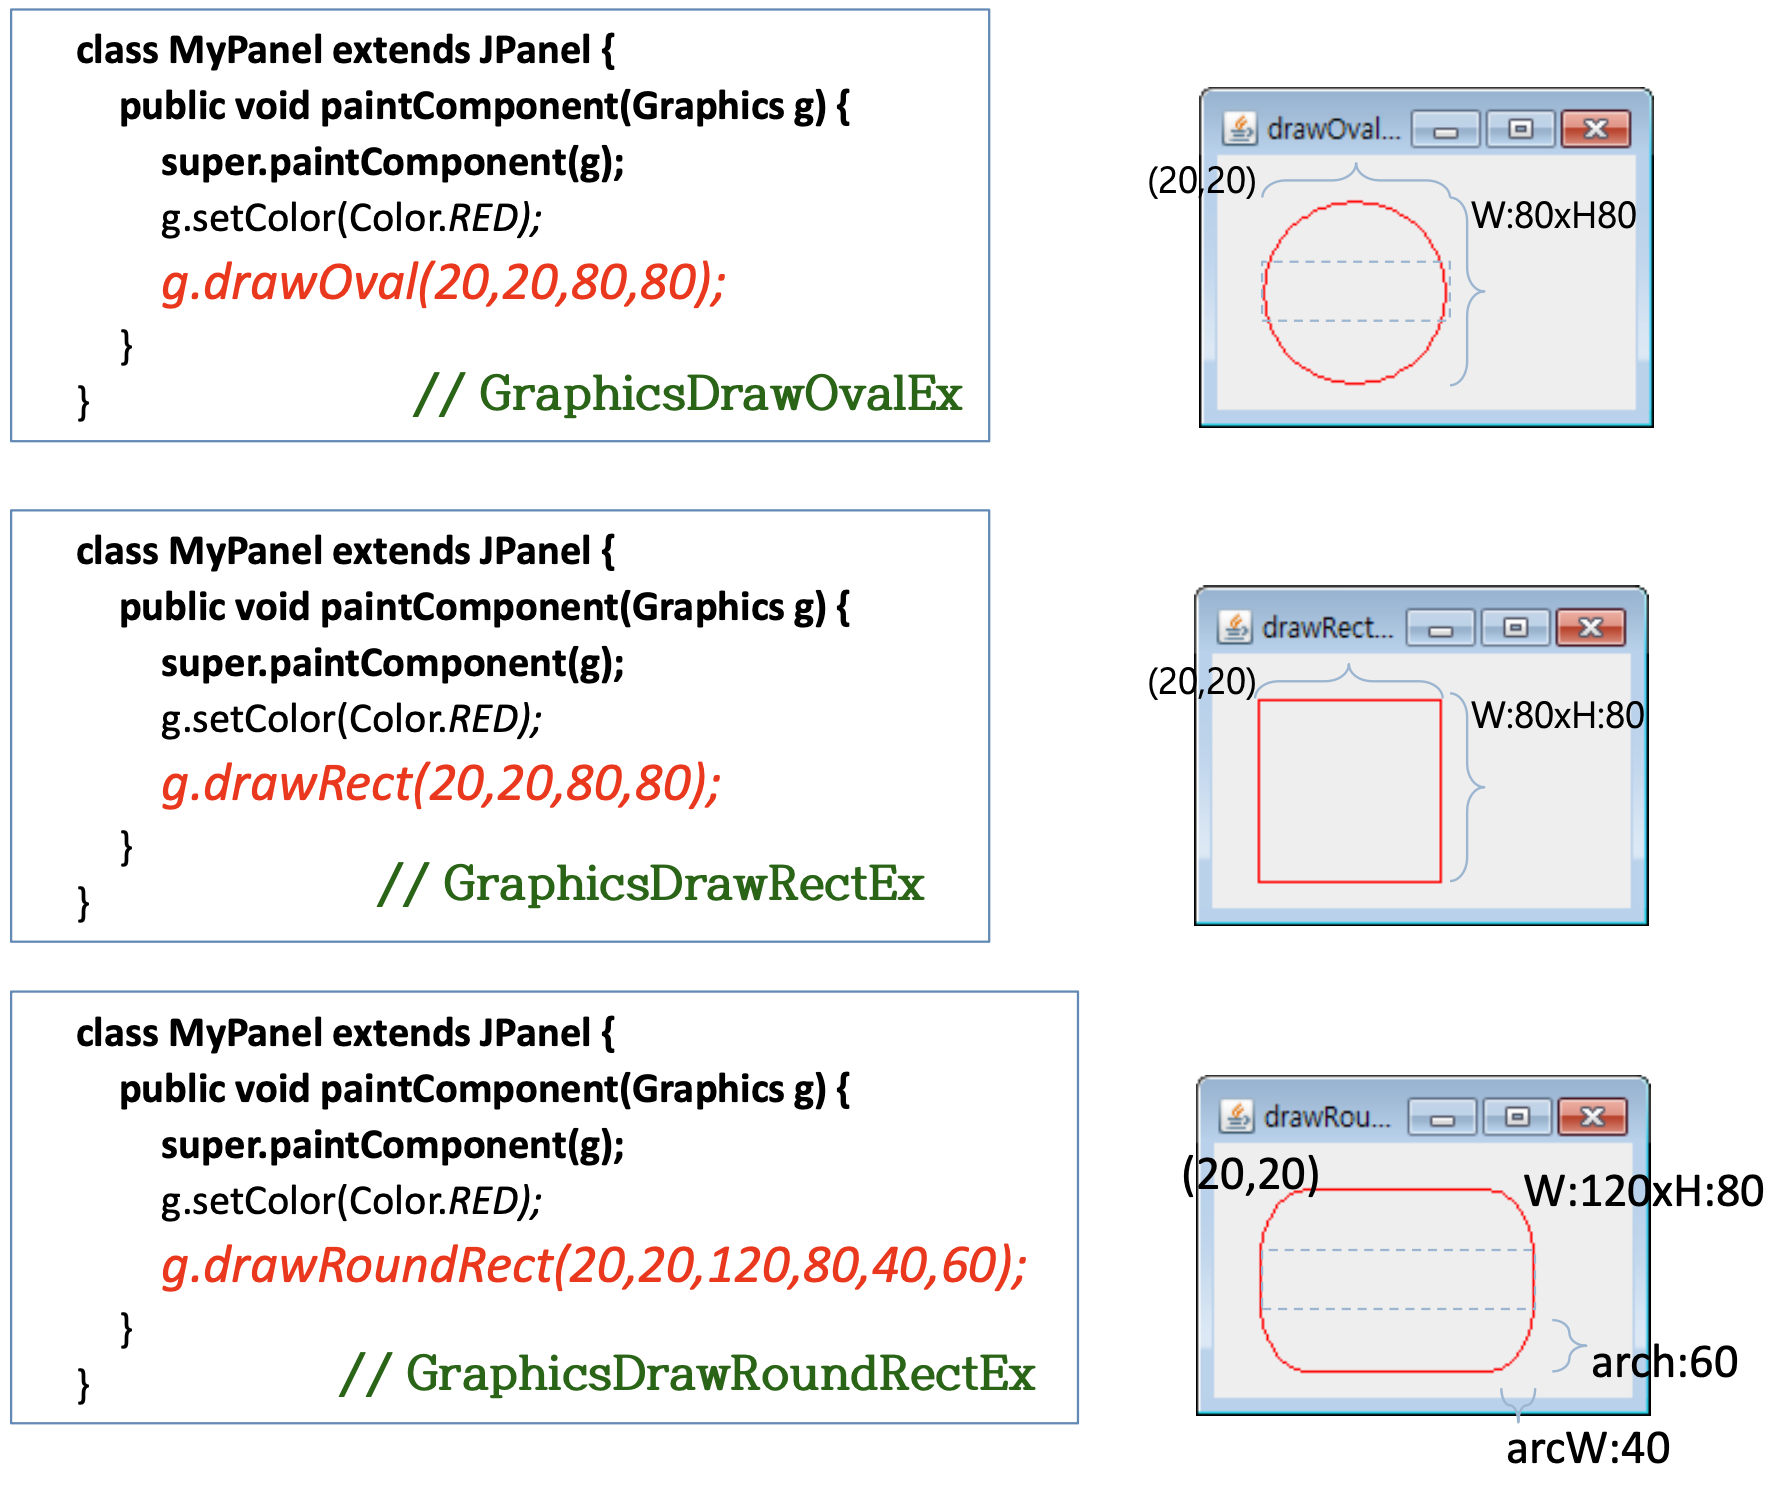
voiddrawOval(intx1,inty1,intw,inth)- (x1, y1)에서 w × h 크기의 사각형에 내접하는 타원 그린다.
voiddrawRect(intx1,inty1,intw,inth)- (x1, y1)에서 w × h 크기의 사각형을 그린다.
voiddrawRoundRect(intx1,inty1,intw,inth,intarcWidth,intarcHeight)- (x1,y1)에서 w × h 크기의 사각형을 그리고, 4 개의 모서리는 arcWidth와 arcHeight를 이용하여 원호로 그린다
- arcWidth는 모서리의 원 수평 반지름,
- arcHeight는 수직 반지름
- (x1,y1)에서 w × h 크기의 사각형을 그리고, 4 개의 모서리는 arcWidth와 arcHeight를 이용하여 원호로 그린다
예제 12-4 : Graphics 의 drawLine() 메소드로 선 그리기
: 눈으로 보고 넘어감
다른 도형 그리기 사례
: 말로하고 넘어감
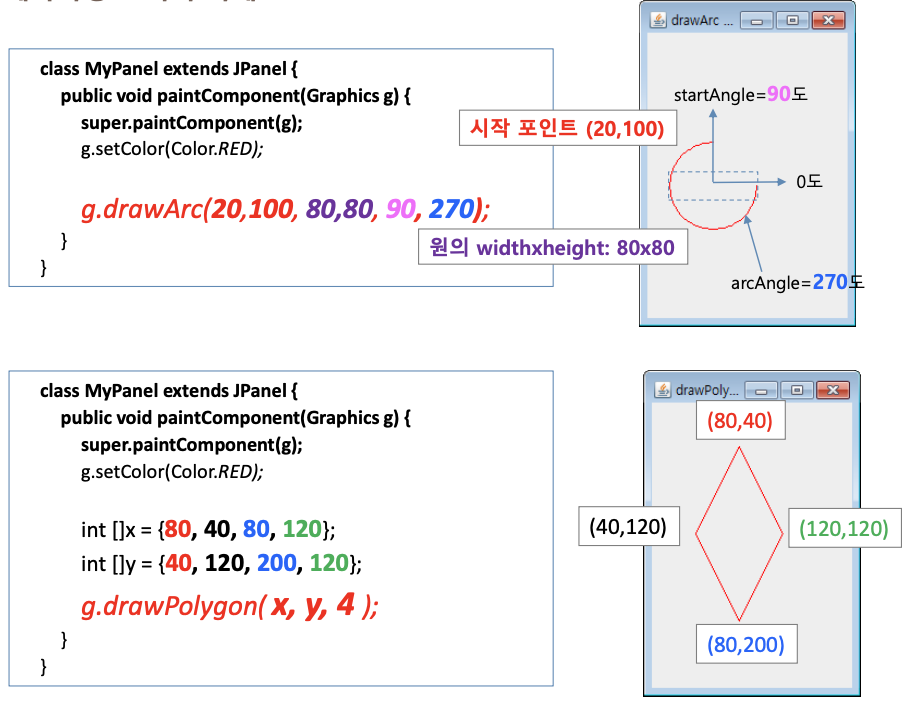
Graphics의 원호와 폐다각형 그리기
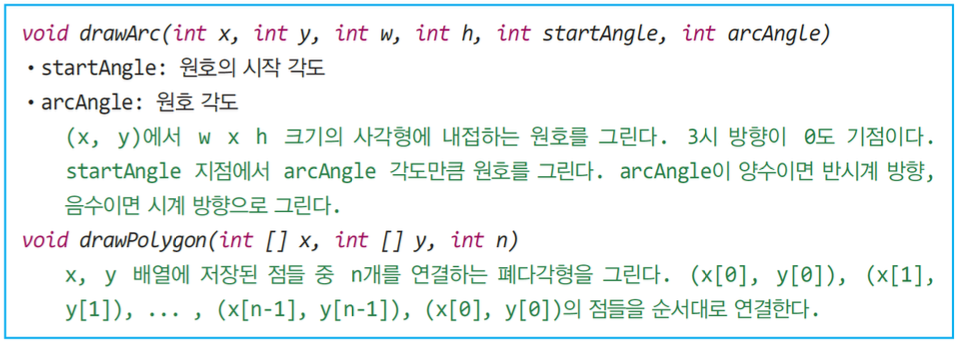
폐다각형은 x,y 좌표 주어지고 4 하면 -> 사각형
원호와 폐다각형 그리기 사례
- 시작 포인트, 원의 wight, height, 각도
Graphics의 도형 칠하기
도형칠하기
도형을그리고그내부를칠하는기능
도형의 외곽선과 내부를 따로 칠하는 기능은 없다.
도형 칠하기를 위한 메소드는 도형 그리기 메소드 명에서 draw 를 fill로 대치하면 된다. 인자는 동일함
◼ 예) drawRect()→fillRect(), drawArc()→fillArc()
칠하기 메소드
void fillOval(int x1, int y1, int w, int h)
void fillRect(int x1, int y1, int w, int h)
void fillRoundRect(int x1, int y1, int w, int h, int arcWidth, int arcHeight) void fillArc(int x, int y, int w, int h, int startAngle, int arcAngle)
void fillPolygon(int []x, int []y, int n)
예제 12-5 : 도형 칠하기 예
import javax.swing.*;
import java.awt.*;

public class GraphicsFillEx extends JFrame {
	private MyPanel panel = new MyPanel();

	public GraphicsFillEx() {
		setTitle("fillXXX 사용 예제");
		setDefaultCloseOperation(JFrame.EXIT_ON_CLOSE);
		setContentPane(panel);
		setSize(100, 350);
		setVisible(true);
	}
	class MyPanel extends JPanel {
		public void paintComponent(Graphics g) {
			super.paintComponent(g);
			g.setColor(Color.RED);
			g.fillRect(10,10,50,50);
			g.setColor(Color.BLUE);
			g.fillOval(10,70,50,50);
			g.setColor(Color.GREEN);
			g.fillRoundRect(10,130,50,50,20,20);
			g.setColor(Color.MAGENTA);
			g.fillArc(10,190,50,50,0,270);
			g.setColor(Color.ORANGE);
			int [] x = {30, 10, 30, 60};
			int [] y = {250, 275, 300, 275};
		}
	}
	public static void main(String[] args) {
		// TODO Auto-generated method stub
		new GraphicsFillEx();
	}

}
[해설]
fill 대신에 fraw 를 쓰면 외각선만 나온다?
fillArc : 0부터 시작해서 270도까지 그린다.
pass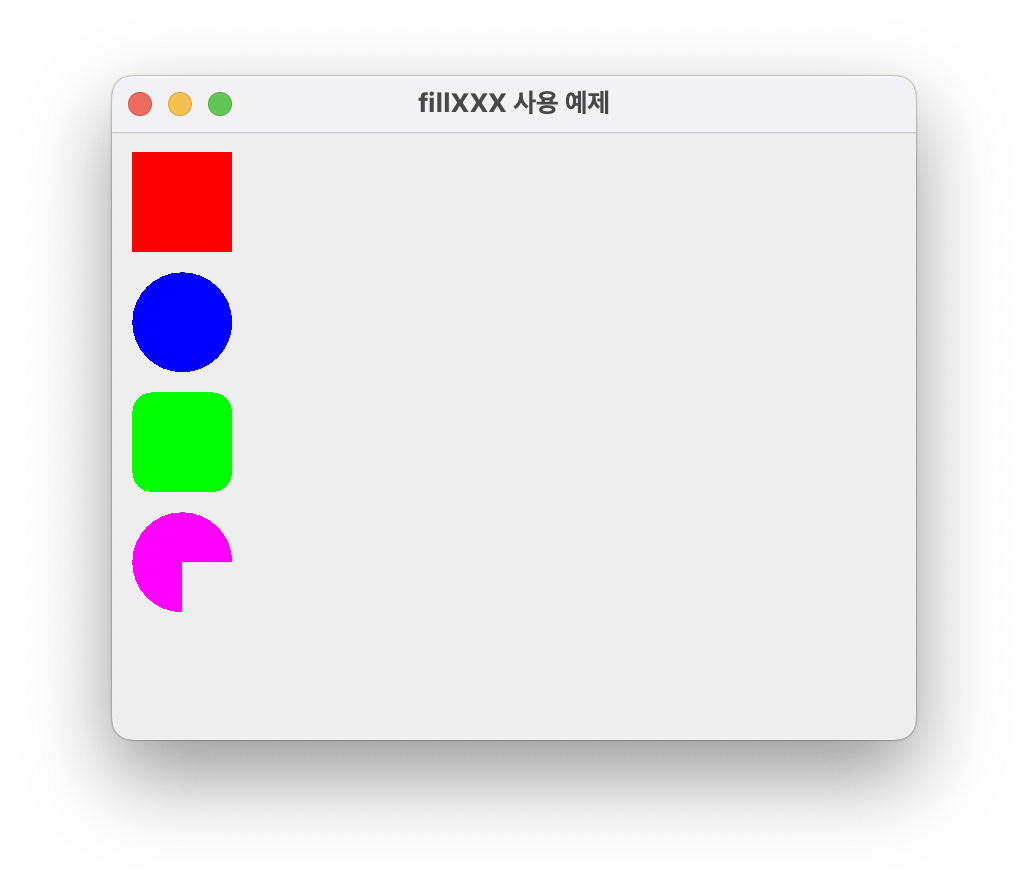
스윙에서 이미지를 그리는 2가지 방법 (이미지 출력)
- JLabel 컴포넌트를 이용한 이미지 출력: 11장에서 배움! JLabel 컴포넌트가 이미지를 자신의 영역에 그린다.

장점
◼ 이미지 그리기가 간편하고 쉬운 장점
◼ 이미지가 컴포넌트 이므로 이벤트 발생: 이미지에 마우스 클릭하면 이벤트 받을 수 있음
단점
◼ 이미지의 원본 크기대로 그리므로 이미지의 크기 조절 불가능
- JPanel에 Graphics 메소드를 이용한 이미지 출력 장점:이미지의원본크기와다르게그리기가능 단점:컴포넌트로관리되지않음
◼ 개발자가상황에따라이미지의위치나크기등을적절히조절해야함 ◼ 이미지가 마우스를 클릭해도 이미지에 이벤트 발생하지 않음
Graphics로 이미지 그리기
총6개의메소드 원본 크기로 그리기
◼ void drawImage(Image img, ◼ void drawImage(Image img,
크기 조절하여 그리기
◼ void drawImage(Image img, ◼ void drawImage(Image img,
원본의 일부분을 크기 조절하여 그리기
◼ void drawImage(Image img,
ImageObserver observer)
◼ void drawImage(Image img,
int x, int y, Color bgColor, ImageObserver observer) int x, int y, ImageObserver observer)
int x, int y, int width, int height, Color bgColor, ImageObserver observer) int x, int y, int width, int height, ImageObserver observer)
int dx1, int dy1, int dx2, int dy2, int sx1, int sy1, int sx2, int sy2, Color bgColor,
int dx1, int dy1, int dx2, int dy2, int sx1, int sy1, int sx2, int sy2, ImageObserver observer)

[설명]
- 지금 객체 그 자체로 넘겨준다고 해서 this 로 쓰거나 없을떄는 null
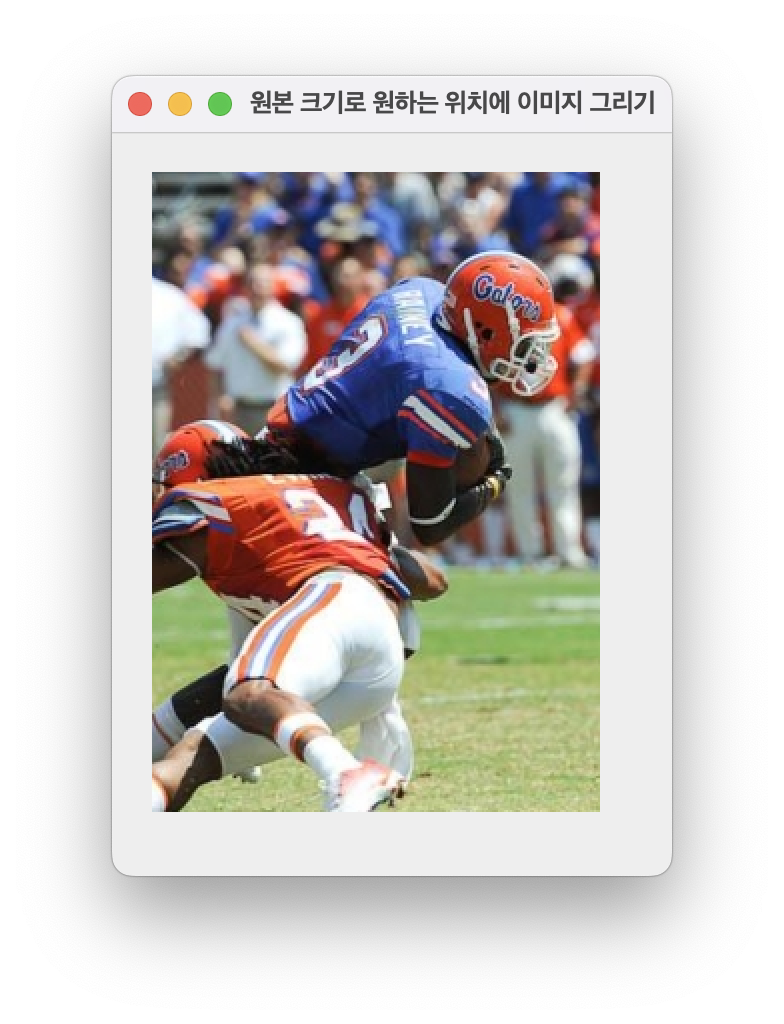
12-6
import javax.swing.*;
import java.awt.*;

public class GraphicsDrawImageEx1 extends JFrame {
	private MyPanel panel = new MyPanel();

	public GraphicsDrawImageEx1() {
		setTitle("원본 크기로 원하는 위치에 이미지 그리기");
		setDefaultCloseOperation(JFrame.EXIT_ON_CLOSE);
		setContentPane(panel);
		setSize(280, 400);
		setVisible(true);
	}
	class MyPanel extends JPanel {
		private ImageIcon icon = new ImageIcon("/Users/seonik/eclipse-workspace/GraphicsColorFontEx/images/image0.jpg");
		private Image img = icon.getImage();
		public void paintComponent(Graphics g) {
			super.paintComponent(g);
			g.drawImage(img,20,20,this);
			//g.drawImage(img,0,0,getWidth(),getHeight(),this);
			//g.drawImage(img,20,20,250,100,100,50,200,200,this);
		}
	}
	public static void main(String[] args) {
		// TODO Auto-generated method stub
		new GraphicsDrawImageEx1();
	}

}
12.7
import javax.swing.*;
import java.awt.*;

public class GraphicsDrawImageEx1 extends JFrame {
	private MyPanel panel = new MyPanel();

	public GraphicsDrawImageEx1() {
		//setTitle("원본 크기로 원하는 위치에 이미지 그리기");
		setTitle("패널의 크기에 맞추어 이미지 그리기");
		setDefaultCloseOperation(JFrame.EXIT_ON_CLOSE);
		setContentPane(panel);
		setSize(200, 300);
		setVisible(true);
	}
	class MyPanel extends JPanel {
		private ImageIcon icon = new ImageIcon("/Users/seonik/eclipse-workspace/GraphicsColorFontEx/images/image0.jpg");
		private Image img = icon.getImage();
		public void paintComponent(Graphics g) {
			super.paintComponent(g);
			//g.drawImage(img,20,20,this);
			g.drawImage(img,0,0,getWidth(),getHeight(),this);
		}
	}
	public static void main(String[] args) {
		// TODO Auto-generated method stub
		new GraphicsDrawImageEx1();
	}

}
축소된것만 하고 싶으면 getWidth 와 getHeight 부분을 40, 40 으로 바꿔보기 꼭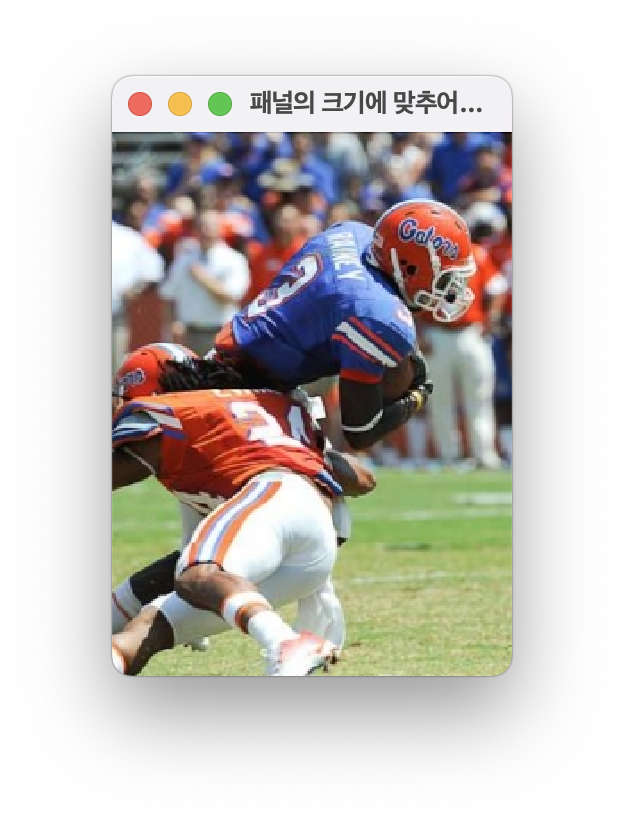
12-8
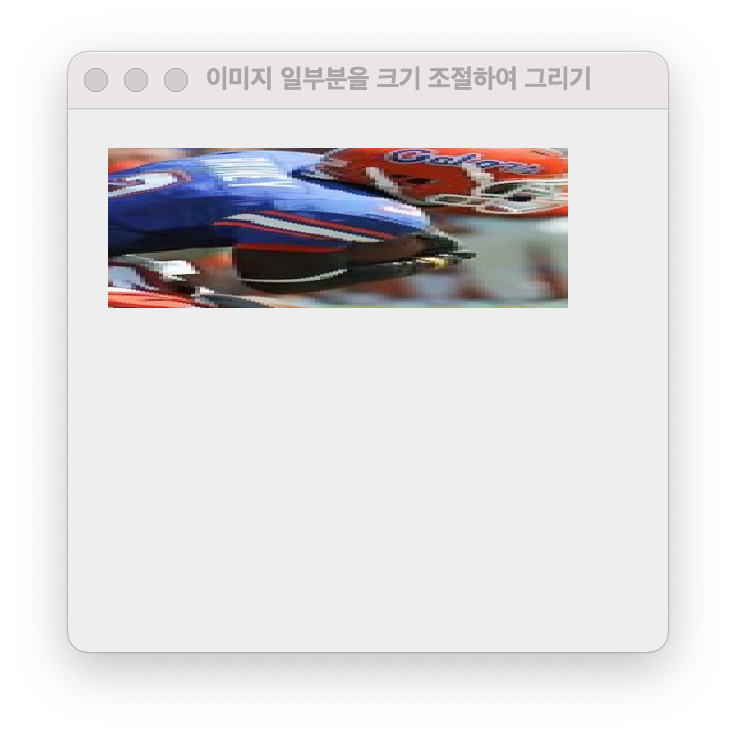
imgage 20, 20 250, 100 부분이 destination
100, 50, 200, 200, this 가 원래 원본
원본을 내가 원하는 응용프로글매 좌표에 출력하는 코드
import javax.swing.*;
import java.awt.*;

public class GraphicsDrawImageEx1 extends JFrame {
	private MyPanel panel = new MyPanel();

	public GraphicsDrawImageEx1() {
		setTitle("이미지 일부분을 크기 조절하여 그리기");
		setDefaultCloseOperation(JFrame.EXIT_ON_CLOSE);
		setContentPane(panel);
		setSize(300, 300);
		setVisible(true);
	}
	class MyPanel extends JPanel {
		private ImageIcon icon = new ImageIcon("/Users/seonik/eclipse-workspace/GraphicsColorFontEx/images/image0.jpg");
		private Image img = icon.getImage();
		public void paintComponent(Graphics g) {
			super.paintComponent(g);
			//g.drawImage(img,20,20,this);
			//g.drawImage(img,0,0,getWidth(),getHeight(),this);
			g.drawImage(img,20,20,250,100,100,50,200,200,this);
		}
	}
	public static void main(String[] args) {
		// TODO Auto-generated method stub
		new GraphicsDrawImageEx1();
	}

}
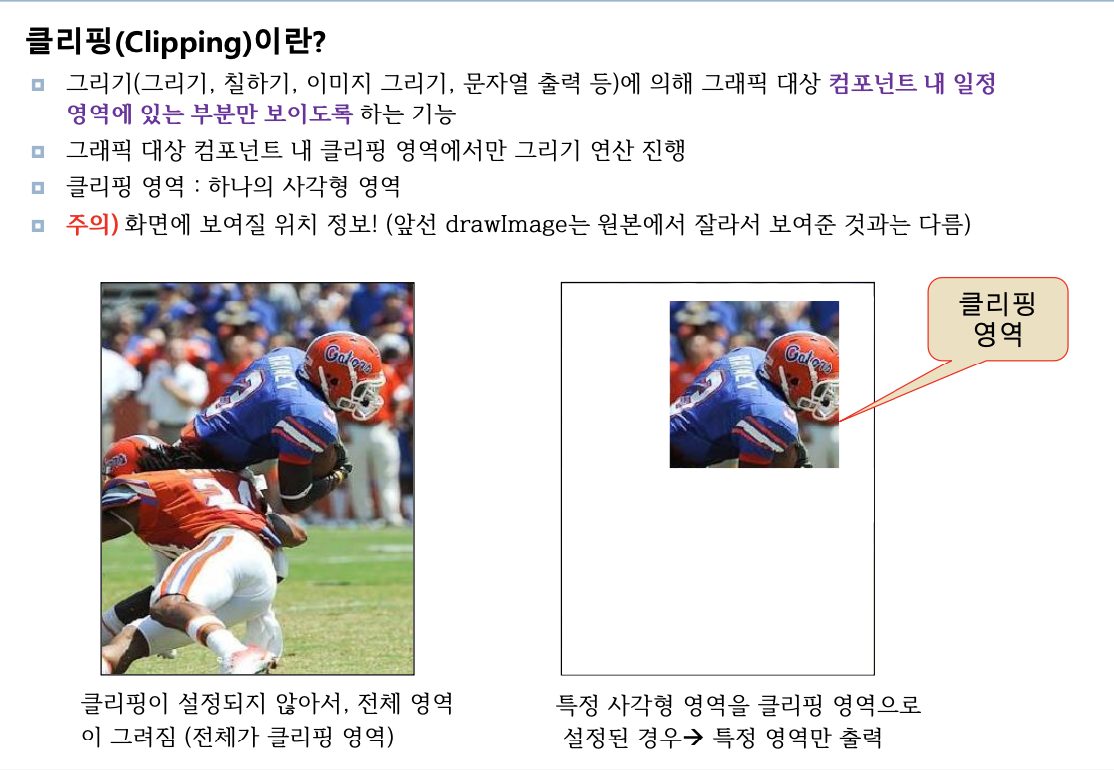
클리핑
원본이 있고 자르는게 아니라 필터링 해서 특정 영역만 나오도록 한다.
import javax.swing.*;
import java.awt.*;
public class GraphicsClipEx extends JFrame {
private MyPanel panel = new MyPanel();
public GraphicsClipEx() {
setTitle("클리핑 예제");
setDefaultCloseOperation(JFrame.EXIT_ON_CLOSE);
setContentPane(panel);
setSize(300, 400);
setVisible(true);
}
class MyPanel extends JPanel {
private ImageIcon icon = new ImageIcon("/Users/seonik/eclipse-workspace/GraphicsColorFontEx/images/image0.jpg");
private Image img = icon.getImage();
public void paintComponent(Graphics g) {
super.paintComponent(g);
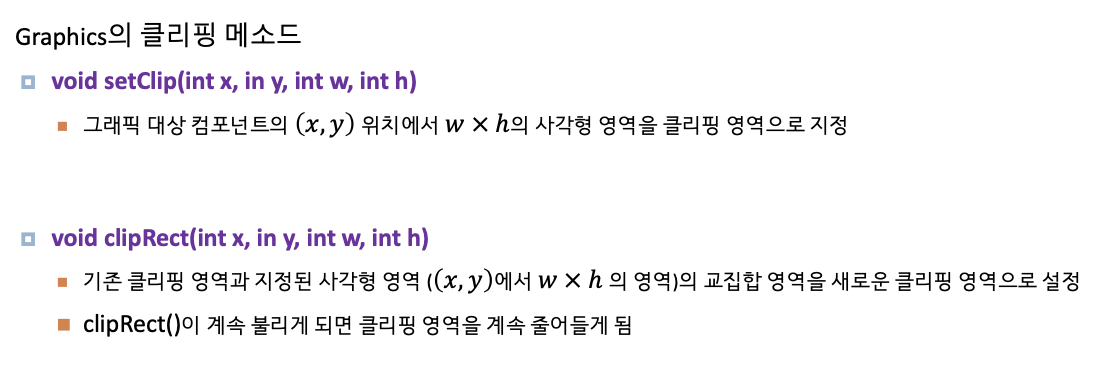
g.setClip(100,20,150,150);
g.drawImage(img, 0, 0, getWidth(), getHeight(), this);
g.setColor(Color.YELLOW);
g.setFont(new Font("Arial", Font.ITALIC, 40));
g.drawString("Go Gator!!", 10, 150);
}
}
public static void main(String[] args) {
// TODO Auto-generated method stub
new GraphicsClipEx();
}
}
스윙 페인팅
컴포넌트를 직접 페인팅을 한다.
우리가 호출하는것 아니라 응용프로그램이 새로 만들어질떄 (새로그려지는것) -> paint 자동 호출
내가 원하는 컴포넌트들을 기존에 설저오디어있는것을 가져다 사용했는데
우리가 그 설정값들을 바꾸려면 repaint() 를 사용하면
예를 들어서 컴포넌트의 디자인을 우리가 고칠수있다.
-> 컴포넌트의 모양과 위치를 변경가능
repaint 강조
revalidate 는 참조
import javax.swing.*;
import java.awt.*;
import java.util.*;
import java.awt.event.*;
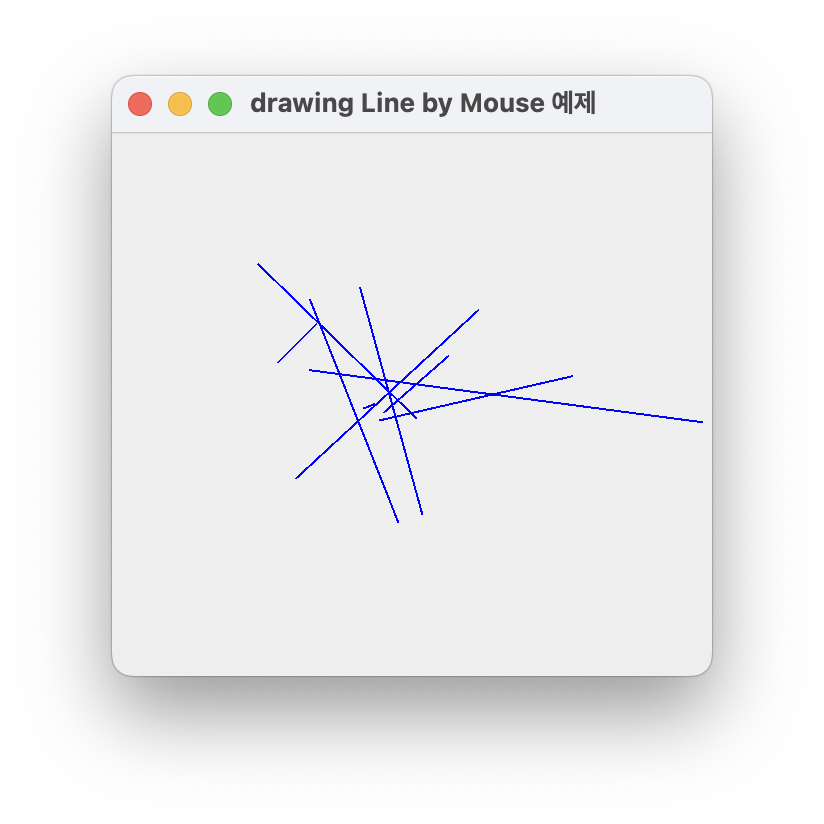
public class GraphicsDrawLineMouseRx extends JFrame {
private MyPanel panel = new MyPanel();
public GraphicsDrawLineMouseRx() {
setTitle("drawing Line by Mouse 예제");
setDefaultCloseOperation(JFrame.EXIT_ON_CLOSE);
setContentPane(panel);
setSize(300,300);
setVisible(true);
}
public static void main(String[] args) {
// TODO Auto-generated method stub
new GraphicsDrawLineMouseRx();
}
class MyPanel extends JPanel {
private Vector<Point> vStart = new Vector<Point>();
private Vector<Point> vEnd = new Vector<Point>();
public MyPanel() {
addMouseListener(new MouseAdapter(){
public void mousePressed(MouseEvent e) {
Point startP = e.getPoint(); //좌쵸 얻어와 좌표를 보관할 수 있는 Point 클래스 StartP로 보
vStart.add(startP);
}
public void mouseReleased(MouseEvent e) {
Point endP = e.getPoint();
vStart.add(endP);
repaint(); //이부분이 중요하다.
//여기까지가 시작과 끝 좌표 정보를 보관했으니까 화면 변화가 일어나도록 paint 를 발생시켜야 함.
}
});
}
public void paintComponent(Graphics g) {
super.paintComponent(g);
g.setColor(Color.BLUE);
for(int i=0; i<vStart.size(); i++) {
Point s = vStart.elementAt(i); // 순차적으러ㅗ Point 데이터 타입 얻어오고 그리고 그안에 있는 x좌표 y좌료를 얻어와 직선을 그리기
Point e = vEnd.elementAt(i);
g.drawLine((int)s.getX(),(int)s.getY(),(int)e.getX(),(int)e.getY() );
}
}
}
}
마우스가 눌러졌을때의 위치, 떼었을때의 위치의 벡터 정보를 보관 (여기강조)
중여한것은 reapint();
-> 앞서 뒤 예제는 버튼은 reapint 가 없이 자동으로 되는데, 이 예제에서 그리기는 화면변화가 있는것처럼 paint 를 호출해야하기 떔누에 repaunt 가 꼭 필요함
마우스. 키보드는 화면 변화가 아니기 떄문에 그것이 강제로 화면 변화가 있었다는 것처럼 설정해줘야함
반복문에서 보관된 정보를 한단계 한단계 출력 -> elementAt() !
키보드 마수으는 화면변화가 아니다 -> 강제package paintComponentEx;
import javax.swing.*;
import java.awt.*;
public class paintComponentEx extends JFrame {
public paintComponentEx() {
setTitle("새로운 버튼 만들기");
setDefaultCloseOperation(JFrame.EXIT_ON_CLOSE);
Container c = getContentPane();
c.setLayout(new FlowLayout());
MyButton b = new MyButton("New Button");
b.setOpaque(true);
b.setBackground(Color.CYAN);
c.add(b);
setSize(250, 200);
setVisible(true);
}
class MyButton extends JButton {
public MyButton(String s) {
super(s);
}
public void paintComponent(Graphics g) {
super.paintComponent(g);
g.setColor(Color.RED);
g.drawOval(0,0,this.getWidth()-1, this.getHeight()-1);
}
}
public static void main(String[] args) {
// TODO Auto-generated method stub
new paintComponentEx();
}
}
이코드가 제대로 실행되는지는 모르겠음