🎇 사용자 정의 Exception
exception 이 이미 정의된 걸 사용할 수도 있고 사용자가 직접 exception 을 정의해서 사용할 수 도 있습니다.
사용자 정의 Exception 은 exception 이나 runTimeException 이라는 클래스를 상속받아 새로운 Exception class 를 만들어 냅니다.
이미 Exception이 있음에도 만드는 이유는 클래스 이름만으로 어떤 오류가 발생햇는지 알려주어 코드의 직관성을 높이기 위함입니다.
public class BizException extends RuntimeException{
    // 어떤 오류가 발생했는지 문자열로 받는 생성자
    //A constructor who receives what error occurred in a String
    public BizException(String msg){
        super(msg);
    }

    //A constructor receives error and send them to its parent side
    public BizException(Exception e){
        super(e);
    }
}
이미 부모클래스(RuntimeException)가 같은 기능을 하는 생성자가 있기 때문에 사용자가 정의한 Exception 객체에서 따로 할 일은 없고 그저 전달만 하면 됩니다.
public class BizService {
    // throw + 예외명
    public void bizMethod(int i) throws BizException{
        System.out.println("Start");
        if(i<0){
            // throw + 예외 메세지
            throw new BizException("The Parameter i must bigger than 0");
        }
        System.out.println("End");
    }
}
아래 코드는 사용자가 만든 BizException 이라는 사용자 Exception 으로 오류를 던진다는 뜻이다.
BizException Class 의 BizException(Exception e) 으로 보냈다.
public void bizMethod(int i) throws BizException아래 코드는 i < 0 일 때 , 객체를 생성하여 BizException(String msg) 로 보냅니다.
객체를 생성하는 이유는 객체를 생성하지 않고는 예외를 발생시킬 수 없으므로 new를 사용하여 BizException 클래스의 인스턴스를 생성해야 합니다.
throws + new -> 오류 발생!!
if(i<0){
	throws new BizExeption("The Parameter i must bigger than 0");
}
public class BizExam {
    public static void main(String[] args) {
        BizService biz = new BizService();
        biz.bizMethod(5);
        try{
            biz.bizMethod(-1);
        }catch (Exception e){
            System.out.println(e.toString());
            e.printStackTrace();
        }
    }
}
마찬가지로 예외처리가 되는(오류가 생기는) 부분을 try - catch 로 감싸서 처리했습니다.
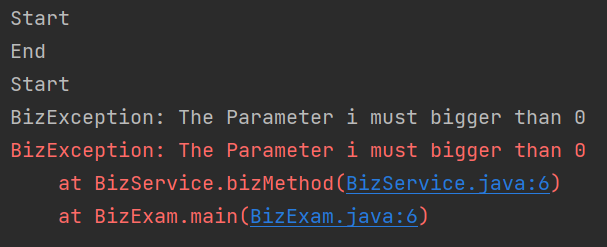
Start , End 가 한 쌍이 찍힌 것을 보아 5는 정상적으로 작동했음을 알 수 있습니다.
Start 가 하나만 찍힌 것을 보아 시작 후에 i가 0보다 작은 -1 이었기에 오류가 난 것으로 볼 수 있습니다.
e.toString() 은 에러의 Exception 내용과 원인을 출력하는 것입니다.
e.printStackTrace() 은 에러의 발생근원지를 찾아서 단계별로 에러를 출력하는 것입니다.
e.toString() 은 간단하게 에러가 난 이유를 알 수 있고,
e.printStackTrace() 은 이유를 더욱 상세하게 볼 수 있습니다.