Fragment Instrumentation Test with Hilt in feature wise multi module
안녕하세요, 이번 포스팅에서는 각 피쳐별로 나눈 모듈에서 프래그먼트 ui 테스트를 진행하고, ui 테스트를 진행할 때 공통적으로 쓰이는 JUnit Runner와 Hilt Module, 테스트 보조 함수 등을 다른 모듈에서 구성하고 이 모듈을 호출하는 방식으로 진행하겠습니다.
다음과 같이 진행하겠습니다.
- 공통 모듈 구성 (Hilt Test Activity, JUnit Runner, ...)
- Instrumentation Test
공통 모듈 구성
Hilt Test Activity 생성
프래그먼트 테스트를 하기 위해 우선 테스트용 액티비티를 생성해줍니다.
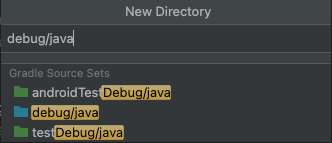
먼저, 모듈에서 debug source set을 만들어 줍니다.
src 폴더에서 New -> Directory -> debug/java 폴더를 생성해줍니다.
그런 다음 debug/java 폴더에 AndroidManifest.xml을 작성해줍니다.
<manifest xmlns:android="http://schemas.android.com/apk/res/android"
	package="com.example.testpractice">

	<application>
		<activity
			android:name=".HiltTestActivity"
			android:theme="@style/Theme.AppCompat"
			android:exported="false"  />
	</application>

</manifest>
마지막으로 debug/java/package 폴더에 HiltTestActivity를 생성해줍니다.
@AndroidEntryPoint
class HiltTestActivity : AppCompatActivity()
이 HiltTestActivity를 사용하기 위해 그래이들에서 몇 가지 설정을 해줍니다.
plugins {
	kotlin("kapt")
	kotlin("android")
	id("com.android.library")
	id("dagger.hilt.android.plugin")
}

android {
	...

    // 1)
	sourceSets["main"].manifest.srcFile("src/debug/java/AndroidManifest.xml")

	...
}

dependencies {
	implementation("com.google.dagger:hilt-android:2.42")
	kapt("com.google.dagger:hilt-android-compiler:2.42")
}
1) main source set 없이 빌드를 돌리면 AndroidMainfest.xml이 없다는 오류가 뜨기 때문에 debug source set의 AndroidManifest.xml을 main source set의 AndroidMainfest.xml로 지정해줍니다.
Custom JUnitRunner 생성
다음으로 테스트에 사용할 JUnitRunner를 생성합니다.
생성하기 전에 먼저 다음 종속 항목을 추가해줍니다.
implementation("androidx.test:runner:1.4.0")implementation("com.google.dagger:hilt-android-testing:2.42")
class CustomJUnitRunner : AndroidJUnitRunner() {

	override fun newApplication(
		cl: ClassLoader?,
		className: String?,
		context: Context?
	): Application {
		return super.newApplication(cl, HiltTestApplication::class.java.name, context)
	}
}
Test용 Hilt Module 생성
Test 용으로 사용할 Hilt Module을 지정해줍니다.
@Module
@TestInstallIn(
	components = [SingletonComponent::class],
	replaces = [RepositoryModule::class]
)
object FakeModule {

	@Provides
	fun provideUnsplashService(): UnsplashService = object : UnsplashService {
		override suspend fun searchPhotos(query: String, page: Int, perPage: Int): Result<UnsplashResponse> {
			val photoList = listOf(
				UnsplashPhoto(
					id = "1",
					description = "first",
					urls = UnsplashPhoto.UnsplashPhotoUrls("", "", "", "", ""),
					user = UnsplashPhoto.UnsplashUser("first_user", "first_user")
				)
			)
			val response = UnsplashResponse(
				photoList, 1
			)

			return Result.Success(response, 200)
		}
	}

	@Singleton
	@Provides
	fun provideUnsplashRepository(
		unsplashService: UnsplashService
	): UnsplashRepository {
		return UnsplashRepositoryImpl(unsplashService)
	}

	@Singleton
	@Provides
	fun provideItemRepository(
		itemService: ItemService,
		itemDao: ItemDao
	): ItemRepository = ItemRepositoryImpl(itemService, itemDao)

}
Fragment Hilt Container 생성
프래그먼트 테스트를 위해 Hilt Test Activity상에서 프래그먼트를 진행하겠습니다. 이를 위해 관련 함수를 사용하겠습니다.
이 함수에 관한 내용은 링크를 참고해주세요.
먼저 함수를 작성하기 전에 다음 종속 항목을 추가해줍니다.
debugImplementation("androidx.fragment:fragment-testing:1.4.1")
프래그먼트 테스트를 위해 R.style.FragmentScenarioEmptyFragmentActivityTheme 이라는 테마를 사용하는데, 이 테마를 사용하기 위한 종속 항목입니다.
inline fun <reified T: Fragment> launchFragmentInHiltContainer(
	fragmentArgs: Bundle? = null,
	@StyleRes themeResId: Int = R.style.FragmentScenarioEmptyFragmentActivityTheme,
	fragmentFactory: FragmentFactory? = null,
	crossinline action: T.() -> Unit = { }
) {
	val mainActivityIntent = Intent.makeMainActivity(
		ComponentName(
			ApplicationProvider.getApplicationContext(),
			HiltTestActivity::class.java,
		)
	).putExtra("androidx.fragment.app.testing.FragmentScenario.EmptyFragmentActivity"
			+ ".THEME_EXTRAS_BUNDLE_KEY", themeResId)

	ActivityScenario.launch<HiltTestActivity>(mainActivityIntent).onActivity { activity ->
		fragmentFactory?.let {
			activity.supportFragmentManager.fragmentFactory = it
		}
		val fragment = activity.supportFragmentManager.fragmentFactory.instantiate(
			Preconditions.checkNotNull(T::class.java.classLoader),
			T::class.java.name
		)

		fragment.arguments = fragmentArgs
		activity.supportFragmentManager.beginTransaction()
			.add(android.R.id.content, fragment, "")
			.commitNow()

		(fragment as T).action()
	}
}
Instrumentation Testing
본격적으로 ui 테스트를 하기 위해 그래이들을 설정합니다.
plugins {
    kotlin("kapt")
    kotlin("android")
    id("com.android.library")
    id("dagger.hilt.android.plugin")
}

android {
	...

    defaultConfig {
    	...
        testInstrumentationRunner = "com.example.testpractice.CustomJUnitRunner"
    }

    ...
}

dependencies {
	androidTestImplementation(project(":common"))
	androidTestImplementation("androidx.test.ext:junit-ktx:1.1.3")
    androidTestImplementation("androidx.test.espresso:espresso-core:3.4.0")
    androidTestImplementation("org.mockito:mockito-android:3.8.0")
    androidTestImplementaiton("com.google.dagger:hilt-android-testing:2.42")
    kaptAndroidTest("com.google.dagger:hilt-android-compiler:2.42")
}
이제 테스트 코드를 작성해보겠습니다.
아까 전에 작성했던 테스트용 힐트 모듈에서 http 통신을 통해 얻어오는 데이터를 임의로 지정해줬었습니다.
이를 이용해 해당하는 데이터를 잘 표시하는지 체크하는 테스트 코드를 작성하겠습니다.
@HiltAndroidTest
@RunWith(AndroidJUnit4::class)
class GalleryFragmentTest {

	@get:Rule(order = 0)
	val hiltRule = HiltAndroidRule(this)

	@Before
	fun launchScreen() {
		launchFragmentInHiltContainer<GalleryFragment>()
	}

	@Test
	fun isRecyclerViewVisible_OnStart() {
		Espresso.onView(ViewMatchers.withId(R.id.rvPhoto))
			.check(ViewAssertions.matches(ViewMatchers.isDisplayed()))

		Espresso.onView(ViewMatchers.withId(R.id.rvPhoto))
			.check { view, _ ->
				assertThat((view as RecyclerView).adapter?.itemCount, `is`(1))
			}
	}

	@Test
	fun isItemContentsAppropriate() {
		Espresso.onView(ViewMatchers.withId(R.id.text_view_user_name))
			.check(ViewAssertions.matches(withText("first_user")))
	}
}
전체 코드는 링크를 참고해주세요.
Refrences