
Thymeleaf
- 자바 웹 및 서버 측 템플릿 엔진
- HTML, XML, JavaScript, CSS 등과 같은 웹 문서를 생성하기 위한 서버 측 템플릿 엔진으로 사용
- Spring Framework와 함께 사용
- 웹 애플리케이션에서 동적으로 데이터를 표시하고 처리하는 데 사용
- 웹 애플리케이션의 유연성과 확장성을 높여줌
- 비즈니스 로직과 분리되어 View에 집중 가능
- 코드를 변경하지 않기 때문에 서버팀과 퍼블팀 간의 협업이 원활함
- 서버상에서 동작하지 않아도 되기 때문에, 서버 동작 없이 화면을 확인 가능
템플릿 엔진
- 템플릿 양식(html)과 데이터 모델(DB)에 따른 입력 자료를 결합해서 문서를 출력하는 소프트웨어
- 코드 양 적음
- 재사용성 높음
- 유지보수에 용이

Thymeleaf 사용 방법
- Gradle
implementation 'org.springframework.boot:spring-boot-starter-thymeleaf'- Maven
<dependency>
    <groupId>org.springframework.boot</groupId>
    <artifactId>spring-boot-starter-thymeleaf</artifactId>
</dependency>- 사용 선언
<html xmlns:th="http://www.thymeleaf.org">Thymeleaf 기능
텍스트 - text, utext
-
th:text : HTML의 콘텐츠에 데이터를 출력 할 때
-
[[...]] : HTML 콘텐츠 영역안에서 직접 데이터를 출력하고 싶을 때
-
Escape : HTML에서 사용하는 특수 문자를 HTML 엔티티로 변경하는 것
th:text, [[...]] 는 기본적으로 이스케이프(escape)를 제공 -
Unescape : Escape기능을 사용하지 않는 것
th:text -> th:utext, [[...]] -> [(...)] -
escape를 사용하지 않아서 HTML이 정상 렌더링 되지 않는 수 많은 문제가 발생할수도 있어 escape를 기본으로 하고 필요할 때만 unescape를 사용
-
예시
model.addAttribute("data", "Hello <b>Spring!</b>");이렇게 데이터를 넣을 때
<li>th:text = <span th:text="${data}"></span></li>
<li>th:utext = <span th:utext="${data}"></span></li>

<li><span th:inline="none">[[...]] = </span>[[${data}]]</li>
<li><span th:inline="none">[(...)] = </span>[(${data})]</li>

escape는 태그를 HTML 엔티티로 변경하기 때문에 적용이 안되고
unescape는 태그를 해석하지않기 때문에 적용되는 것을 볼 수 있음
변수 - SpringEL
-
${...} : 변수 표현식
-
예시
User userA = new User("userA", 10);
User userB = new User("userB", 20);
list.add(userA);
list.add(userB);
map.put("userA", userA);
map.put("userB", userB);이렇게 데이터를 넣을 때
<ul>Object
    <li>${user.username} = <span th:text="${user.username}"></span></li>
    <li>${user['username']} = <span th:text="${user['username']}"></span></li>
    <li>${user.getUsername()} = <span th:text="${user.getUsername()}"></span></li>
</ul>
<ul>List
    <li>${users[0].username} = <span th:text="${users[0].username}"></span></li>
    <li>${users[0]['username']} = <span th:text="${users[0]['username']}"></span></li>
    <li>${users[0].getUsername()} = <span th:text="${users[0].getUsername()}"></span></li>
</ul>
<ul>Map
    <li>${userMap['userA'].username} = <span th:text="${userMap['userA'].username}"></span></li>
    <li>${userMap['userA']['username']} = <span th:text="${userMap['userA']['username']}"></span></li>
    <li>${userMap['userA'].getUsername()} = <span th:text="${userMap['userA'].getUsername()}"></span></li>
</ul>
user.username : user의 username을 프로퍼티 접근
user['username'] : 위와 같음
user.getUsername() : user의 getUsername() 을 직접 호출
users[0].username : List에서 첫 번째 회원을 찾고 username 프로퍼티 접근
users[0]['username'] : 위와 같음
users[0].getUsername() : List에서 첫 번째 회원을 찾고 메서드 직접 호출
userMap['userA'].username : Map에서 userA를 찾고, username 프로퍼티 접근
userMap['userA']['username'] : 위와 같음
userMap['userA'].getUsername() : Map에서 userA를 찾고 메서드 직접 호출
이렇게 다양한 표현식으로 변수를 사용할 수 있음
유틸리티 객체와 날짜
-
#message : 메시지, 국제화 처리
-
#uris : URI 이스케이프 지원
-
#dates : java.util.Date 서식 지원
-
#calendars : java.util.Calendar 서식 지원
-
#temporals : 자바8 날짜 서식 지원
-
#numbers : 숫자 서식 지원
-
#strings : 문자 관련 편의 기능
-
#objects : 객체 관련 기능 제공
-
#bools : boolean 관련 기능 제공
-
#arrays : 배열 관련 기능 제공
-
#lists , #sets , #maps : 컬렉션 관련 기능 제공
-
#ids : 아이디 처리 관련 기능 제공, 뒤에서 설명
-
예시
<li>default = <span th:text="${localDateTime}"></span></li>
<li>yyyy-MM-dd HH:mm:ss = <span th:text="${#temporals.format(localDateTime, 'yyyy-MM-dd HH:mm:ss')}"></span></li>
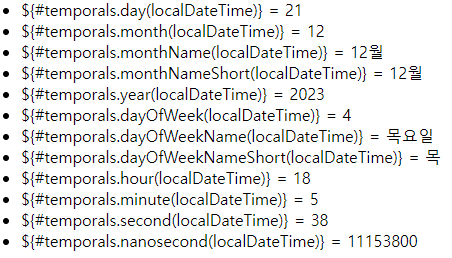
<li>${#temporals.day(localDateTime)} = <span th:text="${#temporals.day(localDateTime)}"></span></li>
<li>${#temporals.month(localDateTime)} = <span th:text="${#temporals.month(localDateTime)}"></span></li>
<li>${#temporals.monthName(localDateTime)} = <span th:text="${#temporals.monthName(localDateTime)}"></span></li>
<li>${#temporals.monthNameShort(localDateTime)} = <span th:text="${#temporals.monthNameShort(localDateTime)}"></span></li>
<li>${#temporals.year(localDateTime)} = <span th:text="${#temporals.year(localDateTime)}"></span></li>
<li>${#temporals.dayOfWeek(localDateTime)} = <span th:text="${#temporals.dayOfWeek(localDateTime)}"></span></li>
<li>${#temporals.dayOfWeekName(localDateTime)} = <span th:text="${#temporals.dayOfWeekName(localDateTime)}"></span></li>
<li>${#temporals.dayOfWeekNameShort(localDateTime)} = <span th:text="${#temporals.dayOfWeekNameShort(localDateTime)}"></span></li>
<li>${#temporals.hour(localDateTime)} = <span th:text="${#temporals.hour(localDateTime)}"></span></li>
<li>${#temporals.minute(localDateTime)} = <span th:text="${#temporals.minute(localDateTime)}"></span></li>
<li>${#temporals.second(localDateTime)} = <span th:text="${#temporals.second(localDateTime)}"></span></li>
<li>${#temporals.nanosecond(localDateTime)} = <span th:text="${#temporals.nanosecond(localDateTime)}"></span></li>
URL 링크
-
@{...} : URL을 생성할 때
-
예시
model.addAttribute("param1", "data1");
model.addAttribute("param2", "data2");
이렇게 데이터를 넣을 때
<li><a th:href="@{/hello}">basic url</a></li>
<li><a th:href="@{/hello(param1=${param1}, param2=${param2})}">hello queryparam</a></li>
<li><a th:href="@{/hello/{param1}/{param2}(param1=${param1}, param2=${param2})}">path variable</a></li>
<li><a th:href="@{/hello/{param1}(param1=${param1}, param2=${param2})}">pathvariable + query parameter</a></li>
단순한 URL
@{/hello} -> /hello
쿼리 파라미터
@{/hello(param1={param2})} -> /hello?param1=data1¶m2=data2
경로 변수
@{/hello/{param1}/{param2}(param1={param2})} -> /hello/data1/data2
경로 변수 + 쿼리 파라미터
@{/hello/{param1}(param1={param2})} -> /hello/data1?param2=data2
이런 식으로 url이 변경 됨
리터럴
- 소스 코드상에 고정된 값
- 타임리프에서 문자 리터럴은 항상 작은 따옴표로 감싸야함
<span th:text="'hello'">- 공백 없이 쭉 이어진다면 하나의 의미있는 토큰으로 인지해 생략 가능
<span th:text="hello">*예시
String a = "Hello"
int a = 10 * 20
Hello는 문자 리터럴, 10과 20은 숫자 리터럴
반복
-
th:each : 반복에서 사용할 수 있는 여러 상태 값을 지원
-
예시
list.add(new User("userA", 10));
list.add(new User("userB", 20));
list.add(new User("userC", 30));
이렇게 데이터를 넣었을 때
<table border="1">
    <tr>
        <th>username</th>
        <th>age</th>
    </tr>
    <tr th:each="user : ${users}">
        <td th:text="${user.username}">username</td>
        <td th:text="${user.age}">0</td>
    </tr>
</table>
반복 시 오른쪽 컬렉션(${users})의 값을 하나씩 꺼내서 왼쪽 변수(user)에 담아서 태그를 반복 실행함
템플릿 조각
-
th:fragment
-
여러 곳에서 재사용할 수 있는 작은 조각
-
동적으로 데이터를 바인딩하거나 여러 페이지에서 재사용할 수 있는 모듈화된 코드를 작성 가능
-
예시
<footer th:fragment="copy">
 	푸터 자리 입니다.
</footer>

<footer th:fragment="copyParam (param1, param2)">
	<p>파라미터 자리 입니다.</p>
 	<p th:text="${param1}"></p>
 	<p th:text="${param2}"></p>
</footer>
이러한 Footer html이 있을 때
<h2>부분 포함 insert</h2>
<div th:insert="~{template/fragment/footer :: copy}"></div>
<h2>부분 포함 replace</h2>
<div th:replace="~{template/fragment/footer :: copy}"></div>
<h2>부분 포함 단순 표현식</h2>
<div th:replace="template/fragment/footer :: copy"></div>
<h1>파라미터 사용</h1>
<div th:replace="~{template/fragment/footer :: copyParam ('데이터1', '데이터2')}"></div>
template/fragment/footer :: copy : template/fragment/footer.html 템플릿에 있는
th:fragment="copy" 라는 부분을 템플릿 조각으로 가져와서 사용한다는 의미
예제
<tr>
 	<td><a href="item.html">1</a></td>
 	<td><a href="item.html">테스트 상품1</a></td>
 	<td>10000</td>
	 <td>10</td>
</tr>
<tr>
 	<td><a href="item.html">2</a></td>
 	<td><a href="item.html">테스트 상품2</a></td>
 	<td>20000</td>
 	<td>20</td>
</tr>
이런 정적인 html을
<tr th:each="item : ${items}">
      <td><a href="item.html" th:href="@{/basic/items/{itemId}(itemId=${item.id})}" th:text="${item.id}">회원id</a></td>
      <td><a href="item.html" th:href="@{|/basic/items/${item.id}|}" th:text="${item.itemName}">상품명</a></td>
      <td th:text="${item.price}">10000</td>
      <td th:text="${item.quantity}">10</td>
</tr>
이렇게 동적인 html로 바꿀 수 있음
결론
- 코드를 변경하지 않아도 되서 협업할 때 편함
- 동적인 코드를 작성할 수 있음
- 서버를 키지 않아도 뷰를 확인할 수 있어서 편함
