
시작하기
- VITE를 이용해 react+ts 프로젝트를 생성
- tailwindCSS 도입
- Chromatic 배포
- 유지보수
사용할 스택
pnpm ,VITE(react+ts), tailwindCSS, storybook, rollup, NPM
설치시작
습관성으로 일단 init 을 하여 package.json을 만들어 준다.
pnpm init
우선 VITE를 깔아준다. 만약 next.js나 vue를 사용하고 싶다면 사용해도 된다.
pnpm create vite@latest
아래 명령어로 node모듈을 설치 해준다.
pnpm i
아래 명령어로 storybook을 설치한다.
알아서 react+ts로 만들어진 프로젝트임을 찾아서 설치할 것이다.
VITE를 설치하지 않고, 아래 명령어를 통해 설치해도 되지만(VITE 설치 메뉴가 나옴) 필자는 2번 에러를 만나서 VTIE설치 후에 하는 것을 추천드립니다.
pnpx storybook@latest init
tailwind와 postcss, autoprefixer를 설치합니다.
pnpm add -D tailwindcss postcss autoprefixer
pnpx tailwindcss init -p
@storybook/addon-styling-webpack은 Storybook에서 CSS 관련 스타일링을 관리하기 위한 애드온입니다. TailwindCSS와 같은 CSS 프레임워크나 커스텀 CSS 설정을 Storybook 환경에서 쉽게 통합하고 관리할 수 있도록 설계되어 있습니다.
아래 명령어로 설치를 해줍니다.
pnpx storybook@latest add @storybook/addon-styling-webpack
저는 src폴더 안에 컴포넌트들을 위치할 것이기 때문에 아래와 같이 tailwind.config.js 설정을 했습니다. lib이나 다른 이름의 폴더를 사용하실 분들은 content부분을 알맞게 설정해주시면 됩니다.
// tailwind.config.js

/** @type {import('tailwindcss').Config} */
export default {
  content: ["./index.html", "./src/**/*.{js,jsx,ts,tsx}"],
  theme: {
    extend: {},
  },
  plugins: [],
};
src/shared/styles.css 파일 생성후, 아래와 같이 수정해줍니다.
tailwind doc에서는 index.css를 수정하는데 저는 별도의 파일에 해당 코드를 추가하였습니다.
// src > shared > styles.css

@tailwind base;
@tailwind components;
@tailwind utilities;
.storybook > preview.ts에 위에서 만든 css를 import합니다.
(다른 파일 명, 경로를 사용했다면, 그 파일을 import)
//.storybook > preview.ts

...기존코드
import "../src/shared/styles.css";
...기존코드
파일 구조 수정 및 필요없는거 삭제
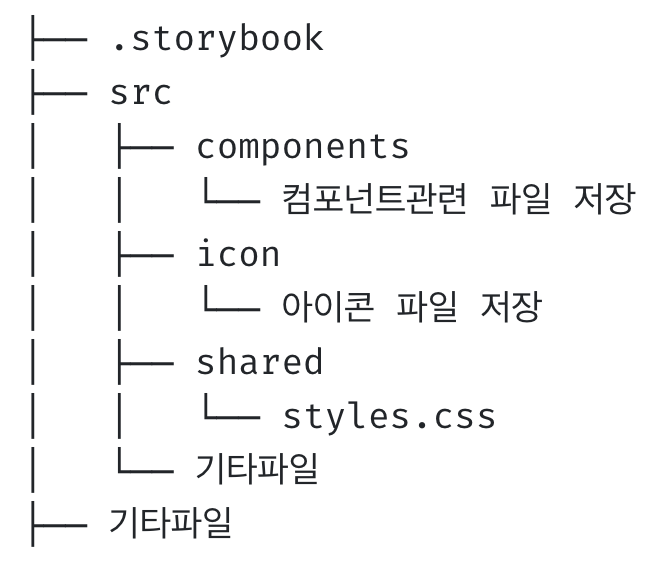
요런 느낌으로 폴더를 정리해주었습니다.
버튼 새로 만든거 추가
원하는 대로 스토리북을 작성하면 됩니다.
아이콘 관련
svg 아이콘을 사용하기 위해 아래와 같이 세팅합니다.
아래 명령어를 통해 rollup을 설치합니다.
pnpm add -D @svgr/rollup @rollup/plugin-url
src > types.d.ts을 아래와 같이 수정합니다.
svg를 export 하기위한 설정입니다.
// src > types.d.ts

declare module "*.svg" {
  import * as React from "react";
  export const ReactComponent: React.FC<React.SVGProps<SVGSVGElement>>;
  const src: string;
  export default src;
}
vite.config.ts에서도 svgr을 추가해줍니다.
// vite.config.ts

import { defineConfig } from "vite";
import react from "@vitejs/plugin-react";
import svgr from "@svgr/rollup";
import url from "@rollup/plugin-url";

export default defineConfig({
  plugins: [react(), url(), svgr()],
});
src > shared > assets > icons 폴더 안에 svg로 된 아이콘을 추가합니다.
필자는 menu_filled.svg 라는 이름의 svg 파일을 사용하였습니다.
// src > shared > assets > icons > index.ts

import { ReactComponent as MenuFilled } from "./menu_filled.svg";

export default {
  menu_filled: MenuFilled,
};
요렇게 세팅한 후 icon도 스토리를 작성하면 됩니다.
배포관련
src > index.ts을 아래와 같이 수정하여, npm 배포했을 때, 접근 위치를 잡아줍니다.
// src > index.ts

import * as icons from "./shared/assets/icons";
import "./shared/styles.css";

export { icons };

export * from "./components/button";
export * from "./icon";
아래와 같은 명령어를 통해 babel과 rollup에 필요한 모듈을 추가해줍니다.
pnpm add -D @rollup/plugin-babel @rollup/plugin-commonjs @rollup/plugin-node-resolve \
@rollup/plugin-typescript @rollup/plugin-url @svgr/rollup \
@babel/preset-env @babel/preset-react @babel/preset-typescript \
rollup rollup-plugin-dts rollup-plugin-peer-deps-external
package.json의 dependencies에는 아래 4개만 있으면 됩니다.
-> 번들 사이즈 감소를 위함입니다.
나머지는 devDependencies에 넣어주면 됩니다.
// package.json

  "dependencies": {
    "autoprefixer": "^10.4.20",
    "class-variance-authority": "^0.7.1",
    "postcss": "^8.5.1",
    "tailwindcss": "^3.4.17"
  },
아래와 같이 rollup을 세팅해줍니다.
input: "src/index.ts",은 접근 위치입니다.
// rollup.config.mjs
import { nodeResolve } from "@rollup/plugin-node-resolve";
import commonjs from "@rollup/plugin-commonjs";
import terser from "@rollup/plugin-terser";
import peerDepsExternal from "rollup-plugin-peer-deps-external";
import { babel } from "@rollup/plugin-babel";
import typescript from "@rollup/plugin-typescript";
import svgr from "@svgr/rollup";
import url from "@rollup/plugin-url";
import { dts } from "rollup-plugin-dts";
import postcss from "rollup-plugin-postcss";

import { createRequire } from "node:module";
const requireFile = createRequire(import.meta.url);
const packageJson = requireFile("./package.json");

export default [
  {
    input: "src/index.ts",
    output: [
      {
        file: packageJson.main,
        format: "cjs",
        sourcemap: true,
      },
      {
        file: packageJson.module,
        format: "esm",
        sourcemap: true,
      },
    ],
    plugins: [
      nodeResolve(),
      peerDepsExternal(),
      commonjs(),
      terser(),
      typescript({
        tsconfig: "./tsconfig.json",
      }),
      babel({
        babelHelpers: "bundled",
        sourceType: "unambiguous",
        presets: [
          "@babel/preset-env",
          "@babel/preset-react",
          "@babel/preset-typescript",
        ],
        extensions: [".js", ".jsx", ".ts", ".tsx"],
        exclude: "node_modules/**",
      }),
      url({
        include: "**/*.svg",
        limit: 8192,
        emitFiles: true,
        fileName: "[name][hash][extname]",
      }),
      svgr(),
      postcss({
        extensions: [".css"],
        inject: true,
        extract: false,
      }),
    ],
    external: ["react", "react-dom", "tailwindcss", "autoprefixer", "postcss"],
  },
  {
    input: "dist/esm/types/index.d.ts",
    output: [{ file: packageJson.types, format: "esm" }],
    plugins: [dts()],
    external: [/\.css$/, "class-variance-authority/types"],
  },
];
아래부터는 동일하게 세팅해줍니다.
// tsconfig.json

{
  "compilerOptions": {
    "target": "ES2020",
    "module": "ESNext",
    "skipLibCheck": true,
    "allowJs": false,

    /* Bundler mode */
    "moduleResolution": "bundler",
    "allowImportingTsExtensions": true,
    "resolveJsonModule": true,
    "isolatedModules": true,
    "jsx": "react-jsx",

    /* Emit */
    "declaration": true,
    "emitDeclarationOnly": true,
    "sourceMap": true,
    "outDir": "dist",
    "declarationDir": "types",
    "allowSyntheticDefaultImports": true,
    "esModuleInterop": true,
    "forceConsistentCasingInFileNames": true,

    /* Linting */
    "strict": true,
    "noUnusedLocals": true,
    "noUnusedParameters": true,
    "noFallthroughCasesInSwitch": true,
    "noImplicitReturns": true,
    "noUncheckedIndexedAccess": true,
    "allowUnreachableCode": false
  },
  "include": ["src"],
  "references": [{ "path": "./tsconfig.node.json" }]
}
tsconfig.node.json
{
"compilerOptions": {
"composite": true,
"skipLibCheck": true,
"module": "ESNext",
"moduleResolution": "bundler",
"allowSyntheticDefaultImports": true,
"strict": true
},
"include": ["vite.config.ts"]
}
tsconfig.app.json 삭제 후,
빌드를 진행합니다. script에 build가 없다면, rollup-c를 실행하는 스크립트를 실행해줍니다.
pnpm build
빌드 후에 dist 파일이 만들어진 것을 확인 후, npm에 등록하여줍니다.
pnpm login
pnpm publish --access public
Chromatic 배포
chromatic 홈페이지에서 시키는 대로 세팅 하면 됩니다.pnpm 으로 사용하는 코드만 남기겠습니다.
pnpm add -D chromatic
pnpm dlx chromatic --project-token=본인토큰
자동화 관련 yml 파일
// .github > workflows > chromatic.yml

# 워크플로우 이름
name: "wu-dang-clan Chromatic Publish"

# 워크플로우를 위한 이벤트
on:
  push:
    branches:
      - main # main 브랜치에 push가 발생했을 때

# 작업 목록
jobs:
  chromatic:
    runs-on: ubuntu-latest # 작업을 실행할 OS
    steps: # 작업 단계
      - name: Checkout code
        uses: actions/checkout@v4
        with:
          fetch-depth: 0

      - name: Install pnpm
        uses: pnpm/action-setup@v2
        with:
          version: latest

      - name: Install dependencies
        run: pnpm install

      - name: Run Chromatic
        uses: chromaui/action@latest
        with:
          projectToken: ${{ secrets.CHROMATIC_PROJECT_TOKEN }}
CHROMATIC_PROJECT_TOKEN 은 chromatic 페이지에서 managed > Setup Chromatic with this project token 에서 확인 할 수 있고, github actions secrets에서 추가해주면 됩니다.
이렇게 하면 main 브랜치가 업데이트 될때마다 알아서 Chromatic 배포가 진행됩니다. repo 용량 마다 다르지만 5분 정도는 걸립니다.