오늘 하루종일 헤멨던 취소선 만들기를 정리해보려고 한다. 이 포스팅은 수많은 실패와 도전, 그리고 내 멘탈이 녹아져있다.
내 목표는 아래 사진과 같이 할 일을 추가하고(스위치 ON), 할 일을 완료하면 취소선(스위치 OFF)을 그리는 것이다. 물론 메인화면에 나갔다와도 유지되어야 한다.
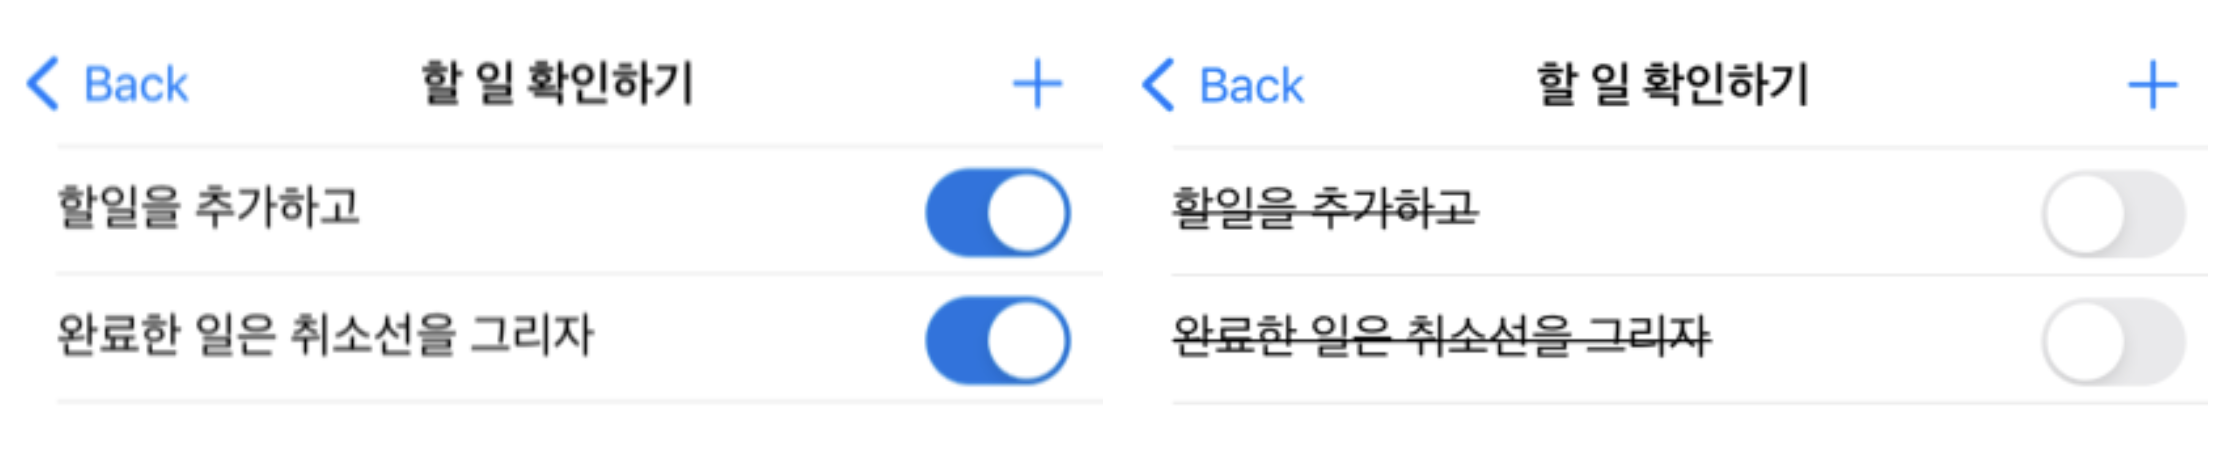
취소선
취소선을 그리는 함수는 여러 블로그들을 통해 긁어온 코드이다.
이때 addAttribute가 있으면 remove도 있을거라고 생각했어야만....
extension String {
    func strikeThrough() -> NSAttributedString {
        let attributeString = NSMutableAttributedString(string: self)
        attributeString.addAttribute(NSAttributedString.Key.strikethroughStyle, value: NSUnderlineStyle.single.rawValue, range: NSMakeRange(0, attributeString.length))
        return attributeString
    }
}
첫번째 시도
취소선을 그리는 함수를 스위치 IBAction에 넣어서 스위치 상태에 따라 취소선을 그리기
class TableViewCell: UITableViewCell {

	// 이전 코드 생략

    // 이전 텍스트를 저장할 변수 추가
    private var previousText: String?  // (1)

    // 스위치 상태를 저장하는 변수
    var isSwitchOn = true   // (2)

    @IBAction func memoSwitch(_ sender: UISwitch) {   // (3)
        isSwitchOn = sender.isOn
        updateLabelStrikeThrough()
    }

    func updateLabelStrikeThrough() {   // (4)
    if isSwitchOn {
        // 스위치가 on인 경우 취소선을 없애고 이전 텍스트 복원
        memoLabel.attributedText = nil   // (5)
        memoLabel.text = previousText   // (6)
    } else {
        // 스위치가 off인 경우 취소선을 추가하고 이전 텍스트 저장
        previousText = memoLabel.text   // (7)
        memoLabel.attributedText = memoLabel.text?.strikeThrough()   // (8)
    }
}- (1) : 스위치를 끌 때 텍스트까지 같이 없어지므로 이전 텍스트 값을 저장할 변수 선언
- (2) : 스위치 상태를 저장하는 변수. 스위치 초기값은 true
- (3) : 스위치를 클릭할 때 작동되는 Action으로, 작동한 스위치 상태를 isSwitchOn에 할당하고 취소선 함수 실행
- (4) : 조건문에 따라 취소선 함수 실행
- (5) : 스위치가 On인 경우 memoLabel에 설정된 모든 값을 nil로 처리*
- (6) : (5)가 실행되면 텍스트도 nil이 되므로 이전에 저장한 값을 할당*
메모 추가시 스위치의 기본값은 true이기 때문에 스위치를 클릭하기 전까지는 (5), (6)는 작동하지 않음(현재 코드 기준 previousText는 nil) - (7) : 스위치가 Off인 경우 기존 텍스트를 previousText로 저장(스위치 On일 때 할당해야하기 때문)
- (8) : 취소선 함수를 실행하고 memoLabel에 적용
🥲 적용 화면

🤔 문제점/해결방안
(1) 메모를 추가하고 스위치를 작동했을 때 적용이 잘 되나, 메인화면에 갔다오면 스위치 작동이 초기화 되는 문제 발생
-> 셀을 불러올 때 TableViewController에서 updateLabelStrikeThrough 함수를 실행하면 될 듯(메모리스트의 스위치 상태에 따른 취소선)
(2) 스위치를 끈 상태에서 새 메모를 추가하면 기존 메모의 스위치 상태가 변하고 취소선도 맘대로 그어져있음
-> 스위치의 상태를 저장하고 셀이 재사용될 때 기존 셀의 상태를 가져오는 코드로 보완하면 어떨까 생각
두번째 시도
첫번째 문제로 인해 내가 생각해본 해결방안을 적용해서 보완해보았다.
class TableViewController: UITableViewController {

	// 이전 코드 생략

	override func tableView(_ tableView: UITableView, cellForRowAt indexPath: IndexPath) -> UITableViewCell {
        let cell = tableView.dequeueReusableCell(withIdentifier: "TableViewCell", for: indexPath) as! TableViewCell
        let target = myMemo.memoList[indexPath.row]
        cell.memoLabel?.text = target.content
        cell.memoSwitch.isOn = target.isCompleted
        // 추가된 코드
        cell.updateLabelStrikeThrough()   // (1)
        cell.memo = target   // (2)
        return cell
    }
    // 생략
}

class TableViewCell: UITableViewCell {

	// 이전 코드 생략

    // 이전 텍스트를 저장할 변수 추가
    private var previousText: String?

    // (삭제) 스위치 상태를 저장하는 변수
    // var isSwitchOn = true

    // 스위치 상태 가져오기
    var memo: Memo? {   // (3)
        didSet {
            guard let memo = memo else { return }
            memoLabel.text = memo.content
            memoSwitch.isOn = memo.isCompleted
        }
    }

    @IBAction func memoSwitch(_ sender: UISwitch) {   // (4)
        guard let memo = memo else { return }
        memo.isCompleted = sender.isOn
        updateLabelStrikeThrough()
    }

    func updateLabelStrikeThrough() {   // (5)
    // 스위치가 on인 경우 취소선을 없애고 이전 텍스트 복원
    if memoSwitch.isOn {
        memoLabel.attributedText = nil
        memoLabel.text = previousText
    } else {
		// 스위치가 off인 경우 취소선을 추가
        previousText = memoLabel.text
        memoLabel.attributedText = memoLabel.text?.strikeThrough()
    }
}- (1) : 셀이 재사용될 때마다 취소선을 적용하고 해제함. 테이블 뷰 셀이 화면에 나타날 때마다 스위치 상태에 따라 취소선 표시
- (2) : 셀에 표시할 메모 객체를 설정
- (3) : memo에 객체를 설정할 때마다 해당 셀의 레이블과 스위치 내용을 가져옴
- (4) : 스위치를 토글할 때마다 스위치의 상태를 업데이트하고 그에 따라 취소선을 표시하는 함수 실행
- (5) : 스위치 상태에 따른 작동(On - 취소선 없애고 이전 메모 복원, Off - 취소선 긋기)
🥲 적용 화면
🤔 해결한 것/문제점/해결방안
(1) (해결한 것) 셀을 불러올 때 메모리스트의 스위치 상태에 따른 취소선 적용 완료
(2) 스위치를 끈 상태에서 새 메모를 추가하면 처음 추가는 문제가 없으나, 두번째부터는 기존 메모의 취소선이 맘대로 그어져있음
-> 취소선을 제거하는 함수를 별도로 만들어 attributedText를 nil로 두지말고 함수로 실행해보면 어떨지?
세번째 시도
취소선이 너무 싫다.. 왜 자꾸 안사라지고 남아있는 것임????
class TableViewController: UITableViewController {

	// 이전 코드 생략

	override func tableView(_ tableView: UITableView, cellForRowAt indexPath: IndexPath) -> UITableViewCell {
        let cell = tableView.dequeueReusableCell(withIdentifier: "TableViewCell", for: indexPath) as! TableViewCell
        let target = myMemo.memoList[indexPath.row]
        cell.memoLabel?.text = target.content
        cell.memoSwitch.isOn = target.isCompleted
        cell.updateLabelStrikeThrough()
        // 삭제
        // cell.memo = target
        return cell
    }
    // 생략
}

class TableViewCell: UITableViewCell {

	// 이전 코드 생략

    // (삭제) 이전 텍스트를 저장할 변수 추가
    // private var previousText: String?

    // (삭제) 스위치 상태를 저장하는 변수
    // var isSwitchOn = true

    // 스위치 상태 가져오기
    var memo: Memo?   // (1)

    @IBAction func memoSwitch(_ sender: UISwitch) {   // (2)
        guard let memo = memo else { return }
        memo.isCompleted = sender.isOn
        updateLabelStrikeThrough()
    }

    // 추가
    func insertLabelContent(content: String?) {   // (3)
    	memoLabel?.text = content
    }

    func updateLabelStrikeThrough() {   // (4)
        // 스위치 상태에 따른 취소선 업데이트
        if self.memoSwitch.isOn {
          insertLabelContent(content: memo?.content)
          self.memoLabel?.attributedText = self.memoLabel?.text?.removeStrikeThrough()
        } else {
          self.memoLabel?.attributedText = self.memoLabel?.text?.strikeThrough()
        }
  	}
}

extension String {
    func strikeThrough() -> NSAttributedString {
        let attributeString = NSMutableAttributedString(string: self)
        attributeString.addAttribute(
          NSAttributedString.Key.strikethroughStyle, value: NSUnderlineStyle.single.rawValue, range: NSMakeRange(0, attributeString.length))
        return attributeString
    }
    func removeStrikeThrough() -> NSAttributedString {   // (5)
        let attributeString = NSMutableAttributedString(string: self)
        attributeString.removeAttribute(
          NSAttributedString.Key.strikethroughStyle, range: NSMakeRange(0, attributeString.length))
        return attributeString
    }
}- (1) : Memo 를 그 자체로 가져와, memo 프로퍼티를 통해 셀에 표시할 메모 객체 설정 및 스위치 상태정보 반영
- (2) : 스위치를 토글할 때마다 스위치의 상태를 업데이트하고 그에 따라 취소선을 표시하는 함수 실행
- (3) : content 매개변수에 전달된 문자열을 memoLabel에 표시
- (4) : 스위치의 상태에 따른 메모 텍스트 취소선 추가 및 제거
- (5) : removeAttribute(_:range:) 메서드를 사용하여 특정 속성을 지정된 범위에서 제거
🥲 적용 화면

🤔 문제점/해결방안
(1) 스위치 Off 시 취소선 작동한 이후 스위치 On 시 취소선 삭제가 안되는 문제 발생, removeAttribute 안먹음
-> 구글링 결과... NSUnderlineStyle.single 취소선 스타일이 추가되지 않아 삭제가 안됐다고 함. 취소선을 없애는 스타일을 NSMutableAttributedString에 추가한 후 재시도
네번째 시도
드디어.. 성공!!!!! 장장 몇시간이야.. 진짜 하루종일 이거 때매 난리였다..
extension String {
    func strikeThrough() -> NSAttributedString {
        let attributeString = NSMutableAttributedString(string: self)
        attributeString.addAttribute(
          NSAttributedString.Key.strikethroughStyle, value: NSUnderlineStyle.single.rawValue, range: NSMakeRange(0, attributeString.length))
        return attributeString
    }
    func removeStrikeThrough() -> NSAttributedString {
        let attributeString = NSMutableAttributedString(string: self)
        // 수정된 부분
        attributeString.addAttribute(NSAttributedString.Key.strikethroughStyle, value: 0 , range: NSMakeRange(0, attributeString.length))
        return attributeString
    }
}- removeStrikeThrough() 메서드 내부에서 NSMutableAttributedString(string: self)를 통해 attributeString을 새로운 NSMutableAttributedString로 초기화
- attributeString.addAttribute(NSAttributedString.Key.strikethroughStyle, value: 0 , range: NSMakeRange(0, attributeString.length)): attributeString에 NSUnderlineStyle.single 취소선 스타일 추가
취소선 스타일 : NSUnderlineStyle의 rawValue 값인 0을 strikethroughStyle 속성에 추가(취소선을 없애기 위한 값)
🥲 적용 화면

😭 회고
미쳤다. 진짜.. 취소선 어지간히 복잡한게 아니네...
처음에 앱 만들기 시작할 때 완료된 UI의 예시가 취소선으로 나와있어서 그대로 따라서 시작을 했는데 이렇게 힘들 줄 몰랐다.
그런데 두번째 시도까지만 해도 코드만 봐서는 이상한게 없었는데 취소선의 attributedText가 안먹는게 너무 이해가 안되서 취소선 함수 말고 폰트 색상을 바꿔서 시도해봤는데 너무 잘 되는거다!!
잘 되는거 보고 취소선 포기할까도 고민했지만, 이것저것 시도해보면서 이건 왜 안되고 이건 왜 되지?? 이런 생각을 하고 찾아보는 시간을 가질 수 있어서 좋았다.
그리고 취소선을 없애는걸 완성하면서 드는 생각은 앱을 기획할 때는 지극히 유저 입장을 먼저 고려해야한다는 것이다.
생각해보면 완료된 할 일을 [할 일 확인하기] 목록에서 봐야할 필요도 없을 뿐더러, 스위치를 Off 하는 순간 해당 목록에서 사라지는게 가장 UX/UI가 고려된 개발이 아닐까 싶다.
그리고 [할 일 확인하기] 목록에 남겨둘 거라면 취소선 보다 비활성화 느낌을 줄 수 있는 색상의 음영을 통해 표현하는 것이 더 좋을 것이다.
오늘의 경험을 토대로 추가 필수 기능 구현 후에 UX/UI가 고려된 어플로 보완해보고자 한다. 그러려면 먼저 기획을 수정해야겠지?
회고 이후 한번 더 도전
코드가 너무 복잡하고 removeAttribute가 있는데 제대로 못쓰고 있는게 아쉬워서 새마음 새뜻으로 다음날 아침에 수정봤는데 됐다.. Jump to Definition 확인하는 습관 가지자...!!
import UIKit

class TableViewCell: UITableViewCell {
    var myMemo = MemoManager.myMemo

    @IBOutlet weak var memoLabel: UILabel!
    @IBOutlet weak var memoSwitch: UISwitch!

    var memo: Memo?

    @IBAction func memoSwitch(_ sender: UISwitch) {
        guard let memo = memo else { return }
        memo.isCompleted = sender.isOn
        updateLabelStrikeThrough()
    }

    func updateLabelStrikeThrough() {
		// 수정된 부분
        if memoSwitch.isOn {
            memoLabel.attributedText = memoLabel.text?.removestrikeThrough()
        } else {
            memoLabel.attributedText = memoLabel.text?.strikeThrough()
        }
    }

    override func awakeFromNib() {
        super.awakeFromNib()
    }

    override func setSelected(_ selected: Bool, animated: Bool) {
        super.setSelected(selected, animated: animated)
    }

    override func prepareForReuse() {
        super.prepareForReuse()

        // 추가된 부분
        memoLabel.attributedText = nil
    }

}

extension String {
    func strikeThrough() -> NSAttributedString {
        let attributeString = NSMutableAttributedString(string: self)
        attributeString.addAttribute(NSAttributedString.Key.strikethroughStyle, value: NSUnderlineStyle.single.rawValue, range: NSMakeRange(0, attributeString.length))
        return attributeString
    }
    // 수정된 부분
    func removestrikeThrough() -> NSAttributedString {
        let attributeString = NSMutableAttributedString(string: self)
        attributeString.removeAttribute(NSAttributedString.Key.strikethroughStyle, range: NSMakeRange(0, attributeString.length))
        return attributeString
    }
}
동작 화면은 이전과 동일하기 때문에 추가 첨부는 하지 않겠다.
단순히 removeAttribute를 사용해 취소선을 긋는 범위와 name을 addAttribute와 동일하게 주고 셀을 재사용할 때 해당 기능을 nil로 바꿔주니까 해결이 됐다.
개발할 때 막히면 손을 좀 놨다가(...) 다시 해보면 또 다른 해결방안이 떠오를 수 있으니까 리프레시를 하자!!

좋은 글 보고 갑니다..
취소선 때문에 머리 아팠는데 한줄기의 빛이... ㅎㅎ