[React Native] 인스타그램 UI 만들기 #2

리액트 네이티브(React Native)로 인스타그램 UI를 구현하는 두 번째 강의입니다. 이번에는 홈 화면에 피드 목록을 구현합니다. 이 포스팅은 아래 무료 동영상 강의를 참고하여 작성하였습니다.
_
CardComponent 만들기
Components 폴더 아래에 CardComponent.js 파일을 생성합니다. CardComponent는 우리가 앞으로 구현할 피드 목록에서 피드 항목 하나를 담당하게 될 컴포넌트입니다.
import React, { Component } from 'react';
import { View, Image, Text, StyleSheet } from 'react-native';

export default class CardCompnent extends Component{
    render() {
        return (
            <View style={style.container}>
                <Text>CardCompnent</Text>
            </View>
        );
    }
}

const style = StyleSheet.create({
    container: {
        flex: 1,
        alignItems: 'center',
        justifyContent: 'center',
    }
});
동영상에서는 create snippet 기능을 사용해서 컴포넌트 파일을 생성하는데, 무척 간편해 보입니다. 해당 기능이 궁금한 분은 여기를 참고하세요.
_
CardComponent에 추가로 필요한 native-base 컴포넌트를 import 합니다.
import { Card, CardItem, Thumbnail, Body, Left, Right, Button, Icon } from 'native-base';_
그리고 CardComponent의 render() 함수를 수정합니다.
export default class CardCompnent extends Component{
  render(){
    return (
      <Card>
        <CardItem>
          <Left>
            <Thumbnail source={{ uri: 'https://steemitimages.com/u/anpigon/avatar' }} />
            <Body>
              <Text>Anpigon</Text>
              <Text note>Jan 21, 2019</Text>
            </Body>
          </Left>
        </CardItem>
        <CardItem cardBody>
          <Image
            source={{ uri: 'https://user-images.githubusercontent.com/3969643/51441420-b41f1c80-1d14-11e9-9f5d-af5cd3a6aaae.png' }}
            style={{ height:200, width:null, flex: 1 }} />
        </CardItem>
        <CardItem style={{ height:45 }}>
          <Left>
            <Button transparent>
              <Icon name='ios-heart' style={{ color:'black' }}/>
            </Button>
            <Button transparent>
              <Icon name='ios-chatbubbles' style={{ color:'black' }}/>
            </Button>
            <Button transparent>
              <Icon name='ios-send' style={{ color:'black' }}/>
            </Button>
          </Left>
        </CardItem>
        <CardItem style={{ height: 20 }}>
          <Text>101 likes</Text>
        </CardItem>
        <CardItem>
          <Text>
            <Text style={{ fontWeight:'900'}}>Anpigon</Text>
              이번에는 리액트 네이티브(React Native)로 인스타그램 UI을 구현하는 포스팅입니다. 다른 앱을 따라 만들어 보는 것은 굉장히 재미있습니다. 구글에서 인스타그램 클론 코딩 강의를 찾아보니, 다른 개발자들이 올린 동영상 강의를 몇 개 찾을 수 있었습니다.
            </Text>
          </CardItem>
        </Card>
    );
  }
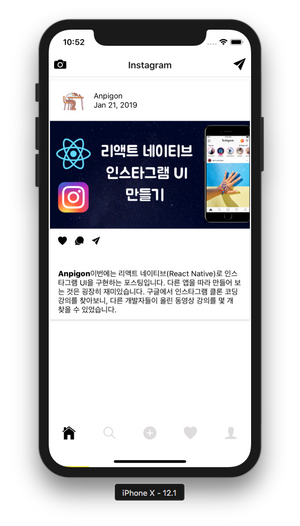
}CardComponent는 작성자 프로필 영역, 메인 이미지 영역, 본문 영역으로 구성되어 있습니다. 일단은 화면에 피드가 어떻게 표시되는지 확인하기 위해, CardComponent에 임시 데이터를 입력해 놓았습니다.
_
HomeTab 컴포넌트 수정하기
./Components/AppTabNavigator/HomeTab.js 파일을 수정합니다. native-base에서 Container, Content 컴포넌트와 방금 만든 CardComponent를 Import 합니다. 그리고 render() 함수와 style를 수정합니다.
// ... 일부 import 생략 ...

import { Container, Content, Icon } from 'native-base'; // Container, Content 추가로 import
import CardComponent from '../CardComponent'; // 카드 컴포넌트 추가

export default class HomeTab extends Component {

    // ... navigationOptions 코드 생략 ...

    render() {
        return (
            <Container style={style.container}>
                <Content>
                    <CardComponent />
                </Content>
            </Container>
        );
    }
}

const style = StyleSheet.create({
    container: {
        flex: 1,
        backgroundColor: 'white'
    }
});
_
여기까지 작업한 화면입니다.

_
스팀잇 피드 가져와서 출력하기
동영상에서는 더미 데이터를 이용해서 피드 목록을 출력하고 있습니다. 저는 스팀잇 서버에서 데이터를 가져와서 화면에 출력해보겠습니다.
HomeTab.js 파일을 수정합니다. 그리고 스팀잇에서 피드를 가져오는 fetchFeeds() 함수를 구현합니다. 저는 kr 태그에서 최신글 20개를 가져오도록 구현하였습니다.
export default class HomeTab extends Component {

    fetchFeeds() {
        const data = {
            id: 1,
            jsonrpc: "2.0",
            method: "call",
            params: [
              "database_api",
              "get_discussions_by_created",
              [{ tag: "kr", limit: 20 }]
            ]
        };
        return fetch('https://api.steemit.com', {
            method: 'POST',
            body: JSON.stringify(data)
        })
        .then(res => res.json())
        .then(res => res.result)
    }

    // ... 일부 코드 생략 ...
_
그 다음은 HomeTab 컴포넌트가 마운트되기 전에 피드를 가져옵니다. state.feeds를 선언하고, componentWillMount() 함수를 구현합니다.
export default class HomeTab extends Component {

    state = {
        feeds: []
    }

    componentWillMount() {
        this.fetchFeeds().then(feeds => {
            this.setState({
              feeds
            })
        });
    }

    // ... 일부 코드 생략 ...
스팀잇 서버에서 가져온 피드 목록 데이터를
state.feeds에 저장합니다.
_
그다음은 HomeTab의 render() 함수를 수정합니다.
export default class HomeTab extends Component {

  render() {
    return (
      <Container style={style.container}>
        <Content>
          {
            this.state.feeds.map(feed => <CardComponent data={ feed }/>)
          }
        </Content>
      </Container>
    );
  }

  // ... 일부 코드 생략 ...
피드 목록을 구현하기 위해 Array의
map함수을 사용하였습니다.state.feeds배열을 루프돌면서 CardComponent의data에 각 피드 항목 데이터를 전달합니다.
CardCompnent 수정하기
마지막으로 HomeTab에서 전달 받은 피드 항목 데이터를 CardCompnent에 출력합니다.
export default class CardCompnent extends Component {
  render() {
    const { data } = this.props; // 피드 항목 데이터
    const { image } = JSON.parse(data.json_metadata); // json_metadata에서 이미지 url을 파싱
    return (
        <Card>
            <CardItem>
              <Left>
                <Thumbnail source={{ uri: `https://steemitimages.com/u/${data.author}/avatar` }} />
                <Body>
                  <Text>{data.author}</Text>
                  <Text note>{new Date(data.created).toDateString()}</Text>
                </Body>
              </Left>
            </CardItem>
            {
              image && image.length ?
              <CardItem cardBody>
                <Image
                  source={{ uri: image[0] }}
                  style={{ height:200, width:null, flex: 1 }} />
              </CardItem> : null
            }
            <CardItem style={{ height: 20 }}>
              <Text>{ data.active_votes.length } likes</Text>
            </CardItem>
            <CardItem>
              <Text style={{ fontWeight:'900'}}>{ data.title }</Text>
            </CardItem>
            <CardItem>
              <Text>
              { data.body.replace(/\n/g,' ').slice(0, 200) }
              </Text>
            </CardItem>
            <CardItem style={{ height:45 }}>
              <Left>
                <Button transparent>
                  <Icon name='ios-heart' style={{ color:'black', marginRight: 5 }}/>
                  <Text>{ data.active_votes.length }</Text>
                </Button>
                <Button transparent>
                  <Icon name='ios-chatbubbles' style={{ color:'black', marginRight: 5 }}/>
                  <Text>{ data.children }</Text>
                </Button>
                <Button transparent>
                  <Icon name='ios-send' style={{ color:'black' }}/>
                </Button>
              </Left>
              <Right>
                <Text>{ data.pending_payout_value }</Text>
              </Right>
            </CardItem>
        </Card>
    );
  }
}
대문 이미지는
json_metadata에 이미지 URL이 있는 경우에만 표시되도록 하였습니다.
_
여기까지 작업한 화면입니다.

_
작업한 코드는 모두 깃허브에 업로드되어 있습니다.
https://github.com/anpigon/rn_instagram_clone
_
여기까지 읽어주셔서 감사합니다.


와ㅡ 뭔게 엄청 쉬워 보이지만, 따라 하면 잘 안되겠죠 하핳