1. 폼 처리의 개요
01. 폼(form)
- 사용자가 웹 브라우저를 통해 입력된 모든 데이터를 한번에 웹 서버로 전송하는 양식
- 전송한 데이터는 웹 서버가 처리하고 처리 결과에 따라 다른 웹페이지를 보여줌
- 사용자와 웹 애플리케이션이 상호 작용하는 중요한 기술 중 하나
- 사용자가 어떤 내용을 원하는지, 사용자의 요구 사항이 무엇인지 파악할 때 가장 많이 사용하는 웹 애플리케이션 필수적인 요소
02. 폼 데이터 처리 과정

03. 폼을 구성하는 태그의 종류

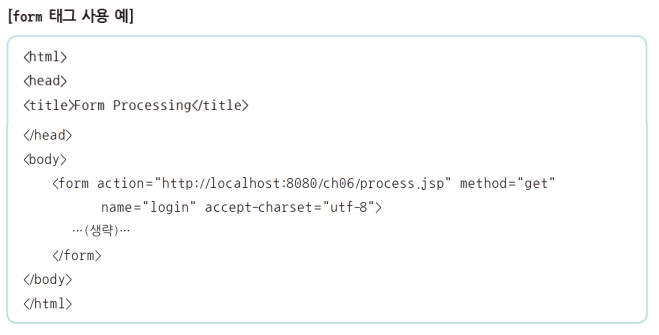
- 속성을 이용하여 폼 데이터를 전송할 때 어디로 보낼지, 어떤 방식으로 보낼지 설정
- form 태그의 모든 속성은 필수가 아니라 선택적으로 사용

3. input 태그의 기능과 사용법
01. input 태그
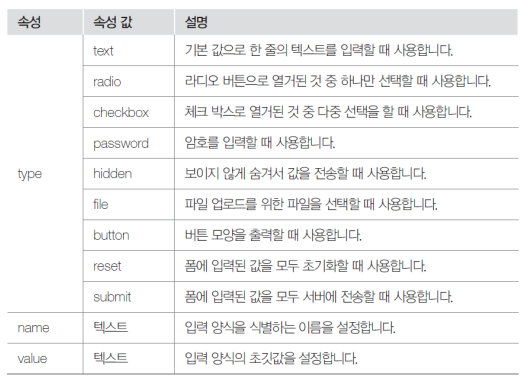
- 사용자가 텍스트 입력이나 선택 등을 다양하게 할 수 있도록 공간을 만드는 태그
- 종료 태그 없이 단독으로 사용할 수 있음

- input 태그의 기본 속성

예제 01.
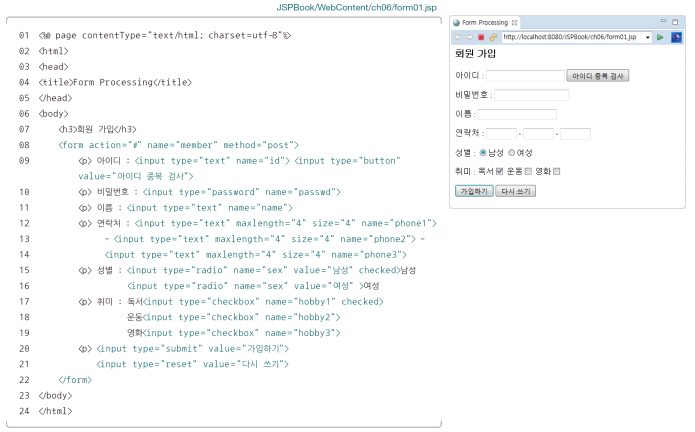
- form 태그와 input 태그로 간단한 회원 가입 양식 만들기
<%@ page language="java" contentType="text/html; charset=UTF-8"
    pageEncoding="UTF-8"%>
<!DOCTYPE html>
<html>
<head>
<meta http-equiv="Content-Type" content="text/html; charset=UTF-8">
<title>Insert title here</title>
</head>
<body>
	<h3>회원 가입</h3>
	<form action="#" name="member" method="post">
		<p> 아이디 : <input type="text" name="id"> <input type="button" value="아이디 중복 검사"></p>
		<p>비밀번호 : <input type="password" name="password"></p>
		<p>이름 : <input type="text" name="name"></p>
		<p>
			연락처 : <input type="text" maxlength="4" size="4" name="phone1">
			- <input type="text" maxlength="4" size="4" name="phone2">
			- <input type="text" maxlength="4" size="4" name="phone3">
		</p>
		<p>
			성별 : <input type="radio" name="sex" value="남성" checked>남성
			<input type="radio" name="sex" value="여성">여성
		</p>
		<p>
			취미 : 독서 <input type="checkbox" name="hobby1" checked>
			운동 <input type="checkbox" name="hobby2">
			영화 <input type="checkbox" name="hobby3">
		</p>
		<p>
			<input type="submit" value="가입하기">
			<input type="reset" value="다시 쓰기">
		</p>

	</form>
</body>
</html>
4. select 태그의 기능과 사용법
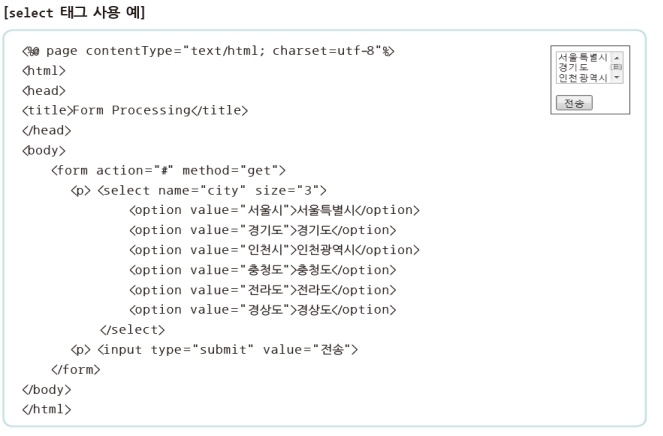
01. select 태그
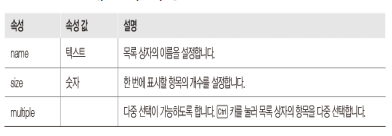
- 여러 개의 항목이 나타나는 목록 상자에서 항목을 선택하는 태그
- 시작 태그와 종료 태그가 있으며, 리스트 박스에 여러 항목을 추가 삽입하기위해 반드시 option 태그를 포함해야 함

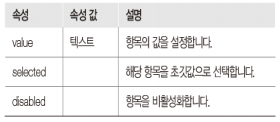
- select 태그의 속성
- option 태그의 속성
예제 02.
- select 태그로 [예제 6-1] 회원 가입 양식의 연락처 수정하기

<%@ page language="java" contentType="text/html; charset=UTF-8"
    pageEncoding="UTF-8"%>
<!DOCTYPE html>
<html>
<head>
<meta http-equiv="Content-Type" content="text/html; charset=UTF-8">
<title>Insert title here</title>
</head>
<body>
	<h3>회원 가입</h3>
	<form action="#" name="member" method="post">
		<p> 아이디 : <input type="text" name="id"> <input type="button" value="아이디 중복 검사"></p>
		<p>비밀번호 : <input type="password" name="password"></p>
		<p>이름 : <input type="text" name="name"></p>
		<p>
			연락처 : <select name="phone1">
				<option value="010">010</option>
				<option value="011">011</option>
				<option value="016">016</option>
				<option value="017">017</option>
				<option value="019">019</option>
			</select>
			- <input type="text" maxlength="4" size="4" name="phone2">
			- <input type="text" maxlength="4" size="4" name="phone3">
		</p>
		<p>
			성별 : <input type="radio" name="sex" value="남성" checked>남성
			<input type="radio" name="sex" value="여성">여성
		</p>
		<p>
			취미 : 독서 <input type="checkbox" name="hobby1" checked>
			운동 <input type="checkbox" name="hobby2">
			영화 <input type="checkbox" name="hobby3">
		</p>
		<p>
			<input type="submit" value="가입하기">
			<input type="reset" value="다시 쓰기">
		</p>

	</form>
</body>
</html>
5. textarea 태그의 기능과 사용법
01. textarea 태그
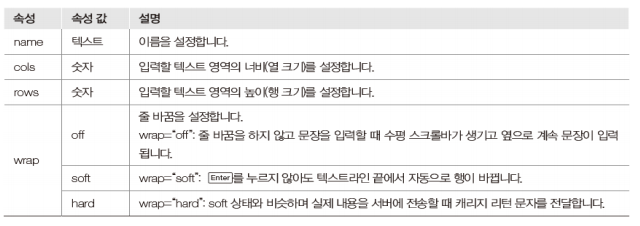
- 여러 줄의 텍스트를 입력할 수 있는 태그
- 기본 값은 <textarea>와 </textarea>태그 사이에 설정
- 입력 폼 안에 사용된 태그와 띄어쓰기가 그대로 출력됨

- textarea 태그의 속성

02. 예제 03.
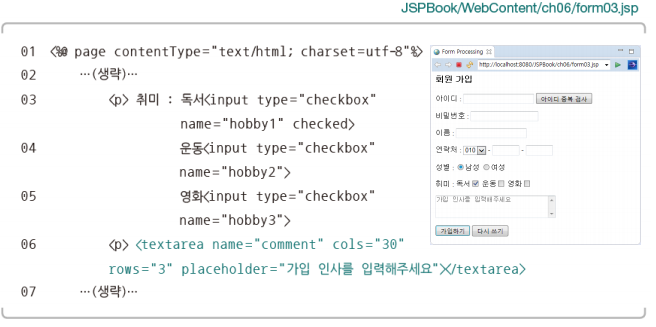
- textarea 태그로 [예제 6-2]의 회원 가입 양식에 가입 인사 추가하기
<%@ page language="java" contentType="text/html; charset=UTF-8"
    pageEncoding="UTF-8"%>
<!DOCTYPE html>
<html>
<head>
<meta http-equiv="Content-Type" content="text/html; charset=UTF-8">
<title>Insert title here</title>
</head>
<body>
	<h3>회원 가입</h3>
	<form action="#" name="member" method="post">
		<p> 아이디 : <input type="text" name="id"> <input type="button" value="아이디 중복 검사"></p>
		<p>비밀번호 : <input type="password" name="password"></p>
		<p>이름 : <input type="text" name="name"></p>
		<p>
			연락처 : <select name="phone1">
				<option value="010">010</option>
				<option value="011">011</option>
				<option value="016">016</option>
				<option value="017">017</option>
				<option value="019">019</option>
			</select>
			- <input type="text" maxlength="4" size="4" name="phone2">
			- <input type="text" maxlength="4" size="4" name="phone3">
		</p>
		<p>
			성별 : <input type="radio" name="sex" value="남성" checked>남성
			<input type="radio" name="sex" value="여성">여성
		</p>
		<p>
			취미 : 독서 <input type="checkbox" name="hobby1" checked>
			운동 <input type="checkbox" name="hobby2">
			영화 <input type="checkbox" name="hobby3">
		</p>
		 <p>
		 	<textarea name="comment" cols="30" rows="3" placeholder="가입 인사를 입력해 주세요">
		 	</textarea>
		 </p>
		<p>
			<input type="submit" value="가입하기">
			<input type="reset" value="다시 쓰기">
		</p>

	</form>
</body>
</html>
6. 폼 데이터 처리하기
01. 요청 파라미터의 값 받기
- request 내장 객체는 웹 브라우저가 서버로 보낸 요청에 대한 다양한 정보를 담고 있어 getParameter() 메소드를 이용하여 요청 파라미터의 값을 얻을 수 있음


예제 04.
- [예제 6-3]의 회원 가입 양식에서 폼 데이터 전송받기

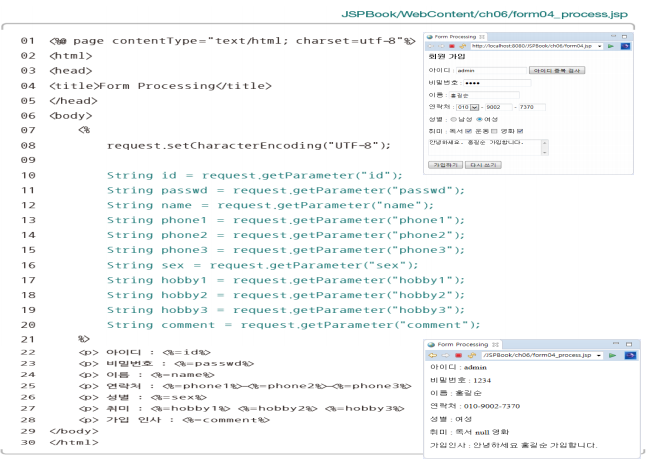
<%@ page language="java" contentType="text/html; charset=UTF-8"
    pageEncoding="UTF-8"%>
<!DOCTYPE html>
<html>
<head>
<meta http-equiv="Content-Type" content="text/html; charset=UTF-8">
<title>Insert title here</title>
</head>
<body>
	<h3>회원 가입</h3>
	<form action="form04_process.jsp" name="member" method="post">
		<p> 아이디 : <input type="text" name="id"> <input type="button" value="아이디 중복 검사"></p>
		<p>비밀번호 : <input type="password" name="password"></p>
		<p>이름 : <input type="text" name="name"></p>
		<p>
			연락처 : <select name="phone1">
				<option value="010">010</option>
				<option value="011">011</option>
				<option value="016">016</option>
				<option value="017">017</option>
				<option value="019">019</option>
			</select>
			- <input type="text" maxlength="4" size="4" name="phone2">
			- <input type="text" maxlength="4" size="4" name="phone3">
		</p>
		<p>
			성별 : <input type="radio" name="sex" value="남성" checked>남성
			<input type="radio" name="sex" value="여성">여성
		</p>
		<p>
			취미 : 독서 <input type="checkbox" name="hobby1" checked>
			운동 <input type="checkbox" name="hobby2">
			영화 <input type="checkbox" name="hobby3">
		</p>
		 <p>
		 	<textarea name="comment" cols="30" rows="3" placeholder="가입 인사를 입력해 주세요">
		 	</textarea>
		 </p>
		<p>
			<input type="submit" value="가입하기">
			<input type="reset" value="다시 쓰기">
		</p>

	</form>
</body>
</html>
<%@ page language="java" contentType="text/html; charset=UTF-8"
pageEncoding="UTF-8"%>
<!DOCTYPE html>
<html>
<head>
<meta http-equiv="Content-Type" content="text/html; charset=UTF-8">
<title>Insert title here</title>
</head>
<body>
<%
request.setCharacterEncoding("UTF-8");
String id = request.getParameter("id");
String password = request.getParameter("password");
String name = request.getParameter("name");
String phone1 = request.getParameter("phone1");
String phone2 = request.getParameter("phone2");
String phone3 = request.getParameter("phone3");
String sex = request.getParameter("sex");
String hobby1 = request.getParameter("hobby1");
String hobby2 = request.getParameter("hobby2");
String hobby3 = request.getParameter("hobby3");
String comment = request.getParameter("comment");
%>
<p> 아이디 : <%=id %></p>
<p> 비밀번호 : <%=password %></p>
<p> 이름 : <%=name %></p>
<p> 휴대폰 : <%=phone1 %>-<%=phone2 %>-<%=phone3 %></p>
<p> 성별 : <%=sex %></p>
<p> 취미 : <%=hobby1 %> <%=hobby2 %> <%=hobby3 %></p>
<p> 가입인사 : <%=comment %></p>
</body>
</html>예제 05.
- [예제 6-4]의 회원 가입 양식에서 폼 데이터 전송받기
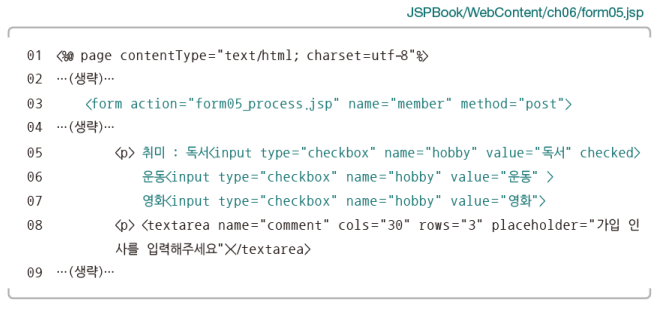


<%@ page language="java" contentType="text/html; charset=UTF-8"
    pageEncoding="UTF-8"%>
<!DOCTYPE html>
<html>
<head>
<meta http-equiv="Content-Type" content="text/html; charset=UTF-8">
<title>Insert title here</title>
</head>
<body>
	<h3>회원 가입</h3>
	<form action="form04_process.jsp" name="member" method="post">
		<p> 아이디 : <input type="text" name="id"> <input type="button" value="아이디 중복 검사"></p>
		<p>비밀번호 : <input type="password" name="password"></p>
		<p>이름 : <input type="text" name="name"></p>
		<p>
			연락처 : <select name="phone1">
				<option value="010">010</option>
				<option value="011">011</option>
				<option value="016">016</option>
				<option value="017">017</option>
				<option value="019">019</option>
			</select>
			- <input type="text" maxlength="4" size="4" name="phone2">
			- <input type="text" maxlength="4" size="4" name="phone3">
		</p>
		<p>
			성별 : <input type="radio" name="sex" value="남성" checked>남성
			<input type="radio" name="sex" value="여성">여성
		</p>
		<p>
			취미 : 독서 <input type="checkbox" name="hobby" value="독서" checked>
			운동 <input type="checkbox" name="hobby" value="운동">
			영화 <input type="checkbox" name="hobby" value="영화">
		</p>
		 <p>
		 	<textarea name="comment" cols="30" rows="3" placeholder="가입 인사를 입력해 주세요">
		 	</textarea>
		 </p>
		<p>
			<input type="submit" value="가입하기">
			<input type="reset" value="다시 쓰기">
		</p>

	</form>
</body>
</html>
<%@ page language="java" contentType="text/html; charset=UTF-8"
pageEncoding="UTF-8"%>
<!DOCTYPE html>
<html>
<head>
<meta http-equiv="Content-Type" content="text/html; charset=UTF-8">
<title>Insert title here</title>
</head>
<body>
<%
request.setCharacterEncoding("UTF-8");
String id = request.getParameter("id");
String password = request.getParameter("password");
String name = request.getParameter("name");
String phone1 = request.getParameter("phone1");
String phone2 = request.getParameter("phone2");
String phone3 = request.getParameter("phone3");
String sex = request.getParameter("sex");
String[] hobbys = request.getParameterValues("hobby");
String comment = request.getParameter("comment");
%>
<p> 아이디 : <%=id %></p>
<p> 비밀번호 : <%=password %></p>
<p> 이름 : <%=name %></p>
<p> 휴대폰 : <%=phone1 %>-<%=phone2 %>-<%=phone3 %></p>
<p> 성별 : <%=sex %></p>
<p> 취미 : <%
if (hobbys != null) {
for(String hoby : hobbys) {
out.println(" "+hoby);
}
}
%>
</p>
<p> 가입인사 : <%=comment %></p>
</body>
</html>02. 요청 파라미터의 전체 값 받기
- 요청 파라미터를 설정하지 않아도 모든 값을 전달 받을 수 있음
- 텍스트 박스, 라이도 버튼, 드롭다운 박스와 같은 다양한 유형에 대해 한 번에 폼 데이터를 전달 받을 수 있음
03. 폼 데이터의 일괄 처리 메소드


예제 06.
- [예제 6-4]의 회원 가입 양식에서 폼 데이터를 한 번에 전송하기

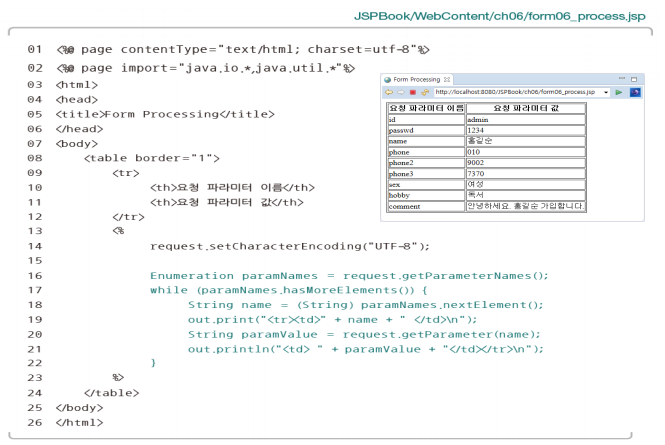
<%@ page language="java" contentType="text/html; charset=UTF-8"
    pageEncoding="UTF-8"%>
<!DOCTYPE html>
<html>
<head>
<meta http-equiv="Content-Type" content="text/html; charset=UTF-8">
<title>Insert title here</title>
</head>
<body>
	<h3>회원 가입</h3>
	<form action="form06_process.jsp" name="member" method="post">
		<p> 아이디 : <input type="text" name="id"> <input type="button" value="아이디 중복 검사"></p>
		<p>비밀번호 : <input type="password" name="password"></p>
		<p>이름 : <input type="text" name="name"></p>
		<p>
			연락처 : <select name="phone1">
				<option value="010">010</option>
				<option value="011">011</option>
				<option value="016">016</option>
				<option value="017">017</option>
				<option value="019">019</option>
			</select>
			- <input type="text" maxlength="4" size="4" name="phone2">
			- <input type="text" maxlength="4" size="4" name="phone3">
		</p>
		<p>
			성별 : <input type="radio" name="sex" value="남성" checked>남성
			<input type="radio" name="sex" value="여성">여성
		</p>
		<p>
			취미 : 독서 <input type="checkbox" name="hobby" value="독서" checked>
			운동 <input type="checkbox" name="hobby" value="운동">
			영화 <input type="checkbox" name="hobby" value="영화">
		</p>
		 <p>
		 	<textarea name="comment" cols="30" rows="3" placeholder="가입 인사를 입력해 주세요">
		 	</textarea>
		 </p>
		<p>
			<input type="submit" value="가입하기">
			<input type="reset" value="다시 쓰기">
		</p>

	</form>
</body>
</html>
<%@page import="java.util.Enumeration"%>
<%@ page language="java" contentType="text/html; charset=UTF-8"
pageEncoding="UTF-8"%>
<!DOCTYPE html>
<html>
<head>
<meta http-equiv="Content-Type" content="text/html; charset=UTF-8">
<title>Insert title here</title>
</head>
<body>
<table border="1" >
<tr>
<th>요청 파라미터 이름</th>
<th>요청 파라미터 값</th>
</tr>
<%
request.setCharacterEncoding("UTF-8");
Enumeration paramNames = request.getParameterNames();
while(paramNames.hasMoreElements()) {
String name = (String) paramNames.nextElement();
out.print("<tr><td>"+name+"</td>\n");
String paramValue = request.getParameter(name);
out.print("<td>"+paramValue+"</td></tr>\n");
}
%>
</table>
</body>
</html>7. 웹 쇼핑몰 상품 등록 페이지

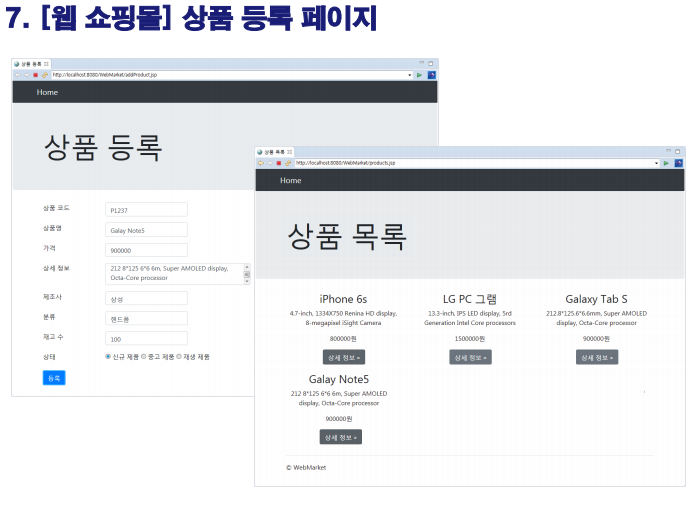
- WebContent/addProduct.jsp
<%@ page language="java" contentType="text/html; charset=UTF-8"
	pageEncoding="UTF-8"%>
<!DOCTYPE html>
<html>
<head>
<meta http-equiv="Content-Type" content="text/html; charset=UTF-8">
<title>상품 등록</title>
<style>
.inputRow {
	margin: 15px 0px;
	display: flex;
	align-items : center;
}

.inputRow label {
	width : 150px;
}

.inputRow input, .inputRow textarea {
	font-size: 1.3rem;
}
.inputRow input.btn {
	font-size: 1rem;
	padding : 5px 15px;
}
</style>
</head>
<body>
	<jsp:include page="header.jsp" />

	<div class="main">
		<div class="banner">
			<div class="container">
				<h1>상품 등록</h1>
			</div>
		</div>

		<div class="content">
			<div class="container">
				<form name="newProduct" action="./processAddProduct.jsp"
					class="form-horizontal" method="post">
					<div class="inputRow">
						<label for="productId">상품 코드</label> <input type="text"
							name="productId" id="productId">
					</div>
					<div class="inputRow">
						<label for="name">상품 명</label> <input type="text" name="name" id ="name">
					</div>
					<div class="inputRow">
						<label for="unitPrice">가격</label> <input type="text" name="unitPrice" id="unitPrice">
					</div>
					<div class="inputRow">
						<label for="description">상세 정보</label>
						<textarea name="description" cols="50" rows="2" id="description">
							</textarea>
					</div>
					<div class="inputRow">
						<label for="manufacturer">제조사</label> <input type="text" name="manufacturer" id="manufacturer">
					</div>
					<div class="inputRow">
						<label for="category">분류</label> <input type="text" name="category" id="category">
					</div>
					<div class="inputRow">
						<label for="unitStock">재고 수</label> <input type="text" name="unitStock" id="unitStock">
					</div>
					<div class="inputRow">
						<label>상태</label>
						<label><input type="radio" name="condition" value="New"> 신규 제품</label>
						<label><input type="radio" name="condition" value="Old"> 중고 제품</label>
						<label><input type="radio" name="condition" value="Refurbished"> 재생 제품</label>
					</div>
					<div class="inputRow">
						<input type="submit" value="등록" class="btn btn-secondary">
					</div>
				</form>
				<hr>
			</div>
		</div>
	</div>

	<jsp:include page="footer.jsp" />
</body>
</html>- WebMarket/src/dao/ProductRepository.java
package dao;

import java.util.ArrayList;
import dto.Product;

public class ProductRepository {

	private ArrayList<Product> listOfProducts = new ArrayList<Product>();
	private static ProductRepository instance = new ProductRepository();

	public static ProductRepository getInstance() {
		return instance;
	}

	public ProductRepository() {
		Product phone = new Product("P1234", "iPhone 6s", 800000);
		phone.setDescription("4.7-inch, 1334X750 Renina HD display, 8-megapixel iSight Camera");
		phone.setCategory("Smart Phone");
		phone.setManufacturer("Apple");
		phone.setUnitInStock(1000);
		phone.setCondition("New");

		Product notebook = new Product("P1235", "LG PC 그램", 1500000);
		notebook.setDescription("13.3-inch, IPS LED display, 5rd Generation notebook. Inter Core processors");
		notebook.setCategory("Notebook");
		notebook.setManufacturer("LG");
		notebook.setUnitInStock(1000);
		notebook.setCondition("Refurbished");

		Product tablet = new Product("P1236", "Galaxy Tab S", 900000);
		tablet.setDescription("212.8*125.6*6.6mm, Super AMOLEED display, Octa-Core processor");
		tablet.setCategory("Tablet");
		tablet.setManufacturer("Samsum");
		tablet.setUnitInStock(1000);
		tablet.setCondition("Old");

		listOfProducts.add(phone);
		listOfProducts.add(notebook);
		listOfProducts.add(tablet);
	}

	public ArrayList<Product> getAllProducts() {
		return listOfProducts;
	}

	public Product getProductById(String productId) {
		Product productById = null;

		for (int i = 0; i < listOfProducts.size(); i++) {
			Product product = listOfProducts.get(i);
			if(product != null && product.getProductId() != null && product.getProductId().equals(productId)){
				productById = product;
				break;
			}
		}
		return productById;
	}

	public void addProduct(Product product) {
		listOfProducts.add(product);
	}
}
- WebMarket/WebContent/processAddProduct.jsp
<%@ page language="java" contentType="text/html; charset=UTF-8"
    pageEncoding="UTF-8"%>
<%@ page import="dto.Product" %>
<%@ page import="dao.ProductRepository" %>
<!DOCTYPE html>
<html>
<head>
<meta http-equiv="Content-Type" content="text/html; charset=UTF-8">
<title>Insert title here</title>
</head>
<body>
	<%
		request.setCharacterEncoding("UTF-8");

		String productId = request.getParameter("productId");
		String name = request.getParameter("name");
		String unitPrice = request.getParameter("unitPrice");
		String description = request.getParameter("description");
		String manufacturer = request.getParameter("manufacturer");
		String category = request.getParameter("category");
		String unitInStock = request.getParameter("unitInStock");
		String condition = request.getParameter("condition");

		Integer price;

		if(unitPrice.isEmpty())
			price = 0;
		else
			price = Integer.parseInt(unitPrice);

		long stock;

		if(unitInStock.isEmpty())
			stock = 0;
		else
			stock = Long.parseLong(unitInStock);

		ProductRepository dao = ProductRepository.getInstance();

		Product newProduct = new Product();
		newProduct.setProductId(productId);
		newProduct.setPname(name);
		newProduct.setUnitPrice(price);
		newProduct.setDescription(description);
		newProduct.setManufacturer(manufacturer);
		newProduct.setCategory(category);
		newProduct.setUnitInStock(stock);
		newProduct.setCondition(condition);

		dao.addProduct(newProduct);

		response.sendRedirect("products.jsp");
	%>
</body>
</html>- WebMarket/WebContent/products.jsp
<%@ page language="java" contentType="text/html; charset=UTF-8"
pageEncoding="UTF-8"%>
<%@ page import="java.util.ArrayList"%>
<%@ page import="dto.Product"%>
<%@ page import="dao.ProductRepository" %>
<jsp:useBean id="productDAO" class="dao.ProductRepository"
scope="session" />
<!DOCTYPE html>
<html>
<head>
<meta http-equiv="Content-Type" content="text/html; charset=UTF-8">
<title>상품 목록</title>
<style>
.main .content .row {
display: flex;
justify-content: space-around;
align-items: center;
flex-wrap : wrap;
}
.main .content .row .column {
width: 300px;
display: flex;
flex-direction: column;
justify-content: center;
margin: 15px 0;
}
.main .content .row .column h3, .main .content .row .column p {
text-align: center;
padding: 10px;
}
.main .content .row .column h3 {
font-size: 1.7rem;
font-weight: 400;
}
</style>
<%!String greenting = "상품목록";%>
</head>
<body>
<jsp:include page="header.jsp" />
<div class="main">
<div class="banner">
<div class="container">
<h1><%=greenting%></h1>
</div>
</div>
<div class="content">
<%
ProductRepository dao = ProductRepository.getInstance();
ArrayList<Product>listOfProducts = dao.getAllProducts();
%>
<div class="container">
<div class="row">
<%
for (int i = 0; i < listOfProducts.size(); i++) {
Product product = listOfProducts.get(i);
%>
<div class="column">
<h3><%=product.getPname()%></h3>
<p><%=product.getDescription()%></p>
<p><%=product.getUnitPrice()%>원
</p>
<p>
<a href="./product.jsp?id=<%=product.getProductId()%>"
class="btn" role="button">상세 정보»</a>
</div>
<%
}
%>
</div>
<hr>
</div>
</div>
</div>
<jsp:include page="footer.jsp" />
</body>
</html>- WebMarket/WebContent/product.jsp
<%@ page language="java" contentType="text/html; charset=UTF-8"
pageEncoding="UTF-8"%>
<%@ page import="dto.Product"%>
<%@ page import="dao.ProductRepository" %>
<jsp:useBean id="productDAO" class="dao.ProductRepository"
scope="session" />
<!DOCTYPE html>
<html>
<head>
<meta http-equiv="Content-Type" content="text/html; charset=UTF-8">
<title>상품 상세 정보</title>
<style>
.content .row {
padding : 30px 0;
}
.content h3, .content p, .content h4 {
margin : 25px 0;
}
.content h3 {
margin-bottom : 5px;
}
.content .description {
margin-top : 5px;
}
.content .badge {
background-color : #f00;
color : #fff;
border-radius : 5px;
}
</style>
</head>
<body>
<jsp:include page="header.jsp" />
<div class="main">
<div class="banner">
<div class="container">
<h1>상품 정보</h1>
</div>
</div>
<%
String id = request.getParameter("id");
ProductRepository dao = ProductRepository.getInstance();
Product product = dao.getProductById(id);
%>
<div class="content">
<div class="container">
<div class="row">
<h3><%=product.getPname()%></h3>
<p class="description"><%=product.getDescription()%></p>
<p>
<b>상품 코드 : </b><span class="badge"><%=product.getProductId()%></span>
<p>
<b>제조사</b> :
<%=product.getManufacturer()%></p>
<p>
<b>분류</b> :
<%=product.getCategory()%></p>
<p>
<b>재고 수</b> :
<%=product.getUnitInStock()%>
</p>
<h4><%=product.getUnitPrice()%>원</h4>
<p>
<a href="#" class="btn btn-secondary">상품 주문 »</a>
<a href="./products.jsp" class="btn">상품 목록 »</a>
</p>
</div>
<hr>
</div>
</div>
</div>
<jsp:include page="footer.jsp" />
</body>
</html>
