0. 오리엔테이션
(1) 웹이란 무엇인가?
-
웹과 인터넷의 관계: 웹 ≠ 인터넷, 인터넷이 web을 포괄하는 개념
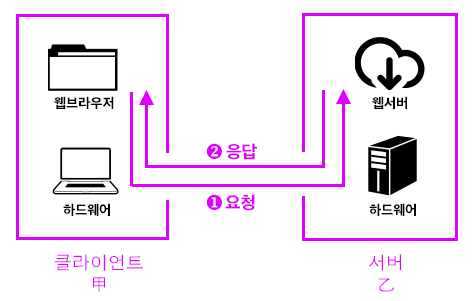
서버와 클라이언트 -
서버: 클라이언트에게 응답
-
클라이언트: 서버에게 요청

(2) HTML의 정의 -
HTML: 웹 페이지를 만드는 언어
- HT: HyperText, 문서와 문서가 링크로 연결되어 있음
- M: Markup, 태그로 이루어져 있음
- L: Language
(3) HTML 문법
- 태그(Tag): 정보를 정의하는 방식
- 태그의 형식 <태그명 속성명1="속성값1" 속성명2="속성값2">컨텐츠</태그명> *닫히는 태그가 필요없는 태그의 경우: <태그명 />의 형식
- 예시: 생활코딩 (밑줄친 부분이 태그)
-
앞뒤로 강조 표시한 부분: 열리는 태그 & 닫히는 태그 / 생활코딩: 컨텐츠
-
a: 태그명, 링크
-
herf: 속성명, 이 속성값으로 "http://opentutorials.org" (” “로 묶어줌)
*닫히는 태그는 태그 앞에 ‘/’가 붙음
-
(4) 문서의 구조
- 문서의 구조
<html> <head> 문서를 정의하는 데이터가 위치함 </head> <body> 문서에 표시되는 컨텐츠가 위치함 </body> </html>-
HTML 문서의 파일 확장자: .html 혹은 .htm
-
최상위 태그로 사용, 그 하위에 와 태그
- 태그: 문서 설명, 제목이나 키워드와 같은 정보
-
태그: 문서의 내용
*참고: 메타 데이터(meta data): 데이터를 설명하는 데이터로, 태그가 대표적인 메타 데이터.
-
- 예제:
<a> 태그 사용해서 링크를 만들고 <img> 태그를 이용해 이미지 출력
<!DOCTYPE html>
<html>
     <head>
          <meta http-equiv="Content-Type" content="text/html;charset=utf-8" />
     </head>
     <body>
          <img alt="생활코딩 로고" scr="https://opentutorials.org/user/course/1/94.png" />
          <br/>
          <a href="https://opentutorials.org/course/1">생활코딩</a>
     </body>
</html>- 로 시작해 로 끝남
- 의 meta data 안에 문서 설명
- 태그 안에 화면에 표시되는 데이터들( 태그의 자식), 문서의 내용
(5) 실습방법과 개발도구
- 개발도구: 개발을 하는데 필요한 도구와 개발된 결과를 실행할 환경
- 웹 브라우저: 구글 크롬을 사용
- 인스펙터(크롬 개발자 도구에 내장)
- 네트워크 감시(크롬 개발자 도구에 내장)
- 에디터: 소스코드를 작성하는 데 필요한 도구, aptana 사용
- jisfiddle, github를 사용해 예제 사용
1. DTD(Doctype)
- 요약: Document Type Difinition. 문서의 형식 지정
<!DOCTYPE html> - Doctype: 문서의 형식(어떤 표준을 따른 것인지)을 브라우저에게 알려주는 것, 문서의 제일 위에 위치
- HTML5의 doctype 사용:
2. BODY
(1) BODY 태그란
- BODY 태그: 웹페이지의 내용들이 위치하는 태그
(2) 링크
- 링크: 문서에서 다른 문서로 이동할 수 있는 수단.
- 문법:
<a href="URL" title="설명" target="문서가 로드될 대상">링크이름</a>- href : 링크이름과 연결되어 있는 리소스(resource)의 주소
- title : 연결되어 있는 리소스에 대한 설명
- target : 문서가 로드될 대상
- _self : 현재의 문서가 로드된 프래임, 현재 문서 사라짐
- _blank : 새로운 창(탭)을 띄우고 거기에 문서를 로드
- _parent : 현재 문서가 frame나 iframe에 로드된 경우 현재 문서를 로드한 프레임에 문서를 로드
- 프레임의 이름
- 예제:
<!DOCTYPE html>
<html>
    <head>
        <meta http-equiv="Content-Type" content="text/html;charset=utf-8" >
    </head>
    <body>
        <p>
            <a href="http://opentutorials.org/course/1">생활코딩</a> : 생활코딩 홈페이지로 이동한다.
        </p>
        <p>
            <a href="http://opentutorials.org/course/1" target="_blank">생활코딩</a> : 새창에서 생활코딩 홈페이지를 연다. (_blank)
        </p>
        <p>
            <a href="http://opentutorials.org" target="_self">생활코딩</a> : 현재 프래임에서 생활코딩 홈페이지를 연다.
        </p>
        <p>
            <a href="http://opentutorials.org" title="생활코딩 홈페이지">생활코딩</a> : 링크에 부가 설명을 추가한다. 링크에 툴팁을 표시한다.
        </p>
        <p>
            <a href="http://opentutorials.org/course/11/10#reference" title="생활코딩 html이란 무엇인가 참조">HTML 소개 참조</a> : 생활코딩의 HTML소개 페이지 중 참조 부분으로 문서를 이동한다.
        </p>
    </body>
</html>
<!DOCTYPE html> <html> <body> <iframe name="sample" src="http://w3c.org/" width="100%" height="300"></iframe> <a href="http://opentutorials.org/" target="sample">아이프래임</a> </body> </html>- 프레임: 하나의 문서 안에 다른 문서 로드
- 아이프레임: 자신이 원하는 공간에 링크시키는 방법
- src: 아이프레임이 위치할 곳에 로드될 문서 URL
- target: 문서가 어디로 열릴 것인지를 결정
- 아이프레임: name을 지정한 다음 a의 target에 해당 속성값 지정
(3) 문단, 줄바꿈, 띄어쓰기
- 문단: 글에서 하나로 묶을 수 있는 짧은 단위
- 문법:
<p>문단</p>- 문단을 구분할 때 사용
- 문법:
- 줄바꿈: HTML은 개행문자를 무시하므로 <br/태그 사용>
- 문법:
문장<br />
- 문법:
- 띄어쓰기: HTML에서는 스페이스 문자가 한 번만 인정
- 문법:
문장 문장- 이를 이용해 여러 개의 공백 만들 수 있음
- 문법:
(4) 이미지
- 문법:
<img src="이미지가 위치하는 URL" alt="대체텍스트" width="폭" height="높이" longdesc="링크" />- src : source의 약자, 이미지가 위치하는 URL
- alt : alternative의 약자, 대체 텍스트. 이미지가 로딩되기 전이나, 이미지를 로딩할 수 없는 경우 이미지의 위치에 텍스트가 표시
- width, height : 이미지의 크기
- longdesc : 이미지와 관련된 링크가 있을 경우, 자세한 설명
(5) 목록(ul>li, ol>li)
- 목록: 연관되어 있는 항목들을 나열할 때 사용, CSS와 함께 메뉴로도 사용 가능
- 문법 순서가 없는 리스트(Unorderd List)
순서가 있는 리스트 (Ordered List)<ul> <li>항목</li> </ul><ol> <li>항목</li> </ol> - 예제: 리스트 중
<!DOCTYPE html>
<html>
    <head>
        <meta http-equiv="Content-Type" content="text/html;charset=utf-8" />
    </head>
    <body>
        <ol>
            <li>html
                <ol>
                    <li>수업</li>
                    <li>사전</li>
                    <li>쿡북</li>
                </ol>
            </li>
            <li>css</li>
            <li>javascript</li>
            <li>os</li>
            <li>php</li>
            <li>database</li>
        </ol>
    </body>
</html>
(6) 아이프레임, 프레임
- iframe: 페이지 안에 페이지를 삽입하는 방법
- 문법
<iframe src="불러올 웹페이지의 URL" scrolling="스크롤링 허용여부(yes|no|auto)"> iframe를 지원하지 않는 브라우저인 경우 대체정보를 제공 </iframe>-
src : 불러올 페이지의 URL
-
scrolling : 아이프레임 안에서 스크롤링을 허용할 것인지를 지정
- auto : 스크롤이 필요한 경우만 스크롤 바를 노출 (기본 값)
- yes : 스크롤링 허용, 스크롤이 필요 없는 경우도 스크롤 바를 노출
- no : 스크롤 하지 않음*참고: width, height, frameborder(프레임의 테두리 사용여부) 등의 속성이 더 있지만, 디자인은 CSS를 통해 제어하는 것이 권장
-
- 예제
<!DOCTYPE html>
<html>
    <body>
        <iframe src="http://opentutorials.org" width="90%" height="300" frameborder="1" scrolling="yes"></iframe>
    </body>
</html>
(7) 이스케이핑
- 예시:
태그를 줄바꿈으로 해석되지 않도록 하려면?<!DOCTYPE html> <html> <body> <br />은 줄바꿈을 의미하는 태그입니다. </body> </html> - 주요 이스케이프 코드
&→ & (ampersand, U+0026)<→ < (less-than sign, U+003C)>→ > (greater-than sign, U+003E)"→ " (quotation mark, U+0022)'→ ' (apostrophe, U+0027)
- 이스케이핑 도구 http://www.htmlescape.net/htmlescape_tool.html
(8) 표
-
표: 데이터를 구조화할 때 사용, 레이아웃으로도 사용 가능(div와 css가 더 많이 사용됨)
-
문법
<table> <tr> <th>제목</th> </tr> <tr> <td>데이터</td> </tr> </table>- th: 데이터 그룹의 제목
- td: th에 속하는 데이터 그룹
-
예제
<!DOCTYPE html> <html> <body> <table border="1"> <tr> <th>이름</th><th>성별</th><th>나이</th> </tr> <tr> <td>최진혁</td><td colspan="2">비공개</td> </tr> <tr> <td>최유빈</td><td>여</td><td>2</td> </tr> </table> </body> </html>- rowspan: 행 병합
- colspan: 열 병합
3. HEAD
(1) HEAD 태그란?
- HEAD 태그: 문서를 설명하는 태그들이 위치하는 태그, body 태그의 정보를 설명하는 메타 정보
(2) meta
- meta: 문서에 대한 정보를 기술하는 태그
- 문법
<meta name="" content="" /> <meta http-equiv="" content="" /> - 예제
<!DOCTYPE html>
<html>
    <head>
        <meta name="description" content="생활코딩은 일반인에게 프로그래밍을 알려주는 온라인 수업" />
        <meta name="keywords" content="생활코딩, HTML, HEAD, META" />
        <meta http-equiv="Content-Type" content="text/html;charset=utf-8" >
    </head>
</html>
<!DOCTYPE html> <html> <head> <meta http-equiv="refresh" content="2;url=http://opentutorials.org/"> </head> </html>- 2초 후에 opentutorials.org로 페이지를 이동함
(3) title
- title: 문서의 제목 정의
- 예제
<!DOCTYPE html>
<html>
    <head>
        <title>생활코딩</title>
    </head>
    <body>
    생활코딩은....
    </body>
</html>
4. FORM
(1) 서버와 클라이언트
- 서버: 정보 제공
- 개인용 PC와 똑같음 -단지 웹서비스가 돌아가는 컴퓨터일 뿐임
- 개인용 PC도 서버가 될 수 있음.
- 서버들이 모여있는 곳을 IDC라고 함.
- 보통 이렇게 생겼음 - 그러나 거의 똑같은 컴퓨터임
- 클라이언트: 정보를 제공받음
- • 서비스를 받는 컴퓨터, 브라우저 등을 의미
- 서버-클라이언트 모델
- 클라이언트가 요청하면 서버가 응답하는 것을 통해서 웹서비스가 운영됨
- 이 모델이 극대화된 것이 클라우드 컴퓨팅
- 모든 에플리케이션을 웹서버에서 제공하고 컴퓨터는 브라우져를 통해서 시스템을 이용 - 구글의 웹에플리케이션들과 크롬 OS
(2) 폼 (form)
- 폼: 사용자의 데이터를 서버에 전송하는 방법, 로그인/회원가입/글 작성/파일 전송 등의 작업을 하기 위해 이용
- 문법
<form action="서버로 전송한 데이터를 수신할 URL" method="데이터를 전송하는 방법"> 텍스트 필드, 라디오 버튼, 체크 박스와 같은 컨트롤을 생성하는 태그 </form>- action: 사용자가 입력한 데이터를 전송할 서버의 URL
- method : 사용자가 입력한 데이터를 전송하는 방법, 아래와 같은 방식
- get : action에 입력한 URL에 파라미터의 형태로 전송
- post : header의 body에 포함해서 전송
- 컨트롤: 텍스트 필드, 라디오 버튼, 체크 박스 등의 요소
- 사용자가 컨트로를 조작한 다음 전송 ⇒ action에 기술된 URL로 입력된 정보 전송 ⇒ 서버의 작업 수행
- GET과 POST
- GET
- URL에 정보가 담겨서 전송
- 전송할 수 있는 정보의 길이 제한
- 퍼머링크로 사용될 수 있음
- POST
- header의 body에 정보가 담겨서 전송
- URL 상에 저옵가 표시되지 않음
- 전송할 수 있는 정보의 길이 제한 없음
- 퍼머링크로 사용될 수 없음
- 서버 쪽에 작업(데이터의 기록, 삭제, 수정 등)을 명령할 때
- GET
- 예제
-
예제 1
<html> <head> <meta http-equiv="Content-Type" content="text/html;charset=utf-8" > </head> <body> <fieldset> <legend> GET </legend> <form action="./example2.php" method="GET"> <p> 닉네임 : <input type="text" name="nickname" /> <br /> </p> <p> 직업 : <select name="job"> <option value="designer">디자이너</option> <option value="programmer">프로그래머</option> <option value="planner">기획자</option> </select> </p> <input type="submit" value="전송"/> </form> </fieldset> <fieldset> <legend> POST </legend> <form action="./example2.php" method="POST"> <p> 닉네임 : <input type="text" name="nickname" /> <br /> </p> <p> 직업 : <select name="job"> <option value="designer">디자이너</option> <option value="programmer">프로그래머</option> <option value="planner">기획자</option> </select> </p> <input type="submit" value="전송"/> </form> </fieldset> </body> </html> -
예제 2
<html>
        <head>
                <meta http-equiv="Content-Type" content="text/html;charset=utf-8" >
        </head>
        <body>
                <?php
                echo $_REQUEST['nickname'].'님의 직업은 '.$_REQUEST['job'].'이군요!';
                ?>
        </body>
</html>
-
(3) 텍스트 입력
- 텍스트 필드: 사용자로부터 텍스트를 입력받을 수 있음, 단문에 적합한 것으로 긴 줄의 텍스트는
- name : 입력한 데이터의 이름
- value : 데이터의 값. 입력한 데이터의 기본 값으로 이 값이 기본적으로 텍스트 필드에 표시
- disabled : 값으로 disabled을 지정하면 텍스트 필드가 불능 상태. 서버로 전송해도 이 속성이 설정된 컨트롤의 데이터는 서버로 전송되지 않음
- readonly : 값으로 readonly를 지정하면 텍스트 필드에 값이 입력되지 않음. 서버로는 데이터가 전송
- 문법
<textarea name="값의 이름" rows="행의 수" cols="열의 수" disabled="disabled" readonly="readonly">값</textarea>- rows : 입력한 행위 수 만큼 높이가 정해짐
- cols : 입력한 열의 수 만큼 폭이 정해짐
(4) 선택
- 라디오 버튼
- 라디오 버튼: 여러 개의 항목 중 하나만 선택할 수 있도록 제한하는 컨트롤
- 문법
<input type="radio" name="값의 이름" value="값" checked="checked">
- 콤보박스
- 콤보박스: 여러개의 항목 중에서 원하는 것을 하나만 선택하는 컨트롤
- 문법
<select name="값의 이름" multiple="multiple"> <option value="선택될 경우 name의 값이 됨" selected="selected">값에 대한 표시값</option> ...option 반복 </select>- multiple : 이 속성의 값을 mulitple로 지정하면 여러 개의 항목을 선택 가능
- 체크 박스:
- 체크 박스: 여러 개의 황목 중에서 원하는 것을 복수로 선택할 수 있는 컨트롤
- 문법
<input type="checkbox" name="값의 이름" value="값" />- name의 이름 끝에 '[]'를 붙이면 서버 쪽에서 실행되는 언어가 이 값을 배열로 인지
- checkbox는 여러개의 값을 같은 이름으로 전송해야 하기 때문에 연관된 항목들의 name 값을 같은 이름으로 지정 (예제 참고)
<form action="example_receive_multi.php" method="POST">
                    관심사 : <br />
                    <input type="checkbox" name="interest[]" value="programming" /> 프로그래밍<br />
                    <input type="checkbox" name="interest[]" value="design" /> 디자인<br />
                    <input type="checkbox" name="interest[]" value="planning" checked="checked" /> 기획<br />
                    <input type="submit" />
                </form>
(5) 파일전송
- 파일 업로드: 업로드할 파일을 선택할 수 있는 컨트롤 생성
- 문법
<input type="file" name="서버쪽에서 파일을 식별하기 위한 이름" /> - 예제
<!DOCTYPE html>
<html>
        <head>
                <meta http-equiv="Content-Type" content="text/html;charset=utf-8" >
        </head>
        <body>
                <form action="example_receive.php" method="POST" enctype="multipart/form-data">
                    <input type="file" name="image" />
                    <input type="submit" />
                </form>
        </body>
</html>
5. Array
(1) URL
| 부분 | 명칭 | 설명 |
|---|---|---|
| http:// | scheme | 통신에 사용되는 방식, 프로토콜 |
| codingeverybody.com | hosts | 자원이 위치하고 있는 웹서버의 이름, 도메인이나 IP가 사용된다. |
| /codingeverybody_html_tutorial/url_72/example2.html | url-path | 루트 디렉토리부터 자원이 위치한 장소까지의 디렉토리와 파일명 |
| ?mode=view | query | 웹서버에 넘기는 추가적인 질문 |
| #bookmark | bookmark | 하이퍼링크를 클릭했을 때 특정 위치로 이동하기 위해서 사용 |
(2) 경로 (path)
- 상대경로와 절대경로
- 상대경로 : 문서를 기준으로 한 다른 리소스들의 위치정보
- 절대경로 : 문서의 위치를 가르키는 도메인을 포함한 전체 위치정보
- 예제
 <!DOCTYPE html>
 <html>
     <head>
         <meta http-equiv="Content-Type" content="text/html;charset=utf-8" >
         <style>
             img{
                 height:50px;
                 width:50px;
             }
             #structure{
                 width:379px;
                 height:124px;
                 border:1px solid gray;
             }
             body{
                 font-size:0.8em;
             }
             table {
                 width:100%;
                 border-collapse: collapse;
             }
             td, th{
                 border:1px solid gray;
                 padding:5px;
             }
             textarea{
                 width:100%;
                 border:none;
             }
             .div{width:50px}
             .ex{width:30px;}
             .desc{width:150px}
             .result{width:60px}
         </style>
     </head>
     <body>
         <p>
             exampe1.html 파일이 아래와 같은 디렉토리 구조 위에 위치한다고 간주한다. <br />
             <img id="structure" src="structure.gif" />
         </p>
         <table>
             <tr>
                 <th class="div">구분</th>
                 <th class="ex">기호</th>
                 <th class="desc">설명</th>
                 <th class="code">코드</th>
                 <th class="result">결과</th>
             </tr>
             <tr>
                 <td rowspan="3">상대경로</td>
                 <td>../</td>
                 <td>부모 디렉토리</td>
                 <td>
                     <textarea><img src="../image/logo.png" /></textarea>
                 </td>
                 <td>
                     <img src="../image/logo.png" />
                 </td>
             </tr>
             <tr>
                 <td>./</td>
                 <td>현재 디렉토리</td>
                 <td>
                     <textarea><img src="./image/logo.png" /></textarea>
                 </td>
                 <td>
                     <img src="./image/logo.png" />
                 </td>
             </tr>

             <tr>
                 <td>없음</td>
                 <td>현재 디렉토리 기호는 생략할 수 있다</td>
                 <td>
                     <textarea><img src="image/logo.png" /></textarea>
                 </td>
                 <td>
                     <img src="image/logo.png" />
                 </td>
             </tr>
             <tr>
                 <td rowspan="2">절대경로</td>
                 <td>/</td>
                 <td>루트(root) 디렉토리</td>
                 <td>
                     <textarea><img src="/codingeverybody_html_tutorial/url_72/image/logo.png" /></textarea>
                 </td>
                 <td>
                     <img src="/codingeverybody_html_tutorial/url_72/image/logo.png" />
                 </td>
             </tr>
             <tr>
                 <td>URL</td>
                 <td>URL을 사용</td>
                 <td>
                     <textarea><img src="http://codingeverybody.com/codingeverybody_html_tutorial/url_72/image/logo.png" /></textarea>
                 </td>
                 <td>
                     <img src="http://codingeverybody.com/codingeverybody_html_tutorial/url_72/image/logo.png" />
                 </td>
             </tr>
         </table>
     </body>
 </html>
(3) 검색엔진최적화 (SEO)
- 검색엔진최적화: 검섹엔진에 잘 노출될 수 있도록 하는 활동
- HTML과 SEO: 검색은 정보를 찾는 행위이고, 웹에서 정보를 표현하는 언어는 HTML이기 때문에 의미에 맞는 HTML 코딩은 자연스럽게 검색엔진 최적화에 기여
